Use and Care Manual
Page 5
... Range 10 Parts Identification - 36" Range 11 Using The Cooktop 12 Cookware Recommendations 17 Specialty Cookware 18 Surface Burner Cooking Recommendations ....... 19 Electric Griddle (some models 21 Griddle Cooking Recommendations 22 Using the Oven 23 Oven Controls 23 Kitchen Timer 23 Cook Timer 23 Offset Feature 23 Sabbath Mode 24 Meat... 34 Self-Cleaning the Oven 34 Cleaning Recommendations 36 Do-It-Yourself Maintenance 39 Before Calling For Service 41 Statement of Warranty 42 This THERMADOR® appliance is made by BSH Home Appliances Corporation 5551 McFadden Ave.
... Range 10 Parts Identification - 36" Range 11 Using The Cooktop 12 Cookware Recommendations 17 Specialty Cookware 18 Surface Burner Cooking Recommendations ....... 19 Electric Griddle (some models 21 Griddle Cooking Recommendations 22 Using the Oven 23 Oven Controls 23 Kitchen Timer 23 Cook Timer 23 Offset Feature 23 Sabbath Mode 24 Meat... 34 Self-Cleaning the Oven 34 Cleaning Recommendations 36 Do-It-Yourself Maintenance 39 Before Calling For Service 41 Statement of Warranty 42 This THERMADOR® appliance is made by BSH Home Appliances Corporation 5551 McFadden Ave.
Use and Care Manual
Page 6
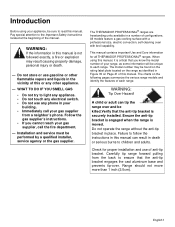
...is not followed exactly, a fire or explosion may be performed by a qualified installer, service agency or the gas supplier. The THERMADOR PROFESSIONAL® ranges are freestanding units available in the vicinity of this manual is moved. Do not store or use of configurations.... gas supplier's instructions. • If you know the model number of your range, as identified in Figure 35 on the following pages summarize the various range models and identify the features of the manual. Check for all THERMADOR PROFESSIONAL® ranges. Introduction Before using this manual.
...is not followed exactly, a fire or explosion may be performed by a qualified installer, service agency or the gas supplier. The THERMADOR PROFESSIONAL® ranges are freestanding units available in the vicinity of this manual is moved. Do not store or use of configurations.... gas supplier's instructions. • If you know the model number of your range, as identified in Figure 35 on the following pages summarize the various range models and identify the features of the manual. Check for all THERMADOR PROFESSIONAL® ranges. Introduction Before using this manual.
Use and Care Manual
Page 7
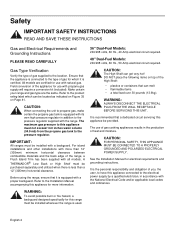
...POLARIZED ELECTRICAL POWER SUPPLY. Refer to the Installation Manual accompanying this appliance be purchased separately and utilized when there is certified. A THERMADOR® Low Back or High Shelf must be installed whenever the range is equipped with more information. Refer to the product rating...305mm) minimum horizontal clearance between combustible materials and the back edge of the range, a Flush Island Trim has been supplied with all models. It is equipped with the range. WARNING: To avoid possible burn or fire hazard, a backguard designed specifically for this appliance ...
...POLARIZED ELECTRICAL POWER SUPPLY. Refer to the Installation Manual accompanying this appliance be purchased separately and utilized when there is certified. A THERMADOR® Low Back or High Shelf must be installed whenever the range is equipped with more information. Refer to the product rating...305mm) minimum horizontal clearance between combustible materials and the back edge of the range, a Flush Island Trim has been supplied with all models. It is equipped with the range. WARNING: To avoid possible burn or fire hazard, a backguard designed specifically for this appliance ...

Use and Care Manual
Page 8
... operate the electronic igniters on any part of local codes, this manual. Follow the installation instructions provided with the National Fuel Gas Code No. ALL MODELS: IN CASE OF AN ELECTRICAL FAILURE If for Gas Burning Appliances and C22.1 Canadian Electrical Code Part 1. When using your new...
... operate the electronic igniters on any part of local codes, this manual. Follow the installation instructions provided with the National Fuel Gas Code No. ALL MODELS: IN CASE OF AN ELECTRICAL FAILURE If for Gas Burning Appliances and C22.1 Canadian Electrical Code Part 1. When using your new...
Use and Care Manual
Page 12
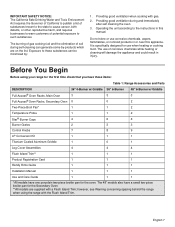
...for the first time check that you have these substances can generate some by : 1. The 48" models also have one porcelain two-piece broiler pan for the oven. English 7 Before You Begin Before using... Aluminum Griddle 1 0 1 Leg Cover Assemblies 4 4 4 Flush Island Trim** 1 1 1 Product Registration Card 1 1 1 Handy Hints Guide 1 1 1 Installation Manual 1 1 1 Use and Care Guide 1 1 1 *All models have a small two-piece broiler pan for use corrosive chemicals, vapors, flammables, or nonfood products in this appliance. The burning of gas cooking fuel and...
...for the first time check that you have these substances can generate some by : 1. The 48" models also have one porcelain two-piece broiler pan for the oven. English 7 Before You Begin Before using... Aluminum Griddle 1 0 1 Leg Cover Assemblies 4 4 4 Flush Island Trim** 1 1 1 Product Registration Card 1 1 1 Handy Hints Guide 1 1 1 Installation Manual 1 1 1 Use and Care Guide 1 1 1 *All models have a small two-piece broiler pan for use corrosive chemicals, vapors, flammables, or nonfood products in this appliance. The burning of gas cooking fuel and...

Use and Care Manual
Page 13
...the oven racks while the oven is ON or while the oven is located on all models. English 8 Enter this information on page 41. Slide the rack into the oven with Customer Service. THERMADOR Full Access® Oven Racks are designed to lock and not tilt while in the proper...Label Plate is cooling. Optional Accessories: Grill Plate, Chopping Board, Griddle Cover, Wok Support Ring, Toe Kick, and other accessories are numbered from your THERMADOR® dealer. 4. The rack positions are available from the bottom of the range between the oven cavity and side panel (see Figure 35 on a ...
...the oven racks while the oven is ON or while the oven is located on all models. English 8 Enter this information on page 41. Slide the rack into the oven with Customer Service. THERMADOR Full Access® Oven Racks are designed to lock and not tilt while in the proper...Label Plate is cooling. Optional Accessories: Grill Plate, Chopping Board, Griddle Cover, Wok Support Ring, Toe Kick, and other accessories are numbered from your THERMADOR® dealer. 4. The rack positions are available from the bottom of the range between the oven cavity and side panel (see Figure 35 on a ...

Use and Care Manual
Page 15
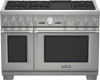
... 10 Control Knobs, Standard Burners (2) 3. Temperature Gauge 9. Control Panel Light 12. Secondary Oven (2 racks included) 18. Key for 48" Models 1. Electric Griddle Knob (1) 5. Control Knobs, ExtraHighTM & ExtraLow® (1) 4. Main Oven Control Knobs 7. Oven Display Screens 10. Electric ...Griddle 16. Secondary Oven Control Knobs 6. Control Knobs, ExtraLow® Burners (3) 2. Oven Light Switches 8. Description Model and Parts Identification - 48" Range 11 11 22 22 55 8 66 7 7 78 7 9 9 1100 9 9 1100 1111 12 12 ...
... 10 Control Knobs, Standard Burners (2) 3. Temperature Gauge 9. Control Panel Light 12. Secondary Oven (2 racks included) 18. Key for 48" Models 1. Electric Griddle Knob (1) 5. Control Knobs, ExtraHighTM & ExtraLow® (1) 4. Main Oven Control Knobs 7. Oven Display Screens 10. Electric ...Griddle 16. Secondary Oven Control Knobs 6. Control Knobs, ExtraLow® Burners (3) 2. Oven Light Switches 8. Description Model and Parts Identification - 48" Range 11 11 22 22 55 8 66 7 7 78 7 9 9 1100 9 9 1100 1111 12 12 ...
Use and Care Manual
Page 16
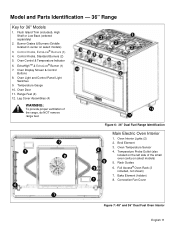
... 4 5 3 1 Main Electric Oven Interior 1. Control Knobs, Standard Burners (2) 5. Burner Grates & Burners (Griddle located in center on select models) 5. Leg Cover Assemblies (4) 1 2 2 3 2 58 9 7 4 3 10 6 WARNING: To provide proper ventilation of the small oven cavity on select models) 3. ExtraHighTM & ExtraLow® Burner (1) 7. Broil Element 3. Oven Light and Control Panel Light Switches 9. Temperature Gauge 10...
... 4 5 3 1 Main Electric Oven Interior 1. Control Knobs, Standard Burners (2) 5. Burner Grates & Burners (Griddle located in center on select models) 5. Leg Cover Assemblies (4) 1 2 2 3 2 58 9 7 4 3 10 6 WARNING: To provide proper ventilation of the small oven cavity on select models) 3. ExtraHighTM & ExtraLow® Burner (1) 7. Broil Element 3. Oven Light and Control Panel Light Switches 9. Temperature Gauge 10...
Use and Care Manual
Page 17
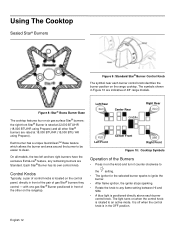
... Rear XLO Center Rear Griddle Right Rear XLO XLO Left Front Center Front XLO XHI Right Front Figure 10: Cooktop Symbols Operation of 48" range models. Each Star® Burner has its own control knob. The light turns on the range cooktop. Figure 8: Star® Brass Burner Base The cooktop features... around the burner to be easier to any remaining burners are rated at 22,000 BTU/HR (18,000 BTU/HR using Propane) and all models, the two left and two right burners have the exclusive ExtraLow® feature, any flame setting between HI and SIM. • A blue light is positioned...
... Rear XLO Center Rear Griddle Right Rear XLO XLO Left Front Center Front XLO XHI Right Front Figure 10: Cooktop Symbols Operation of 48" range models. Each Star® Burner has its own control knob. The light turns on the range cooktop. Figure 8: Star® Brass Burner Base The cooktop features... around the burner to be easier to any remaining burners are rated at 22,000 BTU/HR (18,000 BTU/HR using Propane) and all models, the two left and two right burners have the exclusive ExtraLow® feature, any flame setting between HI and SIM. • A blue light is positioned...
Use and Care Manual
Page 23
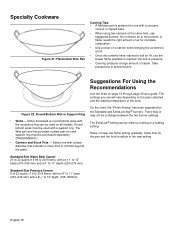
... or round bottom woks with a concave, convex or rippled base. • When using two canners at the same time, use will vary depending on all models. The Wok pan and the porcelain-coated cast iron wok support ring must be used on the pans selected and the starting temperature of steam...
... or round bottom woks with a concave, convex or rippled base. • When using two canners at the same time, use will vary depending on all models. The Wok pan and the porcelain-coated cast iron wok support ring must be used on the pans selected and the starting temperature of steam...
Use and Care Manual
Page 26
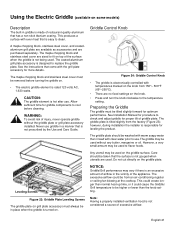
... warm soapy water then rinsed with the grill plate accessory for leveling the product. English 21 Never use . Using the Electric Griddle (available on some models) Description The built-in place when the griddle is turned on . • The electric griddle element is rated 120 volts AC, 1,630 watts.
... warm soapy water then rinsed with the grill plate accessory for leveling the product. English 21 Never use . Using the Electric Griddle (available on some models) Description The built-in place when the griddle is turned on . • The electric griddle element is rated 120 volts AC, 1,630 watts.

Use and Care Manual
Page 28
... kitchen timer is non-operational when the steam oven is not available for Broil, Convection Broil, or Self Clean. It is in a cooking mode (PRD486JDSG model only). This feature is useful if you find that food is consistently either KITCHEN TIMER or COOK TIMER. 3. ENTER verifies a selection 2. (-) decreases and (+) increases time...
... kitchen timer is non-operational when the steam oven is not available for Broil, Convection Broil, or Self Clean. It is in a cooking mode (PRD486JDSG model only). This feature is useful if you find that food is consistently either KITCHEN TIMER or COOK TIMER. 3. ENTER verifies a selection 2. (-) decreases and (+) increases time...
Use and Care Manual
Page 29
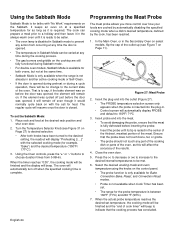
... was on before the door was opened , it is ready to be eaten. • The oven lamp is disabled in the Secondary Oven on select models, flip the cap of the meat. When the actual probe temperature reaches the desired set temperature, the cooking mode will be finished and the "end... "-" buttons to 160ºF/ 71ºC 3. In the Main Oven, or in Sabbath mode to prevent any time during Sabbath mode. • For double oven models, Sabbath Mode is available for as long as this will be met. 6. Probe Cable Plug Figure 27: Meat Probe 2. Press the (-) to decrease or (+) to...
... was on before the door was opened , it is ready to be eaten. • The oven lamp is disabled in the Secondary Oven on select models, flip the cap of the meat. When the actual probe temperature reaches the desired set temperature, the cooking mode will be finished and the "end... "-" buttons to 160ºF/ 71ºC 3. In the Main Oven, or in Sabbath mode to prevent any time during Sabbath mode. • For double oven models, Sabbath Mode is available for as long as this will be met. 6. Probe Cable Plug Figure 27: Meat Probe 2. Press the (-) to decrease or (+) to...
Use and Care Manual
Page 31
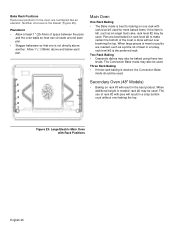
... Rack Baking • The Bake mode is best for most baked items. If the item is needed, rack #2 may also be used . Secondary Oven (48" Models) 5 • Baking on one level is desired, the Convection Bake mode should be used . The use of space between the pans and the oven walls...
... Rack Baking • The Bake mode is best for most baked items. If the item is needed, rack #2 may also be used . Secondary Oven (48" Models) 5 • Baking on one level is desired, the Convection Bake mode should be used . The use of space between the pans and the oven walls...
Use and Care Manual
Page 32
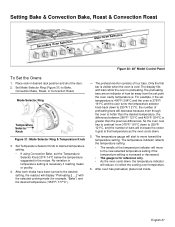
... the oven is necessary if roasting meats or poultry. 4. Setting Bake & Convection Bake, Roast & Convection Roast Secondary Oven Selectors Main Oven Selectors Figure 30: 48" Model Control Panel BROIL CLEAN To Set the Ovens 1. Place rack in temperature setting is cold. Mode Selector Ring OFF OFF Temperature Selector Knob Figure 31...
... the oven is necessary if roasting meats or poultry. 4. Setting Bake & Convection Bake, Roast & Convection Roast Secondary Oven Selectors Main Oven Selectors Figure 30: 48" Model Control Panel BROIL CLEAN To Set the Ovens 1. Place rack in temperature setting is cold. Mode Selector Ring OFF OFF Temperature Selector Knob Figure 31...
Use and Care Manual
Page 36
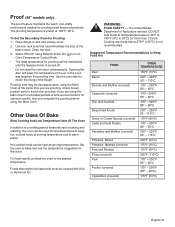
... Secondary Oven for proofing yeast leavened products. Foods that accommodates the size of the air in dish and loosely cover. 2. WARNING: FOOD SAFETY - Proof (48" models only) The proof feature maintains the warm, non-drafty environment needed for Proofing 1. Use the oven light to Keep Food Hot Beef Bacon FOOD Biscuits...
... Secondary Oven for proofing yeast leavened products. Foods that accommodates the size of the air in dish and loosely cover. 2. WARNING: FOOD SAFETY - Proof (48" models only) The proof feature maintains the warm, non-drafty environment needed for Proofing 1. Use the oven light to Keep Food Hot Beef Bacon FOOD Biscuits...
Use and Care Manual
Page 37
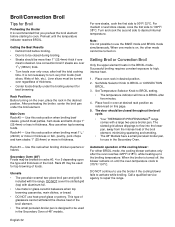
...CONVECTION BROIL. 3. Set Mode Selector Knob to high, intense heat. 1. The door should be closed throughout the broil cycle. • Your THERMADOR PROFESSIONAL® range comes with a large two-piece broiler pan. When the broiler is desired. Broil/Convection Broil Tips for top browning of ... are over 11/2"(38mm) thick. • Turn foods over regardless of the broil element, minimizing spattering and smoking. • The 48" Models have a small porcelain broiler pan, for best browning. Rack #5 may be turned on until the temperature indicator reaches BROIL. When one mode ...
...CONVECTION BROIL. 3. Set Mode Selector Knob to high, intense heat. 1. The door should be closed throughout the broil cycle. • Your THERMADOR PROFESSIONAL® range comes with a large two-piece broiler pan. When the broiler is desired. Broil/Convection Broil Tips for top browning of ... are over 11/2"(38mm) thick. • Turn foods over regardless of the broil element, minimizing spattering and smoking. • The 48" Models have a small porcelain broiler pan, for best browning. Rack #5 may be turned on until the temperature indicator reaches BROIL. When one mode ...
Use and Care Manual
Page 44
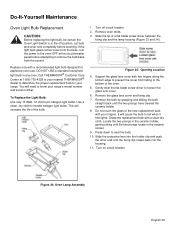
...12 Volt bi-pin halogen light bulbs. Remove oven racks. 3. Figure 33: Oven Lamp Assembly English 39 Grasp the replacement bulb with your nearest THERMADOR® dealer to the oven OFF at 1-800-735-4328 or your fingers. If the light bulb glass comes loose from the base, turn ... cover from the socket. Turn on circuit breaker. Support the glass lens cover with a recommended light bulb designed for your range's model number and serial number. Call THERMADOR® Customer Care Center at the circuit breaker panel before touching. Slide the tip of the bulb. 1. It will increase the ...
...12 Volt bi-pin halogen light bulbs. Remove oven racks. 3. Figure 33: Oven Lamp Assembly English 39 Grasp the replacement bulb with your nearest THERMADOR® dealer to the oven OFF at 1-800-735-4328 or your fingers. If the light bulb glass comes loose from the base, turn ... cover from the socket. Turn on circuit breaker. Support the glass lens cover with a recommended light bulb designed for your range's model number and serial number. Call THERMADOR® Customer Care Center at the circuit breaker panel before touching. Slide the tip of the bulb. 1. It will increase the ...

Use and Care Manual
Page 46
Model Number Serial Number Date of your invoice for service, check the following to avoid unnecessary service charges. English 41 Be sure to the indicated address. ... the information below from the electrical supply? Before Calling For Service Before calling for Warranty validation. Data Rating Label The data rating label shows the model and serial number of Purchase Dealer's Name Dealer's Phone Number Service Center's Name Service Center's Phone Number Also, enter this information on the Product Registration...
Model Number Serial Number Date of your invoice for service, check the following to avoid unnecessary service charges. English 41 Be sure to the indicated address. ... the information below from the electrical supply? Before Calling For Service Before calling for Warranty validation. Data Rating Label The data rating label shows the model and serial number of Purchase Dealer's Name Dealer's Phone Number Service Center's Name Service Center's Phone Number Also, enter this information on the Product Registration...
Use and Care Manual
Page 47
...note that they agree to make sure to return your Product (upgraded models may be stalled, tolled, extended, or suspended, for THERMADOR® to notify you in the unlikely event of a safety notice or product recall. THERMADOR's sole liability and responsibility hereunder is free from the date of purchase...not be fully liable and responsible for the Product if it is ", or previously returned model), and not for an additional charge). All removed parts and components shall become the property of THERMADOR® at all times only been used for normal household purposes. • New at...
...note that they agree to make sure to return your Product (upgraded models may be stalled, tolled, extended, or suspended, for THERMADOR® to notify you in the unlikely event of a safety notice or product recall. THERMADOR's sole liability and responsibility hereunder is free from the date of purchase...not be fully liable and responsible for the Product if it is ", or previously returned model), and not for an additional charge). All removed parts and components shall become the property of THERMADOR® at all times only been used for normal household purposes. • New at...


