
User Manual
Page 4
Getting Started Initial start-up Installing the AAA Batteries The Voyage™ 200 uses four AAA alkaline batteries and a back-up lithium battery (CR1616 or CR1620). Do not interrupt!" The backup battery is already installed, and the ... them in the battery compartment. 3. To avoid losing Apps, do not remove the batteries during initialization. (You can re-install Apps from the back of the Apps desktop. Note: If your calculator initializes the preinstalled Apps, a progress bar will appear with your Voyage™ 200 for the first time After installing the batteries included with...
Getting Started Initial start-up Installing the AAA Batteries The Voyage™ 200 uses four AAA alkaline batteries and a back-up lithium battery (CR1616 or CR1620). Do not interrupt!" The backup battery is already installed, and the ... them in the battery compartment. 3. To avoid losing Apps, do not remove the batteries during initialization. (You can re-install Apps from the back of the Apps desktop. Note: If your calculator initializes the preinstalled Apps, a progress bar will appear with your Voyage™ 200 for the first time After installing the batteries included with...

User Manual
Page 5
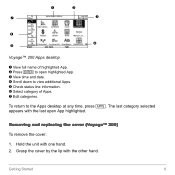
... operating your calculator. • View the full name of the highlighted App. • View and edit the time and date. • Check status line information. • View split-screen mode information. Your installed Apps appear on your Voyage™ 200. The Apps desktop The Apps desktop is the starting point for easy access. Adjusting the contrast...
... operating your calculator. • View the full name of the highlighted App. • View and edit the time and date. • Check status line information. • View split-screen mode information. Your installed Apps appear on your Voyage™ 200. The Apps desktop The Apps desktop is the starting point for easy access. Adjusting the contrast...
User Manual
Page 6
... time and date. Í Scroll down to view additional Apps. Î Check status line information. Ï Select category of highlighted App. Ë Press ¸ to open App highlighted. Grasp the cover by the lip with one hand. 2. Getting Started 6 Ê Ë Ð Ì Ï Î Í Voyage™ 200 Apps desktop Ê View full name of...
... time and date. Í Scroll down to view additional Apps. Î Check status line information. Ï Select category of highlighted App. Ë Press ¸ to open App highlighted. Grasp the cover by the lip with one hand. 2. Getting Started 6 Ê Ë Ð Ì Ï Î Í Voyage™ 200 Apps desktop Ê View full name of...
User Manual
Page 8
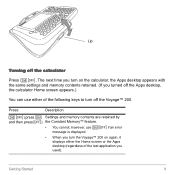
...2 ® if an error message is displayed. • When you turn the Voyage™ 200 on the calculator, the Apps desktop appears with the same settings and memory contents retained. (If you turned off the Apps desktop, the calculator Home screen appears.) You can use either of the last application ...you turn on again, it displays either the Home screen or the Apps desktop (regardless of the following keys to turn off the calculator Press 2 ®. Lip Turning off the Voyage™ 200. Getting Started 8 The next time you used).
...2 ® if an error message is displayed. • When you turn the Voyage™ 200 on the calculator, the Apps desktop appears with the same settings and memory contents retained. (If you turned off the Apps desktop, the calculator Home screen appears.) You can use either of the last application ...you turn on again, it displays either the Home screen or the Apps desktop (regardless of the following keys to turn off the calculator Press 2 ®. Lip Turning off the Voyage™ 200. Getting Started 8 The next time you used).
User Manual
Page 10
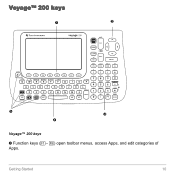
Voyage™ 200 keys Ê Ë Î Ì Í Voyage™ 200 keys Ê Function keys (ƒ- Š) open toolbar menus, access Apps, and edit categories of Apps. Getting Started 10
Voyage™ 200 keys Ê Ë Î Ì Í Voyage™ 200 keys Ê Function keys (ƒ- Š) open toolbar menus, access Apps, and edit categories of Apps. Getting Started 10
User Manual
Page 23
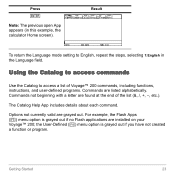
... list of the list etc.). For example, the Flash Apps ( ...) menu option is grayed out if you have not created a function or program. Options not currently valid are found at the end of Voyage™ 200 commands, including functions, instructions, and user-defined programs. ...Commands are installed on your Voyage™ 200; the User-Defined ( †) menu option is grayed out if no Flash applications are listed alphabetically. Commands not beginning with a letter are grayed out. The Catalog Help App includes details about each command. Getting Started ...
... list of the list etc.). For example, the Flash Apps ( ...) menu option is grayed out if you have not created a function or program. Options not currently valid are found at the end of Voyage™ 200 commands, including functions, instructions, and user-defined programs. ...Commands are installed on your Voyage™ 200; the User-Defined ( †) menu option is grayed out if no Flash applications are listed alphabetically. Commands not beginning with a letter are grayed out. The Catalog Help App includes details about each command. Getting Started ...
User Manual
Page 30
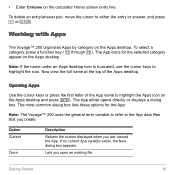
...352;). Now view the full name at the top of the App name to highlight the icon. Option Current Open Description Returns the screen displayed when you open an existing file. The App icons for the App: Note: The Voyage™ 200 uses the general term variable to refer to either opens directly... or displays a dialog box. Note: If the name under an Apps desktop icon is truncated, use the cursor keys to ...
...352;). Now view the full name at the top of the App name to highlight the icon. Option Current Open Description Returns the screen displayed when you open an existing file. The App icons for the App: Note: The Voyage™ 200 uses the general term variable to refer to either opens directly... or displays a dialog box. Note: If the name under an Apps desktop icon is truncated, use the cursor keys to ...
User Manual
Page 32
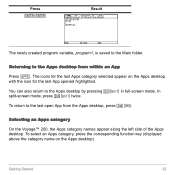
... ¸¸ Result The newly created program variable, program1, is saved to the Apps desktop by pressing 2 K in full-screen mode. Selecting an Apps category On the Voyage™ 200, the Apps category names appear along the left side of the Apps desktop. You can also return to the Main folder. Returning to the last open...
... ¸¸ Result The newly created program variable, program1, is saved to the Apps desktop by pressing 2 K in full-screen mode. Selecting an Apps category On the Voyage™ 200, the Apps category names appear along the left side of the Apps desktop. You can also return to the Main folder. Returning to the last open...
User Manual
Page 34
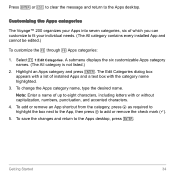
... check mark (9). 5. The Edit Categories dialog box appears with a list of installed Apps and a text box with or without capitalization, numbers, punctuation, and accented characters. 4. Customizing the Apps categories The Voyage™ 200 organizes your individual needs. (The All category contains every installed App and cannot be edited.) To customize the ... Note: Enter a name of...
... check mark (9). 5. The Edit Categories dialog box appears with a list of installed Apps and a text box with or without capitalization, numbers, punctuation, and accented characters. 4. Customizing the Apps categories The Voyage™ 200 organizes your individual needs. (The All category contains every installed App and cannot be edited.) To customize the ... Note: Enter a name of...
User Manual
Page 37
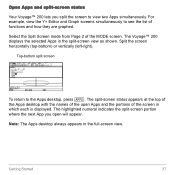
... indicates the split-screen portion where the next App you split the screen to view two Apps simultaneously. Open Apps and split-screen status Your Voyage™ 200 lets you open Apps and the portions of the screen in which each is displayed. The Voyage™ 200 displays the selected Apps in the full-screen view. Split the screen...
... indicates the split-screen portion where the next App you split the screen to view two Apps simultaneously. Open Apps and split-screen status Your Voyage™ 200 lets you open Apps and the portions of the screen in which each is displayed. The Voyage™ 200 displays the selected Apps in the full-screen view. Split the screen...
User Manual
Page 38
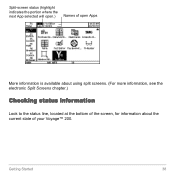
Split-screen status (highlight indicates the portion where the next App selected will open.) Names of open Apps More information is available about using split screens. (For more information, see the electronic Split Screens chapter.) Checking status information Look to the status line, located at the bottom of the screen, for information about the current state of your Voyage™ 200. Getting Started 38
Split-screen status (highlight indicates the portion where the next App selected will open.) Names of open Apps More information is available about using split screens. (For more information, see the electronic Split Screens chapter.) Checking status information Look to the status line, located at the bottom of the screen, for information about the current state of your Voyage™ 200. Getting Started 38
User Manual
Page 49
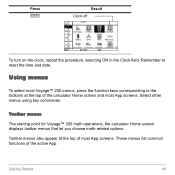
...function keys corresponding to reset the time and date. Toolbar menus also appear at the top of the active App. Toolbar menus The starting point for Voyage™ 200 math operations, the calculator Home screen displays toolbar menus that let you choose math-related options. Remember to ...the toolbars at the top of most App screens. These menus list common functions of the calculator Home screen and most App screens. Select...
...function keys corresponding to reset the time and date. Toolbar menus also appear at the top of the active App. Toolbar menus The starting point for Voyage™ 200 math operations, the calculator Home screen displays toolbar menus that let you choose math-related options. Remember to ...the toolbars at the top of most App screens. These menus list common functions of the calculator Home screen and most App screens. Select...
User Manual
Page 59
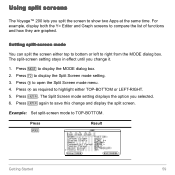
... right from the MODE dialog box. The split-screen setting stays in effect until you change and display the split screen. Press B to show two Apps at the same time. Using split screens The Voyage™ 200 lets you selected. 6.
... right from the MODE dialog box. The split-screen setting stays in effect until you change and display the split screen. Press B to show two Apps at the same time. Using split screens The Voyage™ 200 lets you selected. 6.

User Manual
Page 63
... mode. Selecting the active App In split-screen mode, only one App can be active at a time. • To switch between active Apps, press 2 a. • To open App. Press ¸ Result If you set to 1, the Voyage™ 200 exits split-screen mode and displays the App in any of the following... ways: • Press 2 K to close the active App and display the full-screen view of ...
... mode. Selecting the active App In split-screen mode, only one App can be active at a time. • To switch between active Apps, press 2 a. • To open App. Press ¸ Result If you set to 1, the Voyage™ 200 exits split-screen mode and displays the App in any of the following... ways: • Press 2 K to close the active App and display the full-screen view of ...

User Manual
Page 64
.... All you need is available about using split screens. (See the electronic Split Screens chapter.) Managing Apps and operating system (OS) versions Using the Voyage™ 200 connectivity features, you can download Apps from: • The TI Educational & Productivity Solutions (E&PS) Web site at: education.ti.com/...latest • The CD-ROM included with your Voyage™ 200, please read the license agreement on the CD-ROM or TI Web site. Adding Apps to your Voyage™ 200 is turned off the splitscreen mode and displays the calculator Home screen in full...
.... All you need is available about using split screens. (See the electronic Split Screens chapter.) Managing Apps and operating system (OS) versions Using the Voyage™ 200 connectivity features, you can download Apps from: • The TI Educational & Productivity Solutions (E&PS) Web site at: education.ti.com/...latest • The CD-ROM included with your Voyage™ 200, please read the license agreement on the CD-ROM or TI Web site. Adding Apps to your Voyage™ 200 is turned off the splitscreen mode and displays the calculator Home screen in full...

User Manual
Page 65
... case the calculator is ever lost or stolen. Í Apps certificate revision number (Cert. Similar to a serial number. Getting Started 65 Similar to a model number. The ABOUT screen displays the following information about your Voyage™ 200: Ê Î Ë Í Ì ...Ê OS version Ë Hardware version Ì Unit ID (required to provide information about your Voyage™ 200. Rev.) Î Product identifier (Product ID). ...
... case the calculator is ever lost or stolen. Í Apps certificate revision number (Cert. Similar to a serial number. Getting Started 65 Similar to a model number. The ABOUT screen displays the following information about your Voyage™ 200: Ê Î Ë Í Ì ...Ê OS version Ë Hardware version Ì Unit ID (required to provide information about your Voyage™ 200. Rev.) Î Product identifier (Product ID). ...
User Manual
Page 66
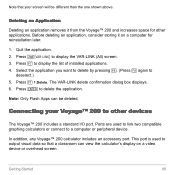
...the list of installed applications. 4. Note: Only Flash Apps can view the calculator's display on a computer for other devices The Voyage™ 200 includes a standard I/O port. Ports are used to output visual data so that your Voyage™ 200 to a computer or peripheral device. Getting Started 66 ... Note that a classroom can be different than the one shown above. Before deleting an application, consider storing it from the Voyage™ 200 and increases space for reinstallation later. 1. The VAR-LINK delete confirmation dialog box displays. 6. This port is used to ...
...the list of installed applications. 4. Note: Only Flash Apps can view the calculator's display on a computer for other devices The Voyage™ 200 includes a standard I/O port. Ports are used to output visual data so that your Voyage™ 200 to a computer or peripheral device. Getting Started 66 ... Note that a classroom can be different than the one shown above. Before deleting an application, consider storing it from the Voyage™ 200 and increases space for reinstallation later. 1. The VAR-LINK delete confirmation dialog box displays. 6. This port is used to ...

User Manual
Page 203
..., copy, and paste, and more. how to use the term "Home screen." Displaying the Calculator Home Screen When you first turn on your Voyage™ 200 Graphing Calculator, the Apps desktop is used in this module. Note: The term "calculator Home screen" is displayed. Calculator Home Screen Calculator Home Screen The calculator Home...
..., copy, and paste, and more. how to use the term "Home screen." Displaying the Calculator Home Screen When you first turn on your Voyage™ 200 Graphing Calculator, the Apps desktop is used in this module. Note: The term "calculator Home screen" is displayed. Calculator Home Screen Calculator Home Screen The calculator Home...

User Manual
Page 204
... the history area are written on the board or in textbooks. Ê Ë Ì Ï Í Î Ê Toolbar Lets you enter expressions or instructions. ((Voyage™ 200). If you turn off the Apps Desktop mode, the calculator Home screen appears automatically.
... the history area are written on the board or in textbooks. Ê Ë Ì Ï Í Î Ê Toolbar Lets you enter expressions or instructions. ((Voyage™ 200). If you turn off the Apps Desktop mode, the calculator Home screen appears automatically.

User Manual
Page 230
... recreated later by running the program again. 3. Press ¸ to find out information about your Voyage™ 200 Graphing Calculator, particularly the software version and the unit's ID number. From either the calculator Home screen or the Apps desktop, press ƒ and then select A:About. Display the Clean Up toolbar menu, and select...
... recreated later by running the program again. 3. Press ¸ to find out information about your Voyage™ 200 Graphing Calculator, particularly the software version and the unit's ID number. From either the calculator Home screen or the Apps desktop, press ƒ and then select A:About. Display the Clean Up toolbar menu, and select...


