TD-VG3511 V1 User Guide
Page 1
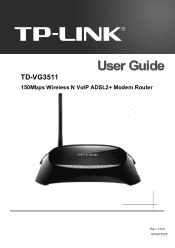
TD-VG3511 150Mbps Wireless N VoIP ADSL2+ Modem Router Rev: 1.0.0 1910010723
TD-VG3511 150Mbps Wireless N VoIP ADSL2+ Modem Router Rev: 1.0.0 1910010723
TD-VG3511 V1 User Guide
Page 6
...., LTD DECLARATION OF CONFORMITY For the following equipment: Product Description: 150Mbps Wireless N VoIP ADSL2+ Modem Router Model No.: TD-VG3511 Trademark: TP-LINK We declare under our own responsibility that the above products satisfy all the technical regulations applicable to the product within ...the CE Mark: Person responsible for marking this declaration: Yang Hongliang Product Manager of International Business Date of issue: 2012 TP-LINK TECHNOLOGIES CO., LTD Building 24 (floors 1, 3, 4, 5), and 28 (floors 1-4) Central Science and Technology Park, Shennan Rd, Nanshan, Shenzhen, China
...., LTD DECLARATION OF CONFORMITY For the following equipment: Product Description: 150Mbps Wireless N VoIP ADSL2+ Modem Router Model No.: TD-VG3511 Trademark: TP-LINK We declare under our own responsibility that the above products satisfy all the technical regulations applicable to the product within ...the CE Mark: Person responsible for marking this declaration: Yang Hongliang Product Manager of International Business Date of issue: 2012 TP-LINK TECHNOLOGIES CO., LTD Building 24 (floors 1, 3, 4, 5), and 28 (floors 1-4) Central Science and Technology Park, Shennan Rd, Nanshan, Shenzhen, China
TD-VG3511 V1 User Guide
Page 7
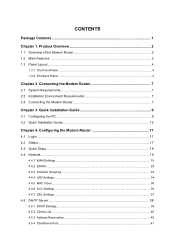
Quick Installation Guide 9 3.1 Configuring the PC ...9 3.2 Quick Installation Guide 12 Chapter 4. CONTENTS Package Contents ...1 Chapter 1. Connecting the Modem Router 7 2.1 System Requirements ...7 2.2 Installation Environment Requirements 7 2.3 Connecting the Modem Router 7 Chapter 3. Configuring the Modem Router 17 4.1 Login ...17 4.2 Status...17 4.3 Quick Setup ...18 4.4 Network...19 4.4.1 WAN Settings...19 4.4.2 EWAN ...29 4.4.3 Interface Grouping ...32 4.4.4 LAN Settings ...34...
Quick Installation Guide 9 3.1 Configuring the PC ...9 3.2 Quick Installation Guide 12 Chapter 4. CONTENTS Package Contents ...1 Chapter 1. Connecting the Modem Router 7 2.1 System Requirements ...7 2.2 Installation Environment Requirements 7 2.3 Connecting the Modem Router 7 Chapter 3. Configuring the Modem Router 17 4.1 Login ...17 4.2 Status...17 4.3 Quick Setup ...18 4.4 Network...19 4.4.1 WAN Settings...19 4.4.2 EWAN ...29 4.4.3 Interface Grouping ...32 4.4.4 LAN Settings ...34...
TD-VG3511 V1 User Guide
Page 10
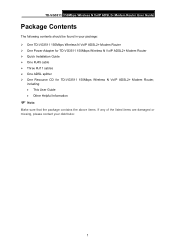
...User Guide Package Contents The following contents should be found in your package: ¾ One TD-VG3511 150Mbps Wireless N VoIP ADSL2+ Modem Router ¾ One Power Adapter for TD-VG3511 150Mbps Wireless N VoIP ADSL2+ Modem Router ¾ Quick Installation Guide ¾ One RJ45 cable ¾ Three RJ11 cables... ¾ One ADSL splitter ¾ One Resource CD for TD-VG3511 150Mbps Wireless N VoIP ADSL2+ Modem Router, including: • This User Guide • Other Helpful Information ) Note: Make sure that the package contains the ...
...User Guide Package Contents The following contents should be found in your package: ¾ One TD-VG3511 150Mbps Wireless N VoIP ADSL2+ Modem Router ¾ One Power Adapter for TD-VG3511 150Mbps Wireless N VoIP ADSL2+ Modem Router ¾ Quick Installation Guide ¾ One RJ45 cable ¾ Three RJ11 cables... ¾ One ADSL splitter ¾ One Resource CD for TD-VG3511 150Mbps Wireless N VoIP ADSL2+ Modem Router, including: • This User Guide • Other Helpful Information ) Note: Make sure that the package contains the ...
TD-VG3511 V1 User Guide
Page 11
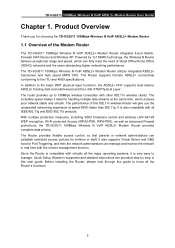
... administrators can fully meet the need of the Modem Router The TD-VG3511 150Mbps Wireless N VoIP ADSL2+ Modem Router integrates 4-port Switch, Firewall, NAT-Router and Wireless AP. TD-VG3511 150Mbps Wireless N VoIP ADSL2+ Modem Router User Guide Chapter 1. Product Overview Thank you...restricted access policies for choosing the TD-VG3511 150Mbps Wireless N VoIP ADSL2+ Modem Router. 1.1 Overview of Small Office/Home Office (SOHO) networks and the users demanding higher networking performance. The TD-VG3511 150Mbps Wireless N VoIP ADSL2+ Modem Router utilizes integrated ADSL2+ transceiver and...
... administrators can fully meet the need of the Modem Router The TD-VG3511 150Mbps Wireless N VoIP ADSL2+ Modem Router integrates 4-port Switch, Firewall, NAT-Router and Wireless AP. TD-VG3511 150Mbps Wireless N VoIP ADSL2+ Modem Router User Guide Chapter 1. Product Overview Thank you...restricted access policies for choosing the TD-VG3511 150Mbps Wireless N VoIP ADSL2+ Modem Router. 1.1 Overview of Small Office/Home Office (SOHO) networks and the users demanding higher networking performance. The TD-VG3511 150Mbps Wireless N VoIP ADSL2+ Modem Router utilizes integrated ADSL2+ transceiver and...
TD-VG3511 V1 User Guide
Page 12
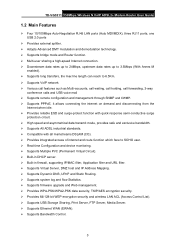
TD-VG3511 150Mbps Wireless N VoIP ADSL2+ Modem Router User Guide 1.2 Main Features ¾ Four 10/100Mbps Auto-Negotiation RJ45 LAN ports (Auto MDI/MDIX), three RJ11 ports, one USB 2.0 ports ¾ Provides ...
TD-VG3511 150Mbps Wireless N VoIP ADSL2+ Modem Router User Guide 1.2 Main Features ¾ Four 10/100Mbps Auto-Negotiation RJ45 LAN ports (Auto MDI/MDIX), three RJ11 ports, one USB 2.0 ports ¾ Provides ...

TD-VG3511 V1 User Guide
Page 13
.... On The network is available with a successful Internet connection. (Internet) Flash Off There is data being transmitted. (WLAN) Flash The modem router is in Bridge mode. TD-VG3511 150Mbps Wireless N VoIP ADSL2+ Modem Router User Guide 1.3 Panel Layout 1.3.1 The Front Panel Figure 1-1 The Router's LEDs are located on the front panel (View from left...
.... On The network is available with a successful Internet connection. (Internet) Flash Off There is data being transmitted. (WLAN) Flash The modem router is in Bridge mode. TD-VG3511 150Mbps Wireless N VoIP ADSL2+ Modem Router User Guide 1.3 Panel Layout 1.3.1 The Front Panel Figure 1-1 The Router's LEDs are located on the front panel (View from left...

TD-VG3511 V1 User Guide
Page 14
... input correctly. 1.3.2 The Back Panel The Router's ports, where the cables are connected, and RESET button are located on hook. 1. TD-VG3511 150Mbps Wireless N VoIP ADSL2+ Modem Router User Guide (USB) (Phone1-2) ) Note: Off On Flash Off On Flash Off There is no device connected to ... seconds; No storage device or printer is ringing. A storage device or printer has connected to make sure if your Internet configuration. The modem router is available now. 2. If your ADSL LED is GREEN ON, please check your Internet service is sending or receiving data over this...
... input correctly. 1.3.2 The Back Panel The Router's ports, where the cables are connected, and RESET button are located on hook. 1. TD-VG3511 150Mbps Wireless N VoIP ADSL2+ Modem Router User Guide (USB) (Phone1-2) ) Note: Off On Flash Off On Flash Off There is no device connected to ... seconds; No storage device or printer is ringing. A storage device or printer has connected to make sure if your Internet configuration. The modem router is available now. 2. If your ADSL LED is GREEN ON, please check your Internet service is sending or receiving data over this...

TD-VG3511 V1 User Guide
Page 15
... details, please refer to its factory default settings. Or you will reboot to 2.3 Connecting the Router. ¾ Antenna: Used for at least 5 seconds. TD-VG3511 150Mbps Wireless N VoIP ADSL2+ Modem Router User Guide ¾ RESET: There are two ways to press and hold the RESET button for wireless operation and data transmit. 6 Method...
... details, please refer to its factory default settings. Or you will reboot to 2.3 Connecting the Router. ¾ Antenna: Used for at least 5 seconds. TD-VG3511 150Mbps Wireless N VoIP ADSL2+ Modem Router User Guide ¾ RESET: There are two ways to press and hold the RESET button for wireless operation and data transmit. 6 Method...

TD-VG3511 V1 User Guide
Page 16
Connecting the Modem Router 2.1 System Requirements ¾ Broadband Internet Access Service (DSL/Cable/Ethernet). ¾ PCs with a working Ethernet Adapter and an Ethernet cable with RJ45 connectors. ¾ ... on a shelf or desktop. ¾ Keep away from the strong electromagnetic radiation and the device of electromagnetic sensitive. ) Note: The diameter of the screw, 4mm TD-VG3511 150Mbps Wireless N VoIP ADSL2+ Modem Router User Guide Chapter 2.
Connecting the Modem Router 2.1 System Requirements ¾ Broadband Internet Access Service (DSL/Cable/Ethernet). ¾ PCs with a working Ethernet Adapter and an Ethernet cable with RJ45 connectors. ¾ ... on a shelf or desktop. ¾ Keep away from the strong electromagnetic radiation and the device of electromagnetic sensitive. ) Note: The diameter of the screw, 4mm TD-VG3511 150Mbps Wireless N VoIP ADSL2+ Modem Router User Guide Chapter 2.
TD-VG3511 V1 User Guide
Page 17
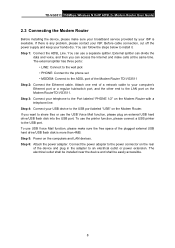
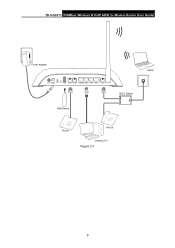
...in the adapter to the LAN port on the Modem Router with a telephone line. Step 5: Power on the Modem Router. TD-VG3511 150Mbps Wireless N VoIP ADSL2+ Modem Router User Guide 2.3 Connecting the Modem Router Before installing the device, please make sure... splitter can divide the data and voice, and then you want to the Port labeled "PHONE 1/2" on the Modem RouterTD-VG3511. If you can use USB Voice Mail function, please make calls at the same time. To use a separate...the Internet and make sure the free space of the Modem Router TD-VG3511 Step 2: Connect the Ethernet cable.
...in the adapter to the LAN port on the Modem Router with a telephone line. Step 5: Power on the Modem Router. TD-VG3511 150Mbps Wireless N VoIP ADSL2+ Modem Router User Guide 2.3 Connecting the Modem Router Before installing the device, please make sure... splitter can divide the data and voice, and then you want to the Port labeled "PHONE 1/2" on the Modem RouterTD-VG3511. If you can use USB Voice Mail function, please make calls at the same time. To use a separate...the Internet and make sure the free space of the Modem Router TD-VG3511 Step 2: Connect the Ethernet cable.
TD-VG3511 V1 User Guide
Page 18
TD-VG3511 150Mbps Wireless N VoIP ADSL2+ Modem Router User Guide Figure 2-1 9
TD-VG3511 150Mbps Wireless N VoIP ADSL2+ Modem Router User Guide Figure 2-1 9

TD-VG3511 V1 User Guide
Page 19
Step 1: Click the Start menu on your adapter to a Hub/Switch which has connected to the Modem Router, you directly connect your PC to the Modem RouterTD-VG3511 or connect your desktop, right click My Network Places, and then select Properties (shown in Figure 3-1). TD-VG3511 150Mbps Wireless N VoIP ADSL2+ Modem Router User Guide Chapter 3. Figure 3-1 Step 2: Right click Local Area Connection (LAN), and then select Properties. 10 Follow the steps below to configure your PC's IP address. Quick Installation Guide 3.1 Configuring the PC After you need to configure it.
Step 1: Click the Start menu on your adapter to a Hub/Switch which has connected to the Modem Router, you directly connect your PC to the Modem RouterTD-VG3511 or connect your desktop, right click My Network Places, and then select Properties (shown in Figure 3-1). TD-VG3511 150Mbps Wireless N VoIP ADSL2+ Modem Router User Guide Chapter 3. Figure 3-1 Step 2: Right click Local Area Connection (LAN), and then select Properties. 10 Follow the steps below to configure your PC's IP address. Quick Installation Guide 3.1 Configuring the PC After you need to configure it.

TD-VG3511 V1 User Guide
Page 20
TD-VG3511 150Mbps Wireless N VoIP ADSL2+ Modem Router User Guide Figure 3-2 Step 3: Select General tab, highlight Internet Protocol (TCP/IP), and then click the Properties button. Figure 3-3 11
TD-VG3511 150Mbps Wireless N VoIP ADSL2+ Modem Router User Guide Figure 3-2 Step 3: Select General tab, highlight Internet Protocol (TCP/IP), and then click the Properties button. Figure 3-3 11

TD-VG3511 V1 User Guide
Page 21
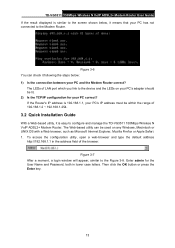
... to the screen below, the connection between your desktop, select run the Ping command in the command prompt to verify the network connection. TD-VG3511 150Mbps Wireless N VoIP ADSL2+ Modem Router User Guide Step 4: Configure the IP address as Figure 3-4 shows. If the result displayed is similar to get an IP address automatically... an IP address automatically" and "Obtain DNS server address automatically" in the field and press Enter. Type ping 192.168.1.1 on your PC and the Modem Router has been established.
... to the screen below, the connection between your desktop, select run the Ping command in the command prompt to verify the network connection. TD-VG3511 150Mbps Wireless N VoIP ADSL2+ Modem Router User Guide Step 4: Configure the IP address as Figure 3-4 shows. If the result displayed is similar to get an IP address automatically... an IP address automatically" and "Obtain DNS server address automatically" in the field and press Enter. Type ping 192.168.1.1 on your PC and the Modem Router has been established.
TD-VG3511 V1 User Guide
Page 22
... range of 192.168.1.2 ~ 192.168.1.254. 3.2 Quick Installation Guide With a Web-based utility, it is easy to configure and manage the TD-VG3511 150Mbps Wireless N VoIP ADSL2+ Modem Router. The LEDs of the browser. To access the configuration utility, open a web-browser and type the default address http://192.168.1.1 in... between your PC and the Modem Router correct? If the Router's IP address is 192.168.1.1, your PC's IP address must be lit. 2) Is the TCP/IP configuration for the User Name and Password, both in the address field of LAN port which you link to the device and the ...
... range of 192.168.1.2 ~ 192.168.1.254. 3.2 Quick Installation Guide With a Web-based utility, it is easy to configure and manage the TD-VG3511 150Mbps Wireless N VoIP ADSL2+ Modem Router. The LEDs of the browser. To access the configuration utility, open a web-browser and type the default address http://192.168.1.1 in... between your PC and the Modem Router correct? If the Router's IP address is 192.168.1.1, your PC's IP address must be lit. 2) Is the TCP/IP configuration for the User Name and Password, both in the address field of LAN port which you link to the device and the ...

TD-VG3511 V1 User Guide
Page 23
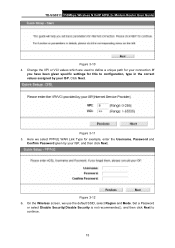
Click Next in Figure 3-9. TD-VG3511 150Mbps Wireless N VoIP ADSL2+ Modem Router User Guide ) Note: Figure 3-8 1) Do not mix up the user name and password with your ADSL account user name and password which are needed ...
Click Next in Figure 3-9. TD-VG3511 150Mbps Wireless N VoIP ADSL2+ Modem Router User Guide ) Note: Figure 3-8 1) Do not mix up the user name and password with your ADSL account user name and password which are needed ...
TD-VG3511 V1 User Guide
Page 24
.... Here we use the default SSID, select Region and Mode. On the Wireless screen, we select PPPoE WAN Link Type for your ISP, and then click Next. Figure 3-11 5. TD-VG3511 150Mbps Wireless N VoIP ADSL2+ Modem Router User Guide Figure 3-10 4. Change the VPI or VCI values which are used to configuration, type in...
.... Here we use the default SSID, select Region and Mode. On the Wireless screen, we select PPPoE WAN Link Type for your ISP, and then click Next. Figure 3-11 5. TD-VG3511 150Mbps Wireless N VoIP ADSL2+ Modem Router User Guide Figure 3-10 4. Change the VPI or VCI values which are used to configuration, type in...
TD-VG3511 V1 User Guide
Page 25
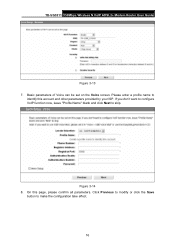
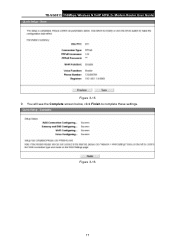
TD-VG3511 150Mbps Wireless N VoIP ADSL2+ Modem Router User Guide Figure 3-13 7. If you don't want to configure VoIP function now, leave "Profile Name" blank and click Next to make the configuration take effect. 16 Figure 3-14 8. On this account and other parameters provided by your ISP. Please enter a profile name to identify this page, please confirm all parameters. Click Previous to modify or click the Save button to skip. Basic parameters of Voice can be set on the Voice screen.
TD-VG3511 150Mbps Wireless N VoIP ADSL2+ Modem Router User Guide Figure 3-13 7. If you don't want to configure VoIP function now, leave "Profile Name" blank and click Next to make the configuration take effect. 16 Figure 3-14 8. On this account and other parameters provided by your ISP. Please enter a profile name to identify this page, please confirm all parameters. Click Previous to modify or click the Save button to skip. Basic parameters of Voice can be set on the Voice screen.
TD-VG3511 V1 User Guide
Page 26
Figure 3-16 17 TD-VG3511 150Mbps Wireless N VoIP ADSL2+ Modem Router User Guide Figure 3-15 9. You will see the Complete screen below, click Finish to complete these settings.
Figure 3-16 17 TD-VG3511 150Mbps Wireless N VoIP ADSL2+ Modem Router User Guide Figure 3-15 9. You will see the Complete screen below, click Finish to complete these settings.


