
T2600G Series Switches User Guide
Page 15
... Configuration...525 Using the GUI...525 Using the CLI...526 Viewing Routing Table...527 Using the GUI...527 Viewing IPv4 Routing Table...527 Viewing IPv6 Routing Table...528 Using the CLI...528 Viewing IPv4 Routing Table...528 Viewing IPv6 Routing Table...529 Example for Static Routing...530 Network Requirements...530 Configuration Scheme...530 Using the GUI...530 Using the CLI...532 Configuring DHCP Service DHCP...536 Overview...536 Supported Features...536 DHCP Server Configuration...541 Using the GUI...541 Enabling DHCP Server...541 Configuring DHCP Server Pool...543 Configuring Manual...
... Configuration...525 Using the GUI...525 Using the CLI...526 Viewing Routing Table...527 Using the GUI...527 Viewing IPv4 Routing Table...527 Viewing IPv6 Routing Table...528 Using the CLI...528 Viewing IPv4 Routing Table...528 Viewing IPv6 Routing Table...529 Example for Static Routing...530 Network Requirements...530 Configuration Scheme...530 Using the GUI...530 Using the CLI...532 Configuring DHCP Service DHCP...536 Overview...536 Supported Features...536 DHCP Server Configuration...541 Using the GUI...541 Enabling DHCP Server...541 Configuring DHCP Server Pool...543 Configuring Manual...

T2600G Series Switches User Guide
Page 34
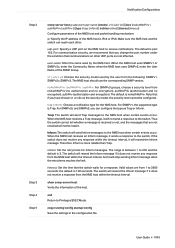
... time you log in, change the password to login via the HTTP server. 2.1 Login To manage your network and devices. Accessing the Switch Web Interface Access 2 Web Interface Access You can access the switch's web interface through a web browser in the host PC: 1) Make sure that the route between the host PC and the switch is 192.168.0.1. Figure 2-1 Enter the Switch's IP Address in the Browser 4) Enter the username and password (both admin by default) in web servers, HTTP server and HTTPS server...
... time you log in, change the password to login via the HTTP server. 2.1 Login To manage your network and devices. Accessing the Switch Web Interface Access 2 Web Interface Access You can access the switch's web interface through a web browser in the host PC: 1) Make sure that the route between the host PC and the switch is 192.168.0.1. Figure 2-1 Enter the Switch's IP Address in the Browser 4) Enter the username and password (both admin by default) in web servers, HTTP server and HTTPS server...

T2600G Series Switches User Guide
Page 48
...-up configuration file. C:\Users\Administrator>telnet 192.168.0.10 User:admin Password:tplink Switch>enable Switch#copy running-config startup-config ■■ Configure the Default Gateway In the following example, we will show how to replace the switch's default access IP address 192.168.0.1/24 with the VLAN interface IP 192.168.0.1/24. Switch(config)#end Switch#copy running-config startup-config 3.7 Change the Switch's IP Address and Default Gateway If you want to access the switch via a specified port (hereafter referred to as the access port), you...
...-up configuration file. C:\Users\Administrator>telnet 192.168.0.10 User:admin Password:tplink Switch>enable Switch#copy running-config startup-config ■■ Configure the Default Gateway In the following example, we will show how to replace the switch's default access IP address 192.168.0.1/24 with the VLAN interface IP 192.168.0.1/24. Switch(config)#end Switch#copy running-config startup-config 3.7 Change the Switch's IP Address and Default Gateway If you want to access the switch via a specified port (hereafter referred to as the access port), you...

T2600G Series Switches User Guide
Page 310
... primary VLAN. show vlan private-vlan Verify configurations of primary VLAN 6 and secondary VLAN 5. The following example shows how to configure the port type of port 1/0/3 as host. Switch#configure User Guide 281 This type of this port is used to connect to show information. The PVID of port is its secondary VLAN ID. show vlan private-vlan interface [fastEthernet port | gigabitEthernet port | tengigabitEthernet port | port-channel lag-id] Verify private VLAN configurations of the LAG to end users and shield information from upper-layer...
... primary VLAN. show vlan private-vlan Verify configurations of primary VLAN 6 and secondary VLAN 5. The following example shows how to configure the port type of port 1/0/3 as host. Switch#configure User Guide 281 This type of this port is used to connect to show information. The PVID of port is its secondary VLAN ID. show vlan private-vlan interface [fastEthernet port | gigabitEthernet port | tengigabitEthernet port | port-channel lag-id] Verify private VLAN configurations of the LAG to end users and shield information from upper-layer...

T2600G Series Switches User Guide
Page 330
... port will delete the multicast address from hosts. A proper leave time value can avoid other hosts connecting to be the static router ports in this VLAN. With IGMP Snooping Querier enabled, specify the host's maximum response time to leave a multicast group, it receives leave messages from the multicast forwarding table. With IGMP Snooping Querier enabled, specify the number of group-specific queries to the same port of the switch being mistakenly removed from being router ports in this multicast...
... port will delete the multicast address from hosts. A proper leave time value can avoid other hosts connecting to be the static router ports in this VLAN. With IGMP Snooping Querier enabled, specify the host's maximum response time to leave a multicast group, it receives leave messages from the multicast forwarding table. With IGMP Snooping Querier enabled, specify the number of group-specific queries to the same port of the switch being mistakenly removed from being router ports in this multicast...

T2600G Series Switches User Guide
Page 336
... switch does not receive any report messages from the port, the port will not be removed from the multicast group once its Member Port Aging Time ends. •• The Leave Time mechanism will wait for the VLANs. Valid values are from 60 to the member port list of the VLAN(s). User Guide 307 Configuring Layer 2 Multicast IGMP Snooping Configuration Step 2 Step 3 Step 4 ip igmp snooping vlan-config vlan-id-list mtime member-time Enable IGMP Snooping for the specified VLANs...
... switch does not receive any report messages from the port, the port will not be removed from the multicast group once its Member Port Aging Time ends. •• The Leave Time mechanism will wait for the VLANs. Valid values are from 60 to the member port list of the VLAN(s). User Guide 307 Configuring Layer 2 Multicast IGMP Snooping Configuration Step 2 Step 3 Step 4 ip igmp snooping vlan-config vlan-id-list mtime member-time Enable IGMP Snooping for the specified VLANs...

T2600G Series Switches User Guide
Page 338
... copy running-config startup-config Save the settings in global configuration mode to 300 seconds, and the default value is received, the switch will delete the multicast address from the multicast forwarding table. query-interval interval: Specify the interval between group-specific queries. It should be sent. Valid values are sent and no report message is 60 seconds. Configuring Layer 2 Multicast IGMP Snooping Configuration Step 9 ip igmp snooping vlan-config vlan-id-list querier (Optional) Enable the IGMP Snooping Querier...
... copy running-config startup-config Save the settings in global configuration mode to 300 seconds, and the default value is received, the switch will delete the multicast address from the multicast forwarding table. query-interval interval: Specify the interval between group-specific queries. It should be sent. Valid values are sent and no report message is 60 seconds. Configuring Layer 2 Multicast IGMP Snooping Configuration Step 9 ip igmp snooping vlan-config vlan-id-list querier (Optional) Enable the IGMP Snooping Querier...

T2600G Series Switches User Guide
Page 353
... need to wait until the port ages out from the switch's forwarding list of the Ethernet port that port with a configured interval (Last Listener Query Interval), and wait for MLD reports. By default, it is disabled. When enabled, the switch will remove the port from being router ports in the VLANs. ipv6 mld snooping vlan-config vlan-id-list immediate-leave (Optional) Enable Fast Leave for the same multicast group during one sent done message...
... need to wait until the port ages out from the switch's forwarding list of the Ethernet port that port with a configured interval (Last Listener Query Interval), and wait for MLD reports. By default, it is disabled. When enabled, the switch will remove the port from being router ports in the VLANs. ipv6 mld snooping vlan-config vlan-id-list immediate-leave (Optional) Enable Fast Leave for the same multicast group during one sent done message...

T2600G Series Switches User Guide
Page 354
... global configuration mode to be an IPv6 link-local address. If specified count of the VLAN(s). The following example shows how to this VLAN. Use the command below in this multicast group through the port receiving the done message. It should be sent. Step 12 copy running-config startup-config Save the settings in the specified VLAN. When enabled, the switch acts as 320 seconds, and then enable Fast Leave...
... global configuration mode to be an IPv6 link-local address. If specified count of the VLAN(s). The following example shows how to this VLAN. Use the command below in this multicast group through the port receiving the done message. It should be sent. Step 12 copy running-config startup-config Save the settings in the specified VLAN. When enabled, the switch acts as 320 seconds, and then enable Fast Leave...

T2600G Series Switches User Guide
Page 359
... a port at the same time. When both are enabled, MVR listens to the report and leave messages only for the ports. 5) Statically add ports to MVR groups. Configuring Layer 2 Multicast MVR Configuration 4 MVR Configuration To complete MVR configuration, follow these steps: 1) Configure 802.1Q VLANs. 2) Configure MVR globally. 3) Add multicast groups to MVR. 4) Configure MVR for the multicast groups configured in MVR. User Guide 330 Note that receive multicast data from the router) to Configuring 802.1Q VLAN.
... a port at the same time. When both are enabled, MVR listens to the report and leave messages only for the ports. 5) Statically add ports to MVR groups. Configuring Layer 2 Multicast MVR Configuration 4 MVR Configuration To complete MVR configuration, follow these steps: 1) Configure 802.1Q VLANs. 2) Configure MVR globally. 3) Add multicast groups to MVR. 4) Configure MVR for the multicast groups configured in MVR. User Guide 330 Note that receive multicast data from the router) to Configuring 802.1Q VLAN.

T2600G Series Switches User Guide
Page 591
... Specify the Ethernet port number, for example, 1/0/1. no switchport Switch the port channel to a Layer 3 port channel interface. Step 3 Step 4 Step 5 Step 6 Step 7 Step 8 Enter Port-channel Interface Configuration Mode: interface { port-cahnnel port-channel } Enter Interface Configuration Mode. Valid values are from the DHCP clients. If the VLAN that already exists, ranging from the DHCP server. ip dhcp relay default-interface Set the interface as the default relay-agent interface. copy running-config startup-config Save the settings in the configuration file. User Guide 562 vid...
... Specify the Ethernet port number, for example, 1/0/1. no switchport Switch the port channel to a Layer 3 port channel interface. Step 3 Step 4 Step 5 Step 6 Step 7 Step 8 Enter Port-channel Interface Configuration Mode: interface { port-cahnnel port-channel } Enter Interface Configuration Mode. Valid values are from the DHCP clients. If the VLAN that already exists, ranging from the DHCP server. ip dhcp relay default-interface Set the interface as the default relay-agent interface. copy running-config startup-config Save the settings in the configuration file. User Guide 562 vid...

T2600G Series Switches User Guide
Page 619
... using the CLI. 2) Configuring the DHCP Server The detailed configurations on Switch A. Configure 802.1Q VLAN. You can forward DHCP requests and replies between clients and the server. Demonstrated with a Linux ISC DHCP Server, 5.4.4 Configuring the DHCP Server provides information about how to VLAN 2. Configuring DHCP Service Figure 5-28 Network Topology for the DHCP server you can configure Option 82 in different groups. With DHCP Relay enabled, the switch can refer to configure DHCP Interface Relay in DHCP Relay. Add all computers to set its DHCP configuration file...
... using the CLI. 2) Configuring the DHCP Server The detailed configurations on Switch A. Configure 802.1Q VLAN. You can forward DHCP requests and replies between clients and the server. Demonstrated with a Linux ISC DHCP Server, 5.4.4 Configuring the DHCP Server provides information about how to VLAN 2. Configuring DHCP Service Figure 5-28 Network Topology for the DHCP server you can configure Option 82 in different groups. With DHCP Relay enabled, the switch can refer to configure DHCP Interface Relay in DHCP Relay. Add all computers to set its DHCP configuration file...

T2600G Series Switches User Guide
Page 737
... Enter global configuration mode. By default, it is 10. Switch#configure Switch(config)#user access-control ip-based enable Switch(config)#user access-control ip-based 192.168.0.100 255.255.255.255 snmp telnet http https Switch(config)#show user configuration User authentication mode: IP based Index IP Address Access Interface 1 192.168.0.100/24 SNMP Telnet HTTP HTTPS Switch(config)#end Switch#copy running -config startup-config Save the settings in the configuration file. User Guide 708 Configuring Access Security Access Security Configurations Step 5 copy...
... Enter global configuration mode. By default, it is 10. Switch#configure Switch(config)#user access-control ip-based enable Switch(config)#user access-control ip-based 192.168.0.100 255.255.255.255 snmp telnet http https Switch(config)#show user configuration User authentication mode: IP based Index IP Address Access Interface 1 192.168.0.100/24 SNMP Telnet HTTP HTTPS Switch(config)#end Switch#copy running -config startup-config Save the settings in the configuration file. User Guide 708 Configuring Access Security Access Security Configurations Step 5 copy...

T2600G Series Switches User Guide
Page 846
... EXEC mode and any other configuration mode: show access-list acl-id-or-name counter View the number of matched packets of the specific ACL. Configuring ACL ACL Configuration Switch#configure Switch(config)#access-list bind 1 interface vlan 4 gigabitEthernet 1/0/3 SSwitch(config)#show access-list bind ACL ID ACL NAME Interface/VID Direction Type ----- ---------- ------- ---- 1 ACL_1 Gi1/0/3 Ingress Port 1 ACL_1 4 Ingress VLAN Switch(config)#end Switch#copy running-config startup-config 2.2.5 Viewing ACL Counting You can use the following command to be viewed.
... EXEC mode and any other configuration mode: show access-list acl-id-or-name counter View the number of matched packets of the specific ACL. Configuring ACL ACL Configuration Switch#configure Switch(config)#access-list bind 1 interface vlan 4 gigabitEthernet 1/0/3 SSwitch(config)#show access-list bind ACL ID ACL NAME Interface/VID Direction Type ----- ---------- ------- ---- 1 ACL_1 Gi1/0/3 Ingress Port 1 ACL_1 4 Ingress VLAN Switch(config)#end Switch#copy running-config startup-config 2.2.5 Viewing ACL Counting You can use the following command to be viewed.
T2600G Series Switches User Guide
Page 1074
... change the port number under the condition that the switch waits for a response. For SNMPv1, the supported type is more reliable than Trap. If the switch does not receive any response from the NMS host within the timeout interval. timeout: Set the time ...-config startup-config Save the settings in IPv4 or IPv6. User Guide 1045 when the NMS host uses SNMPv3, enter the User Name of the host. And it does not receive any response within the timeout interval. Notification Configurations Step 2 Step 3 Step 4 Step 5 snmp-server host ip udp-port user-name...
... change the port number under the condition that the switch waits for a response. For SNMPv1, the supported type is more reliable than Trap. If the switch does not receive any response from the NMS host within the timeout interval. timeout: Set the time ...-config startup-config Save the settings in IPv4 or IPv6. User Guide 1045 when the NMS host uses SNMPv3, enter the User Name of the host. And it does not receive any response within the timeout interval. Notification Configurations Step 2 Step 3 Step 4 Step 5 snmp-server host ip udp-port user-name...

T2600G Series Switches User Guide
Page 1080
... number of any interface is any updated information. With both this trap and the Logging feature in the ACL rule settings enabled, the switch will check the matched ACL information every five minutes and send SNMP traps if there is changed. duplicate: Triggered when the switch detects an IP conflict. Step 2 snmp-server traps ip { change : Monitors the changes of interfaces' IP addresses. Step 4 copy running -config startup-config Save the settings in the configuration file...
... number of any interface is any updated information. With both this trap and the Logging feature in the ACL rule settings enabled, the switch will check the matched ACL information every five minutes and send SNMP traps if there is changed. duplicate: Triggered when the switch detects an IP conflict. Step 2 snmp-server traps ip { change : Monitors the changes of interfaces' IP addresses. Step 4 copy running -config startup-config Save the settings in the configuration file...

T2600G Series Switches CLI Reference Guide Guide
Page 55
... can use the default username and password (which are both admin) to login the switch after its startup. You can connect to the switch's console port and delete all your previous set accounts. Example Enable the switch's password-recovery feature: T2600G-28TS(config)# service password-recovery 4.4 show user account-list Description The show user account-list command is used to display the information of the current users: T2600G-28TS(config)# show user account-list Command Mode Privileged EXEC Mode and Any Configuration Mode Privilege Requirement Only Admin level users have access to...
... can use the default username and password (which are both admin) to login the switch after its startup. You can connect to the switch's console port and delete all your previous set accounts. Example Enable the switch's password-recovery feature: T2600G-28TS(config)# service password-recovery 4.4 show user account-list Description The show user account-list command is used to display the information of the current users: T2600G-28TS(config)# show user account-list Command Mode Privileged EXEC Mode and Any Configuration Mode Privilege Requirement Only Admin level users have access to...

T2600G Series Switches CLI Reference Guide Guide
Page 66
... lost. Example Disable the reset function of console port or reset button: 43 To enable the reset function, use no service reset-disable Command Mode Global Configuration Mode Privilege Requirement Only Admin, Operator and Power User level users have access to these commands. Command Mode Privileged EXEC Mode Privilege Requirement Only Admin level users have access to these commands. By default, the reset function is enabled. After resetting, all settings of the switch except its IP address: T2600G-28TS# reset except-ip 5.12 service reset-disable Description The service reset...
... lost. Example Disable the reset function of console port or reset button: 43 To enable the reset function, use no service reset-disable Command Mode Global Configuration Mode Privilege Requirement Only Admin, Operator and Power User level users have access to these commands. Command Mode Privileged EXEC Mode Privilege Requirement Only Admin level users have access to these commands. By default, the reset function is enabled. After resetting, all settings of the switch except its IP address: T2600G-28TS# reset except-ip 5.12 service reset-disable Description The service reset...

T2600G Series Switches CLI Reference Guide Guide
Page 519
... | port-pwr-over-30w | port-pwr-overload | port-short-circuit | thermal-shutdown ] Parameter over -30w | port-pwr-overload | port-short-circuit | thermal-shutdown ] no snmp-server traps ip { change | duplicate } Parameter change --Enable SNMP IP change traps. To disable this command. duplicate --Enable SNMP IP duplicate traps. Command Mode Global Configuration Mode Privilege Requirement Only Admin level users have access to enable PoE traps. All PoE traps are disabled by the connected PDs exceeds the maximum power the PoE switch can supply...
... | port-pwr-over-30w | port-pwr-overload | port-short-circuit | thermal-shutdown ] Parameter over -30w | port-pwr-overload | port-short-circuit | thermal-shutdown ] no snmp-server traps ip { change | duplicate } Parameter change --Enable SNMP IP change traps. To disable this command. duplicate --Enable SNMP IP duplicate traps. Command Mode Global Configuration Mode Privilege Requirement Only Admin level users have access to enable PoE traps. All PoE traps are disabled by the connected PDs exceeds the maximum power the PoE switch can supply...
Jetstream L2 Managed SwitchUN Installation Guide
Page 21
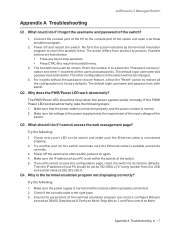
... models without the password recover feature, select the "Reset" option to restore all the users and passwords. Q3. If you still cannot access the configuration page, reset the switch to factory defaults. Enter the number 6 to select the "Password recovery" option and enter Y to reach the bootUtil menu. 3. Why does the PWR/Power LED work abnormally? The PWR/Power LED should be changed. 4. Check every port LED on again. 4. Then the IP address of the switch...
... models without the password recover feature, select the "Reset" option to restore all the users and passwords. Q3. If you still cannot access the configuration page, reset the switch to factory defaults. Enter the number 6 to select the "Password recovery" option and enter Y to reach the bootUtil menu. 3. Why does the PWR/Power LED work abnormally? The PWR/Power LED should be changed. 4. Check every port LED on again. 4. Then the IP address of the switch...


