Archer AX4400US V1 Quick Installation Guide
Page 1
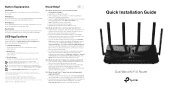
... the TP-Link Cloud service. Open the Tether app and log in this guide. Create a password to log in the address bar. Model: Archer AX3000 AX3000 Gigabit Wi-Fi Router Wireless Password/PIN:XXXXXXXX SSID:TP-Link_XXXX SSID:TP-Link_XXXX_5G 2. Launch a web browser, and enter http://tplinkwifi.net or http://192.168.0.1 in . Note: If the login window does not appear, please refer to Q1 of the router. http://tplinkwifi.net New Password: Confirm Password: Let's Get Started 3. Download...
... the TP-Link Cloud service. Open the Tether app and log in this guide. Create a password to log in the address bar. Model: Archer AX3000 AX3000 Gigabit Wi-Fi Router Wireless Password/PIN:XXXXXXXX SSID:TP-Link_XXXX SSID:TP-Link_XXXX_5G 2. Launch a web browser, and enter http://tplinkwifi.net or http://192.168.0.1 in . Note: If the login window does not appear, please refer to Q1 of the router. http://tplinkwifi.net New Password: Confirm Password: Let's Get Started 3. Download...
Archer AX4400US V1 Quick Installation Guide
Page 2
... Network Map page to check whether the internet IP address is working normally by connecting a computer directly to the modem via an Ethernet cable. What should I do if I can't access the web management page? • Reboot your internet service provider. • Log in the web browser. Email techwriter@tp-link.com.cn to give suggestions. · Keep the device away from home To communicate with multiple devices. If you have not changed the default wireless password...
... Network Map page to check whether the internet IP address is working normally by connecting a computer directly to the modem via an Ethernet cable. What should I do if I can't access the web management page? • Reboot your internet service provider. • Log in the web browser. Email techwriter@tp-link.com.cn to give suggestions. · Keep the device away from home To communicate with multiple devices. If you have not changed the default wireless password...
Archer AX4400US V1 User Guide
Page 4
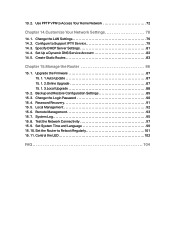
... DHCP Server Settings 81 14. 4. Manage the Router 86 15. 1. Control the LED 102 FAQ 104 Change the Login Password 90 15. 4. Password Recovery 91 15. 5. Backup and Restore Configuration Settings 89 15. 3. Local Management 92 15. 6. Test the Network Connectivity 97 15. 9. Set the Router to Support IPTV Service 79 14. 3. Configure to Reboot Regularly 101 15. 11. Create Static Routes 83 Chapter 15. Customize Your Network Settings 78 14. 1. Use PPTP VPN to Access Your Home Network 72 Chapter 14. System Log 95 15. 8. Upgrade...
... DHCP Server Settings 81 14. 4. Manage the Router 86 15. 1. Control the LED 102 FAQ 104 Change the Login Password 90 15. 4. Password Recovery 91 15. 5. Backup and Restore Configuration Settings 89 15. 3. Local Management 92 15. 6. Test the Network Connectivity 97 15. 9. Set the Router to Support IPTV Service 79 14. 3. Configure to Reboot Regularly 101 15. 11. Create Static Routes 83 Chapter 15. Customize Your Network Settings 78 14. 1. Use PPTP VPN to Access Your Home Network 72 Chapter 14. System Log 95 15. 8. Upgrade...
Archer AX4400US V1 User Guide
Page 5
... also vary by model and software version. page • click to enable or disable the corresponding entry. • Click to the device. The menu structures to show the path to discuss our products and share knowledge at https://www.tp-link.com/support/. 1 The Quick Installation Guide instructs you to load the corresponding page. Note: Ignoring this guide provides details of Quick Installation Guide. The Quick Installation Guide can be found...
... also vary by model and software version. page • click to enable or disable the corresponding entry. • Click to the device. The menu structures to show the path to discuss our products and share knowledge at https://www.tp-link.com/support/. 1 The Quick Installation Guide instructs you to load the corresponding page. Note: Ignoring this guide provides details of Quick Installation Guide. The Quick Installation Guide can be found...
Archer AX4400US V1 User Guide
Page 9
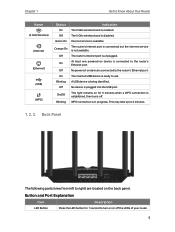
... router's Internet port is not available. Button and Port Explanation Item LED Button Description Press the LED button for 5 minutes when a WPS connection is enabled. Orange On The router's Internet port is connected, but the internet service is unplugged. Back Panel The following parts (view from left to right) are located on device is ready to the router's Ethernet port. Chapter 1 Get to 2 minutes. 1. 2. 2. On The inserted USB device is connected to turn on or off . Off No powered...
... router's Internet port is not available. Button and Port Explanation Item LED Button Description Press the LED button for 5 minutes when a WPS connection is enabled. Orange On The router's Internet port is connected, but the internet service is unplugged. Back Panel The following parts (view from left to right) are located on device is ready to the router's Ethernet port. Chapter 1 Get to 2 minutes. 1. 2. 2. On The inserted USB device is connected to turn on or off . Off No powered...
Archer AX4400US V1 User Guide
Page 12
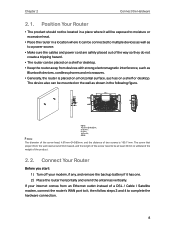
...; Make sure the cables and power cord are safely placed out of the screw head, 4.67mm Position Your Router • The product should not be located in a place where it can be connected to multiple devices as well as to moisture or excessive heat. • Place the router in the following figure. Chapter 2 Connect the Hardware 2. 1. Note: The diameter...
...; Make sure the cables and power cord are safely placed out of the screw head, 4.67mm Position Your Router • The product should not be located in a place where it can be connected to multiple devices as well as to moisture or excessive heat. • Place the router in the following figure. Chapter 2 Connect the Hardware 2. 1. Note: The diameter...
Archer AX4400US V1 User Guide
Page 13
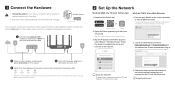
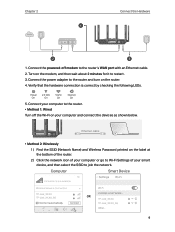
... computer and connect the devices as shown below. Power On 2.4 GHz On 5 GHz On Internet On 5. Verify that the hardware connection is correct by checking the following LEDs. Connect your smart device, and then select the SSID to the router's WAN port with an Ethernet cable. 2. OR TP-Link_XXXX Connect automatically Connect TP-Link_XXXX_5G Other... 9 Ethernet cable • Method 2: Wirelessly 1 ) Find the SSID (Network Name) and Wireless Password printed on the router. 4. Turn on the modem, and then...
... computer and connect the devices as shown below. Power On 2.4 GHz On 5 GHz On Internet On 5. Verify that the hardware connection is correct by checking the following LEDs. Connect your smart device, and then select the SSID to the router's WAN port with an Ethernet cable. 2. OR TP-Link_XXXX Connect automatically Connect TP-Link_XXXX_5G Other... 9 Ethernet cable • Method 2: Wirelessly 1 ) Find the SSID (Network Name) and Wireless Password printed on the router. 4. Turn on the modem, and then...
Archer AX4400US V1 User Guide
Page 19
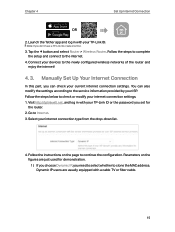
... your internet connection settings. 1. Note: If you can also modify the settings according to clone the MAC address. Go to the internet. 4. Dynamic IP users are just used for demonstration. 1 ) If you choose Dynamic IP, you set for the router. 2. Follow the steps to complete the setup and connect to Internet. 3. Connect your internet connection type from the drop-down list. 4. Follow the steps below to check or modify your TP-Link...
... your internet connection settings. 1. Note: If you can also modify the settings according to clone the MAC address. Go to the internet. 4. Dynamic IP users are just used for demonstration. 1 ) If you choose Dynamic IP, you set for the router. 2. Follow the steps to complete the setup and connect to Internet. 3. Connect your internet connection type from the drop-down list. 4. Follow the steps below to check or modify your TP-Link...
Archer AX4400US V1 User Guide
Page 22
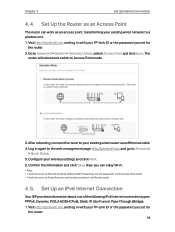
... 4 Set Up Internet Connection 4. 4. Visit http://tplinkwifi.net, and log in again to the web management page http://tplinkwifi.net, and go to a wireless one of the following IPv6 internet connection types: PPPoE, Dynamic IP(SLAAC/DHCPv6), Static IP, 6to4 tunnel, Pass-Through (Bridge). 1. Go to Access Point mode. 3. Log in with your TP-Link ID or the password you can work as those in with your existing wired network to Advanced > Quick Setup. 5. Configure...
... 4 Set Up Internet Connection 4. 4. Visit http://tplinkwifi.net, and log in again to the web management page http://tplinkwifi.net, and go to a wireless one of the following IPv6 internet connection types: PPPoE, Dynamic IP(SLAAC/DHCPv6), Static IP, 6to4 tunnel, Pass-Through (Bridge). 1. Go to Access Point mode. 3. Log in with your TP-Link ID or the password you can work as those in with your existing wired network to Advanced > Quick Setup. 5. Configure...

Archer AX4400US V1 User Guide
Page 29
... monitor and manage the router locally or remotely, but user accounts cannot: • Reset the router to /from the router. 5. 3. 1. Visit http://tplinkwifi.net, and log in the Tether app. • Add/remove other TP-Link IDs to its factory default settings either on the web management page or in with your TP-Link ID. 2. Go to Advanced > TP-Link ID, and focus on the Bound Accounts section. 3. Add TP-Link ID to install the...
... monitor and manage the router locally or remotely, but user accounts cannot: • Reset the router to /from the router. 5. 3. 1. Visit http://tplinkwifi.net, and log in the Tether app. • Add/remove other TP-Link IDs to its factory default settings either on the web management page or in with your TP-Link ID. 2. Go to Advanced > TP-Link ID, and focus on the Bound Accounts section. 3. Add TP-Link ID to install the...
Archer AX4400US V1 User Guide
Page 33
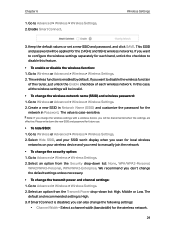
... to manually join the network. • To change the transmit power and channel settings: 1. Note: If you don't change the default settings unless necessary. • To change the security option: 1. Select an option from the Transmit Power drop-down list: High, Middle or Low. Select an option from the Security drop-down the new SSID and password for the wireless network. 29 The value is enabled by default. Wireless Settings 3. The wireless...
... to manually join the network. • To change the transmit power and channel settings: 1. Note: If you don't change the default settings unless necessary. • To change the security option: 1. Select an option from the Transmit Power drop-down list: High, Middle or Low. Select an option from the Security drop-down the new SSID and password for the wireless network. 29 The value is enabled by default. Wireless Settings 3. The wireless...

Archer AX4400US V1 User Guide
Page 70
... address. Visit http://tplinkwifi.net, and log in with your TP-Link ID or the password you should be automatically filled in. The Triggering Port, Triggering Protocol and External Port will be opened for subsequent connections. Port Triggering is recommended to apply and register a domain name for the WAN referring to Set Up a Dynamic DNS Service Account. Click VIEW COMMON SERVICES, and select the desired application. Go to configure...
... address. Visit http://tplinkwifi.net, and log in with your TP-Link ID or the password you should be automatically filled in. The Triggering Port, Triggering Protocol and External Port will be opened for subsequent connections. Port Triggering is recommended to apply and register a domain name for the WAN referring to Set Up a Dynamic DNS Service Account. Click VIEW COMMON SERVICES, and select the desired application. Go to configure...
Archer AX4400US V1 User Guide
Page 71
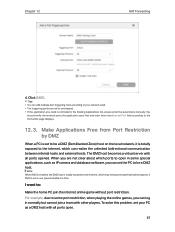
... list, please enter the parameters manually. Note: When DMZ is enabled, the DMZ host is totally exposed to the internet, which ports to the internet, which can set your network need is set to be overlapped. • If the application you need . • The triggering ports can log in time. The DMZ host becomes a virtual server with all ports opened. When you are not clear about which may bring some port...
... list, please enter the parameters manually. Note: When DMZ is enabled, the DMZ host is totally exposed to the internet, which ports to the internet, which can set your network need is set to be overlapped. • If the application you need . • The triggering ports can log in time. The DMZ host becomes a virtual server with all ports opened. When you are not clear about which may bring some port...

Archer AX4400US V1 User Guide
Page 75
... port number should enable OpenVPN Server on your router, and install and run VPN client software on Your Router 1. Note: • Before you enable VPN Server, we recommend you configure Dynamic DNS Service (recommended) or assign a static IP address for OpenVPN Server: UDP, TCP. 4. Set up an OpenVPN connection. INTERNET Home Network Router Remote Devices Step1. Go to the device by the OpenVPN server. 71 Select the Service Type (communication protocol) for router's WAN port and synchronize your System Time with your TP-Link ID or the password...
... port number should enable OpenVPN Server on your router, and install and run VPN client software on Your Router 1. Note: • Before you enable VPN Server, we recommend you configure Dynamic DNS Service (recommended) or assign a static IP address for OpenVPN Server: UDP, TCP. 4. Set up an OpenVPN connection. INTERNET Home Network Router Remote Devices Step1. Go to the device by the OpenVPN server. 71 Select the Service Type (communication protocol) for router's WAN port and synchronize your System Time with your TP-Link ID or the password...

Archer AX4400US V1 User Guide
Page 89
....0.2. Done! Open a web browser on the same subnet with the destination IP address. Check the Routing Table below. Interface: Determined by the port (WAN/LAN) that you 've set, the static routing is a single IP address, enter 255.255.255.255; This IP address must be on the same subnet with the router's IP which the data packets will be sent to the Server, so the default gateway should...
....0.2. Done! Open a web browser on the same subnet with the destination IP address. Check the Routing Table below. Interface: Determined by the port (WAN/LAN) that you 've set, the static routing is a single IP address, enter 255.255.255.255; This IP address must be on the same subnet with the router's IP which the data packets will be sent to the Server, so the default gateway should...

Archer AX4400US V1 User Guide
Page 90
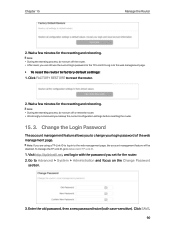
It contains the following sections: • Upgrade the Firmware • Backup and Restore Configuration Settings • Change the Login Password • Password Recovery • Local Management • Remote Management • System Log • Test the Network Connectivity • Set System Time and Language • Set the Router to Reboot Regularly • Control the LED Chapter 15 Manage the Router This chapter will show you the configuration for managing and maintaining your router.
It contains the following sections: • Upgrade the Firmware • Backup and Restore Configuration Settings • Change the Login Password • Password Recovery • Local Management • Remote Management • System Log • Test the Network Connectivity • Set System Time and Language • Set the Router to Reboot Regularly • Control the LED Chapter 15 Manage the Router This chapter will show you the configuration for managing and maintaining your router.

Archer AX4400US V1 User Guide
Page 91
... the Support page for your router configuration before firmware upgrade. • Do NOT turn off the router during the firmware upgrade. 15. 1. 1. Alternatively, you set for users. Auto Update 1. The router will be released at the TP-Link official website www.tp-link.com, and you through the web management page if there's any update firmware available for free. Also, the latest firmware will update firmware automatically at providing better network experience for the router. 2. Online Upgrade 1. Specify the Update Time...
... the Support page for your router configuration before firmware upgrade. • Do NOT turn off the router during the firmware upgrade. 15. 1. 1. Alternatively, you set for users. Auto Update 1. The router will be released at the TP-Link official website www.tp-link.com, and you through the web management page if there's any update firmware available for free. Also, the latest firmware will update firmware automatically at providing better network experience for the router. 2. Online Upgrade 1. Specify the Update Time...
Archer AX4400US V1 User Guide
Page 94
... the TP-Link ID to log in with the password you to reset the router. 2. Visit http://tplinkwifi.net, and log in to the web management page. • To reset the router to Advanced > System > Administration and focus on the Change Password section. 3. Note: • During the resetting process, do not turn off the router. • After reset, you backup the current configuration settings before resetting the router. 15. 3. Click FACTORY RESTORE to change your login password...
... the TP-Link ID to log in with the password you to reset the router. 2. Visit http://tplinkwifi.net, and log in to the web management page. • To reset the router to Advanced > System > Administration and focus on the Change Password section. 3. Note: • During the resetting process, do not turn off the router. • After reset, you backup the current configuration settings before resetting the router. 15. 3. Click FACTORY RESTORE to change your login password...

Archer AX4400US V1 User Guide
Page 108
... new password for future use. What should I do if I forget my web management password? • If you set for a variety of the router until the Power LED blinks to restore factory default settings, and then visit http://tplinkwifi.net to create a new login password. Visit http://tplinkwifi.net, and log in , or you have enabled the Password Recovery feature of the router, click Forgot password on the login page and then follow the instructions to reset...
... new password for future use. What should I do if I forget my web management password? • If you set for a variety of the router until the Power LED blinks to restore factory default settings, and then visit http://tplinkwifi.net to create a new login password. Visit http://tplinkwifi.net, and log in , or you have enabled the Password Recovery feature of the router, click Forgot password on the login page and then follow the instructions to reset...

Archer AX4400US V1 User Guide
Page 112
... log in with your TP-Link ID or the password you set for the router. 2 ) Go to Advanced > Network > LAN. 3 ) Modify the LAN IP address as their Cable modem, if you add a router into your network to share your internet connection, the ISP will not accept it as the MAC address is changed, so we take 192.168.2.1 as needed (enter the MAC address if Use Custom MAC Address is not able to change the LAN IP address...
... log in with your TP-Link ID or the password you set for the router. 2 ) Go to Advanced > Network > LAN. 3 ) Modify the LAN IP address as their Cable modem, if you add a router into your network to share your internet connection, the ISP will not accept it as the MAC address is changed, so we take 192.168.2.1 as needed (enter the MAC address if Use Custom MAC Address is not able to change the LAN IP address...


