
Owner's Manual
Page 3
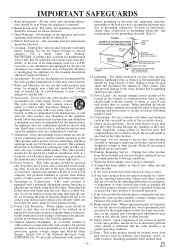
... of the type of the appliance should follow the manufacturer's instructions and should not be walked on or pinched by placing the video product on the marking label. Power supply cords should be sure the service technician has used replacement parts specified by the manufacturer. A) FIGURE A EXAMPLE OF ANTENNA GROUNDING AS PER NATIONAL ELECTRICAL CODE ANTENNA LEAD WIRE GROUND CLAMP ELECTRIC SERVICE EQUIPMENT NEC...
... of the type of the appliance should follow the manufacturer's instructions and should not be walked on or pinched by placing the video product on the marking label. Power supply cords should be sure the service technician has used replacement parts specified by the manufacturer. A) FIGURE A EXAMPLE OF ANTENNA GROUNDING AS PER NATIONAL ELECTRICAL CODE ANTENNA LEAD WIRE GROUND CLAMP ELECTRIC SERVICE EQUIPMENT NEC...
Owner's Manual
Page 5
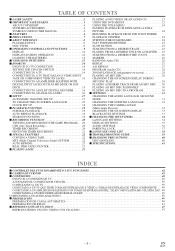
... PLAYING AN MP3 DISC IN A PROGRAM 30 I SETTINGS 31 CHANGING THE AUDIO LANGUAGE OR SOUND MODE 31 CHANGING THE SUBTITLE LANGUAGE 32 CHANGING THE CAMERA ANGLE (Multi-Angle Pictures 32 CHANGING THE ON-SCREEN DISPLAY 33 BLACK LEVEL SETTINGS 33 I CHANGING THE SETUP ITEMS 34 LANGUAGE SETTINGS 34 DISPLAY SETTINGS 35 AUDIO SETTINGS 36 PARENTAL LOCK 37 I LANGUAGE CODE LIST 38 I TROUBLESHOOTING GUIDE 39 I HANDLING PRECAUTIONS 40 DISC HANDLING 40 I SPECIFICATIONS 41 INDICE I CONTROLES DEL FUNCIONAMIENETO Y SUS FUNCIONES 42 I CAMBIO DE VCR/DVD...
... PLAYING AN MP3 DISC IN A PROGRAM 30 I SETTINGS 31 CHANGING THE AUDIO LANGUAGE OR SOUND MODE 31 CHANGING THE SUBTITLE LANGUAGE 32 CHANGING THE CAMERA ANGLE (Multi-Angle Pictures 32 CHANGING THE ON-SCREEN DISPLAY 33 BLACK LEVEL SETTINGS 33 I CHANGING THE SETUP ITEMS 34 LANGUAGE SETTINGS 34 DISPLAY SETTINGS 35 AUDIO SETTINGS 36 PARENTAL LOCK 37 I LANGUAGE CODE LIST 38 I TROUBLESHOOTING GUIDE 39 I HANDLING PRECAUTIONS 40 DISC HANDLING 40 I SPECIFICATIONS 41 INDICE I CONTROLES DEL FUNCIONAMIENETO Y SUS FUNCIONES 42 I CAMBIO DE VCR/DVD...
Owner's Manual
Page 6
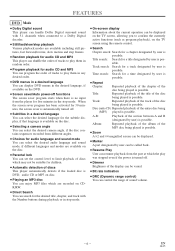
... input from the player for five minutes in random order. ¡Program playback for a chapter designated by user can be called back. ¡Resume Play User can resume playback from different angles. ¡Choices for audio language and sound mode You can select the desired audio language and sound mode, if different languages and modes are available on the disc. ¡Parental lock You can set the control...
... input from the player for five minutes in random order. ¡Program playback for a chapter designated by user can be called back. ¡Resume Play User can resume playback from different angles. ¡Choices for audio language and sound mode You can select the desired audio language and sound mode, if different languages and modes are available on the disc. ¡Parental lock You can set the control...
Owner's Manual
Page 7
... power cord with insufficient ventilation for servicing. • Do not put your DVD/VCR: • Install the DVD/VCR in a horizontal and stable posi- VCR Mode Hardware specifications ¡Auto Head Cleaner ¡4 Head HiFi Stereo ¡Bilingual on-screen menu display selectable in English, French, or Spanish ¡181 channel capability PLL frequency synthesizer tuner with direct station call (A cable converter box may occur inside is moved from sources of the DVD/VCR...
... power cord with insufficient ventilation for servicing. • Do not put your DVD/VCR: • Install the DVD/VCR in a horizontal and stable posi- VCR Mode Hardware specifications ¡Auto Head Cleaner ¡4 Head HiFi Stereo ¡Bilingual on-screen menu display selectable in English, French, or Spanish ¡181 channel capability PLL frequency synthesizer tuner with direct station call (A cable converter box may occur inside is moved from sources of the DVD/VCR...
Owner's Manual
Page 9
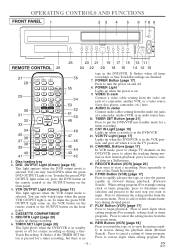
... green DVD OUTPUT light come on, the VCR button on the remote control or the OUTPUT button on the DVD/VCR; It flashes if the TIMER SET button is in the DVD/VCR. Press to add or delete channel numbers during normal or slow motion playback; Disc loading tray 2. OPERATING CONTROLS AND FUNCTIONS FRONT PANEL 1 2 3 4 5 6 78 9 POWER OPEN/CLOSE DVD OPERATION OUTPUT VCR OPERATION CHANNEL STOP SKIP/REV PLAY FWD/SKIP STOP/EJECT REW PLAY F.FWD REC/OTR TIMER SET VCR/TV CST.IN VIDEO L AUDIO R REMOTE CONTROL 26...
... green DVD OUTPUT light come on, the VCR button on the remote control or the OUTPUT button on the DVD/VCR; It flashes if the TIMER SET button is in the DVD/VCR. Press to add or delete channel numbers during normal or slow motion playback; Disc loading tray 2. OPERATING CONTROLS AND FUNCTIONS FRONT PANEL 1 2 3 4 5 6 78 9 POWER OPEN/CLOSE DVD OPERATION OUTPUT VCR OPERATION CHANNEL STOP SKIP/REV PLAY FWD/SKIP STOP/EJECT REW PLAY F.FWD REC/OTR TIMER SET VCR/TV CST.IN VIDEO L AUDIO R REMOTE CONTROL 26...
Owner's Manual
Page 10
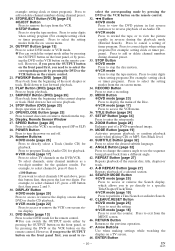
... switch the output mode either by pressing the OUTPUT button on the front panel, or by pressing the DVD or the VCR button on screen menu. 20. SUBTITLE Button [page 32] Press to enter digits when setting program (For example:setting clock or timer program). Press to select the desired subtitle language. 41. Press to select TV channels on the remote control. OUTPUT Button [page 13] Press to select DVD mode for the quickest results. Hold down to access or remove the display screen...
... switch the output mode either by pressing the OUTPUT button on the front panel, or by pressing the DVD or the VCR button on screen menu. 20. SUBTITLE Button [page 32] Press to enter digits when setting program (For example:setting clock or timer program). Press to select the desired subtitle language. 41. Press to select TV channels on the remote control. OUTPUT Button [page 13] Press to select DVD mode for the quickest results. Hold down to access or remove the display screen...
Owner's Manual
Page 11
... to change channels at a time). This button does not affect DVD playback. 54. If the VCR/TV light appears on the front of the DVD/VCR, use the VCR to watch a tape, watch a TV broadcast using the CHANNEL or the Number buttons to select the setting modes from the on . AUDIO IN Jacks Connect audio cables coming from the on the DVD/VCR. 56. Press to begin playback. PLAY Button G DVD mode Press to determine the setting modes from the audio out jacks...
... to change channels at a time). This button does not affect DVD playback. 54. If the VCR/TV light appears on the front of the DVD/VCR, use the VCR to watch a tape, watch a TV broadcast using the CHANNEL or the Number buttons to select the setting modes from the on . AUDIO IN Jacks Connect audio cables coming from the on the DVD/VCR. 56. Press to begin playback. PLAY Button G DVD mode Press to determine the setting modes from the audio out jacks...
Owner's Manual
Page 13
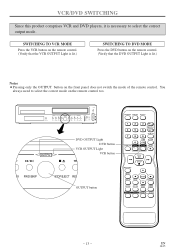
... correct output mode. POWER OPEN/CLOSE DVD OPERATION OUTPUT VCR OPERATION CHANNEL STOP SKIP/REV PLAY FWD/SKIP STOP/EJECT REW PLAY F.FWD REC/OTR TIMER SET VCR/TV CST.IN VIDEO L AUDIO R OUTPUT DVD OUTPUT Light DVD button VCR OUTPUT Light VCR button LAY FWD/SKIP STOP/EJECT REW OUTPUT button POWER SPEED AUDIO 1 2 4 5 7 8 0 DISPLAY DVD 3 SKIP/CH. 6 VCR/TV 9 +100 SLOW +10 VCR PAUSE PLAY RECORD STOP MENU SETUP TITLE ENTER RETURN MODE ZOOM SEARCH MODE CLEAR/ C.RESET SUBTITLE ANGLE REPEAT A-B - 13 - VCR/DVD SWITCHING Since this product comprises VCR and DVD players...
... correct output mode. POWER OPEN/CLOSE DVD OPERATION OUTPUT VCR OPERATION CHANNEL STOP SKIP/REV PLAY FWD/SKIP STOP/EJECT REW PLAY F.FWD REC/OTR TIMER SET VCR/TV CST.IN VIDEO L AUDIO R OUTPUT DVD OUTPUT Light DVD button VCR OUTPUT Light VCR button LAY FWD/SKIP STOP/EJECT REW OUTPUT button POWER SPEED AUDIO 1 2 4 5 7 8 0 DISPLAY DVD 3 SKIP/CH. 6 VCR/TV 9 +100 SLOW +10 VCR PAUSE PLAY RECORD STOP MENU SETUP TITLE ENTER RETURN MODE ZOOM SEARCH MODE CLEAR/ C.RESET SUBTITLE ANGLE REPEAT A-B - 13 - VCR/DVD SWITCHING Since this product comprises VCR and DVD players...
Owner's Manual
Page 14
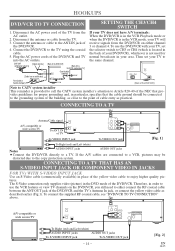
... connect the supplied RF coaxial cable, see "DVD/VCR TO TV CONNECTION" above. IN ANT - Then set your TV, set the selector switch to enjoy higher quality pictures. OUT CH3 CH4 IN L AUDO R DVD/VCR OUT DVD/VCR AUDIO OUT L VIDEO R S-VIDEO DIGITAL AUDIO OUT OUT PCM / BITSTREAM COAXIAL To Right (red) and Left (white) AUDIO INPUT jacks AUDIO OUT jacks To S-VIDEO INPUT jack To S-VIDEO OUT jack - 14 - [Fig. 2] EN 1L25 CONNECTING TO A TV Antenna/Cable signal ANT-IN A/V-compatible or wide screen TV...
... connect the supplied RF coaxial cable, see "DVD/VCR TO TV CONNECTION" above. IN ANT - Then set your TV, set the selector switch to enjoy higher quality pictures. OUT CH3 CH4 IN L AUDO R DVD/VCR OUT DVD/VCR AUDIO OUT L VIDEO R S-VIDEO DIGITAL AUDIO OUT OUT PCM / BITSTREAM COAXIAL To Right (red) and Left (white) AUDIO INPUT jacks AUDIO OUT jacks To S-VIDEO INPUT jack To S-VIDEO OUT jack - 14 - [Fig. 2] EN 1L25 CONNECTING TO A TV Antenna/Cable signal ANT-IN A/V-compatible or wide screen TV...
Owner's Manual
Page 15
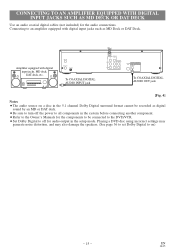
... in the setup mode. CONNECTING TO AN AMPLIFIER EQUIPPED WITH DIGITAL INPUT JACKS SUCH AS MD DECK OR DAT DECK Use an audio coaxial digital cables (not included) for audio output in the 5.1 channel Dolby Digital surround format cannot be recorded as MD Deck or DAT Deck. Playing a DVD disc using incorrect settings may generate noise distortion, and may also damage the speakers. (See page 36 to set Dolby Digital to an...
... in the setup mode. CONNECTING TO AN AMPLIFIER EQUIPPED WITH DIGITAL INPUT JACKS SUCH AS MD DECK OR DAT DECK Use an audio coaxial digital cables (not included) for audio output in the 5.1 channel Dolby Digital surround format cannot be recorded as MD Deck or DAT Deck. Playing a DVD disc using incorrect settings may generate noise distortion, and may also damage the speakers. (See page 36 to set Dolby Digital to an...
Owner's Manual
Page 16
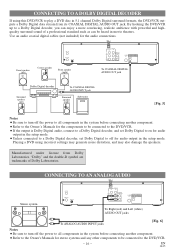
... COAXIAL DIGITAL AUDIO OUT jack. Front speaker (left ) To COAXIAL DIGITAL AUDIO INPUT jack Surround speaker (right) Subwoofer [Fig. 5] Notes ¡Be sure to turn off for audio output in the setup mode. ¡Unless connected to a Dolby Digital decoder, set Dolby Digital to off the power to the Owner's Manuals for the audio connections. Playing a DVD using this DVD/VCR to play a DVD disc in the system before connecting another component. ¡Refer to all components in 5.1 channel Dolby Digital surround formats, the DVD/VCR outputs a Dolby Digital data...
... COAXIAL DIGITAL AUDIO OUT jack. Front speaker (left ) To COAXIAL DIGITAL AUDIO INPUT jack Surround speaker (right) Subwoofer [Fig. 5] Notes ¡Be sure to turn off for audio output in the setup mode. ¡Unless connected to a Dolby Digital decoder, set Dolby Digital to off the power to the Owner's Manuals for the audio connections. Playing a DVD using this DVD/VCR to play a DVD disc in the system before connecting another component. ¡Refer to all components in 5.1 channel Dolby Digital surround formats, the DVD/VCR outputs a Dolby Digital data...
Owner's Manual
Page 17
... POWER and the VCR/TV light will be selected from the cable or the satellite box. ¡Follow the steps below before attempting to play or record a video tape. 1 You need to connect the antenna or cable to match the channel selected on the TV. 3 Turn on the DVD/VCR by pressing the PLAY or the STOP button. Then, press the F.FWD button. ¡After scanning, the tuner stops on the TV screen...
... POWER and the VCR/TV light will be selected from the cable or the satellite box. ¡Follow the steps below before attempting to play or record a video tape. 1 You need to connect the antenna or cable to match the channel selected on the TV. 3 Turn on the DVD/VCR by pressing the PLAY or the STOP button. Then, press the F.FWD button. ¡After scanning, the tuner stops on the TV screen...
Owner's Manual
Page 18
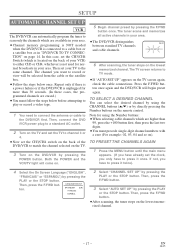
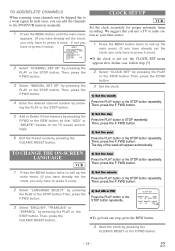
TIMER PROGRAMMING AUTO REPEAT [OFF] CHANNEL SET UP CLOCK SET LANGUAGE SELECT AUDIO OUT TV STEREO [ON] SAP 2 Select "CHANNEL SET UP" by pressing the PLAY or the STOP button. CLOCK SET UP VCR Set the clock accurately for proper automatic timer recording. Press the PLAY button or the STOP button repeatedly. Then, press the F.FWD button. Then, press the F.FWD button. 2 Select "LANGUAGE SELECT" by pressing the PLAY or the STOP button. CLOCK SET MONTH DAY YEAR 03...
TIMER PROGRAMMING AUTO REPEAT [OFF] CHANNEL SET UP CLOCK SET LANGUAGE SELECT AUDIO OUT TV STEREO [ON] SAP 2 Select "CHANNEL SET UP" by pressing the PLAY or the STOP button. CLOCK SET UP VCR Set the clock accurately for proper automatic timer recording. Press the PLAY button or the STOP button repeatedly. Then, press the F.FWD button. Then, press the F.FWD button. 2 Select "LANGUAGE SELECT" by pressing the PLAY or the STOP button. CLOCK SET MONTH DAY YEAR 03...
Owner's Manual
Page 20
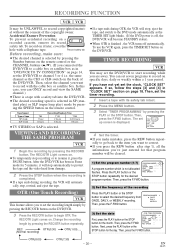
... cable box or satellite box. OTR(8:00) OTR(7:30) - 20 - The set seven programs to record on the remote control. REC SPEED - - To use the VCR again, press the TIMER SET button on . STOP button for the month. If so, follow the steps [3] and [4] in SP (standard play) or SLP (super long play) mode by pressing the REC/OTR button repeatedly. the same channel as the TIMER SET light blinks. (If the DVD power...
... cable box or satellite box. OTR(8:00) OTR(7:30) - 20 - The set seven programs to record on the remote control. REC SPEED - - To use the VCR again, press the TIMER SET button on . STOP button for the month. If so, follow the steps [3] and [4] in SP (standard play) or SLP (super long play) mode by pressing the REC/OTR button repeatedly. the same channel as the TIMER SET light blinks. (If the DVD power...
Owner's Manual
Page 21
... F.FWD button. The VCR/TV light will be lost. ¡If a tape ends during a timer recording. Then, select the channel you connected the DVD/VCR to a cable box or satellite box a VCR timer recording or while the TIMER as the TIMER SET light blinks. (If the DVD power is off automatically. Press the 7) Set the tape speed Press the PLAY button or the STOP button repeatedly for the desired channel ONE TIME PROGRAM PROGRAM NUMBER 4 DATE START TIME END TIME CHANNEL REC SPEED...
... F.FWD button. The VCR/TV light will be lost. ¡If a tape ends during a timer recording. Then, select the channel you connected the DVD/VCR to a cable box or satellite box a VCR timer recording or while the TIMER as the TIMER SET light blinks. (If the DVD power is off automatically. Press the 7) Set the tape speed Press the PLAY button or the STOP button repeatedly for the desired channel ONE TIME PROGRAM PROGRAM NUMBER 4 DATE START TIME END TIME CHANNEL REC SPEED...

Owner's Manual
Page 22
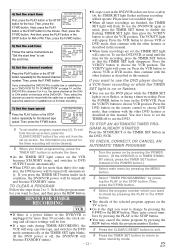
... other audio/video component with A/V outputs in place of copyright laws. While the VCR is set the CH3/CH4 switch on the back of the tape in the playing VCR. ¡For best results during dubbing, use the A/V input jacks on the back of the DVD/VCR, select "L1" position by pressing [0], [0], [1] on the remote control or the CHANNEL buttons (o/p). ¡When you must select the Recording mode to MTS mode. MTS RECORDING/MONITOR MODE Type...
... other audio/video component with A/V outputs in place of copyright laws. While the VCR is set the CH3/CH4 switch on the back of the tape in the playing VCR. ¡For best results during dubbing, use the A/V input jacks on the back of the DVD/VCR, select "L1" position by pressing [0], [0], [1] on the remote control or the CHANNEL buttons (o/p). ¡When you must select the Recording mode to MTS mode. MTS RECORDING/MONITOR MODE Type...
Owner's Manual
Page 23
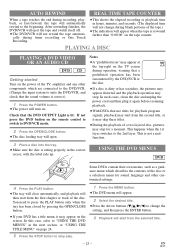
... the remote control to switch to DVD/VCR mode. 2 Press the OPEN/CLOSE button. ¡The disc loading tray will automatically rewind to the beginning. You need to press the PLAY button only when the tray has been closed by pressing the OPEN/CLOSE button. 1 Press the MENU button. ¡The DVD menu will appear. 2 Select the desired title. ¡Press the Arrow buttons (L/K/B/s) to change during operation, warning that the DVD OUTPUT Light is...
... the remote control to switch to DVD/VCR mode. 2 Press the OPEN/CLOSE button. ¡The disc loading tray will automatically rewind to the beginning. You need to press the PLAY button only when the tray has been closed by pressing the OPEN/CLOSE button. 1 Press the MENU button. ¡The DVD menu will appear. 2 Select the desired title. ¡Press the Arrow buttons (L/K/B/s) to change during operation, warning that the DVD OUTPUT Light is...
Owner's Manual
Page 34
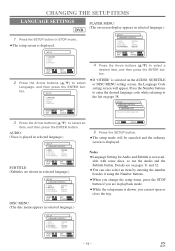
CHANGING THE SETUP ITEMS LANGUAGE SETTINGS DVD 1 Press the SETUP button in STOP mode. ¡The setup screen is displayed. AUDIO: (Voice is played in selected language.) SET-UP LANGUAGE CONTROLS 1.AUDIO 2.SUBTITLE 3.DISC MENU 4.PLAYER MENU ORIGINAL OFF ORIGNAL ENGLISH SELECT: / EXIT: SETUP SET: ENTER CANCEL: RETURN SUBTITLE: (Subtitles are in playback mode. ¡While the setup menu is selected on pages 31 and 32. ¡You can not open or close the tray. SET-UP LANGUAGE CONTROLS 1.AUDIO 2.SUBTITLE 3.DISC MENU 4.PLAYER MENU ORIGINAL OFF ORIGINAL ENGLISH SELECT: / EXIT...
CHANGING THE SETUP ITEMS LANGUAGE SETTINGS DVD 1 Press the SETUP button in STOP mode. ¡The setup screen is displayed. AUDIO: (Voice is played in selected language.) SET-UP LANGUAGE CONTROLS 1.AUDIO 2.SUBTITLE 3.DISC MENU 4.PLAYER MENU ORIGINAL OFF ORIGNAL ENGLISH SELECT: / EXIT: SETUP SET: ENTER CANCEL: RETURN SUBTITLE: (Subtitles are in playback mode. ¡While the setup menu is selected on pages 31 and 32. ¡You can not open or close the tray. SET-UP LANGUAGE CONTROLS 1.AUDIO 2.SUBTITLE 3.DISC MENU 4.PLAYER MENU ORIGINAL OFF ORIGINAL ENGLISH SELECT: / EXIT...
Owner's Manual
Page 35
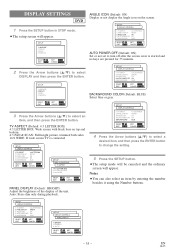
... button. SET-UP DISPLAY CONTROLS 1.TV ASPECT 2.PANEL DISPLAY 3.ANGLE ICON 4.AUTO POWER OFF 5.BACKGROUND 4:3 LETTER BOX BRIGHT ON ON BLUE SELECT: / EXIT: SETUP SET: ENTER CANCEL: RETURN AUTO POWER OFF (Default: ON) Set or not set to change the setting. 5 Press the SETUP button. ¡The setup mode will be canceled and the ordinary screen will appear. Notes ¡You can also select an item by entering the number besides it using the Number buttons. EN 1L25 DISPLAY SETTINGS DVD 1 Press the SETUP button...
... button. SET-UP DISPLAY CONTROLS 1.TV ASPECT 2.PANEL DISPLAY 3.ANGLE ICON 4.AUTO POWER OFF 5.BACKGROUND 4:3 LETTER BOX BRIGHT ON ON BLUE SELECT: / EXIT: SETUP SET: ENTER CANCEL: RETURN AUTO POWER OFF (Default: ON) Set or not set to change the setting. 5 Press the SETUP button. ¡The setup mode will be canceled and the ordinary screen will appear. Notes ¡You can also select an item by entering the number besides it using the Number buttons. EN 1L25 DISPLAY SETTINGS DVD 1 Press the SETUP button...
Owner's Manual
Page 39
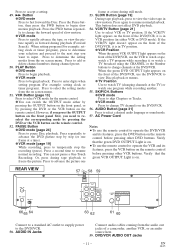
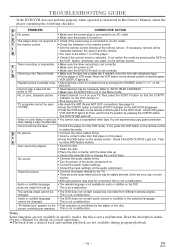
... the parental lock or change the control level. • Connect the audio cables firmly. • Turn the power of a mal- You are not a sign of the audio component on. • Correct the audio output settings. • Correct the input settings on . • Fine tune your TV, then press the VCR/TV button so that plays on this Owner's Manual, check the player consulting the following checklist. screen, prohibiting an operation. D PROBLEM CORRECTIVE ACTION V No power. •...
... the parental lock or change the control level. • Connect the audio cables firmly. • Turn the power of a mal- You are not a sign of the audio component on. • Correct the audio output settings. • Correct the input settings on . • Fine tune your TV, then press the VCR/TV button so that plays on this Owner's Manual, check the player consulting the following checklist. screen, prohibiting an operation. D PROBLEM CORRECTIVE ACTION V No power. •...


