
Owner's Manual
Page 1
If you need additional assistance for set-up or operating after reading owner's manual, please call TOLL FREE : 1-800-242-7158 Please read before using this equipment. OWNER'S MANUAL DVD PLAYER with VIDEO CASSETTE RECORDER WF802 INSTRUCCIONES EN ESPAÑOL INCLUIDAS.
If you need additional assistance for set-up or operating after reading owner's manual, please call TOLL FREE : 1-800-242-7158 Please read before using this equipment. OWNER'S MANUAL DVD PLAYER with VIDEO CASSETTE RECORDER WF802 INSTRUCCIONES EN ESPAÑOL INCLUIDAS.
Owner's Manual
Page 4
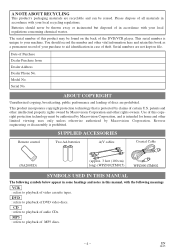
... be reused. ABOUT COPYRIGHT Unauthorized copying, broadcasting, public performance and lending of discs are not kept on the back of the DVD/VCR player. Use of this product may be authorized by Macrovision Corporation, and is unique to playback of certain U.S. Reverse engineering...in some headings and notes in accordance with your machine. MP3 : refers to playback of MP3 discs. -4- Model No. DVD : refers to playback of DVD video discs. Serial numbers are prohibited. Serial No. CD : refers to your local regulations concerning chemical wastes. Batteries should ...
... be reused. ABOUT COPYRIGHT Unauthorized copying, broadcasting, public performance and lending of discs are not kept on the back of the DVD/VCR player. Use of this product may be authorized by Macrovision Corporation, and is unique to playback of certain U.S. Reverse engineering...in some headings and notes in accordance with your machine. MP3 : refers to playback of MP3 discs. -4- Model No. DVD : refers to playback of DVD video discs. Serial numbers are prohibited. Serial No. CD : refers to your local regulations concerning chemical wastes. Batteries should ...
Owner's Manual
Page 5
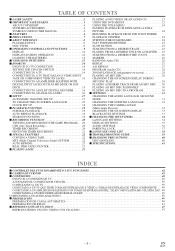
... 8 PLAYABLE DISCS 8 DISC TYPES 8 I OPERATING CONTROLS AND FUNCTIONS 9 DISPLAY 12 DISPLAYS DURING OPERATION 12 LOADING THE BATTERIES 12 I VIDEO/DVD SWITCHING 13 I HOOKUPS 14 DVD/VCR TO TV CONNECTION 14 SETTING THE CH3/CH4 SWITCH 14 CONNECTING TO A TV 14 CONNECTING TO A TV THAT HAS AN S-VIDEO INPUT...39 I HANDLING PRECAUTIONS 40 DISC HANDLING 40 I SPECIFICATIONS 41 INDICE I CONTROLES DEL FUNCIONAMIENETO Y SUS FUNCIONES 42 I CAMBIO DE VCR/DVD 45 I CONEXIONES 46 DVD/VCR A CONEXIÓN DE TV 46 AJUSTANDO EL CONMUTADOR CH3/CH4 46 CONECTANDO A UN TV 46 CONECTADO A UN TV QUE TIENE...
... 8 PLAYABLE DISCS 8 DISC TYPES 8 I OPERATING CONTROLS AND FUNCTIONS 9 DISPLAY 12 DISPLAYS DURING OPERATION 12 LOADING THE BATTERIES 12 I VIDEO/DVD SWITCHING 13 I HOOKUPS 14 DVD/VCR TO TV CONNECTION 14 SETTING THE CH3/CH4 SWITCH 14 CONNECTING TO A TV 14 CONNECTING TO A TV THAT HAS AN S-VIDEO INPUT...39 I HANDLING PRECAUTIONS 40 DISC HANDLING 40 I SPECIFICATIONS 41 INDICE I CONTROLES DEL FUNCIONAMIENETO Y SUS FUNCIONES 42 I CAMBIO DE VCR/DVD 45 I CONEXIONES 46 DVD/VCR A CONEXIÓN DE TV 46 AJUSTANDO EL CONMUTADOR CH3/CH4 46 CONECTANDO A UN TV 46 CONECTADO A UN TV QUE TIENE...
Owner's Manual
Page 6
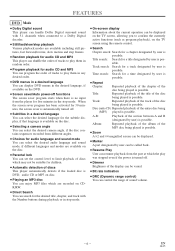
... title designated by user is possible. ¡Repeat Chapter: Repeated playback of the chapter of the disc being played is possible. FEATURES DVD Mode ¡Dolby Digital sound This player can handle Dolby Digital surround sound with the Number buttons during playback or in stop mode. Title... range of the disc being played is possible. A-B: Playback of tracks to confirm the currently active functions (such as program playback), on the DVD. ¡Screen saver/Auto power-off . ¡Dimmer Brightness of the display can be varied. ¡Bit rate indication ¡DRC (...
... title designated by user is possible. ¡Repeat Chapter: Repeated playback of the chapter of the disc being played is possible. FEATURES DVD Mode ¡Dolby Digital sound This player can handle Dolby Digital surround sound with the Number buttons during playback or in stop mode. Title... range of the disc being played is possible. A-B: Playback of tracks to confirm the currently active functions (such as program playback), on the DVD. ¡Screen saver/Auto power-off . ¡Dimmer Brightness of the display can be varied. ¡Bit rate indication ¡DRC (...
Owner's Manual
Page 7
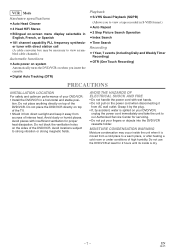
...8226; Shield it from a cold place to strong vibration or strong magnetic fields. tion. Do not place anything directly on your DVD/VCR: • Install the DVD/VCR in S-VHS format.) ¡Auto Repeat ¡2 Step Picture Search Operation ¡Index Search ¡Time Search Recording &#... CONDENSATION WARNING Moisture condensation may be necessary to view scrambled cable channels.) Automatic functions ¡Auto power on system Automatically turns the DVD/VCR on when you insert the cassette. ¡Digital Auto Tracking (DTR) Playback ¡S-VHS Quasi Playback (SQPB) (Allows you...
...8226; Shield it from a cold place to strong vibration or strong magnetic fields. tion. Do not place anything directly on your DVD/VCR: • Install the DVD/VCR in S-VHS format.) ¡Auto Repeat ¡2 Step Picture Search Operation ¡Index Search ¡Time Search Recording &#... CONDENSATION WARNING Moisture condensation may be necessary to view scrambled cable channels.) Automatic functions ¡Auto power on system Automatically turns the DVD/VCR on when you insert the cassette. ¡Digital Auto Tracking (DTR) Playback ¡S-VHS Quasi Playback (SQPB) (Allows you...
Owner's Manual
Page 8
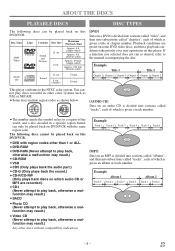
... the manual accompanying the disc. ABOUT THE DISCS PLAYABLE DISCS DISC TYPES The following discs cannot be played back on this DVD/VCR. ¡DVD with the same region code. Disc Type DVD Video Logo Contents Sound and Pictures Disc Size Maximum Playback Time 12 cm Approx. 4 h (single-sided) Approx. 8 ...-sided) 8 cm Approx. 80 min (single-sided) Approx. 160 min (double-sided) Audio CD Sound 12 cm 8 cm (singles) 74 min 20 min [DVD] Data on an MP3 is divided into sections called "albums", and then into subsections called "chapters", each of which is given an album or track...
... the manual accompanying the disc. ABOUT THE DISCS PLAYABLE DISCS DISC TYPES The following discs cannot be played back on this DVD/VCR. ¡DVD with the same region code. Disc Type DVD Video Logo Contents Sound and Pictures Disc Size Maximum Playback Time 12 cm Approx. 4 h (single-sided) Approx. 8 ...-sided) 8 cm Approx. 80 min (single-sided) Approx. 160 min (double-sided) Audio CD Sound 12 cm 8 cm (singles) 74 min 20 min [DVD] Data on an MP3 is divided into sections called "albums", and then into subsections called "chapters", each of which is given an album or track...
Owner's Manual
Page 9
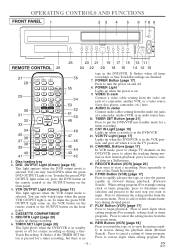
... 18 16 14 12 10 27 POWER SPEED AUDIO 56 28 29 30 31 32 33 34 35 36 37 38 39 40 41 1 2 4 5 7 8 0 DISPLAY DVD 3 SKIP/CH. 6 VCR/TV 9 +100 SLOW +10 VCR PAUSE PLAY RECORD STOP MENU SETUP TITLE ENTER RETURN MODE ZOOM SEARCH MODE CLEAR/ C.RESET SUBTITLE ANGLE... REPEAT A-B 55 54 53 52 51 50 49 48 47 46 45 44 43 42 1. DVD OUTPUT Light (Green) [page 13] This light appears when the DVD output mode is selected. It flashes when all timer recordings or One-Touch Recordings are finished. 7. POWER Button [page 17...
... 18 16 14 12 10 27 POWER SPEED AUDIO 56 28 29 30 31 32 33 34 35 36 37 38 39 40 41 1 2 4 5 7 8 0 DISPLAY DVD 3 SKIP/CH. 6 VCR/TV 9 +100 SLOW +10 VCR PAUSE PLAY RECORD STOP MENU SETUP TITLE ENTER RETURN MODE ZOOM SEARCH MODE CLEAR/ C.RESET SUBTITLE ANGLE... REPEAT A-B 55 54 53 52 51 50 49 48 47 46 45 44 43 42 1. DVD OUTPUT Light (Green) [page 13] This light appears when the DVD output mode is selected. It flashes when all timer recordings or One-Touch Recordings are finished. 7. POWER Button [page 17...
Owner's Manual
Page 10
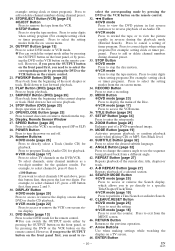
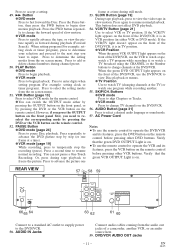
... of the disc. 25. MODE Button [pages 19] Activates program playback or random playback mode when playing CDs or MP3. CLEAR/C.RESET Button G DVD mode [page 26] Press to enter the setup mode. 38. G You can switch the OUTPUT mode either by pressing the OUTPUT button on the...display screen during channel preset. 33. RETURN Button Returns to enter digits when setting program (For example: setting clock or timer program). h Button G DVD mode Press to stop the disc motion. Press to the previous operation. 47. To select channels, enter channel numbers as a two-digit number for...
... of the disc. 25. MODE Button [pages 19] Activates program playback or random playback mode when playing CDs or MP3. CLEAR/C.RESET Button G DVD mode [page 26] Press to enter the setup mode. 38. G You can switch the OUTPUT mode either by pressing the OUTPUT button on the...display screen during channel preset. 33. RETURN Button Returns to enter digits when setting program (For example: setting clock or timer program). h Button G DVD mode Press to stop the disc motion. Press to the previous operation. 47. To select channels, enter channel numbers as a two-digit number for...
Owner's Manual
Page 11
... AUDIO IN Jacks Connect audio cables coming from the audio out jacks of the DVD/VCR, use the DVD/VCR to the DVD/VCR. 58. EN 1L25 Press the FWD button repeatedly to add or delete ...control. G VCR mode [page 19] While recording, press to reselect the corresponding mode by pressing the DVD or the VCR button on the remote control. Press to begin playback. G VCR mode Press to advance...begin playback. Press the Pause button, then press the FWD button to change the forward speed of the DVD/VCR, use the VCR to watch a tape, watch a TV program while recording it, or watch ...
... AUDIO IN Jacks Connect audio cables coming from the audio out jacks of the DVD/VCR, use the DVD/VCR to the DVD/VCR. 58. EN 1L25 Press the FWD button repeatedly to add or delete ...control. G VCR mode [page 19] While recording, press to reselect the corresponding mode by pressing the DVD or the VCR button on the remote control. Press to begin playback. G VCR mode Press to advance...begin playback. Press the Pause button, then press the FWD button to change the forward speed of the DVD/VCR, use the VCR to watch a tape, watch a TV program while recording it, or watch ...
Owner's Manual
Page 12
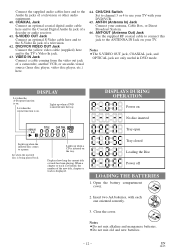
... THE BATTERIES 1. EN 1L25 DISPLAY Lit when the A-B repeat function is inserted into the tray. Lights up when a DVD is on the tray. Open the battery compartment cover. 2. DVD/VCR VIDEO OUT Jack Connect the yellow video cable (supplied) here and to a pause. Lit when the inserted disc...on . Tray closed Loading the Disc Displays how long the current title or track has been playing. ANT-IN (Antenna In) Jack Connect your DVD/VCR. 65. DISPLAYS DURING OPERATION Power on your TV with each one oriented correctly. 3. S-VIDEO OUT Jack Connect an optional S-Video cable ...
... THE BATTERIES 1. EN 1L25 DISPLAY Lit when the A-B repeat function is inserted into the tray. Lights up when a DVD is on the tray. Open the battery compartment cover. 2. DVD/VCR VIDEO OUT Jack Connect the yellow video cable (supplied) here and to a pause. Lit when the inserted disc...on . Tray closed Loading the Disc Displays how long the current title or track has been playing. ANT-IN (Antenna In) Jack Connect your DVD/VCR. 65. DISPLAYS DURING OPERATION Power on your TV with each one oriented correctly. 3. S-VIDEO OUT Jack Connect an optional S-Video cable ...
Owner's Manual
Page 13
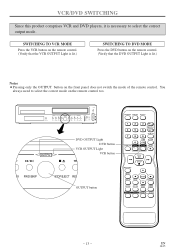
...is necessary to select the correct mode on the front panel does not switch the mode of the remote control. EN 1L25 POWER OPEN/CLOSE DVD OPERATION OUTPUT VCR OPERATION CHANNEL STOP SKIP/REV PLAY FWD/SKIP STOP/EJECT REW PLAY F.FWD REC/OTR TIMER SET VCR/TV CST.IN ... PAUSE PLAY RECORD STOP MENU SETUP TITLE ENTER RETURN MODE ZOOM SEARCH MODE CLEAR/ C.RESET SUBTITLE ANGLE REPEAT A-B - 13 - VCR/DVD SWITCHING Since this product comprises VCR and DVD players, it is lit.) Notes ¡Pressing only the OUTPUT button on the remote control too. You always need to select the...
...is necessary to select the correct mode on the front panel does not switch the mode of the remote control. EN 1L25 POWER OPEN/CLOSE DVD OPERATION OUTPUT VCR OPERATION CHANNEL STOP SKIP/REV PLAY FWD/SKIP STOP/EJECT REW PLAY F.FWD REC/OTR TIMER SET VCR/TV CST.IN ... PAUSE PLAY RECORD STOP MENU SETUP TITLE ENTER RETURN MODE ZOOM SEARCH MODE CLEAR/ C.RESET SUBTITLE ANGLE REPEAT A-B - 13 - VCR/DVD SWITCHING Since this product comprises VCR and DVD players, it is lit.) Notes ¡Pressing only the OUTPUT button on the remote control too. You always need to select the...
Owner's Manual
Page 14
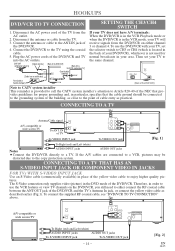
... AUDIO OUT jacks To S-VIDEO INPUT jack To S-VIDEO OUT jack - 14 - [Fig. 2] EN 1L25 Disconnect the antenna or cable from the DVD/VCR on the DVD/VCR, you still need to enjoy higher quality pictures. IN ANT - CONNECTING TO A TV THAT HAS AN S-VIDEO INPUT JACK OR COMPONENT VIDEO IN...point of the UHF/VHF combination TV] OR [Cable box or satellite box] OR From Cable or Satellite Company IN OUT Coaxial cable ANT - HOOKUPS DVD/VCR TO TV CONNECTION SETTING THE CH3/CH4 SWITCH 1. Then set the selector switch to the TV using the coaxial cable. 5. A/V-compatible or wide screen...
... AUDIO OUT jacks To S-VIDEO INPUT jack To S-VIDEO OUT jack - 14 - [Fig. 2] EN 1L25 Disconnect the antenna or cable from the DVD/VCR on the DVD/VCR, you still need to enjoy higher quality pictures. IN ANT - CONNECTING TO A TV THAT HAS AN S-VIDEO INPUT JACK OR COMPONENT VIDEO IN...point of the UHF/VHF combination TV] OR [Cable box or satellite box] OR From Cable or Satellite Company IN OUT Coaxial cable ANT - HOOKUPS DVD/VCR TO TV CONNECTION SETTING THE CH3/CH4 SWITCH 1. Then set the selector switch to the TV using the coaxial cable. 5. A/V-compatible or wide screen...
Owner's Manual
Page 15
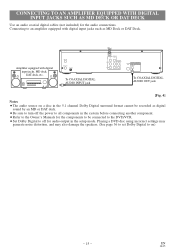
Playing a DVD disc using incorrect settings may generate noise distortion, and may also damage the speakers. (See...Owner's Manuals for the audio connections. IN ANT - ANT - OUT CH3 CH4 To COAXIAL DIGITAL AUDIO INPUT jack IN L AUDO R DVD/VCR OUT DVD/VCR AUDIO OUT L VIDEO R S-VIDEO DIGITAL AUDIO OUT OUT PCM / BITSTREAM COAXIAL To COAXIAL DIGITAL AUDIO OUT jack [Fig. 4]...Use an audio coaxial digital cables (not included) for the components to be connected to the DVD/VCR. ¡Set Dolby Digital to an amplifier equipped with digital input jacks, MD deck, DAT deck, etc. EN...
Playing a DVD disc using incorrect settings may generate noise distortion, and may also damage the speakers. (See...Owner's Manuals for the audio connections. IN ANT - ANT - OUT CH3 CH4 To COAXIAL DIGITAL AUDIO INPUT jack IN L AUDO R DVD/VCR OUT DVD/VCR AUDIO OUT L VIDEO R S-VIDEO DIGITAL AUDIO OUT OUT PCM / BITSTREAM COAXIAL To COAXIAL DIGITAL AUDIO OUT jack [Fig. 4]...Use an audio coaxial digital cables (not included) for the components to be connected to the DVD/VCR. ¡Set Dolby Digital to an amplifier equipped with digital input jacks, MD deck, DAT deck, etc. EN...
Owner's Manual
Page 16
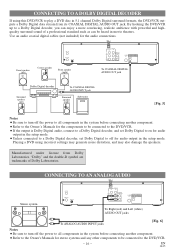
... turn off for the components to be heard in movie theaters. OUT CH3 CH4 Center speaker Front speaker (right) IN L AUDO R DVD/VCR OUT DVD/VCR AUDIO OUT L VIDEO R S-VIDEO DIGITAL AUDIO OUT OUT PCM / BITSTREAM COAXIAL To COAXIAL DIGITAL AUDIO OUT jack Dolby Digital decoder Surround... in the system before connecting another component. ¡Refer to the Owner's Manuals for audio output in the setup mode. By hooking the DVD/VCR up to a Dolby Digital decoder, you can enjoy a more convincing, realistic ambience with powerful and highquality surround sound of Dolby Laboratories....
... turn off for the components to be heard in movie theaters. OUT CH3 CH4 Center speaker Front speaker (right) IN L AUDO R DVD/VCR OUT DVD/VCR AUDIO OUT L VIDEO R S-VIDEO DIGITAL AUDIO OUT OUT PCM / BITSTREAM COAXIAL To COAXIAL DIGITAL AUDIO OUT jack Dolby Digital decoder Surround... in the system before connecting another component. ¡Refer to the Owner's Manuals for audio output in the setup mode. By hooking the DVD/VCR up to a Dolby Digital decoder, you can enjoy a more convincing, realistic ambience with powerful and highquality surround sound of Dolby Laboratories....
Owner's Manual
Page 17
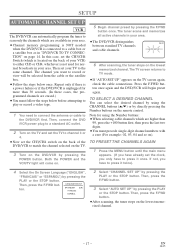
... or the STOP button. Then, press the F.FWD button. 3 Select "AUTO SET UP" by directly pressing the Number buttons on the back of the DVD/VCR to match the channel selected on the TV. 3 Turn on . 5 Begin channel preset by pressing the F.FWD button once. Note for normal broadcasts...begin preset again. Then, press the F.FWD button. ¡After scanning, the tuner stops on page 14. SETUP AUTOMATIC CHANNEL SET UP VCR The DVD/VCR can select the desired channel by using the Number buttons: ¡When selecting cable channels which are higher than 30 seconds. (In these cases...
... or the STOP button. Then, press the F.FWD button. 3 Select "AUTO SET UP" by directly pressing the Number buttons on the back of the DVD/VCR to match the channel selected on the TV. 3 Turn on . 5 Begin channel preset by pressing the F.FWD button once. Note for normal broadcasts...begin preset again. Then, press the F.FWD button. ¡After scanning, the tuner stops on page 14. SETUP AUTOMATIC CHANNEL SET UP VCR The DVD/VCR can select the desired channel by using the Number buttons: ¡When selecting cable channels which are higher than 30 seconds. (In these cases...
Owner's Manual
Page 18
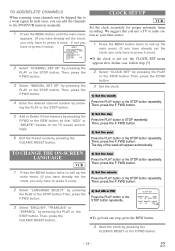
... ADD/DELETE CHANNELS When scanning, some channels may be skipped due to press it twice). - In such cases, you can add the channels to the DVD/VCR memory manually. 1 Press the MENU button until the main menu appears. (If you have already set the clock, you have to press it once...
... ADD/DELETE CHANNELS When scanning, some channels may be skipped due to press it twice). - In such cases, you can add the channels to the DVD/VCR memory manually. 1 Press the MENU button until the main menu appears. (If you have already set the clock, you have to press it once...
Owner's Manual
Page 19
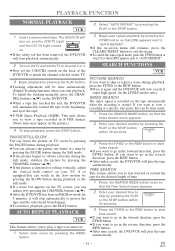
...seconds. AUTO REPEAT PLAYBACK VCR This feature allows you want to go in the reverse direction, press the REW button. ¡After time search, the DVD/VCR will stop playback, press the STOP button. If you to go in the reverse direction, press the REW button. ¡After index search, ... automatically (Digital Tracking function) when you to fast forward or rewind the tape for 5 minutes, it by pressing the CHANNEL buttons (o/p). ¡After the DVD/VCR has been in Still/Slow mode for the desired length of time. 1 Press the SEARCH MODE button twice so that the Time Search menu...
...seconds. AUTO REPEAT PLAYBACK VCR This feature allows you want to go in the reverse direction, press the REW button. ¡After time search, the DVD/VCR will stop playback, press the STOP button. If you to go in the reverse direction, press the REW button. ¡After index search, ... automatically (Digital Tracking function) when you to fast forward or rewind the tape for 5 minutes, it by pressing the CHANNEL buttons (o/p). ¡After the DVD/VCR has been in Still/Slow mode for the desired length of time. 1 Press the SEARCH MODE button twice so that the Time Search menu...
Owner's Manual
Page 20
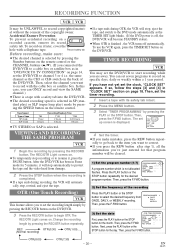
... make sure: ¡The desired channel is displayed. cally stop recording or to resume it later, cover the hole with a safety tab into the DVD/VCR. ¡The desired recording speed is completed. ¡If a tape ends during OTR, the VCR will stop automatically to protect the tape and... record copyrighted material without the consent of the recording Press the PLAY button or the STOP button to start recording while you can set the DVD/VCR to select the desired frequency from damage. 2 Press the STOP button when the recording is selected in "CLOCK SET" section on page 18...
... make sure: ¡The desired channel is displayed. cally stop recording or to resume it later, cover the hole with a safety tab into the DVD/VCR. ¡The desired recording speed is completed. ¡If a tape ends during OTR, the VCR will stop automatically to protect the tape and... record copyrighted material without the consent of the recording Press the PLAY button or the STOP button to start recording while you can set the DVD/VCR to select the desired frequency from damage. 2 Press the STOP button when the recording is selected in "CLOCK SET" section on page 18...
Owner's Manual
Page 21
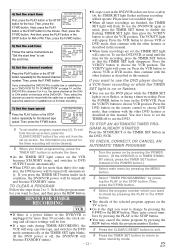
...to 3. TO CHECK, CORRECT, OR CANCEL AN AUTOMATIC TIMER PROGRAM 1 Turn the power on by pressing the ¡If there is a power failure or the DVD/VCR is unplugged for timer recording. TO CLEAR A PROGRAM 2 Select main menu by pressing the MENU button. 3 Select "TIMER PROGRAMMING" by pressing the REW ... light will flash. You don't have a safety tab, the TIMER SET light flashes and timer recording will be turned off to use the DVD player while the TIMER SET light is on or flashes, or during If you finish programming, press the TIMER SET button to activate the timer...
...to 3. TO CHECK, CORRECT, OR CANCEL AN AUTOMATIC TIMER PROGRAM 1 Turn the power on by pressing the ¡If there is a power failure or the DVD/VCR is unplugged for timer recording. TO CLEAR A PROGRAM 2 Select main menu by pressing the MENU button. 3 Select "TIMER PROGRAMMING" by pressing the REW ... light will flash. You don't have a safety tab, the TIMER SET light flashes and timer recording will be turned off to use the DVD player while the TIMER SET light is on or flashes, or during If you finish programming, press the TIMER SET button to activate the timer...

Owner's Manual
Page 22
... select "L1" position by pressing [0], [0], [1] on the remote control or the CHANNEL buttons (o/p). ¡When you use the A/V input jacks on the front of the DVD/VCR, select "L2" position by pressing [0], [0], [2] on the TV and set the TV to channel 3 or 4. ¡Now set in monaural (MONO) mode, ... selected on the TV. 2 Press the VCR/TV button on the recording VCR so that the VCR/TV Light comes on the back of the DVD /VCR to MTS mode. Hi-Fi audio track (2-channel) L-channel R-channel Mono Mono Normal audio track Mono Stereo broadcast Bilingual broadcast Stereo & Bilingual broadcast...
... select "L1" position by pressing [0], [0], [1] on the remote control or the CHANNEL buttons (o/p). ¡When you use the A/V input jacks on the front of the DVD/VCR, select "L2" position by pressing [0], [0], [2] on the TV and set the TV to channel 3 or 4. ¡Now set in monaural (MONO) mode, ... selected on the TV. 2 Press the VCR/TV button on the recording VCR so that the VCR/TV Light comes on the back of the DVD /VCR to MTS mode. Hi-Fi audio track (2-channel) L-channel R-channel Mono Mono Normal audio track Mono Stereo broadcast Bilingual broadcast Stereo & Bilingual broadcast...


