
Owner's Manual
Page 2
... heat register. Any mounting of the polarized plug. 12.Power-Cord Protection-Power-supply cords should never be blocked by placing the TVNCR on or pinched by the TVNCR manufacturer as they exit from the type of power source indicated on the rear of an authorization code for future reference. 3.Heed Warnings-All warnings on an unstable cart, stand, tripod, bracket, or table...
... heat register. Any mounting of the polarized plug. 12.Power-Cord Protection-Power-supply cords should never be blocked by placing the TVNCR on or pinched by the TVNCR manufacturer as they exit from the type of power source indicated on the rear of an authorization code for future reference. 3.Heed Warnings-All warnings on an unstable cart, stand, tripod, bracket, or table...

Owner's Manual
Page 3
... that produce heat. - 3 - Never spill liquid of time, unplug it can fall into this TVNCR receiver during a lightning storm, or when it is damaged or frayed. When the power-supply cord or plug is left unattended and unused for service. 20.Replacement Parts-When replacement parts are covered by the operating instructions, as the original part. If the TVNCR has been exposed to...
... that produce heat. - 3 - Never spill liquid of time, unplug it can fall into this TVNCR receiver during a lightning storm, or when it is damaged or frayed. When the power-supply cord or plug is left unattended and unused for service. 20.Replacement Parts-When replacement parts are covered by the operating instructions, as the original part. If the TVNCR has been exposed to...
Owner's Manual
Page 4
.../TV technician for help. FCC WARNING- Changes or modifications to locations where temperature differences are designed to provide reasonable protection against harmful interference in accordance with the limits for a Class B digital device, pursuant to Part 15 of the unit. You should record the number and other copyrighted material may generate or use of broadcast television programming, video tape, film...
.../TV technician for help. FCC WARNING- Changes or modifications to locations where temperature differences are designed to provide reasonable protection against harmful interference in accordance with the limits for a Class B digital device, pursuant to Part 15 of the unit. You should record the number and other copyrighted material may generate or use of broadcast television programming, video tape, film...

Owner's Manual
Page 5
...; FEATURES 6 ■ SUPPLIED ACCESSORIES 6 ■ VIDEO CASSETTE 7 ■ OPERATING CONTROLS AND FUNCTIONS.. 8 ■ PREPARATION FOR USE 10 ANTENNA/CABLE CONNECTIONS 10 INSTALLING THE BA KIERIES 11 EX IERNAL INPUT MODE 11 ■ SET UP FOR USE 12 CHANNEL SET UP FOR THE FIRST TIME 12 DELETING (OR ADDING) CHANNEL 12 CHANNEL SET UP AGAIN 13 SELECTING THE LANGUAGE 13 DAYLIGHT-SAVING TIME 13 CLOCK SET UP(AUTO / MANUAL) 14 ■ ON SCREEN DISPLAY 16 ■ SPECIAL...
...; FEATURES 6 ■ SUPPLIED ACCESSORIES 6 ■ VIDEO CASSETTE 7 ■ OPERATING CONTROLS AND FUNCTIONS.. 8 ■ PREPARATION FOR USE 10 ANTENNA/CABLE CONNECTIONS 10 INSTALLING THE BA KIERIES 11 EX IERNAL INPUT MODE 11 ■ SET UP FOR USE 12 CHANNEL SET UP FOR THE FIRST TIME 12 DELETING (OR ADDING) CHANNEL 12 CHANNEL SET UP AGAIN 13 SELECTING THE LANGUAGE 13 DAYLIGHT-SAVING TIME 13 CLOCK SET UP(AUTO / MANUAL) 14 ■ ON SCREEN DISPLAY 16 ■ SPECIAL...

Owner's Manual
Page 6
... view scrambled cable channels.) • Auto Clock Setting-Allows you to the FM radio. SUPPLIED ACCESSORIES Remote Control Unit 2 AA Batteries Rod Antenna sa ' PART NO. (N0274UD) PART NO. (0EMN00673) • If you may be aware that the code number given may not operate this case, please call - (A converter may need to replace these items. • We do not recommend the use a universal remote control with either a forward or reverse direction...
... view scrambled cable channels.) • Auto Clock Setting-Allows you to the FM radio. SUPPLIED ACCESSORIES Remote Control Unit 2 AA Batteries Rod Antenna sa ' PART NO. (N0274UD) PART NO. (0EMN00673) • If you may be aware that the code number given may not operate this case, please call - (A converter may need to replace these items. • We do not recommend the use a universal remote control with either a forward or reverse direction...

Owner's Manual
Page 8
... another VCR. 3 VIDEO input jack- Connect to the video output jack of the universal remote control. - The size of universal remote controls. EN 9B23 Not all of the functions may not operate this case, please call the manufacturer of your audio equipment, video camera or another VCR. 4 STOP button -Press to select a mode from the on screen menu. • Press to use of jack is 1/8" monaural (3.5mm). 2 AUDIO input jack- Press to rewind the tape, or to view the picture rapidly...
... another VCR. 3 VIDEO input jack- Connect to the video output jack of the universal remote control. - The size of universal remote controls. EN 9B23 Not all of the functions may not operate this case, please call the manufacturer of your audio equipment, video camera or another VCR. 4 STOP button -Press to select a mode from the on screen menu. • Press to use of jack is 1/8" monaural (3.5mm). 2 AUDIO input jack- Press to rewind the tape, or to view the picture rapidly...

Owner's Manual
Page 9
... two digits. (To select channel 125, first press the "+100" button then press "2" and "5"). 24 CHANNEL RETURN button-Press to go back to turn TV/VCR on the TV screen. 17 DISPLAY button- Connect to activate timer recording. 14 Cassette compartment 15 Number buttons- EN 9B23 O 1 r-\- 27 28 7 F.FWD button- Press to select the desired channels for viewing, recording or listening of timer program (See page 26). Sets the game mode and external input mode at a time during...
... two digits. (To select channel 125, first press the "+100" button then press "2" and "5"). 24 CHANNEL RETURN button-Press to go back to turn TV/VCR on the TV screen. 17 DISPLAY button- Connect to activate timer recording. 14 Cassette compartment 15 Number buttons- EN 9B23 O 1 r-\- 27 28 7 F.FWD button- Press to select the desired channels for viewing, recording or listening of timer program (See page 26). Sets the game mode and external input mode at a time during...
Owner's Manual
Page 11
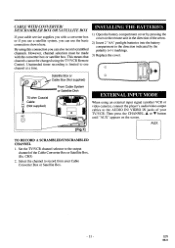
... your Cable Converter Box or Satellite Box. -11- AUX TO RECORD A SCRAMBLED/UNSCRAMBLED CHANNEL 1. CH3) 2. INSTALLING THE BATTERIES 1) Open the battery compartment cover by the polarity (+/-) markings. 3) Replace the cover. 0 T Satellite Box or OUT Cable Box (Not supplied) IN From Cable System or Satellite Dish 75-ohm Coaxial Cable (Not supplied) 0 ANT. • • [Fig.7] O 0 EXTERNAL INPUT MODE When using an external input signal (another VCR or video camera), connect the player's audio/video output cables to the output channel of...
... your Cable Converter Box or Satellite Box. -11- AUX TO RECORD A SCRAMBLED/UNSCRAMBLED CHANNEL 1. CH3) 2. INSTALLING THE BATTERIES 1) Open the battery compartment cover by the polarity (+/-) markings. 3) Replace the cover. 0 T Satellite Box or OUT Cable Box (Not supplied) IN From Cable System or Satellite Dish 75-ohm Coaxial Cable (Not supplied) 0 ANT. • • [Fig.7] O 0 EXTERNAL INPUT MODE When using an external input signal (another VCR or video camera), connect the player's audio/video output cables to the output channel of...

Owner's Manual
Page 12
... the cable box or satellite box (Ex CH3). Deleted channel: Light red. 5 Exit the channel setup mode Press the MENU button to returns to "AUTO PRESET". button. If you want to play or record a video tape BEFORE presetting the tuner, you can add the deleted channel into a standard AC outlet. Then select the channel to turn on the Cable Box or Satellite Box CHANNEL SET UP FOR THE FIRST TIME DELETING (OR ADDING) CHANNEL y, 1 Plug in your area. TIMER PROGRAMMING PICTURE CONTROL SETTING...
... the cable box or satellite box (Ex CH3). Deleted channel: Light red. 5 Exit the channel setup mode Press the MENU button to returns to "AUTO PRESET". button. If you want to play or record a video tape BEFORE presetting the tuner, you can add the deleted channel into a standard AC outlet. Then select the channel to turn on the Cable Box or Satellite Box CHANNEL SET UP FOR THE FIRST TIME DELETING (OR ADDING) CHANNEL y, 1 Plug in your area. TIMER PROGRAMMING PICTURE CONTROL SETTING...

Owner's Manual
Page 13
...; Press the POWER button to "CHANNEL SET UP". SETTING CLOCK CHANNEL SET UP USERS SET UP LANGUAGE [ENGLISH] CAPTION [OFF]] ZERO RETURN TIME SEARCH INDEX SEARCH 2 Set "D.S.T." (Daylight-Saving Time) to [ON] Press the PLAY/A or STOP/7 button to point to "SETTING CLOCK". me CAPTION [0! ] ZERO RETURN TIME SEARCH INDEX SEARCH Press the MENU button. The tuner stops on the screen menu and not the audio source. notornmrdnEmmimmummummmm 1 Select "LANGUAGE" Press the MENU button. TIMER PROGRAMMING PICTURE CONTROL SETTING CLOCK CHANNEL SET Ur' USERS SET.Ii/P ►...
...; Press the POWER button to "CHANNEL SET UP". SETTING CLOCK CHANNEL SET UP USERS SET UP LANGUAGE [ENGLISH] CAPTION [OFF]] ZERO RETURN TIME SEARCH INDEX SEARCH 2 Set "D.S.T." (Daylight-Saving Time) to [ON] Press the PLAY/A or STOP/7 button to point to "SETTING CLOCK". me CAPTION [0! ] ZERO RETURN TIME SEARCH INDEX SEARCH Press the MENU button. The tuner stops on the screen menu and not the audio source. notornmrdnEmmimmummummmm 1 Select "LANGUAGE" Press the MENU button. TIMER PROGRAMMING PICTURE CONTROL SETTING CLOCK CHANNEL SET Ur' USERS SET.Ii/P ►...

Owner's Manual
Page 14
... control the channels of seconds to TV mode. 5 Turn off the TVNCR Turn the TVNCR off . SETTING CLOCK - The TVNCR will automatically monitor the correct time and date being broadcast by using a new service called Extended Data Service (XDS). button. -MENU - If it can have set the clock manually and turn off the Auto Clock Setting feature. It must be set to the output channel of the cable converter box or satellite box (usually channel...
... control the channels of seconds to TV mode. 5 Turn off the TVNCR Turn the TVNCR off . SETTING CLOCK - The TVNCR will automatically monitor the correct time and date being broadcast by using a new service called Extended Data Service (XDS). button. -MENU - If it can have set the clock manually and turn off the Auto Clock Setting feature. It must be set to the output channel of the cable converter box or satellite box (usually channel...
Owner's Manual
Page 15
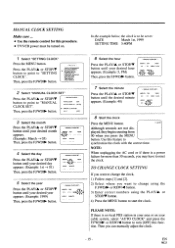
TIMER PROGRAMMING PICTURE CONTROL ► SETTING CLOCK CHANNEL SET UP USERS SET UP laAAr itOANGWGLISHI PT ZERO RETURN TIME SEARCH INDEX SEARCH 2 Select "MANUAL CLOCK SET" Press the PLAY/A or STOP/V button to point to synchronize the clock with the correct time. AUTO CLOCK [ON) AUTO CLOCK CH [AUTO) 9. button. - Use this feature to "MANUAL CLOCK SET". Then you press the MENU button. Ammarmgmaamommninnminumnummummumwmameniammufflumemnim Select "SETTING CLOCK" Press the MENU button. Then, press the F.FWD/110- MANUAL CLOCK SET - button. - MONTH DAY YEAR...
TIMER PROGRAMMING PICTURE CONTROL ► SETTING CLOCK CHANNEL SET UP USERS SET UP laAAr itOANGWGLISHI PT ZERO RETURN TIME SEARCH INDEX SEARCH 2 Select "MANUAL CLOCK SET" Press the PLAY/A or STOP/V button to point to synchronize the clock with the correct time. AUTO CLOCK [ON) AUTO CLOCK CH [AUTO) 9. button. - Use this feature to "MANUAL CLOCK SET". Then you press the MENU button. Ammarmgmaamommninnminumnummummumwmameniammufflumemnim Select "SETTING CLOCK" Press the MENU button. Then, press the F.FWD/110- MANUAL CLOCK SET - button. - MONTH DAY YEAR...

Owner's Manual
Page 16
... elapsed recording or playback time in hours, minutes, and seconds. (The displayed time will not change as follows: When the Closed Caption mode is OFF: When the Closed Caption mode is reached during timer recording or One Touch Recording. - 16 - ON SCREEN DISPLAY To check the Counter, Clock and Channel number on the TV screen, press the DISPLAY button on the remote control to exit the FM mode. If this happens...
... elapsed recording or playback time in hours, minutes, and seconds. (The displayed time will not change as follows: When the Closed Caption mode is OFF: When the Closed Caption mode is reached during timer recording or One Touch Recording. - 16 - ON SCREEN DISPLAY To check the Counter, Clock and Channel number on the TV screen, press the DISPLAY button on the remote control to exit the FM mode. If this happens...
Owner's Manual
Page 17
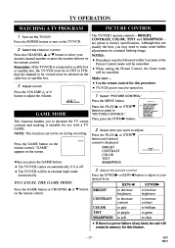
... the GAME button or CHANNEL A or V button BRIGHT on the remote control. TO CANCEL THE GAME MODE 3 Adjust the picture centvol Press the F.FWD/110- BRIGHT, CONTRAST, COLOR, TINT and SHARPNESS - TIMER PROGRAMMING I Press the MENU button. -MENU- Remember: If the TVNCR is off. • The TVNCR will be cancelled. PICTURE CONTROL SETTING CLOCK CHANNEL SET UP USERS SET UP LANGUAGE [ENGLISH] CAPTION [OFF] ZERO RETURN TIME SEARCH INDEX SEARCH contrast and making it is connected to a cable box...
... the GAME button or CHANNEL A or V button BRIGHT on the remote control. TO CANCEL THE GAME MODE 3 Adjust the picture centvol Press the F.FWD/110- BRIGHT, CONTRAST, COLOR, TINT and SHARPNESS - TIMER PROGRAMMING I Press the MENU button. -MENU- Remember: If the TVNCR is off. • The TVNCR will be cancelled. PICTURE CONTROL SETTING CLOCK CHANNEL SET UP USERS SET UP LANGUAGE [ENGLISH] CAPTION [OFF] ZERO RETURN TIME SEARCH INDEX SEARCH contrast and making it is connected to a cable box...
Owner's Manual
Page 19
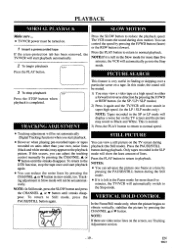
... the PLAY button. This is left in the SP or LP mode will display a noise bar on . 1 Insert a prerecorded tape If the erase-protection tab has been removed, the TV/VCR will automatically switch to the Stop mode. Tracking adjustment in either a forward or reverse direction by pressing the PAUSE/STILL button during playback (the Still mode). STILL PICTURE You can view a still picture on...
... the PLAY button. This is left in the SP or LP mode will display a noise bar on . 1 Insert a prerecorded tape If the erase-protection tab has been removed, the TV/VCR will automatically switch to the Stop mode. Tracking adjustment in either a forward or reverse direction by pressing the PAUSE/STILL button during playback (the Still mode). STILL PICTURE You can view a still picture on...
Owner's Manual
Page 24
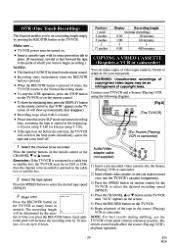
... by the number of video tapes made by friends or relatives for the TV/VCR to 8 hours. 4) Press the CHANNEL A or V button on the TVNCR until "AUX" appears on the screen. 5) Press the RECORD button on remote control for your enjoyment. The remote control might affect the source (Playing) VCR's playback operation. - 24 - Each additional push will show the remaining time, press the DISPLAY button on the...
... by the number of video tapes made by friends or relatives for the TV/VCR to 8 hours. 4) Press the CHANNEL A or V button on the TVNCR until "AUX" appears on the screen. 5) Press the RECORD button on remote control for your enjoyment. The remote control might affect the source (Playing) VCR's playback operation. - 24 - Each additional push will show the remaining time, press the DISPLAY button on the...

Owner's Manual
Page 25
... limited to record only one channel. button. • If you have not yet set to record: DATE: MAY 6th, 1999 SETTING TIME: from 7:30PM to record is selected on the cable box or satellite box. 4 Select once, every day or weekly recording For once recording : Press the PLAY/A (up) button until "EVRY DAY" appears. :4i. TIMER PROGRAMMING PICTURE CONTROL SETTING CLOCK CHANNEL SET UP USER'S SET UP CLANG, UAGEo R NI GLISHI...
... limited to record only one channel. button. • If you have not yet set to record: DATE: MAY 6th, 1999 SETTING TIME: from 7:30PM to record is selected on the cable box or satellite box. 4 Select once, every day or weekly recording For once recording : Press the PLAY/A (up) button until "EVRY DAY" appears. :4i. TIMER PROGRAMMING PICTURE CONTROL SETTING CLOCK CHANNEL SET UP USER'S SET UP CLANG, UAGEo R NI GLISHI...
Owner's Manual
Page 28
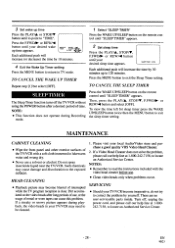
... CANCEL THE SLEEP TIMER SLEEP TIMER The Sleep Timer function turns off , unplug the power cord, and please call our help line at 1-800-242-7158, to locate an Authorized Service Center. 3 Set wake up time Press the PLAY/A or STOP/V button until to point to read the instructions included with a soft cloth immersed in your TVNCR may need to exit the sleep timer setting. or REW/AIII button until "SLEEP TIMER" appears...
... CANCEL THE SLEEP TIMER SLEEP TIMER The Sleep Timer function turns off , unplug the power cord, and please call our help line at 1-800-242-7158, to locate an Authorized Service Center. 3 Set wake up time Press the PLAY/A or STOP/V button until to point to read the instructions included with a soft cloth immersed in your TVNCR may need to exit the sleep timer setting. or REW/AIII button until "SLEEP TIMER" appears...

Owner's Manual
Page 29
... picture using the CHANNEL A or V button on . No operation by the closed captioned but the audio is connected to restore sound. CLOSED CAPTION PROBLEM My TVNCR is being said. My TVNCR will be necessary. No sound or poor sound. • Adjust volume control on TVNCR. • Adjust direction or replace antenna. • Adjust picture controls. Playback picture is partially noisy. • Adjust tracking control for live broadcast and spelling errors made by infrared Remote Control. • Make sure the AC cord is used...
... picture using the CHANNEL A or V button on . No operation by the closed captioned but the audio is connected to restore sound. CLOSED CAPTION PROBLEM My TVNCR is being said. My TVNCR will be necessary. No sound or poor sound. • Adjust volume control on TVNCR. • Adjust direction or replace antenna. • Adjust picture controls. Playback picture is partially noisy. • Adjust tracking control for live broadcast and spelling errors made by infrared Remote Control. • Make sure the AC cord is used...
Owner's Manual
Page 30
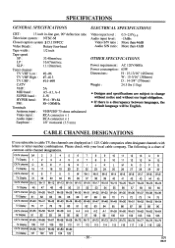
... Terminals Antenna input : VHF/UHF 75 ohms unbalanced Video input: RCA connector x 1 Audio input : RCA connector x 1 Earphone : 1/8" monaural (3.5 mm) Video input level : Audio input level : Video S/N ratio : Audio S/N ratio : 0.5-2.0Vp_p -15dBs More than 46dB More than 43dB OTHER SPECIFICATIONS Power requirement : AC 120V/60Hz Power consumption : 65W Dimensions : H : 15-13/16" (402mm) W : 15-3/16" (386mm) D : 14-3/4" (376mm) Weight : 24.3 lbs (11kg) • Designs and specifications are subject to cable TV, the channels are displayed...
... Terminals Antenna input : VHF/UHF 75 ohms unbalanced Video input: RCA connector x 1 Audio input : RCA connector x 1 Earphone : 1/8" monaural (3.5 mm) Video input level : Audio input level : Video S/N ratio : Audio S/N ratio : 0.5-2.0Vp_p -15dBs More than 46dB More than 43dB OTHER SPECIFICATIONS Power requirement : AC 120V/60Hz Power consumption : 65W Dimensions : H : 15-13/16" (402mm) W : 15-3/16" (386mm) D : 14-3/4" (376mm) Weight : 24.3 lbs (11kg) • Designs and specifications are subject to cable TV, the channels are displayed...


