Operating Instructions
Page 1
4-156-541-14(1) Linear PCM Recorder Operating Instructions Getting Started Basic Operations Other Recording Operations Other Playback Operations Editing Tracks About the Menu Function Utilizing Your Computer Additional Information Troubleshooting Index PCM-M10 © 2009 Sony Corporation Printed in China
4-156-541-14(1) Linear PCM Recorder Operating Instructions Getting Started Basic Operations Other Recording Operations Other Playback Operations Editing Tracks About the Menu Function Utilizing Your Computer Additional Information Troubleshooting Index PCM-M10 © 2009 Sony Corporation Printed in China
Operating Instructions
Page 2
... this product, you call : Sony Customer Information Service Center 1-800-222-7669 or http://www.sony.com/ Declaration of Conformity Trade Name : SONY Mode : PCM-M10 Responsible Party : Sony Electronics Inc. Consult the dealer or an experienced radio/TV technician for a Class B digital device, pursuant to Part 15 ...or television reception, which the receiver is subject to the following two conditions: (1) this equipment. Operation is connected. Owner's Record The model number is located at the rear panel and the serial number is encouraged to try to correct the interference by ...
... this product, you call : Sony Customer Information Service Center 1-800-222-7669 or http://www.sony.com/ Declaration of Conformity Trade Name : SONY Mode : PCM-M10 Responsible Party : Sony Electronics Inc. Consult the dealer or an experienced radio/TV technician for a Class B digital device, pursuant to Part 15 ...or television reception, which the receiver is subject to the following two conditions: (1) this equipment. Operation is connected. Owner's Record The model number is located at the rear panel and the serial number is encouraged to try to correct the interference by ...
Operating Instructions
Page 3
...PCM-M10 linear PCM Recorder. IN NO EVENT SHALL SONY CORPORATION BE LIABLE FOR ANY INCIDENTAL, CONSEQUENTIAL OR SPECIAL DAMAGES, WHETHER BASED ON TORT, CONTRACT, OR OTHERWISE, ARISING OUT OF OR IN CONNECTION WITH THIS MANUAL, THE SOFTWARE OR OTHER INFORMATION CONTAINED HEREIN OR THE USE THEREOF. You cannot connect other linear PCM recorders... and characters, the text shown on the PCM recorder may also be reproduced, translated or reduced to any modification to this limit requires permission of a separate user license agreement. Sony Corporation reserves the right to make any machine...
...PCM-M10 linear PCM Recorder. IN NO EVENT SHALL SONY CORPORATION BE LIABLE FOR ANY INCIDENTAL, CONSEQUENTIAL OR SPECIAL DAMAGES, WHETHER BASED ON TORT, CONTRACT, OR OTHERWISE, ARISING OUT OF OR IN CONNECTION WITH THIS MANUAL, THE SOFTWARE OR OTHER INFORMATION CONTAINED HEREIN OR THE USE THEREOF. You cannot connect other linear PCM recorders... and characters, the text shown on the PCM recorder may also be reproduced, translated or reduced to any modification to this limit requires permission of a separate user license agreement. Sony Corporation reserves the right to make any machine...

Operating Instructions
Page 4
... adaptor 15 Step 3: Turning the PCM recorder On ....16 Turning the power on a memory card 36 Recording across memory media - Table of Contents Techniques for Better Recording 7 Getting Started Step 1: Checking the Contents of the PCM recorder 21 Basic Operations Recording 22 Listening 26 Deleting 30 Other Recording Operations Changing the Recording Method 32 Recording using the menu ........17 Step...
... adaptor 15 Step 3: Turning the PCM recorder On ....16 Turning the power on a memory card 36 Recording across memory media - Table of Contents Techniques for Better Recording 7 Getting Started Step 1: Checking the Contents of the PCM recorder 21 Basic Operations Recording 22 Listening 26 Deleting 30 Other Recording Operations Changing the Recording Method 32 Recording using the menu ........17 Step...
Operating Instructions
Page 5
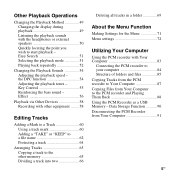
... headphones or external speakers 50 Quickly locating the point you wish to the PCM recorder and Playing Them Back 88 Using the PCM Recorder as a USB Memory - Data Storage Function ...........90 Disconnecting the PCM Recorder from Your Computer to start playback - Other Playback Operations Changing the Playback...49 Changing the display during playback 49 Listening the playback sounds with Your Computer 83 Connecting the PCM recorder to your computer 84 Structure of folders and files 85 Copying Tracks from the PCM recorder to Your Computer 87 Copying Files from Your Computer 91 5GB
... headphones or external speakers 50 Quickly locating the point you wish to the PCM recorder and Playing Them Back 88 Using the PCM Recorder as a USB Memory - Data Storage Function ...........90 Disconnecting the PCM Recorder from Your Computer to start playback - Other Playback Operations Changing the Playback...49 Changing the display during playback 49 Listening the playback sounds with Your Computer 83 Connecting the PCM recorder to your computer 84 Structure of folders and files 85 Copying Tracks from the PCM recorder to Your Computer 87 Copying Files from Your Computer 91 5GB

Operating Instructions
Page 6
... Stick™ media for personal enjoyment and use without the permission of use only. M2™ is prohibited. In this booklet, M2™ is for recording copyright-protected graphics or other forms of the copyright holders. Additional Information Precautions 92 Specifications 95 System requirements 95 Battery life 100 Troubleshooting Troubleshooting 102...
... Stick™ media for personal enjoyment and use without the permission of use only. M2™ is prohibited. In this booklet, M2™ is for recording copyright-protected graphics or other forms of the copyright holders. Additional Information Precautions 92 Specifications 95 System requirements 95 Battery life 100 Troubleshooting Troubleshooting 102...
Operating Instructions
Page 7
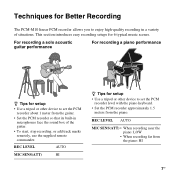
... • Use a tripod or other device to set the PCM recorder about 1 meter from the piano: HI 7GB Techniques for Better Recording The PCM-M10 linear PCM recorder allows you to enjoy high-quality recording in microphones face the sound box of situations. For recording a solo acoustic guitar performance For recording a piano performance z Tips for setup • Use a tripod or...
... • Use a tripod or other device to set the PCM recorder about 1 meter from the piano: HI 7GB Techniques for Better Recording The PCM-M10 linear PCM recorder allows you to enjoy high-quality recording in microphones face the sound box of situations. For recording a solo acoustic guitar performance For recording a piano performance z Tips for setup • Use a tripod or...
Operating Instructions
Page 8
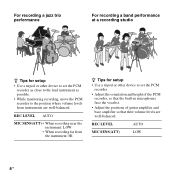
...or other device to set the PCM recorder as close to the lead instrument as possible. • While monitoring recording, move the PCM recorder to the position where volume levels from the instrument: HI z Tips for setup • Use a tripod or other device to set the PCM recorder. • Adjust the orientation... and height of the PCM recorder, so that the built-in microphones face the vocalist. • Adjust the positions of guitar amplifier and base ...
...or other device to set the PCM recorder as close to the lead instrument as possible. • While monitoring recording, move the PCM recorder to the position where volume levels from the instrument: HI z Tips for setup • Use a tripod or other device to set the PCM recorder. • Adjust the orientation... and height of the PCM recorder, so that the built-in microphones face the vocalist. • Adjust the positions of guitar amplifier and base ...
Operating Instructions
Page 9
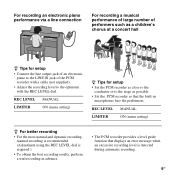
... setup • Set the PCM recorder as possible. • Set the PCM recorder so that the built-in advance. • The PCM recorder provides a level guide function that displays an error message when an excessive recording level is required.) • To obtain the best recording results, perform a trial recording in microphones face the performers. For recording an electronic piano performance...
... setup • Set the PCM recorder as possible. • Set the PCM recorder so that the built-in advance. • The PCM recorder provides a level guide function that displays an error message when an excessive recording level is required.) • To obtain the best recording results, perform a trial recording in microphones face the performers. For recording an electronic piano performance...

Operating Instructions
Page 10
... an introduction to operate this equipment. 10 GB You are cautioned that supports editing and CD creation on the display window before you use the PCM recorder. Remote commander (1) AC power adaptor (3V) (1) LR6 (size AA) alkaline batteries (2) Hand strap (1) CD-ROM (1) (Sound Forge Audio Studio LE... not expressly approved in this manual could void your computer. Getting Started Step 1: Checking the Contents of the Package Linear PCM recorder (1) USB connecting cable (1) Remove the film on your authority to installation of the software, see the "Sound Forge™ Audio Studio ...
... an introduction to operate this equipment. 10 GB You are cautioned that supports editing and CD creation on the display window before you use the PCM recorder. Remote commander (1) AC power adaptor (3V) (1) LR6 (size AA) alkaline batteries (2) Hand strap (1) CD-ROM (1) (Sound Forge Audio Studio LE... not expressly approved in this manual could void your computer. Getting Started Step 1: Checking the Contents of the Package Linear PCM recorder (1) USB connecting cable (1) Remove the film on your authority to installation of the software, see the "Sound Forge™ Audio Studio ...

Operating Instructions
Page 11
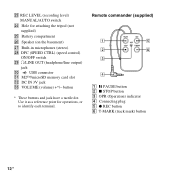
Getting Started Index to parts and controls Front L (repeat) A-B button M DISPLAY button N REC LEVEL (recording level) dial O POWER/HOLD switch P REMOTE jack Q ACCESS indicator R T-MARK (track mark) button S Strap hole Rear A Peak level L/R (-12 dB... F > FF/ v (fast-forward/up) button G . FR/ V (fast-rewind/down) button H x STOP button I X PAUSE button/indicator J N PLAY/ENTER button/indicator* K z REC (record) button/indicator T LINE IN (line input) jack U MIC SENS(ATT) (microphone sensitivity (attenuator)) HI/LOW (high/ low) switch V m (microphone) jack (Plug In Power compatible)* 11GB
Getting Started Index to parts and controls Front L (repeat) A-B button M DISPLAY button N REC LEVEL (recording level) dial O POWER/HOLD switch P REMOTE jack Q ACCESS indicator R T-MARK (track mark) button S Strap hole Rear A Peak level L/R (-12 dB... F > FF/ v (fast-forward/up) button G . FR/ V (fast-rewind/down) button H x STOP button I X PAUSE button/indicator J N PLAY/ENTER button/indicator* K z REC (record) button/indicator T LINE IN (line input) jack U MIC SENS(ATT) (microphone sensitivity (attenuator)) HI/LOW (high/ low) switch V m (microphone) jack (Plug In Power compatible)* 11GB
Operating Instructions
Page 12
.../line output) jack e; Remote commander (supplied) 1 X PAUSE button 2 x STOP button 3 OPR (Operation) indicator 4 Connecting plug 5 z REC button 6 T-MARK (track mark) button 12 GB W REC LEVEL (recording level) MANUAL/AUTO switch X Hole for operations, or to identify each terminal.
.../line output) jack e; Remote commander (supplied) 1 X PAUSE button 2 x STOP button 3 OPR (Operation) indicator 4 Connecting plug 5 z REC button 6 T-MARK (track mark) button 12 GB W REC LEVEL (recording level) MANUAL/AUTO switch X Hole for operations, or to identify each terminal.

Operating Instructions
Page 13
...down until the lid is detached Getting Started 2 Insert the two supplied LR6 (size AA) alkaline batteries into the opening on the PCM recorder (1), and then align the other projected part of the lid along the slit of the battery compartment lid into the battery compartment, and... then close the lid. If this occurs, insert a projected part at one end of the PCM recorder (2) as illustrated above. When using rechargeable batteries You can use rechargeable 13GB Step 2: Inserting the Batteries 1 Slide and lift the battery compartment...
...down until the lid is detached Getting Started 2 Insert the two supplied LR6 (size AA) alkaline batteries into the opening on the PCM recorder (1), and then align the other projected part of the lid along the slit of the battery compartment lid into the battery compartment, and... then close the lid. If this occurs, insert a projected part at one end of the PCM recorder (2) as illustrated above. When using rechargeable batteries You can use rechargeable 13GB Step 2: Inserting the Batteries 1 Slide and lift the battery compartment...

Operating Instructions
Page 14
..., the clock continues moving for the Menu" on the display shows the battery condition. Quick battery charger for the PCM recorder: - Replace two old batteries with new ones soon. Nickel metal hydride rechargeable battery: NH-AA-B2K - m : "Change Battery" ...appears and the PCM recorder will be displayed more precisely. Battery remain indication : "Low Battery Level" appears. With this PCM recorder. • When replacing the batteries, tracks recorded are inserted, the battery indicator may not show the full status. • ...
..., the clock continues moving for the Menu" on the display shows the battery condition. Quick battery charger for the PCM recorder: - Replace two old batteries with new ones soon. Nickel metal hydride rechargeable battery: NH-AA-B2K - m : "Change Battery" ...appears and the PCM recorder will be displayed more precisely. Battery remain indication : "Low Battery Level" appears. With this PCM recorder. • When replacing the batteries, tracks recorded are inserted, the battery indicator may not show the full status. • ...

Operating Instructions
Page 16
... period of "POWER" for more than 1 second. During this time, do not remove or insert batteries and do not use the PCM recorder for about 10 minutes or longer, the window display turns off automatically and the PCM recorder enters the sleep mode. Turning the power off and remove the batteries. • When the...
... period of "POWER" for more than 1 second. During this time, do not remove or insert batteries and do not use the PCM recorder for about 10 minutes or longer, the window display turns off automatically and the PCM recorder enters the sleep mode. Turning the power off and remove the batteries. • When the...

Operating Instructions
Page 17
Setting the clock using the menu While the PCM recorder is turned on before recording, the recording's date and time will be correctly saved. FR/ V to set month, day, hour, and minute in the stop mode. 17GB When the PCM recorder is in the stop mode display. Then the "Clock" display ...of the clock. Getting Started Step 4: Setting the Clock > FF/ v, . N PLAY/ ENTER x STOP Recorded audio files (tracks) are named using the menu. 1 Select "Clock" ...
Setting the clock using the menu While the PCM recorder is turned on before recording, the recording's date and time will be correctly saved. FR/ V to set month, day, hour, and minute in the stop mode. 17GB When the PCM recorder is in the stop mode display. Then the "Clock" display ...of the clock. Getting Started Step 4: Setting the Clock > FF/ v, . N PLAY/ ENTER x STOP Recorded audio files (tracks) are named using the menu. 1 Select "Clock" ...

Operating Instructions
Page 18
... within 1 minute of entering the clock setting data, the clock setting mode is reset to the stop mode display. P Notes • If you leave the PCM recorder for approximately 3 minutes or longer, with no batteries inserted, the clock is cancelled and the window will be displayed. 3 Press > FF/ v or . 1 Press MENU to...
... within 1 minute of entering the clock setting data, the clock setting mode is reset to the stop mode display. P Notes • If you leave the PCM recorder for approximately 3 minutes or longer, with no batteries inserted, the clock is cancelled and the window will be displayed. 3 Press > FF/ v or . 1 Press MENU to...

Operating Instructions
Page 21
...commander connected to prevent accidental operation. Unlocking the buttons of the PCM recorder Slide the POWER/HOLD switch towards the center so that all the functions of the buttons of the PCM recorder are locked to the PCM recorder. 21GB P Note When the HOLD function is activated, you ...can start, pause, or stop recording, cancel the HOLD function first. Getting Started Preventing Accidental Operation - HOLD...
...commander connected to prevent accidental operation. Unlocking the buttons of the PCM recorder Slide the POWER/HOLD switch towards the center so that all the functions of the buttons of the PCM recorder are locked to the PCM recorder. 21GB P Note When the HOLD function is activated, you ...can start, pause, or stop recording, cancel the HOLD function first. Getting Started Preventing Accidental Operation - HOLD...

Operating Instructions
Page 22
Basic Operations Recording P Note Before making a recording, turn on the power of the PCM recorder. Selecting a folder 1 Press to display the folder selection window in which you purchase the PCM recorder, there are 10 folders already available. > FF/ v . FR/ V to record tracks ( FOLDER01-10). When you want to select the folder in the stop mode. 2 Press > FF/ v or . FR/ V 3 Press N PLAY/ENTER. 22 GB N PLAY/ ENTER
Basic Operations Recording P Note Before making a recording, turn on the power of the PCM recorder. Selecting a folder 1 Press to display the folder selection window in which you purchase the PCM recorder, there are 10 folders already available. > FF/ v . FR/ V to record tracks ( FOLDER01-10). When you want to select the folder in the stop mode. 2 Press > FF/ v or . FR/ V 3 Press N PLAY/ENTER. 22 GB N PLAY/ ENTER

Operating Instructions
Page 23
...sensitivity with the MIC SENS(ATT) switch. 2 Turn the built-in microphones in the direction of the source to be recorded at the end in orange (Recording Standby mode). The new track will be adjusted automatically. phones X PAUSE N PLAY/ ENTER 23GB The REC LEVEL dial... adjustment is enabled when you select "AUTO," the recording level will be recorded, and press X PAUSE, or N PLAY/ENTER. Basic Operations Starting recording (automatic recording) 1 Set the REC LEVEL switch to "AUTO," and press z REC in R micro- z REC X ...
...sensitivity with the MIC SENS(ATT) switch. 2 Turn the built-in microphones in the direction of the source to be recorded at the end in orange (Recording Standby mode). The new track will be adjusted automatically. phones X PAUSE N PLAY/ ENTER 23GB The REC LEVEL dial... adjustment is enabled when you select "AUTO," the recording level will be recorded, and press X PAUSE, or N PLAY/ENTER. Basic Operations Starting recording (automatic recording) 1 Set the REC LEVEL switch to "AUTO," and press z REC in R micro- z REC X ...


