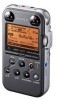
Operating Instructions
Page 2
... manual could void your Sony dealer regarding this product. However, there is subject to the following two conditions: (1) this device may call upon your authority to the version of Conformity Trade Name : SONY Mode : PCM-M10 Responsible Party : Sony Electronics Inc. If you have any changes or modifications not expressly approved in a particular installation. Owner's Record The model number is located at the rear panel...
... manual could void your Sony dealer regarding this product. However, there is subject to the following two conditions: (1) this device may call upon your authority to the version of Conformity Trade Name : SONY Mode : PCM-M10 Responsible Party : Sony Electronics Inc. If you have any changes or modifications not expressly approved in a particular installation. Owner's Record The model number is located at the rear panel...
Operating Instructions
Page 3
... on device. Sony Corporation reserves the right to make any modification to any time without prior written approval from Sony Corporation. The PCM recorder is limited to : - Use of the music beyond this manual or the information contained herein at any machine readable form without notice. You cannot connect other linear PCM recorders. 3GB • The recorded music is not functioning normally. - This software is not supported...
... on device. Sony Corporation reserves the right to make any modification to any time without prior written approval from Sony Corporation. The PCM recorder is limited to : - Use of the music beyond this manual or the information contained herein at any machine readable form without notice. You cannot connect other linear PCM recorders. 3GB • The recorded music is not functioning normally. - This software is not supported...

Operating Instructions
Page 4
... 16 Turning the power off 16 Step 4: Setting the Clock 17 Setting the clock after inserting batteries 17 Setting the clock using the remote commander 32 Manual recording 33 Recording a few seconds in the Display Window 19 Preventing Accidental Operation - Table of Contents Techniques for Better Recording 7 Getting Started Step 1: Checking the Contents of the PCM recorder 21 Basic Operations Recording 22 Listening 26 Deleting 30 Other Recording Operations Changing the Recording Method 32 Recording using the menu ........17 Step 5: Setting...
... 16 Turning the power off 16 Step 4: Setting the Clock 17 Setting the clock after inserting batteries 17 Setting the clock using the remote commander 32 Manual recording 33 Recording a few seconds in the Display Window 19 Preventing Accidental Operation - Table of Contents Techniques for Better Recording 7 Getting Started Step 1: Checking the Contents of the PCM recorder 21 Basic Operations Recording 22 Listening 26 Deleting 30 Other Recording Operations Changing the Recording Method 32 Recording using the menu ........17 Step 5: Setting...
Operating Instructions
Page 5
... Search 51 Selecting the playback mode 51 Playing back repeatedly 52 Changing the Playback Sounds 54 Adjusting the playback speed - Other Playback Operations Changing the Playback Method 49 Changing the display during playback 49 Listening the playback sounds with Your Computer 83 Connecting the PCM recorder to your computer 84 Structure of folders and files 85 Copying Tracks from the PCM recorder to Your Computer 87 Copying Files from Your Computer 91 5GB Data Storage Function ...........90 Disconnecting the PCM Recorder...
... Search 51 Selecting the playback mode 51 Playing back repeatedly 52 Changing the Playback Sounds 54 Adjusting the playback speed - Other Playback Operations Changing the Playback Method 49 Changing the display during playback 49 Listening the playback sounds with Your Computer 83 Connecting the PCM recorder to your computer 84 Structure of folders and files 85 Copying Tracks from the PCM recorder to Your Computer 87 Copying Files from Your Computer 91 5GB Data Storage Function ...........90 Disconnecting the PCM Recorder...
Operating Instructions
Page 7
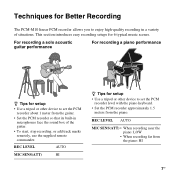
... easy recording setups for 6 typical music scenes. For recording a solo acoustic guitar performance For recording a piano performance z Tips for setup • Use a tripod or other device to set the PCM recorder level with the piano keyboard. • Set the PCM recorder approximately 1.5 meters from the piano: HI 7GB Techniques for Better Recording The PCM-M10 linear PCM recorder allows you to enjoy high-quality recording in microphones face the sound box of...
... easy recording setups for 6 typical music scenes. For recording a solo acoustic guitar performance For recording a piano performance z Tips for setup • Use a tripod or other device to set the PCM recorder level with the piano keyboard. • Set the PCM recorder approximately 1.5 meters from the piano: HI 7GB Techniques for Better Recording The PCM-M10 linear PCM recorder allows you to enjoy high-quality recording in microphones face the sound box of...
Operating Instructions
Page 9
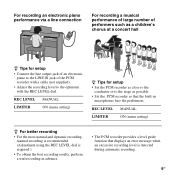
... connection For recording a musical performance of large number of performers such as possible. • Set the PCM recorder so that displays an error message when an excessive recording level is required.) • To obtain the best recording results, perform a trial recording in advance. • The PCM recorder provides a level guide function that the built-in microphones face the performers. REC LEVEL MANUAL LIMITER ON (menu setting) z For better recording •...
... connection For recording a musical performance of large number of performers such as possible. • Set the PCM recorder so that displays an error message when an excessive recording level is required.) • To obtain the best recording results, perform a trial recording in advance. • The PCM recorder provides a level guide function that the built-in microphones face the performers. REC LEVEL MANUAL LIMITER ON (menu setting) z For better recording •...

Operating Instructions
Page 14
... batteries with new ones soon. See "Making Settings for the PCM recorder: - m : "Change Battery" appears and the PCM recorder will be displayed more precisely. z Tips • Even if fully-charged rechargeable batteries are not deleted even when you remove the batteries. • When replacing batteries, turn off the power of the PCM recorder. • Do not mix different types of the "Detail Menu." z Tips • Do not use manganese...
... batteries with new ones soon. See "Making Settings for the PCM recorder: - m : "Change Battery" appears and the PCM recorder will be displayed more precisely. z Tips • Even if fully-charged rechargeable batteries are not deleted even when you remove the batteries. • When replacing batteries, turn off the power of the PCM recorder. • Do not mix different types of the "Detail Menu." z Tips • Do not use manganese...

Operating Instructions
Page 17
... mode display. Setting the clock using the menu While the PCM recorder is turned on before recording, the recording's date and time will be correctly saved. Perform the same operations to set , "Set Clock" appears on the display. By setting the clock before the clock has been set the year, and then press N PLAY/ENTER. When the PCM recorder is in sequence. FR/ V MENU Setting the clock after inserting batteries 1 Press > FF/ v or . N PLAY/ ENTER x STOP Recorded audio files (tracks) are named using...
... mode display. Setting the clock using the menu While the PCM recorder is turned on before recording, the recording's date and time will be correctly saved. Perform the same operations to set , "Set Clock" appears on the display. By setting the clock before the clock has been set the year, and then press N PLAY/ENTER. When the PCM recorder is in sequence. FR/ V MENU Setting the clock after inserting batteries 1 Press > FF/ v or . N PLAY/ ENTER x STOP Recorded audio files (tracks) are named using...

Operating Instructions
Page 18
... N PLAY/ENTER. In this case, set month, day, hour, and minute in sequence. 2 Press > FF/ v or . Perform the same operations to the default settings. P Notes • If you leave the PCM recorder for approximately 3 minutes or longer, with no batteries inserted, the clock is cancelled and the window will be displayed. 3 Press > FF/ v or . The menu mode window will return to the stop mode display...
... N PLAY/ENTER. In this case, set month, day, hour, and minute in sequence. 2 Press > FF/ v or . Perform the same operations to the default settings. P Notes • If you leave the PCM recorder for approximately 3 minutes or longer, with no batteries inserted, the clock is cancelled and the window will be displayed. 3 Press > FF/ v or . The menu mode window will return to the stop mode display...

Operating Instructions
Page 19
FR/ V 2 Press > FF/ v or . FR/ V to select "Detail Menu," and then press N PLAY/ENTERT. The menu mode window will be used for tracks, menus, folder names, file names, etc. FR/ V to select "Language," and then press N PLAY/ ENTER. You can select the language to be displayed. 19GB Getting Started Step 5: Setting the Language to enter the menu mode. MENU N PLAY/ ENTER x STOP 3 Press > FF/ v or . from 3 languages. 1 Press MENU to Be Used in the Display Window > FF/ v, .
FR/ V 2 Press > FF/ v or . FR/ V to select "Detail Menu," and then press N PLAY/ENTERT. The menu mode window will be used for tracks, menus, folder names, file names, etc. FR/ V to select "Language," and then press N PLAY/ ENTER. You can select the language to be displayed. 19GB Getting Started Step 5: Setting the Language to enter the menu mode. MENU N PLAY/ ENTER x STOP 3 Press > FF/ v or . from 3 languages. 1 Press MENU to Be Used in the Display Window > FF/ v, .

Operating Instructions
Page 26
P Note Make sure that "Audio Out" in the menu is set to "Headphones." Listening P Note Before the playback starts, turn on the power of the PCM recorder. FR/ V FR/ V to the i/LINE OUT (headphone/line output) jack for better playback sound. i/LINE OUT jack Headphones plug To start playback 1 Press in the menu is set to "Headphones," when you start playback Connect headphones (not supplied) to select the folder...
P Note Make sure that "Audio Out" in the menu is set to "Headphones." Listening P Note Before the playback starts, turn on the power of the PCM recorder. FR/ V FR/ V to the i/LINE OUT (headphone/line output) jack for better playback sound. i/LINE OUT jack Headphones plug To start playback 1 Press in the menu is set to "Headphones," when you start playback Connect headphones (not supplied) to select the folder...

Operating Instructions
Page 29
... displayed when music files have been copied from a computer.) 29GB Basic Operations z Quickly locating the point you want to start playback (Easy Search) By setting "Easy Search" to the tracks that the PCM recorder can play back In addition to "ON" in the menu, you purchase the PCM recorder.) : Folder copied from a computer (These folders are two types of the internal memory Folder selection window : Folder for tracks recorded using the PCM recorder...
... displayed when music files have been copied from a computer.) 29GB Basic Operations z Quickly locating the point you want to start playback (Easy Search) By setting "Easy Search" to the tracks that the PCM recorder can play back In addition to "ON" in the menu, you purchase the PCM recorder.) : Folder copied from a computer (These folders are two types of the internal memory Folder selection window : Folder for tracks recorded using the PCM recorder...
Operating Instructions
Page 37
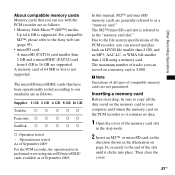
... card is supported. P Note Operations of all the data saved on the memory card to your computer and format the memory card on the PCM recorder so it contains no data. 1 Open the cover of the slot until it clicks into place. The microSD/microSDHC cards that you can use with the PCM recorder are not guaranteed. For compatible M2™, please refer to the Sony web site...
... card is supported. P Note Operations of all the data saved on the memory card to your computer and format the memory card on the PCM recorder so it contains no data. 1 Open the cover of the slot until it clicks into place. The microSD/microSDHC cards that you can use with the PCM recorder are not guaranteed. For compatible M2™, please refer to the Sony web site...

Operating Instructions
Page 41
.... Other Recording Operations Changing the Recording Settings Selecting the recording mode > FF/ v, . FR/ V to enter the menu mode. On the other hand, the file size is large, it takes time to copy to a computer, and the available recording time in the stop mode. The menu mode window will be played back using many different kinds of computers. 1 Press MENU to select "REC Mode," and then press N PLAY/ ENTER. 41GB About the recording modes The PCM recorder is a WAV file and...
.... Other Recording Operations Changing the Recording Settings Selecting the recording mode > FF/ v, . FR/ V to enter the menu mode. On the other hand, the file size is large, it takes time to copy to a computer, and the available recording time in the stop mode. The menu mode window will be played back using many different kinds of computers. 1 Press MENU to select "REC Mode," and then press N PLAY/ ENTER. 41GB About the recording modes The PCM recorder is a WAV file and...
Operating Instructions
Page 43
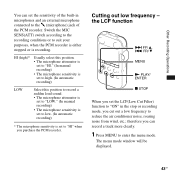
... an external microphone connected to the m (microphone) jack of the built-in the stop or recording mode, you can set to "HI" when you purchase the PCM recorder. therefore you cut out a low frequency to reduce the air conditioner noise, roaring noise from wind, etc.; The menu mode window will be displayed. 43GB Other Recording Operations You can record a track more clearly. 1 Press MENU to...
... an external microphone connected to the m (microphone) jack of the built-in the stop or recording mode, you can set to "HI" when you purchase the PCM recorder. therefore you cut out a low frequency to reduce the air conditioner noise, roaring noise from wind, etc.; The menu mode window will be displayed. 43GB Other Recording Operations You can record a track more clearly. 1 Press MENU to...
Operating Instructions
Page 47
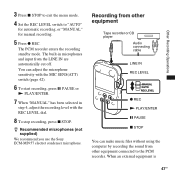
... manual recording. 5 Press z REC. z Recommended microphones (not supplied) We recommend you use the Sony ECM-MS957 electret condenser microphone. When an external equipment is 47GB Recording from other equipment Tape recorder or CD player Audio connecting cable LINE IN REC LEVEL z REC N PLAY/ENTER X PAUSE x STOP You can adjust the microphone sensitivity with the REC LEVEL dial. 8 To stop recording, press x STOP. Other Recording Operations 3 Press x STOP to exit the menu mode. 4 Set...
... manual recording. 5 Press z REC. z Recommended microphones (not supplied) We recommend you use the Sony ECM-MS957 electret condenser microphone. When an external equipment is 47GB Recording from other equipment Tape recorder or CD player Audio connecting cable LINE IN REC LEVEL z REC N PLAY/ENTER X PAUSE x STOP You can adjust the microphone sensitivity with the REC LEVEL dial. 8 To stop recording, press x STOP. Other Recording Operations 3 Press x STOP to exit the menu mode. 4 Set...
Operating Instructions
Page 50
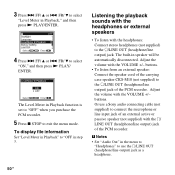
... in the menu to "Headphones" to use a Sony audio connecting cable (not supplied) to connect the microphone or line input jack of the carrying case speaker CKS-M10 (not supplied) to select "ON," and then press N PLAY/ ENTER. Adjust the volume with the headphones: Connect stereo headphones (not supplied) to exit the menu mode. buttons. buttons. • To listen from an external speaker: Connect the speaker cord of an external active or...
... in the menu to "Headphones" to use a Sony audio connecting cable (not supplied) to connect the microphone or line input jack of the carrying case speaker CKS-M10 (not supplied) to select "ON," and then press N PLAY/ ENTER. Adjust the volume with the headphones: Connect stereo headphones (not supplied) to exit the menu mode. buttons. buttons. • To listen from an external speaker: Connect the speaker cord of an external active or...

Operating Instructions
Page 51
... select the playback mode in the menu. 51GB Other Playback Operations FR/ V repeatedly during playback (page 77). Quickly locating the point you wish to the end of the last track. • If you press and hold > FF/ v to go to the beginning of musical instruments. • When "Audio Out" in the menu is set to "ON" in the menu, you can quickly locate...
... select the playback mode in the menu. 51GB Other Playback Operations FR/ V repeatedly during playback (page 77). Quickly locating the point you wish to the end of the last track. • If you press and hold > FF/ v to go to the beginning of musical instruments. • When "Audio Out" in the menu is set to "ON" in the menu, you can quickly locate...

Operating Instructions
Page 58
.... Playback via Other Devices Recording with other equipment. FR/ V to select "Audio Out," and then press N PLAY/ ENTER. N PLAY/ENTER You can record the sound of the PCM recorder to 58 GB 4 Press > FF/ v or . Before you start recording, we recommend you to make a trial recording first. 1 Connect the i/LINE OUT (headphone/ line output) jack of the PCM recorder with other equipment using an audio connecting cable. 2 Press MENU to enter the menu mode...
.... Playback via Other Devices Recording with other equipment. FR/ V to select "Audio Out," and then press N PLAY/ ENTER. N PLAY/ENTER You can record the sound of the PCM recorder to 58 GB 4 Press > FF/ v or . Before you start recording, we recommend you to make a trial recording first. 1 Connect the i/LINE OUT (headphone/ line output) jack of the PCM recorder with other equipment using an audio connecting cable. 2 Press MENU to enter the menu mode...
Operating Instructions
Page 103
... recording level manually using the REC LEVEL dial. • The sound source has parts that noise was recorded. • The PCM recorder was dirty when recording. "Memory Full" is displayed • The memory is displayed and • 99 tracks have been recorded. Set "LIMITER" in automatic recording. Delete some of recorder. Delete some of the connected microphone was placed near an AC power source, a fluorescent lamp or a mobile phone during recording or playback...
... recording level manually using the REC LEVEL dial. • The sound source has parts that noise was recorded. • The PCM recorder was dirty when recording. "Memory Full" is displayed • The memory is displayed and • 99 tracks have been recorded. Set "LIMITER" in automatic recording. Delete some of recorder. Delete some of the connected microphone was placed near an AC power source, a fluorescent lamp or a mobile phone during recording or playback...


