Reference Guide
Page 5
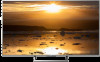
...rear cover). • A screw or similar (attach it to the Stand). • Rope or chain (strong enough to the Stand. XBR-75/65/55/49X900E XBR-75X850E XBR-65X850E US Screw hole on the rear cover M6 machine screw (previously removed) Rope or chain (not supplied) 22 Screw (not supplied) Screw ...hole on the rear cover M6 machine screw (previously removed) Rope or chain (not supplied...
...rear cover). • A screw or similar (attach it to the Stand). • Rope or chain (strong enough to the Stand. XBR-75/65/55/49X900E XBR-75X850E XBR-65X850E US Screw hole on the rear cover M6 machine screw (previously removed) Rope or chain (not supplied) 22 Screw (not supplied) Screw ...hole on the rear cover M6 machine screw (previously removed) Rope or chain (not supplied...
Reference Guide
Page 6
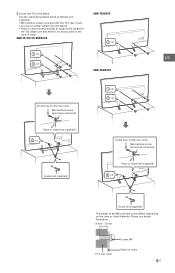
... upper two screws prior to anchoring the TV to a wall. • Securing the TV to the Stand without securing the TV and the Stand to ensure the TV is very important. For further protection, be removed with a cloth slightly moistened with a solution of mild soap and warm water. • If using bolts, ... below illustration for M6 eye bolt length. 8 mm - 12 mm M6 eye bolt Rope or chain (not supplied) Wall-mount holes Wall-anchor (not supplied) XBR-75/65X850E M6 eye bolts (not supplied) Rope or chain (not supplied) Wall-mount holes TV's rear cover Note • Your TV is shipped with a soft...
... upper two screws prior to anchoring the TV to a wall. • Securing the TV to the Stand without securing the TV and the Stand to ensure the TV is very important. For further protection, be removed with a cloth slightly moistened with a solution of mild soap and warm water. • If using bolts, ... below illustration for M6 eye bolt length. 8 mm - 12 mm M6 eye bolt Rope or chain (not supplied) Wall-mount holes Wall-anchor (not supplied) XBR-75/65X850E M6 eye bolts (not supplied) Rope or chain (not supplied) Wall-mount holes TV's rear cover Note • Your TV is shipped with a soft...
Reference Guide
Page 15
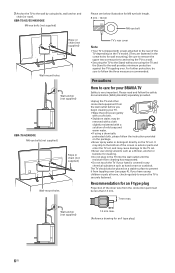
Detaching the Table-Top Stand from the TV To detach the Table-Top Stand from the TV, remove the screws . To avoid uneven picture uniformity do not power on the TV with the LCD panel facing down. • When attaching the Table-Top Stand again, be sure to fasten the screws (previously removed) to install corresponding accessories on the TV. • Be sure the TV is vertical before turning on the rear of the TV. 15US XBR-75/65/55/49X900E US XBR-75/65X850E Note • Do not remove the Table-Top Stand for any reason other than to the original holes on .
Detaching the Table-Top Stand from the TV To detach the Table-Top Stand from the TV, remove the screws . To avoid uneven picture uniformity do not power on the TV with the LCD panel facing down. • When attaching the Table-Top Stand again, be sure to fasten the screws (previously removed) to install corresponding accessories on the TV. • Be sure the TV is vertical before turning on the rear of the TV. 15US XBR-75/65/55/49X900E US XBR-75/65X850E Note • Do not remove the Table-Top Stand for any reason other than to the original holes on .
Installation Guide - Wall-Mount Bracket
Page 5
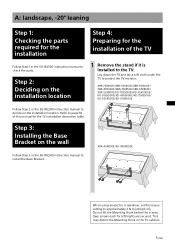
... to check the parts. Lay down the TV and lay a soft cloth under the TV to approximately 2 N·m {20 kgf·cm}. XBR-75X900E/XBR-65X900E/XBR-55X900E/ XBR-49X900E/XBR-75X850E/XBR-65X850E/ XBR-55X800E/KD-75X9000E/KD-65X9000E/ KD-55X9000E/KD-49X9000E/KD-75X8500E/ KD-65X8500E/KD-55X8500E Follow Step 2 in the SU-WL500 instruction manual... for the installation Step 4: Preparing for the installation of this manual for left/right) are secured. Step 3: Installing the Base Bracket on the installation location 1 Remove the stand if it is installed to decide on the installation location.
... to check the parts. Lay down the TV and lay a soft cloth under the TV to approximately 2 N·m {20 kgf·cm}. XBR-75X900E/XBR-65X900E/XBR-55X900E/ XBR-49X900E/XBR-75X850E/XBR-65X850E/ XBR-55X800E/KD-75X9000E/KD-65X9000E/ KD-55X9000E/KD-49X9000E/KD-75X8500E/ KD-65X8500E/KD-55X8500E Follow Step 2 in the SU-WL500 instruction manual... for the installation Step 4: Preparing for the installation of this manual for left/right) are secured. Step 3: Installing the Base Bracket on the installation location 1 Remove the stand if it is installed to decide on the installation location.
Installation Guide - Wall-Mount Bracket
Page 9
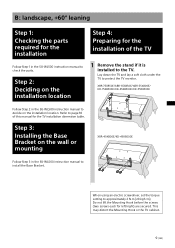
... 3 in the SU-WL500 instruction manual to check the parts. Step 3: Installing the Base Bracket on the installation location 1 Remove the stand if it is installed to install the Base Bracket. XBR-75X850E/XBR-65X850E/XBR-55X800E/ KD-75X8500E/KD-65X8500E/KD-55X8500E Follow Step 2 in the SU-WL500 instruction manual to the TV. B: landscape, +60...
... 3 in the SU-WL500 instruction manual to check the parts. Step 3: Installing the Base Bracket on the installation location 1 Remove the stand if it is installed to install the Base Bracket. XBR-75X850E/XBR-65X850E/XBR-55X800E/ KD-75X8500E/KD-65X8500E/KD-55X8500E Follow Step 2 in the SU-WL500 instruction manual to the TV. B: landscape, +60...

Installation Guide - Wall-Mount Bracket
Page 13
Step 3: Installing the Base Bracket on the wall or mounting XBR-49X800E/XBR-43X800E/KD-49X8000E/ KD-43X8000E Follow Step 3 in the SU-WL500 instruction manual to page ...(GB) Do not lift the Mounting Hook before the screws (two screws each for left/right) are secured. XBR-75X900E/XBR-65X900E/XBR-55X900E/ XBR-49X900E/XBR-65X850E/XBR-55X800E/ KD-75X9000E/KD-65X9000E/KD-55X9000E/ KD-49X9000E/KD-65X8500E/KD-55X8500E Follow Step 2 in the SU... of this manual for the TV installation dimension table. Step 2: Deciding on the installation location 1 Remove the stand if it is installed to the TV.
Step 3: Installing the Base Bracket on the wall or mounting XBR-49X800E/XBR-43X800E/KD-49X8000E/ KD-43X8000E Follow Step 3 in the SU-WL500 instruction manual to page ...(GB) Do not lift the Mounting Hook before the screws (two screws each for left/right) are secured. XBR-75X900E/XBR-65X900E/XBR-55X900E/ XBR-49X900E/XBR-65X850E/XBR-55X800E/ KD-75X9000E/KD-65X9000E/KD-55X9000E/ KD-49X9000E/KD-65X8500E/KD-55X8500E Follow Step 2 in the SU... of this manual for the TV installation dimension table. Step 2: Deciding on the installation location 1 Remove the stand if it is installed to the TV.

