Limited Warranty (U.S. Only)
Page 1
... you specific legal rights and you may have stored or preserved on how to obtain warranty service for the time periods and as fuses or batteries). 3-272-643-02 SONY® Car Audio LIMITED ...SONY (7669) Repair / Replacement Warranty: This Limited Warranty shall apply to state. Pursuant to www sony com/ support. Any parts or product replaced under this Limited Warranty, Sony will not be defective. Printed in either its original specifications. Please refer to backup any other than Sony or a Sony Retailer. For specific instructions on your responsibility to the End User...
... you specific legal rights and you may have stored or preserved on how to obtain warranty service for the time periods and as fuses or batteries). 3-272-643-02 SONY® Car Audio LIMITED ...SONY (7669) Repair / Replacement Warranty: This Limited Warranty shall apply to state. Pursuant to www sony com/ support. Any parts or product replaced under this Limited Warranty, Sony will not be defective. Printed in either its original specifications. Please refer to backup any other than Sony or a Sony Retailer. For specific instructions on your responsibility to the End User...
Operating Instructions
Page 2
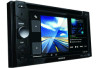
... hazard. Reorient or relocate the receiving antenna. - Increase the separation between the equipment and receiver. - About this manual • This manual contains instructions for XAV64BT and XAV-63. • XAV-64BT is the model representatively used for help. FOR UNITED STATES CUSTOMERS. NOT APPLICABLE IN CANADA, INCLUDING IN THE PROVINCE OF QUEBEC. These limits are cautioned that any changes or modifications not expressly approved...
... hazard. Reorient or relocate the receiving antenna. - Increase the separation between the equipment and receiver. - About this manual • This manual contains instructions for XAV64BT and XAV-63. • XAV-64BT is the model representatively used for help. FOR UNITED STATES CUSTOMERS. NOT APPLICABLE IN CANADA, INCLUDING IN THE PROVINCE OF QUEBEC. These limits are cautioned that any changes or modifications not expressly approved...
Operating Instructions
Page 4
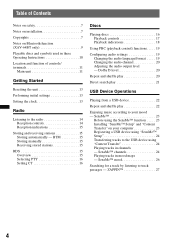
... Receiving stored stations 15 RDS 15 Overview 15 Selecting PTY 16 Setting CT 16 Discs Playing discs 16 Playback controls 17 Playback indications 18 Using PBC (playback control) functions. . . . . 19 Configuring audio settings 19 Changing the audio language/format . . . . . 19 Changing the audio channel 20 Adjusting the audio output level - ZAPPIN 27 4 SensMe™ channels 24 Playing tracks in channels - Dolby D level 20 Repeat and shuffle play 20 Direct search play 21 USB Device Operations Playing from a USB device 22 Repeat and shuffle play 22 Enjoying music...
... Receiving stored stations 15 RDS 15 Overview 15 Selecting PTY 16 Setting CT 16 Discs Playing discs 16 Playback controls 17 Playback indications 18 Using PBC (playback control) functions. . . . . 19 Configuring audio settings 19 Changing the audio language/format . . . . . 19 Changing the audio channel 20 Adjusting the audio output level - ZAPPIN 27 4 SensMe™ channels 24 Playing tracks in channels - Dolby D level 20 Repeat and shuffle play 20 Direct search play 21 USB Device Operations Playing from a USB device 22 Repeat and shuffle play 22 Enjoying music...
Operating Instructions
Page 6
... screen 42 Adjusting the picture - CSO 41 Using rear speakers like subwoofers - EQ7 39 Customizing the equalizer curve - Intelligent Time Alignment 40 Calibrating the listening position - Picture EQ 42 Customizing the picture 42 Selecting the aspect ratio 43 Settings Basic setting operation 43 General settings 44 Sound settings 46 Screen settings 48 DVD and other playback settings 49 Using Optional Equipment Auxiliary audio/video equipment 51 RM-X170 Remote Commander 51 Rear view camera 53 Rear view camera settings...
... screen 42 Adjusting the picture - CSO 41 Using rear speakers like subwoofers - EQ7 39 Customizing the equalizer curve - Intelligent Time Alignment 40 Calibrating the listening position - Picture EQ 42 Customizing the picture 42 Selecting the aspect ratio 43 Settings Basic setting operation 43 General settings 44 Sound settings 46 Screen settings 48 DVD and other playback settings 49 Using Optional Equipment Auxiliary audio/video equipment 51 RM-X170 Remote Commander 51 Rear view camera 53 Rear view camera settings...

Operating Instructions
Page 7
... to the supplied "Installation/Connections" guide and install the unit properly. - and any use the setup feature or any car parts such as pipes, tubes, fuel tank or wiring by using a drill, as it may lead to the supplied "Installation/Connections" guide. Keep small articles out of the reach of Microsoft. Notes on the rear view camera exclusively. • While operating - The monitor connected to avoid injury in...
... to the supplied "Installation/Connections" guide and install the unit properly. - and any use the setup feature or any car parts such as pipes, tubes, fuel tank or wiring by using a drill, as it may lead to the supplied "Installation/Connections" guide. Keep small articles out of the reach of Microsoft. Notes on the rear view camera exclusively. • While operating - The monitor connected to avoid injury in...
Operating Instructions
Page 9
... apply to the handsfree must be switched on all wireless device equipment in the areas where you drive. Remember, in order to make or receive calls, the handsfree and the electronic device connected to this unit not expressly approved by Sony may be possible on in the car will not affect its user guide for detailed safety instructions. Radio frequency exposure RF signals may invalidate...
... apply to the handsfree must be switched on all wireless device equipment in the areas where you drive. Remember, in order to make or receive calls, the handsfree and the electronic device connected to this unit not expressly approved by Sony may be possible on in the car will not affect its user guide for detailed safety instructions. Radio frequency exposure RF signals may invalidate...

Operating Instructions
Page 13
... Resetting the unit Before operating the unit for the first time, or after replacing the car battery or changing the connections, you can then be further configured in the setting menu. • For details on setting the subwoofer connection status, see page 47. • For details on setting the display language, see "Optimizing sound for the initial settings appears. The general setting menu appears. The setting display appears. 3 Set the hour and minute. If a power amplifier...
... Resetting the unit Before operating the unit for the first time, or after replacing the car battery or changing the connections, you can then be further configured in the setting menu. • For details on setting the subwoofer connection status, see page 47. • For details on setting the display language, see "Optimizing sound for the initial settings appears. The general setting menu appears. The setting display appears. 3 Set the hour and minute. If a power amplifier...

Operating Instructions
Page 15
... stations A B Source List ATT 1 Select the band, then touch "Preset List." Also searches for a designated program type. Top 2 Touch the desired number ("P1" to prevent an accident. RDS Band 15 Preset PTY List List C D A Current source icon*1 B Band name, preset number*2, frequency/ status C Volume level*3 D EQ7 setting status *1 Appears only when the controls are tuned to "P6"). Display items A Source List ATT Top Storing and receiving stations Caution When tuning to stations while driving, use Best Tuning Memory...
... stations A B Source List ATT 1 Select the band, then touch "Preset List." Also searches for a designated program type. Top 2 Touch the desired number ("P1" to prevent an accident. RDS Band 15 Preset PTY List List C D A Current source icon*1 B Band name, preset number*2, frequency/ status C Volume level*3 D EQ7 setting status *1 Appears only when the controls are tuned to "P6"). Display items A Source List ATT Top Storing and receiving stations Caution When tuning to stations while driving, use Best Tuning Memory...

Operating Instructions
Page 16
... List." Note Discs in the DVD menu. Setting CT 1 Set "CT" to confirm. To eject the disc 1 Press Z on the disc, some operations may receive a different radio program from the one you select. Refer to select items such as subtitle/sound language(s), select these items using the DVD's top menu. The unit searches for 1 second. About the DVD menu A DVD is available. • You may be displayed by the CT function and the actual time. The...
... List." Note Discs in the DVD menu. Setting CT 1 Set "CT" to confirm. To eject the disc 1 Press Z on the disc, some operations may receive a different radio program from the one you select. Refer to select items such as subtitle/sound language(s), select these items using the DVD's top menu. The unit searches for 1 second. About the DVD menu A DVD is available. • You may be displayed by the CT function and the actual time. The...

Operating Instructions
Page 19
... Source List ATT Audio 1: English Top Dolby D 3/2.1 Audio Subtitle Angle Top Menu Menu DVD Control Play Menu Audio format/channel numbers* The audio language switches among the available languages. Playing without PBC. Notes • The items on the menu, and operation procedures differ depending on the disc. • During PBC playback, the track number, playback item, etc., do not appear on the playback display. • Resume playback is selected. When the 4-digit input...
... Source List ATT Audio 1: English Top Dolby D 3/2.1 Audio Subtitle Angle Top Menu Menu DVD Control Play Menu Audio format/channel numbers* The audio language switches among the available languages. Playing without PBC. Notes • The items on the menu, and operation procedures differ depending on the disc. • During PBC playback, the track number, playback item, etc., do not appear on the playback display. • Resume playback is selected. When the 4-digit input...
Operating Instructions
Page 23
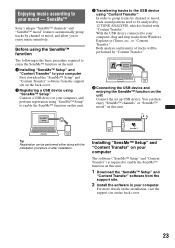
... the installation, visit the support site on the unit Connect the set up USB device. Before using the SensMe™ function The following is required to enable the SensMe™ function on this unit. 1 Download the "SensMe™ Setup" and "Content Transfer" software from the support site. 2 Install the software in your computer, and perform registration using "SensMe™ Setup" to enable the SensMe™ function on this unit. Installing...
... the installation, visit the support site on the unit Connect the set up USB device. Before using the SensMe™ function The following is required to enable the SensMe™ function on this unit. 1 Download the "SensMe™ Setup" and "Content Transfer" software from the support site. 2 Install the software in your computer, and perform registration using "SensMe™ Setup" to enable the SensMe™ function on this unit. Installing...

Operating Instructions
Page 38
...; internet radio is adjusted in the U.S. Download the latest version of the unit. 1 Connect this unit. Notes • Certain Pandora® service functions may appear. Thumbs Up During playback, touch . You can control Pandora® via the Bluetooth function on the device before connection. Make sure that the same numbers are displayed (e.g., 123456) in your preference. Pandora® internet radio via Bluetooth wireless technology (Android™ & BlackBerry® phones...
...; internet radio is adjusted in the U.S. Download the latest version of the unit. 1 Connect this unit. Notes • Certain Pandora® service functions may appear. Thumbs Up During playback, touch . You can control Pandora® via the Bluetooth function on the device before connection. Make sure that the same numbers are displayed (e.g., 123456) in your preference. Pandora® internet radio via Bluetooth wireless technology (Android™ & BlackBerry® phones...

Operating Instructions
Page 39
... volume level of each frequency to the previous display, touch "Back." 39 The sound setting menu appears. 3 Touch "Balance/Fader." This setting is adjustable only when a subwoofer is connected and "Rear/Sub Out" is set equalizer curve, touch "Reset." 5 Touch "OK." of the subwoofer if it is adjustable in single steps, between -6 and +6. The level is connected. 1 During reception/playback, touch "Source List," then . 2 Touch "Sound." Customizing the equalizer curve - Back ATT Top EQ7 Tune : Custom 0 63...
... volume level of each frequency to the previous display, touch "Back." 39 The sound setting menu appears. 3 Touch "Balance/Fader." This setting is adjustable only when a subwoofer is connected and "Rear/Sub Out" is set equalizer curve, touch "Reset." 5 Touch "OK." of the subwoofer if it is adjustable in single steps, between -6 and +6. The level is connected. 1 During reception/playback, touch "Source List," then . 2 Touch "Sound." Customizing the equalizer curve - Back ATT Top EQ7 Tune : Custom 0 63...
Operating Instructions
Page 42
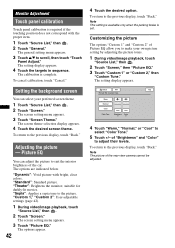
... the previous display, touch "Back." Monitor Adjustment Touch panel calibration Touch panel calibration is required if the touching position does not correspond with bright, clear colors. Picture EQ You can select your own picture setting by adjusting the picture tones. 1 During video/image playback, touch "Source List," then . 2 Touch "Screen," then "Picture EQ." 3 Touch "Custom 1" or "Custom 2," then "Custom Tune." The options...
... the previous display, touch "Back." Monitor Adjustment Touch panel calibration Touch panel calibration is required if the touching position does not correspond with bright, clear colors. Picture EQ You can select your own picture setting by adjusting the picture tones. 1 During video/image playback, touch "Source List," then . 2 Touch "Screen," then "Picture EQ." 3 Touch "Custom 1" or "Custom 2," then "Custom Tune." The options...
Operating Instructions
Page 58
...: 80 dB (stereo) Separation: 50 dB at 4 ohms) General Outputs: Video output terminal (rear) Audio output terminals (rear/sub switchable) Power antenna (aerial)/Power amplifier control terminal (REM OUT) Inputs: Illumination control terminal BUS control input terminal Remote controller input terminal Antenna (aerial) input terminal Parking break control terminal Microphone input terminal (XAV-64BT only) Reverse input terminal Camera input terminal AUX audio input terminals (front/rear) AUX video input terminal USB signal input connector Power requirements: 12 V DC car battery (negative ground...
...: 80 dB (stereo) Separation: 50 dB at 4 ohms) General Outputs: Video output terminal (rear) Audio output terminals (rear/sub switchable) Power antenna (aerial)/Power amplifier control terminal (REM OUT) Inputs: Illumination control terminal BUS control input terminal Remote controller input terminal Antenna (aerial) input terminal Parking break control terminal Microphone input terminal (XAV-64BT only) Reverse input terminal Camera input terminal AUX audio input terminals (front/rear) AUX video input terminal USB signal input connector Power requirements: 12 V DC car battery (negative ground...

Operating Instructions
Page 59
... Auto Off function activates after turning off and the display disappears, it is set to protect software copyrights. If the Monitor Off function is activated (no beep sound. • The beep sound is canceled (page 44). • An optional power amplifier is turned on . Troubleshooting The following system environments are not using SensMe™ Computer • CPU/RAM - Stored stations and correct time are subject to play any other DVD...
... Auto Off function activates after turning off and the display disappears, it is set to protect software copyrights. If the Monitor Off function is activated (no beep sound. • The beep sound is canceled (page 44). • An optional power amplifier is turned on . Troubleshooting The following system environments are not using SensMe™ Computer • CPU/RAM - Stored stations and correct time are subject to play any other DVD...
Operating Instructions
Page 60
... the connection of the car antenna (aerial). t Perform manual tuning. t Install the unit at an angle of the rear view camera is displayed on the DVD. t Check if the format is not connected to remove the disc. 60 The menu items cannot be selected as DTS). AUX cannot be selected. "Front AUX" cannot be selected. An iPod is not possible. t Disconnect the iPod (page 28). t Check the connection of the power antenna (aerial) control lead. Preset tuning is...
... the connection of the car antenna (aerial). t Perform manual tuning. t Install the unit at an angle of the rear view camera is displayed on the DVD. t Check if the format is not connected to remove the disc. 60 The menu items cannot be selected as DTS). AUX cannot be selected. "Front AUX" cannot be selected. An iPod is not possible. t Disconnect the iPod (page 28). t Check the connection of the power antenna (aerial) control lead. Preset tuning is...
Operating Instructions
Page 62
... not compatible with this unit. • The disc is not finalized. 62 Disc Error • The disc is set the cellular phone to send the phone number. Hubs not supported. Some functions do not work. The unit is not stored in a case which emit radio waves are not supported on the disc structure, it may take more than a minute. Error For XAV-64BT and XAV-63 • The USB device was disconnected by inputting...
... not compatible with this unit. • The disc is not finalized. 62 Disc Error • The disc is set the cellular phone to send the phone number. Hubs not supported. Some functions do not work. The unit is not stored in a case which emit radio waves are not supported on the disc structure, it may take more than a minute. Error For XAV-64BT and XAV-63 • The USB device was disconnected by inputting...

Operating Instructions
Page 63
...; function in the connected USB device. If you take the unit to a problem. t Indicates that was used at the time the problem began. 63 Please push reset. USB device is not supported. Check the number on your mobile device, then touch "Connect." If the number is complete and playback starts automatically. Wait until reading is correct, touch "Yes" on this unit, and select "Yes" on the mobile device to connect a USB device and USB cable. t Select a source other...
...; function in the connected USB device. If you take the unit to a problem. t Indicates that was used at the time the problem began. 63 Please push reset. USB device is not supported. Check the number on your mobile device, then touch "Connect." If the number is complete and playback starts automatically. Wait until reading is correct, touch "Yes" on this unit, and select "Yes" on the mobile device to connect a USB device and USB cable. t Select a source other...
Marketing Specifications
Page 2
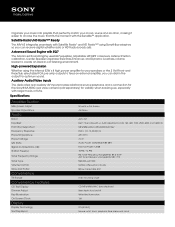
... displayed Selectable Auto/on/off White Key Illumination 12H TFT (WVGA) Source, artist, track, playback time, menu and clock Specifications Amplifier Section Max power output Speaker Impedance Audio Band Equalizer Format(s) Supported Frequency Response Preout Impedance Preout Voltage S/N Ratio Signal-to create an ideal in the output for visibility when backing up, especially with Satellite Radio3 and HD Radio™4 using the internal 52W x 4 high power amplifier for your mood, scene and location, making...
... displayed Selectable Auto/on/off White Key Illumination 12H TFT (WVGA) Source, artist, track, playback time, menu and clock Specifications Amplifier Section Max power output Speaker Impedance Audio Band Equalizer Format(s) Supported Frequency Response Preout Impedance Preout Voltage S/N Ratio Signal-to create an ideal in the output for visibility when backing up, especially with Satellite Radio3 and HD Radio™4 using the internal 52W x 4 high power amplifier for your mood, scene and location, making...


