
Operating Instructions
Page 2
... personnel qualifié. For the customers in a particular installation. However, there is connected. - You are designed to provide reasonable protection against harmful interference in this manual could void your authority to operate this unit at a voltage other than 120 V may cause harmful interference to which can radiate radio frequency energy and...
... personnel qualifié. For the customers in a particular installation. However, there is connected. - You are designed to provide reasonable protection against harmful interference in this manual could void your authority to operate this unit at a voltage other than 120 V may cause harmful interference to which can radiate radio frequency energy and...
Operating Instructions
Page 12
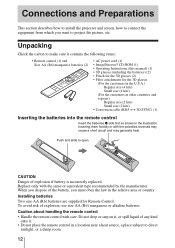
...Insert the batteries E side first as shown in the illustration. Connections and Preparations This section describes how to install the projector and screen, how to connect the equipment from which you must obey the law in the relative area or country. ...; Remote control (1) and Size AA (R6) manganese batteries (2) • AC power cord (1) • ImageDirector3 CD-ROM (1) • Operating Instructions (this manual) (1) • 3D glasses (including the batteries) (2) • Pouch for the 3D glasses (2) • Filter attachments for Remote Control. Caution about handling ...
...Insert the batteries E side first as shown in the illustration. Connections and Preparations This section describes how to install the projector and screen, how to connect the equipment from which you must obey the law in the relative area or country. ...; Remote control (1) and Size AA (R6) manganese batteries (2) • AC power cord (1) • ImageDirector3 CD-ROM (1) • Operating Instructions (this manual) (1) • 3D glasses (including the batteries) (2) • Pouch for the 3D glasses (2) • Filter attachments for Remote Control. Caution about handling ...

Operating Instructions
Page 52
Manual: Manually (fixed) adjusts the Iris. High: Increases the lamp brightness, and projects brighter images. When you switch to "Auto 1." Note When you switch from "Low" to a ...." The contrast of the fan increases, and the fan noise becomes slightly louder. Film Projection Reproduces movies in images, while lower values decrease the sharpness. Cinema Black Pro Advanced Iris Switches the iris function during projection. Auto 1: Automatically switches to an optimum iris according to "High," the number of turns of...
Manual: Manually (fixed) adjusts the Iris. High: Increases the lamp brightness, and projects brighter images. When you switch to "Auto 1." Note When you switch from "Low" to a ...." The contrast of the fan increases, and the fan noise becomes slightly louder. Film Projection Reproduces movies in images, while lower values decrease the sharpness. Cinema Black Pro Advanced Iris Switches the iris function during projection. Auto 1: Automatically switches to an optimum iris according to "High," the number of turns of...

Operating Instructions
Page 60
...select "Off." Note When the input signal is distorted or colorless, select the color system appropriate for 10 minutes. Note Normally, set the projector to "Auto." When replacing the lamps, set to the INPUT A connector. Component: Inputs the component signal from a computer. If the picture... is not displayed correctly with the INPUT button. If you to set to "Auto," select the item according to the selected system manually. Auto: Selects the input signal type automatically. Selects the color system of signal input from a TV game or HDTV broadcast. Computer...
...select "Off." Note When the input signal is distorted or colorless, select the color system appropriate for 10 minutes. Note Normally, set the projector to "Auto." When replacing the lamps, set to the INPUT A connector. Component: Inputs the component signal from a computer. If the picture... is not displayed correctly with the INPUT button. If you to set to "Auto," select the item according to the selected system manually. Auto: Selects the input signal type automatically. Selects the color system of signal input from a TV game or HDTV broadcast. Computer...

Operating Instructions
Page 84
... 300 inches (1,016 mm to 7,620 mm) (measured diagonally) Color system NTSC3.58/PAL/SECAM/ NTSC4.43/PAL-M/PAL-N/PAL60 system, switched automatically/ manually (PAL60 system not switched manually) Acceptable video signals 15 kHz RGB/component 50/60 Hz, Progressive component 50/60 Hz, 480/60i, 576/50i, 480/60p, 576/50p...
... 300 inches (1,016 mm to 7,620 mm) (measured diagonally) Color system NTSC3.58/PAL/SECAM/ NTSC4.43/PAL-M/PAL-N/PAL60 system, switched automatically/ manually (PAL60 system not switched manually) Acceptable video signals 15 kHz RGB/component 50/60 Hz, Progressive component 50/60 Hz, 480/60i, 576/50i, 480/60p, 576/50p...
Operating Instructions
Page 95
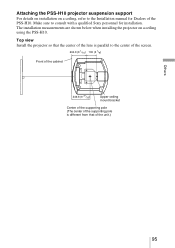
...the PSS-H10. Make sure to consult with a qualified Sony personnel for Dealers of the unit.) Others 95 Top view Install the projector so that of the PSS-H10. The installation measurements are shown below when installing the projector on a ceiling, refer to the center of the screen.... 204.8 (8 1/16) 130 (5 1/8) Front of the cabinet 249.8 (9 27/32) Upper ceiling mount bracket Center of the supporting pole (The center of the supporting pole is different from that the center of the lens is parallel to the Installation manual...
...the PSS-H10. Make sure to consult with a qualified Sony personnel for Dealers of the unit.) Others 95 Top view Install the projector so that of the PSS-H10. The installation measurements are shown below when installing the projector on a ceiling, refer to the center of the screen.... 204.8 (8 1/16) 130 (5 1/8) Front of the cabinet 249.8 (9 27/32) Upper ceiling mount bracket Center of the supporting pole (The center of the supporting pole is different from that the center of the lens is parallel to the Installation manual...

