
Operating Instructions
Page 11
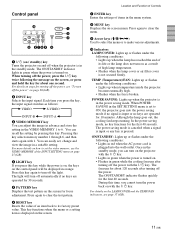
... how to 6. Pressing this key while the power is turned on the screen. Control panel 0 LAMP/ COVER TEMP/ FAN POWER SAVING ON/ STANDBY MENU PATTERN ENTER RESET LIGHT INPUT VIDEO MEMORY 1 2 3 9 8765 4 1 I / 1 (on / standby) key Turns the projector on and off the power, press the I / 1 key twice following the message on the screen...
... how to 6. Pressing this key while the power is turned on the screen. Control panel 0 LAMP/ COVER TEMP/ FAN POWER SAVING ON/ STANDBY MENU PATTERN ENTER RESET LIGHT INPUT VIDEO MEMORY 1 2 3 9 8765 4 1 I / 1 (on / standby) key Turns the projector on and off the power, press the I / 1 key twice following the message on the screen...

Operating Instructions
Page 17
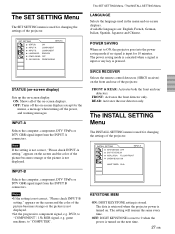
... I / 1 key to turn on screen display. The menu display appears. The menu display disappears automatically if no key is ENGLISH. 4, 5, 6 3 LAMP/ COVER TEMP/ FAN POWER SAVING ON/ STANDBY MENU PATTERN ENTER RESET LIGHT INPUT VIDEO MEMORY 2 1 1 Plug the AC power cord into the selected language . The SET SETTING Menu appears. The factory...
... I / 1 key to turn on screen display. The menu display appears. The menu display disappears automatically if no key is ENGLISH. 4, 5, 6 3 LAMP/ COVER TEMP/ FAN POWER SAVING ON/ STANDBY MENU PATTERN ENTER RESET LIGHT INPUT VIDEO MEMORY 2 1 1 Plug the AC power cord into the selected language . The SET SETTING Menu appears. The factory...
Operating Instructions
Page 18
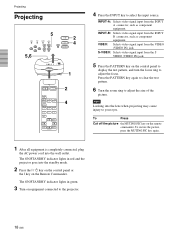
Projecting Projecting 5 LAMP/ COVER TEMP/ FAN POWER SAVING ON/ STANDBY MENU PATTERN ENTER RESET 5,6 LIGHT INPUT VIDEO MEMORY 2 4 1 MUTING PIC INPUT SELECT VIDEO A B S VIDEO VIDEO MEMORY 1 2 3 4 5 6 OFF MENU RESET ENTER 2 4 4 Press the INPUT key to your eyes. The ON/STANDBY ...indicator lights in green. 3 Turn on the Remote Commander. Note Looking into the lens when projecting may cause injury to select the input source. The ON/STANDBY indicator lights in red and the projector...
Projecting Projecting 5 LAMP/ COVER TEMP/ FAN POWER SAVING ON/ STANDBY MENU PATTERN ENTER RESET 5,6 LIGHT INPUT VIDEO MEMORY 2 4 1 MUTING PIC INPUT SELECT VIDEO A B S VIDEO VIDEO MEMORY 1 2 3 4 5 6 OFF MENU RESET ENTER 2 4 4 Press the INPUT key to your eyes. The ON/STANDBY ...indicator lights in green. 3 Turn on the Remote Commander. Note Looking into the lens when projecting may cause injury to select the input source. The ON/STANDBY indicator lights in red and the projector...
Operating Instructions
Page 27
...OFF DIGIT KEYSTONE: 01 INSTALLATION: FLOOR-FRONT CINEMA BLACK: ON LAMP TIMER: 234h KEYSTONE MEM ON: DIGIT KEYSTONE setting is not displayed. appears on the screen and the color of the projector. The data is retrieved when the projector power is used in the menu and on the screen and the...on . INPUT-A Selects the computer, component, DTV YPBPR or DTV GBR signal input from the INPUT B connectors. OFF: DIGIT KEYSTONE is reset to ON, the projector goes into the power saving mode if no signal is not correct, "Please check INPUT-A setting." ON: Shows all of the picture becomes...
...OFF DIGIT KEYSTONE: 01 INSTALLATION: FLOOR-FRONT CINEMA BLACK: ON LAMP TIMER: 234h KEYSTONE MEM ON: DIGIT KEYSTONE setting is not displayed. appears on the screen and the color of the projector. The data is retrieved when the projector power is used in the menu and on the screen and the...on . INPUT-A Selects the computer, component, DTV YPBPR or DTV GBR signal input from the INPUT B connectors. OFF: DIGIT KEYSTONE is reset to ON, the projector goes into the power saving mode if no signal is not correct, "Please check INPUT-A setting." ON: Shows all of the picture becomes...
Operating Instructions
Page 35
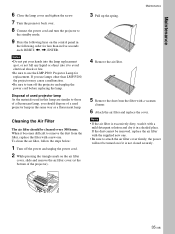
Maintenance 6 Close the lamp cover and tighten the screw. 7 Turn the projector back over. 8 Connect the power cord and turn the projector to the standby mode. 9 Press the following keys on the control panel in the following order for less than in five seconds each: RESET,
Maintenance 6 Close the lamp cover and tighten the screw. 7 Turn the projector back over. 8 Connect the power cord and turn the projector to the standby mode. 9 Press the following keys on the control panel in the following order for less than in five seconds each: RESET,
Operating Instructions
Page 42
...on a ceiling 30 (GB) on a floor 29 (GB) KEYSTONE MEM 27 (GB) Index L Lamp replacement 34 (GB) LAMP TIMER 28 (GB) LANGUAGE 27 (GB) Location and function of controls connector panel 12 (GB) control...(GB) POWER SAVING 11 (GB), 27 (GB) Precautions 7 (GB) Projecting 18 (GB) PSS-610 Projector Suspension Support 30 (GB) R Remote Commander battery installation 14 (GB) location and function of controls 13 (GB)... Remote control detector front 9 (GB) rear 9 (GB) Reset resettable items 21 (GB) resetting the item 21 (GB) RGB ENHANCER 22 (GB) RS-232C connector 12 (GB) S SCAN ...
...on a ceiling 30 (GB) on a floor 29 (GB) KEYSTONE MEM 27 (GB) Index L Lamp replacement 34 (GB) LAMP TIMER 28 (GB) LANGUAGE 27 (GB) Location and function of controls connector panel 12 (GB) control...(GB) POWER SAVING 11 (GB), 27 (GB) Precautions 7 (GB) Projecting 18 (GB) PSS-610 Projector Suspension Support 30 (GB) R Remote Commander battery installation 14 (GB) location and function of controls 13 (GB)... Remote control detector front 9 (GB) rear 9 (GB) Reset resettable items 21 (GB) resetting the item 21 (GB) RGB ENHANCER 22 (GB) RS-232C connector 12 (GB) S SCAN ...


