
Operating Instructions
Page 4
... 8 Location and Function of Controls .. 10 Top/Front/Side 10 Rear/Side/Bottom 10 Control Panel 11 Connector Panel 12 Remote Commander 14 Projecting the Picture Installing the Projector 16 Connecting the Projector 17 Connecting a Computer 17 Connecting a VCR 19 Projecting 20 Turning Off the Power 22 Convenient Functions Selecting the Menu Language...
... 8 Location and Function of Controls .. 10 Top/Front/Side 10 Rear/Side/Bottom 10 Control Panel 11 Connector Panel 12 Remote Commander 14 Projecting the Picture Installing the Projector 16 Connecting the Projector 17 Connecting a Computer 17 Connecting a VCR 19 Projecting 20 Turning Off the Power 22 Convenient Functions Selecting the Menu Language...

Operating Instructions
Page 7
.... Clean the air filter whenever you replace the lamp. Do not install the unit other than 20 degrees. Use the PIC MUTING key on the Remote Commander to cover over on its side. Subject to direct cool or warm air from the light may cause a malfunction of the unit or damage...
.... Clean the air filter whenever you replace the lamp. Do not install the unit other than 20 degrees. Use the PIC MUTING key on the Remote Commander to cover over on its side. Subject to direct cool or warm air from the light may cause a malfunction of the unit or damage...

Operating Instructions
Page 8
...the CD-ROM) This Operating Instructions describes how to the projector. 8 About the Supplied Manuals / Features Features High brightness and high picture performance High brightness Sony's unique optical system with the newgeneration LCD panel "BrightEra" incorporating a newly developed inorganic alignment, allows... function The projector is an application software for RGB input. Manuals Safety Regulations (separately printed manual) This manual describes important notes and cautions to which allows you have made the required connections. VPL-FX40/FX41: Three 0.79-inch XGA panels with ...
...the CD-ROM) This Operating Instructions describes how to the projector. 8 About the Supplied Manuals / Features Features High brightness and high picture performance High brightness Sony's unique optical system with the newgeneration LCD panel "BrightEra" incorporating a newly developed inorganic alignment, allows... function The projector is an application software for RGB input. Manuals Safety Regulations (separately printed manual) This manual describes important notes and cautions to which allows you have made the required connections. VPL-FX40/FX41: Three 0.79-inch XGA panels with ...

Operating Instructions
Page 9
...that can also display VGA, SVGA, XGA, WXGA, SXGA, SXGA+ and UXGA (60 Hz) signals. Simple maintenance Even when the projector is mounted on the ceiling you can install the projector by tilting it is a registered trademark of the projector and the air filter is available for...the screen. Overview * The optional lenses available for VPL-FE40, VPL-FX40 and VPL-FX41 equipped with the center of the projector. Center positioned lens The projector is designed to locate the lens in one Remote Commander when you to turn the projector on/off by connecting a network cable to the...
...that can also display VGA, SVGA, XGA, WXGA, SXGA, SXGA+ and UXGA (60 Hz) signals. Simple maintenance Even when the projector is mounted on the ceiling you can install the projector by tilting it is a registered trademark of the projector and the air filter is available for...the screen. Overview * The optional lenses available for VPL-FE40, VPL-FX40 and VPL-FX41 equipped with the center of the projector. Center positioned lens The projector is designed to locate the lens in one Remote Commander when you to turn the projector on/off by connecting a network cable to the...
Operating Instructions
Page 10
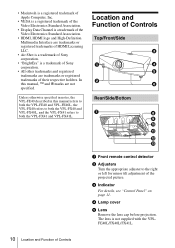
...VPL-FE40 and VPL-FE40L, the VPL-FX40 refers to both the VPL-FX41 and VPL-FX41L. Location and Function of Controls Top/Front/Side 3 1 4 5 2 6 Rear/Side/Bottom 7 8 9 0 qa qs qd a Front remote control detector b Adjusters Turn the appropriate adjuster to both the VPL-FX40 and VPL-FX40L, and the VPL...logo and High-Definition Multimedia Interface are trademarks or registered trademarks of HDMI Licensing LLC. • Air Shot is a trademark of Sony corporation. • "BrightEra" is not supplied with the VPLFE40L/FX40L/FX41L. 10 Location and Function of Controls c Indicator For ...
...VPL-FE40 and VPL-FE40L, the VPL-FX40 refers to both the VPL-FX41 and VPL-FX41L. Location and Function of Controls Top/Front/Side 3 1 4 5 2 6 Rear/Side/Bottom 7 8 9 0 qa qs qd a Front remote control detector b Adjusters Turn the appropriate adjuster to both the VPL-FX40 and VPL-FX40L, and the VPL...logo and High-Definition Multimedia Interface are trademarks or registered trademarks of HDMI Licensing LLC. • Air Shot is a trademark of Sony corporation. • "BrightEra" is not supplied with the VPLFE40L/FX40L/FX41L. 10 Location and Function of Controls c Indicator For ...
Operating Instructions
Page 11
...maintain optimal performance, clean the air filter whenever you can be set on page 43. g Rear remote control detector h Connector Panel For details, see "Cleaning the Air Filter" on one side only. Once the projector is in red when the AC power cord is on with the ?/1 key. i Security lock.... • A reception rate of 3 flashes when the lamp has reached the end of VPLFX41 is plugged into a wall outlet. Location and Function of VPL-FX41 can turn it on one side only. Overview f Air filter covers The air filter of Controls 11 b ON/STANDBY indicator Lights up . •...
...maintain optimal performance, clean the air filter whenever you can be set on page 43. g Rear remote control detector h Connector Panel For details, see "Cleaning the Air Filter" on one side only. Once the projector is in red when the AC power cord is on with the ?/1 key. i Security lock.... • A reception rate of 3 flashes when the lamp has reached the end of VPLFX41 is plugged into a wall outlet. Location and Function of VPL-FX41 can turn it on one side only. Overview f Air filter covers The air filter of Controls 11 b ON/STANDBY indicator Lights up . •...

Operating Instructions
Page 13
...INPUT B or INPUT C. AUDIO jack (stereo minijack) Connects to the monitor output of VIDEO IN is output. e REMOTE RS-232C connector (D-sub 9-pin, female) Connects to a computer to operate the projector from the INPUT D connector. The volume of the computer. When INPUT A, INPUT B or INPUT C is selected,... terminal when signals are to be controlled by the VOLUME +/- Overview AUDIO input L (MONO)/R (phono type) Connect to the audio output of Sony equipment. When VIDEO or S VIDEO is selected, the sound input to the AUDIO input connector of a computer using it as a computer. In...
...INPUT B or INPUT C. AUDIO jack (stereo minijack) Connects to the monitor output of VIDEO IN is output. e REMOTE RS-232C connector (D-sub 9-pin, female) Connects to a computer to operate the projector from the INPUT D connector. The volume of the computer. When INPUT A, INPUT B or INPUT C is selected,... terminal when signals are to be controlled by the VOLUME +/- Overview AUDIO input L (MONO)/R (phono type) Connect to the audio output of Sony equipment. When VIDEO or S VIDEO is selected, the sound input to the AUDIO input connector of a computer using it as a computer. In...

Operating Instructions
Page 14
...on page 31. g KEYSTONE (Vertical trapezoidal distortion correction) key Adjusts the vertical trapezoidal distortion of an item to its factory preset value. Remote Commander The keys that have the same names as those on the control panel function identically. wa w; d APA (Auto Pixel Alignment) key... Automatically adjusts a picture to its clearest while a signal is input from the connector of the same name as those of the Remote Commander. AUDIO - Use the arrow keys (M/m/ e ENTER key f RESET key Resets the value of the image manually. When you press ...
...on page 31. g KEYSTONE (Vertical trapezoidal distortion correction) key Adjusts the vertical trapezoidal distortion of an item to its factory preset value. Remote Commander The keys that have the same names as those on the control panel function identically. wa w; d APA (Auto Pixel Alignment) key... Automatically adjusts a picture to its clearest while a signal is input from the connector of the same name as those of the Remote Commander. AUDIO - Use the arrow keys (M/m/ e ENTER key f RESET key Resets the value of the image manually. When you press ...

Operating Instructions
Page 15
q SHIFT +/- keys Adjusts the vertical/horizontal position of OUTPUT. Press again or press the VOLUME+ key to temporarily cut the audio output from the speaker or audio signal from the AUDIO jack of the picture. n D ZOOM (Digital Zoom) +/- keys Adjusts the picture focus. keys Adjusts the picture size. Press again to restore the picture. • AUDIO: Press to restore the sound. key This function is not provided in this projector. o ZOOM +/- r M/m/ p FOCUS +/- Overview m MUTING keys Cut off the picture and sound. • PIC: Cuts off the picture.
q SHIFT +/- keys Adjusts the vertical/horizontal position of OUTPUT. Press again or press the VOLUME+ key to temporarily cut the audio output from the speaker or audio signal from the AUDIO jack of the picture. n D ZOOM (Digital Zoom) +/- keys Adjusts the picture focus. keys Adjusts the picture size. Press again to restore the picture. • AUDIO: Press to restore the sound. key This function is not provided in this projector. o ZOOM +/- r M/m/ p FOCUS +/- Overview m MUTING keys Cut off the picture and sound. • PIC: Cuts off the picture.

Operating Instructions
Page 20
... directly the input signal you press the INPUT key on the Remote Commander. connected to display Computer, etc. Notes • If "Auto Input Search" is projected clearly. The ON/STANDBY indicator flashes in green, and then lights in red and the projector goes into a wall outlet, then connect all equipment. The ON...
... directly the input signal you press the INPUT key on the Remote Commander. connected to display Computer, etc. Notes • If "Auto Input Search" is projected clearly. The ON/STANDBY indicator flashes in green, and then lights in red and the projector goes into a wall outlet, then connect all equipment. The ON...
Operating Instructions
Page 23
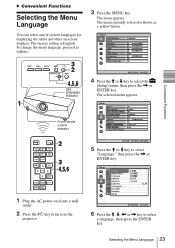
.... 80 50 50 50 Low 50 4 Press the M or m key to select the (Setup) menu, then press the , or ENTER key. Convenient Functions Front remote control detector COMMAND OFF ON INPUT A INPUT D INPUT B INPUT E INPUT C AIR SHOT VIDEO S VIDEO MENU APA ENTER RESET FOCUS ZOOM SHIFT ASPECT KEY STONE 2... 1 3 Press the MENU key. B Convenient Functions Selecting the Menu Language You can select one of sixteen languages for displaying the menu and other on the projector. 5 Press the M or m key to select "Language," then press the , or ENTER key. 30 6 Press the M, m, < or , key to select a language...
.... 80 50 50 50 Low 50 4 Press the M or m key to select the (Setup) menu, then press the , or ENTER key. Convenient Functions Front remote control detector COMMAND OFF ON INPUT A INPUT D INPUT B INPUT E INPUT C AIR SHOT VIDEO S VIDEO MENU APA ENTER RESET FOCUS ZOOM SHIFT ASPECT KEY STONE 2... 1 3 Press the MENU key. B Convenient Functions Selecting the Menu Language You can select one of sixteen languages for displaying the menu and other on the projector. 5 Press the M or m key to select "Language," then press the , or ENTER key. 30 6 Press the M, m, < or , key to select a language...

Operating Instructions
Page 26
... This function works when a signal from the wall outlet after the power off and the ON/ STANDBY indicator lights in red (except with the VPL-FX41). • When the power is turned on soon after it has been turned off, it may take some operations for a slide show ...screen during the slide show using a presentation tool (not supplied). After the power is any obstruction between the presentation tool and the remote control detector on the projector, the presentation tool may not function properly. • A black screen may unplug the AC power cord. Effective Tools for Your ...
... This function works when a signal from the wall outlet after the power off and the ON/ STANDBY indicator lights in red (except with the VPL-FX41). • When the power is turned on soon after it has been turned off, it may take some operations for a slide show ...screen during the slide show using a presentation tool (not supplied). After the power is any obstruction between the presentation tool and the remote control detector on the projector, the presentation tool may not function properly. • A black screen may unplug the AC power cord. Effective Tools for Your ...

Operating Instructions
Page 28
...follows: "Contrast," "Brightness," "Color," "Hue," "Color Temp," "Sharpness," "DDE," "Black Level Adj.," "V key stone" and "Gamma Mode" in the projector memory. For details, see page 39. appears on the input signals. Storage of the items, there are limited depending on the screen. 28 Using a MENU...the screen display appears. The items that cannot be reset are automatically stored in the Picture menu. • Press the RESET key on the Remote Commander. To decrease the number, press the m or < key. Press the ENTER key to restore the previous screen. • When ...
...follows: "Contrast," "Brightness," "Color," "Hue," "Color Temp," "Sharpness," "DDE," "Black Level Adj.," "V key stone" and "Gamma Mode" in the projector memory. For details, see page 39. appears on the input signals. Storage of the items, there are limited depending on the screen. 28 Using a MENU...the screen display appears. The items that cannot be reset are automatically stored in the Picture menu. • Press the RESET key on the Remote Commander. To decrease the number, press the m or < key. Press the ENTER key to restore the previous screen. • When ...

Operating Instructions
Page 35
... does not appear when this to "Off" when you want to "On," a test pattern appears on the Remote Commander. "Input-E" is pressed. Selects the background color of the projector. Set this item is set to select an input selector with effective signals is automatically selected by pressing the APA... key on the Remote Commander even if "Smart APA" set to be seen clearly. Off When set...
... does not appear when this to "Off" when you want to "On," a test pattern appears on the Remote Commander. "Input-E" is pressed. Selects the background color of the projector. Set this item is set to select an input selector with effective signals is automatically selected by pressing the APA... key on the Remote Commander even if "Smart APA" set to be seen clearly. Off When set...

Operating Instructions
Page 36
...Press the APA key when the full image is on the projector's security lock function. If you adjust the picture manually. ...around it is in standby mode, and turns the projector to "On." Setting items Panel Key Lock Security Lock... control panel keys on the security lock function, which locks the projector once a password has been set. Off When set to "On... press and hold the MENU key for 10 seconds turns the projector on when it , the APA function will not work properly ... Lock" is on the type of Off the projector so that the projector can cancel the adjustment by pressing the APA key...
...Press the APA key when the full image is on the projector's security lock function. If you adjust the picture manually. ...around it is in standby mode, and turns the projector to "On." Setting items Panel Key Lock Security Lock... control panel keys on the security lock function, which locks the projector once a password has been set. Off When set to "On... press and hold the MENU key for 10 seconds turns the projector on when it , the APA function will not work properly ... Lock" is on the type of Off the projector so that the projector can cancel the adjustment by pressing the APA key...

Operating Instructions
Page 37
...Flips the picture horizontally. • V: Flips the picture vertically. • Off: The picture does not flip. Standard Avoids any operation of the projector. • Front & Rear: Activates both the front and rear detectors. • Front: Activates the front detector only. • Rear: ...brightness of the trapezoid is recommended that you can adjust the projection lens using "Focus," "Zoom," and "Shift." Selects the remote control detectors (IR Receiver) on the screen horizontally and/or Off vertically. The Installation Menu The Installation menu is longer than the...
...Flips the picture horizontally. • V: Flips the picture vertically. • Off: The picture does not flip. Standard Avoids any operation of the projector. • Front & Rear: Activates both the front and rear detectors. • Front: Activates the front detector only. • Rear: ...brightness of the trapezoid is recommended that you can adjust the projection lens using "Focus," "Zoom," and "Shift." Selects the remote control detectors (IR Receiver) on the screen horizontally and/or Off vertically. The Installation Menu The Installation menu is longer than the...

Operating Instructions
Page 38
... Input-E may not function properly. Notes • Since the V keystone function is on. Illumination Selects whether the SONY logo on the top panel of the On projector lights when the projector is an electronic correction, sometimes the image will be displayed. 38 The Installation Menu When you use Blanking, set ...with the lens shift feature, the aspect ratio of the picture may change from the original or picture distortion may occur with the Remote Commander independently of the ID MODE keys of the 0 screen. Blanking Adjust the displayable area within the four directions of the...
... Input-E may not function properly. Notes • Since the V keystone function is on. Illumination Selects whether the SONY logo on the top panel of the On projector lights when the projector is an electronic correction, sometimes the image will be displayed. 38 The Installation Menu When you use Blanking, set ...with the lens shift feature, the aspect ratio of the picture may change from the original or picture distortion may occur with the Remote Commander independently of the ID MODE keys of the 0 screen. Blanking Adjust the displayable area within the four directions of the...

Operating Instructions
Page 42
...product contains mercury. Note Be sure to 0, and "Lamp Timer Reset Complete!" If not, the projector cannot be regulated due to environmental considerations. The Lamp Timer is not secured properly. 6 Restore the ...lamp replacement slot, and do not allow any key on the control panel of the projector or on the Remote Commander. Notes • Be careful not to touch the glass surface of the lamp.... • The power will not turn the projector on. 9 Press the MENU key, and then select the Setup...
...product contains mercury. Note Be sure to 0, and "Lamp Timer Reset Complete!" If not, the projector cannot be regulated due to environmental considerations. The Lamp Timer is not secured properly. 6 Restore the ...lamp replacement slot, and do not allow any key on the control panel of the projector or on the Remote Commander. Notes • Be careful not to touch the glass surface of the lamp.... • The power will not turn the projector on. 9 Press the MENU key, and then select the Setup...

Operating Instructions
Page 43
... fire. Claws Maintenance 4 Clean the air filter with a vacuum cleaner. The air filter of the projector or on the remote commander. 3 Remove the air filter from the air filter, replace the air filter with qualified Sony personnnel. • Be sure to attach the air filter cover firmly; Attach the air filter so... filter so that the frames on the air filter are visible. • To erase a message, press any key on the control panel of the VPL-FX41 is on the air filter cover. Remove the air filter, and then remove the dust with a vacuum cleaner. Caution If you replace the lamp...
... fire. Claws Maintenance 4 Clean the air filter with a vacuum cleaner. The air filter of the projector or on the remote commander. 3 Remove the air filter from the air filter, replace the air filter with qualified Sony personnnel. • Be sure to attach the air filter cover firmly; Attach the air filter so... filter so that the frames on the air filter are visible. • To erase a message, press any key on the control panel of the VPL-FX41 is on the air filter cover. Remove the air filter, and then remove the dust with a vacuum cleaner. Caution If you replace the lamp...

Operating Instructions
Page 45
...picture has not been adjusted properly. c Adjust the focus (see page 29). • The projector is set to "On" (see page 17). • The sound is not adjusted properly. c Display the full image on the Remote Commander or adjust "Volume" in the Screen menu properly (see page 33). Sound Symptom No... in the Setup menu is disconnected or the connections are black edges the screen. c Replace the lamp with the power on the lens. c Leave the projector for about two hours with a new one (see page 15). • The sound is muted. c Adjust the sound with the VOLUME +/- in the...
...picture has not been adjusted properly. c Adjust the focus (see page 29). • The projector is set to "On" (see page 17). • The sound is not adjusted properly. c Display the full image on the Remote Commander or adjust "Volume" in the Screen menu properly (see page 33). Sound Symptom No... in the Setup menu is disconnected or the connections are black edges the screen. c Replace the lamp with the power on the lens. c Leave the projector for about two hours with a new one (see page 15). • The sound is muted. c Adjust the sound with the VOLUME +/- in the...


