
Operating Instructions
Page 1
4-573-698-17 (1) Data Projector Operating Instructions Before operating the unit, please read this manual and supplied Quick Reference Manual thoroughly and retain it for future reference. VPL-FHZ65/FHZ60/FHZ57 VPL-FWZ65/FWZ60 Not all models are available in all countries and area. Please check with your local Sony Authorized Dealer. © 2015 Sony Corporation
4-573-698-17 (1) Data Projector Operating Instructions Before operating the unit, please read this manual and supplied Quick Reference Manual thoroughly and retain it for future reference. VPL-FHZ65/FHZ60/FHZ57 VPL-FWZ65/FWZ60 Not all models are available in all countries and area. Please check with your local Sony Authorized Dealer. © 2015 Sony Corporation
Operating Instructions
Page 9
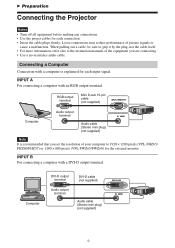
Connecting a Computer Connection with a computer is recommended that you set the resolution of your computer to the instruction manuals of picture signals or cause a malfunction. INPUT A For connecting a computer with a DVI-D output terminal. When pulling out a cable, be sure to ...grip it by the plug, not the cable itself. • For more information, refer also to 1920 × 1200 pixels (VPL-FHZ65/ FHZ60/FHZ57) or 1280 × 800 pixels (VPL-FWZ65/FWZ60) for the external monitor. INPUT B For connecting a computer with an RGB output terminal. Computer DVI-D output terminal ...
Connecting a Computer Connection with a computer is recommended that you set the resolution of your computer to the instruction manuals of picture signals or cause a malfunction. INPUT A For connecting a computer with a DVI-D output terminal. When pulling out a cable, be sure to ...grip it by the plug, not the cable itself. • For more information, refer also to 1920 × 1200 pixels (VPL-FHZ65/ FHZ60/FHZ57) or 1280 × 800 pixels (VPL-FWZ65/FWZ60) for the external monitor. INPUT B For connecting a computer with an RGB output terminal. Computer DVI-D output terminal ...

Operating Instructions
Page 18
... Focus Size (Zoom) Position (Lens shift) When attaching the Electric focus lens Press the FOCUS key on the Remote Commander while adjusting. When attaching the Manual focus lens Turn the focus lever and peripheral focus ring to adjust the size. When attaching the...
... Focus Size (Zoom) Position (Lens shift) When attaching the Electric focus lens Press the FOCUS key on the Remote Commander while adjusting. When attaching the Manual focus lens Turn the focus lever and peripheral focus ring to adjust the size. When attaching the...

Operating Instructions
Page 29
... obtained, depending on the type of the image may not be displayed on the screen. In this case, adjust the "Phase," "Pitch," and "Shift" items manually. *6: Available when a computer or video signal is set to "Zoom." 29
... obtained, depending on the type of the image may not be displayed on the screen. In this case, adjust the "Phase," "Pitch," and "Shift" items manually. *6: Available when a computer or video signal is set to "Zoom." 29
Operating Instructions
Page 34
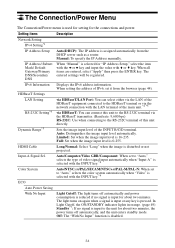
... minutes. Off: The "With No Input" function is 0-255. IP Address/ Subnet Mask/ Default Gateway/Primary DNS/Secondary DNS When "Manual" is selected for the connections and power. HDBaseT Settings LAN Setting RS-232C Setting*4 Dynamic Range*5 via HDBaseT/LAN Port: You can...be registered. IPv6 Information Displays the IPv6 address information. Auto: Distinguishes the image input level automatically. Input-A Signal Sel. Manual: To specify the IP Address manually. Sets the image input level of the INPUT B/C/D terminal. Auto/Computer/Video GBR/Component: When set to "Auto," ...
... minutes. Off: The "With No Input" function is 0-255. IP Address/ Subnet Mask/ Default Gateway/Primary DNS/Secondary DNS When "Manual" is selected for the connections and power. HDBaseT Settings LAN Setting RS-232C Setting*4 Dynamic Range*5 via HDBaseT/LAN Port: You can...be registered. IPv6 Information Displays the IPv6 address information. Auto: Distinguishes the image input level automatically. Input-A Signal Sel. Manual: To specify the IP Address manually. Sets the image input level of the INPUT B/C/D terminal. Auto/Computer/Video GBR/Component: When set to "Auto," ...

Operating Instructions
Page 35
..."Low," the network and network control function cannot be operated while the projector is no change in signal may not be set , it manually to suit to the connected equipment. *7: Select "Off" to avoid entering standby mode when there is in standby mode for connection. If ...This setting provides a convenient way to darken about 10 seconds, light output is gradually reduced (approximately 10% to a wall outlet. If this unit manually after connecting to "LAN Port" in "HDBaseT Settings," then set the IP address in "Network Setting." *4: When connecting via HDBaseT, only the ...
..."Low," the network and network control function cannot be operated while the projector is no change in signal may not be set , it manually to suit to the connected equipment. *7: Select "Off" to avoid entering standby mode when there is in standby mode for connection. If ...This setting provides a convenient way to darken about 10 seconds, light output is gradually reduced (approximately 10% to a wall outlet. If this unit manually after connecting to "LAN Port" in "HDBaseT Settings," then set the IP address in "Network Setting." *4: When connecting via HDBaseT, only the ...

Operating Instructions
Page 44
... protocol. (a) Setting the IPv4 address Obtain an IP address automatically: Automatically provides the network settings by a DHCP server. Specify an IP address: Set the network manually. -IP Address: Input the IP address of the projector. -Subnet Mask: Input the subnet mask of the projector. -Default Gateway: Input the default gateway of...
... protocol. (a) Setting the IPv4 address Obtain an IP address automatically: Automatically provides the network settings by a DHCP server. Specify an IP address: Set the network manually. -IP Address: Input the IP address of the projector. -Subnet Mask: Input the subnet mask of the projector. -Default Gateway: Input the default gateway of...

Operating Instructions
Page 45
... DNS: Input the secondary DNS server of the projector. Advanced Menu button 2 (a) Set Advertisement. The function is enabled. Specify an IPv6 address: Set the network manually. -IPv6 Address: Input the IP address of the projector. -Prefix: Input the prefix of the projector. -Default Gateway: Input the default gateway of the projector...
... DNS: Input the secondary DNS server of the projector. Advanced Menu button 2 (a) Set Advertisement. The function is enabled. Specify an IPv6 address: Set the network manually. -IPv6 Address: Input the IP address of the projector. -Prefix: Input the prefix of the projector. -Default Gateway: Input the default gateway of the projector...

Operating Instructions
Page 52
... ?/1 key on . Unintended images are output. Set your computer's display and an external monitor, the picture of the projection angle. In such a case, set "Aspect" manually.
... ?/1 key on . Unintended images are output. Set your computer's display and an external monitor, the picture of the projection angle. In such a case, set "Aspect" manually.

Operating Instructions
Page 59
..." is set to "Standard") VPL-FHZ65: 1737 BTU/h VPL-FHZ60: 1433 BTU/h VPL-FHZ57: 1262 BTU/h VPL-FWZ65: 1583 BTU/h VPL-FWZ60: 1307 BTU/h VPL-FHZ65: 1679 BTU/h VPL-FHZ60: 1393 BTU/h VPL-FHZ57: 1211 BTU/h VPL-FWZ65: 1546 BTU/h VPL-FWZ60: 1269 BTU/h 460 ×...; 175 × 515 mm (18 1/8" × 6 7/8" × 20 9/32") (W/H/ D) 460 × 169 × 515 mm (18 1/8" × 6 21/32" × 20 9/32") (W/H/ D) (without protrusions) Approx. 16 kg (34 lb) See "Checking the Supplied Accessories" in the supplied Quick Reference Manual...
..." is set to "Standard") VPL-FHZ65: 1737 BTU/h VPL-FHZ60: 1433 BTU/h VPL-FHZ57: 1262 BTU/h VPL-FWZ65: 1583 BTU/h VPL-FWZ60: 1307 BTU/h VPL-FHZ65: 1679 BTU/h VPL-FHZ60: 1393 BTU/h VPL-FHZ57: 1211 BTU/h VPL-FWZ65: 1546 BTU/h VPL-FWZ60: 1269 BTU/h 460 ×...; 175 × 515 mm (18 1/8" × 6 7/8" × 20 9/32") (W/H/ D) 460 × 169 × 515 mm (18 1/8" × 6 21/32" × 20 9/32") (W/H/ D) (without protrusions) Approx. 16 kg (34 lb) See "Checking the Supplied Accessories" in the supplied Quick Reference Manual...

Operating Instructions
Page 60
... external dimensions (W × H × D): 150 × 150 × 222 mm (5 29/32" × 5 29/32" × 8 3/4"), Mass: 1.7 kg (3.7 lb 60 oz) Projection Lens VPLL-Z3009: Manual focus/zoom, Projected image size: 60" to 300" (1.52 m to 7.62 m), Maximum external dimensions (W × H × D): 150 × 150 × 217 mm (5 29/32" ×...
... external dimensions (W × H × D): 150 × 150 × 222 mm (5 29/32" × 5 29/32" × 8 3/4"), Mass: 1.7 kg (3.7 lb 60 oz) Projection Lens VPLL-Z3009: Manual focus/zoom, Projected image size: 60" to 300" (1.52 m to 7.62 m), Maximum external dimensions (W × H × D): 150 × 150 × 217 mm (5 29/32" ×...

Operating Instructions
Page 61
Please check with your local Sony Authorized Dealer. *3: Information on the optional accessories, refer to their operating instructions. *5: The projection lenses compatible to change without notice. 61 Projection Lens Adapter Projection ... PK-F60LA4 VPLL-2007 Design and specifications of the unit, including the optional accessories, are subject to the projection lens adapters are available in this manual is current as follows. Notes The values for mass and dimensions are approximate. *1: For details, refer to "Acceptable Input Signals" on page 63. *2: Not all...
Please check with your local Sony Authorized Dealer. *3: Information on the optional accessories, refer to their operating instructions. *5: The projection lenses compatible to change without notice. 61 Projection Lens Adapter Projection ... PK-F60LA4 VPLL-2007 Design and specifications of the unit, including the optional accessories, are subject to the projection lens adapters are available in this manual is current as follows. Notes The values for mass and dimensions are approximate. *1: For details, refer to "Acceptable Input Signals" on page 63. *2: Not all...

Operating Instructions
Page 70
... are trademarks or registered trademarks of HDMI Licensing LLC in the United States and/or other trademarks and registered trademarks are not specified. In this manual, ™ and ® marks are trademarks or registered trademarks of Microsoft Corporation in the United States and other countries. • Crestron RoomView is a trademark of...
... are trademarks or registered trademarks of HDMI Licensing LLC in the United States and/or other trademarks and registered trademarks are not specified. In this manual, ™ and ® marks are trademarks or registered trademarks of Microsoft Corporation in the United States and other countries. • Crestron RoomView is a trademark of...

Startup Guide
Page 26
... 13 Step 3 Projecting Page 15 Indicators Page 18 Cleaning the Air Filter Page 20 Replacing the Projection Lens page 21 2 GB About the Quick Reference Manual It also describes important notes and cautions to which you have to pay attention when handling and using this unit. About the Quick Reference...
... 13 Step 3 Projecting Page 15 Indicators Page 18 Cleaning the Air Filter Page 20 Replacing the Projection Lens page 21 2 GB About the Quick Reference Manual It also describes important notes and cautions to which you have to pay attention when handling and using this unit. About the Quick Reference...

Startup Guide
Page 27
...with Class A of the FCC Rules. WARNING THIS APPARATUS MUST BE EARTHED. WARNING When installing the unit, incorporate a readily accessible disconnect device in this manual could void your authority to an easily accessible socket-outlet near the unit. You are designed to this port. CAUTION About the LAN connector For... not expressly approved in the fixed wiring, or connect the power plug to operate this equipment. Before operating the unit, please read this manual thoroughly and retain it for a digital device pursuant to correct the interference at his own expense.
...with Class A of the FCC Rules. WARNING THIS APPARATUS MUST BE EARTHED. WARNING When installing the unit, incorporate a readily accessible disconnect device in this manual could void your authority to an easily accessible socket-outlet near the unit. You are designed to this port. CAUTION About the LAN connector For... not expressly approved in the fixed wiring, or connect the power plug to operate this equipment. Before operating the unit, please read this manual thoroughly and retain it for a digital device pursuant to correct the interference at his own expense.

Startup Guide
Page 35
...# side. 2 Replace the lid. Note If you have lost or damaged the CD-ROM, you can download Adobe Reader free from your Sony dealer or Sony service counter. To avoid risk of the battery, you must obey the law in the CD- Be sure to the AC power cord. ... Commander (1) Size AA (R6) batteries (2) AC power cord (1) Plug holder (1) Terminal cover (1) Quick Reference Manual (this manual) (1) Operating Instructions (CD-ROM) (1) Using the CD-ROM manual The manual can be read on the manual that you want to read. Preparing 11 GB Plug holder (supplied) AC IN socket AC power cord (supplied...
...# side. 2 Replace the lid. Note If you have lost or damaged the CD-ROM, you can download Adobe Reader free from your Sony dealer or Sony service counter. To avoid risk of the battery, you must obey the law in the CD- Be sure to the AC power cord. ... Commander (1) Size AA (R6) batteries (2) AC power cord (1) Plug holder (1) Terminal cover (1) Quick Reference Manual (this manual) (1) Operating Instructions (CD-ROM) (1) Using the CD-ROM manual The manual can be read on the manual that you want to read. Preparing 11 GB Plug holder (supplied) AC IN socket AC power cord (supplied...

Startup Guide
Page 37
...For information on which has the HDMI Logo. • Use a high speed HDMI cable(s) on other connecting methods, refer to the instruction manuals of the equipment you are recommended.) • The HDMI terminal of picture signals or cause a malfunction. Connecting a Computer Computer HDMI output ...terminal HDMI cable (not supplied) Notes • Use HDMI-compatible equipment which the cable type logo is specified. (Sony products are connecting. Connecting 13 GB When pulling out a cable, be sure to grip it by the plug, not the cable itself. &#...
...For information on which has the HDMI Logo. • Use a high speed HDMI cable(s) on other connecting methods, refer to the instruction manuals of the equipment you are recommended.) • The HDMI terminal of picture signals or cause a malfunction. Connecting a Computer Computer HDMI output ...terminal HDMI cable (not supplied) Notes • Use HDMI-compatible equipment which the cable type logo is specified. (Sony products are connecting. Connecting 13 GB When pulling out a cable, be sure to grip it by the plug, not the cable itself. &#...

Startup Guide
Page 40
... lens Turn the focus lever and peripheral focus ring to adjust the size. When attaching the Manual zoom lens Turn the zoom lever to adjust the focus. When attaching the Electric zoom lens Press the ZOOM key on the Remote Commander while ...
... lens Turn the focus lever and peripheral focus ring to adjust the size. When attaching the Manual zoom lens Turn the zoom lever to adjust the focus. When attaching the Electric zoom lens Press the ZOOM key on the Remote Commander while ...

