Operating Instructions
Page 1
VPL-FHZ65/FHZ60/FHZ57 VPL-FWZ65/FWZ60 Not all models are available in all countries and area. 4-573-698-17 (1) Data Projector Operating Instructions Before operating the unit, please read this manual and supplied Quick Reference Manual thoroughly and retain it for future reference. Please check with your local Sony Authorized Dealer. © 2015 Sony Corporation
VPL-FHZ65/FHZ60/FHZ57 VPL-FWZ65/FWZ60 Not all models are available in all countries and area. 4-573-698-17 (1) Data Projector Operating Instructions Before operating the unit, please read this manual and supplied Quick Reference Manual thoroughly and retain it for future reference. Please check with your local Sony Authorized Dealer. © 2015 Sony Corporation
Operating Instructions
Page 9
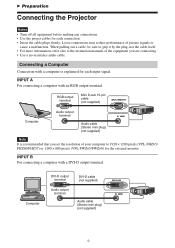
Loose connections may reduce performance of your computer to the instruction manuals of the equipment you set the resolution of picture signals or cause a malfunction. INPUT B For connecting a computer with an RGB output terminal. RGB output ... sure to grip it by the plug, not the cable itself. • For more information, refer also to 1920 × 1200 pixels (VPL-FHZ65/ FHZ60/FHZ57) or 1280 × 800 pixels (VPL-FWZ65/FWZ60) for the external monitor. INPUT A For connecting a computer with a DVI-D output terminal. B Preparation Connecting the Projector Notes • ...
Loose connections may reduce performance of your computer to the instruction manuals of the equipment you set the resolution of picture signals or cause a malfunction. INPUT B For connecting a computer with an RGB output terminal. RGB output ... sure to grip it by the plug, not the cable itself. • For more information, refer also to 1920 × 1200 pixels (VPL-FHZ65/ FHZ60/FHZ57) or 1280 × 800 pixels (VPL-FWZ65/FWZ60) for the external monitor. INPUT A For connecting a computer with a DVI-D output terminal. B Preparation Connecting the Projector Notes • ...

Operating Instructions
Page 18
... size. Press the LENS SHIFT/SHIFT key on the projector or the Remote Commander then press the V/ v/B/b key to adjust the size. When attaching the Manual zoom lens Turn the zoom lever to adjust the focus. When attaching the Electric zoom lens Press the ZOOM key on the projector or the...
... size. Press the LENS SHIFT/SHIFT key on the projector or the Remote Commander then press the V/ v/B/b key to adjust the size. When attaching the Manual zoom lens Turn the zoom lever to adjust the focus. When attaching the Electric zoom lens Press the ZOOM key on the projector or the...

Operating Instructions
Page 29
In this case, adjust the "Phase," "Pitch," and "Shift" items manually. *6: Available when a computer or video signal is input from the RGB/YPBPR input terminal (INPUT A). *5: If the projected image includes a large amount of black portion ...
In this case, adjust the "Phase," "Pitch," and "Shift" items manually. *6: Available when a computer or video signal is input from the RGB/YPBPR input terminal (INPUT A). *5: If the projected image includes a large amount of black portion ...
Operating Instructions
Page 34
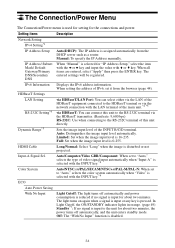
....*6 Color System Auto/NTSC3.58/PAL/SECAM/NTSC4.43/PAL-M/PAL-N: When set it from the DHCP server such as a router. Manual: To specify the IP Address manually. IPv6 Information Displays the IPv6 address information. Full: Set when the image input level is 16-235. IP Address/ Subnet Mask/... Default Gateway/Primary DNS/Secondary DNS When "Manual" is selected with the LAN terminal of the main unit.*2 *3 via HDBaseT: You can select either via the LAN of the HDBaseT equipment connected...
....*6 Color System Auto/NTSC3.58/PAL/SECAM/NTSC4.43/PAL-M/PAL-N: When set it from the DHCP server such as a router. Manual: To specify the IP Address manually. IPv6 Information Displays the IPv6 address information. Full: Set when the image input level is 16-235. IP Address/ Subnet Mask/... Default Gateway/Primary DNS/Secondary DNS When "Manual" is selected with the LAN terminal of the main unit.*2 *3 via HDBaseT: You can select either via the LAN of the HDBaseT equipment connected...

Operating Instructions
Page 35
..., the connection is gradually reduced (approximately 10% to 15%*10) from that set in standby mode. (page 49) On/Off: When set , it manually to suit to the connected equipment. *7: Select "Off" to avoid entering standby mode when there is in signal may unplug the AC power cord without.../10 min./30 min.: After you select "Demo.," the image will start within the specified time (10 minutes or 30 minutes). If this unit manually after connecting to input signal. While dimming the light, the message "Light Dimming" appears. You may not be operated while the projector is not correct...
..., the connection is gradually reduced (approximately 10% to 15%*10) from that set in standby mode. (page 49) On/Off: When set , it manually to suit to the connected equipment. *7: Select "Off" to avoid entering standby mode when there is in signal may unplug the AC power cord without.../10 min./30 min.: After you select "Demo.," the image will start within the specified time (10 minutes or 30 minutes). If this unit manually after connecting to input signal. While dimming the light, the message "Light Dimming" appears. You may not be operated while the projector is not correct...

Operating Instructions
Page 44
... protocol. (a) Setting the IPv4 address Obtain an IP address automatically: Automatically provides the network settings by a DHCP server. Specify an IP address: Set the network manually. -IP Address: Input the IP address of the projector. -Subnet Mask: Input the subnet mask of the projector. -Default Gateway: Input the default gateway of...
... protocol. (a) Setting the IPv4 address Obtain an IP address automatically: Automatically provides the network settings by a DHCP server. Specify an IP address: Set the network manually. -IP Address: Input the IP address of the projector. -Subnet Mask: Input the subnet mask of the projector. -Default Gateway: Input the default gateway of...

Operating Instructions
Page 45
... settings. Advertisement Service setting area Advertisement button Start Advertisement Service: Set Advertisement to display the buttons for Ethenet. Specify an IPv6 address: Set the network manually. -IPv6 Address: Input the IP address of the projector. -Prefix: Input the prefix of the projector. -Default Gateway: Input the default gateway of the projector...
... settings. Advertisement Service setting area Advertisement button Start Advertisement Service: Set Advertisement to display the buttons for Ethenet. Specify an IPv6 address: Set the network manually. -IPv6 Address: Input the IP address of the projector. -Prefix: Input the prefix of the projector. -Default Gateway: Input the default gateway of the projector...

Operating Instructions
Page 52
.... 17 Check if the picture is displayed smaller /a portion of the projection angle. The image may not appear properly. In such a case, you set "Aspect" manually. No image/image Set "HDMI Cable" to "Long." 34 disturbance The color of the external monitor may not be being performed. The aspect ratio of...
.... 17 Check if the picture is displayed smaller /a portion of the projection angle. The image may not appear properly. In such a case, you set "Aspect" manually. No image/image Set "HDMI Cable" to "Long." 34 disturbance The color of the external monitor may not be being performed. The aspect ratio of...

Operating Instructions
Page 59
..." is set to "Standard") VPL-FHZ65: 1737 BTU/h VPL-FHZ60: 1433 BTU/h VPL-FHZ57: 1262 BTU/h VPL-FWZ65: 1583 BTU/h VPL-FWZ60: 1307 BTU/h VPL-FHZ65: 1679 BTU/h VPL-FHZ60: 1393 BTU/h VPL-FHZ57: 1211 BTU/h VPL-FWZ65: 1546 BTU/h VPL-FWZ60: 1269 BTU/h 460 ×...; 175 × 515 mm (18 1/8" × 6 7/8" × 20 9/32") (W/H/ D) 460 × 169 × 515 mm (18 1/8" × 6 21/32" × 20 9/32") (W/H/ D) (without protrusions) Approx. 16 kg (34 lb) See "Checking the Supplied Accessories" in the supplied Quick Reference Manual...
..." is set to "Standard") VPL-FHZ65: 1737 BTU/h VPL-FHZ60: 1433 BTU/h VPL-FHZ57: 1262 BTU/h VPL-FWZ65: 1583 BTU/h VPL-FWZ60: 1307 BTU/h VPL-FHZ65: 1679 BTU/h VPL-FHZ60: 1393 BTU/h VPL-FHZ57: 1211 BTU/h VPL-FWZ65: 1546 BTU/h VPL-FWZ60: 1269 BTU/h 460 ×...; 175 × 515 mm (18 1/8" × 6 7/8" × 20 9/32") (W/H/ D) 460 × 169 × 515 mm (18 1/8" × 6 21/32" × 20 9/32") (W/H/ D) (without protrusions) Approx. 16 kg (34 lb) See "Checking the Supplied Accessories" in the supplied Quick Reference Manual...

Operating Instructions
Page 60
... external dimensions (W × H × D): 150 × 150 × 222 mm (5 29/32" × 5 29/32" × 8 3/4"), Mass: 1.7 kg (3.7 lb 60 oz) Projection Lens VPLL-Z3009: Manual focus/zoom, Projected image size: 60" to 300" (1.52 m to 7.62 m), Maximum external dimensions (W × H × D): 150 × 150 × 217 mm (5 29/32" ×...
... external dimensions (W × H × D): 150 × 150 × 222 mm (5 29/32" × 5 29/32" × 8 3/4"), Mass: 1.7 kg (3.7 lb 60 oz) Projection Lens VPLL-Z3009: Manual focus/zoom, Projected image size: 60" to 300" (1.52 m to 7.62 m), Maximum external dimensions (W × H × D): 150 × 150 × 217 mm (5 29/32" ×...

Operating Instructions
Page 61
.... *1: For details, refer to the projection lens adapters are as of the unit, including the optional accessories, are available in this manual is current as follows. Please check with your local Sony Authorized Dealer. *3: Information on page 63. *2: Not all optional accessories are subject to change without notice. 61 Projection Lens Adapter...
.... *1: For details, refer to the projection lens adapters are as of the unit, including the optional accessories, are available in this manual is current as follows. Please check with your local Sony Authorized Dealer. *3: Information on page 63. *2: Not all optional accessories are subject to change without notice. 61 Projection Lens Adapter...

Operating Instructions
Page 70
...; 21° 21° 14° 122° - Front of the cabinet Front of AMX Corporation. • The terms HDMI and HDMI High- In this manual, ™ and ® marks are trademarks of the HDBaseT Alliance. • All other countries. • Crestron RoomView is a trademark of the lens 70 The distance...
...; 21° 21° 14° 122° - Front of the cabinet Front of AMX Corporation. • The terms HDMI and HDMI High- In this manual, ™ and ® marks are trademarks of the HDBaseT Alliance. • All other countries. • Crestron RoomView is a trademark of the lens 70 The distance...

Startup Guide
Page 26
About the Quick Reference Manual This Quick Reference Manual explains the basic operations for projecting pictures. It also describes important notes and cautions to which you have to the Operating Instructions contained in the ... 13 Step 3 Projecting Page 15 Indicators Page 18 Cleaning the Air Filter Page 20 Replacing the Projection Lens page 21 2 GB About the Quick Reference Manual Refer to "Indicators," "Cleaning the Air Filter," and "Replacing the Projection Lens," as necessary.
About the Quick Reference Manual This Quick Reference Manual explains the basic operations for projecting pictures. It also describes important notes and cautions to which you have to the Operating Instructions contained in the ... 13 Step 3 Projecting Page 15 Indicators Page 18 Cleaning the Air Filter Page 20 Replacing the Projection Lens page 21 2 GB About the Quick Reference Manual Refer to "Indicators," "Cleaning the Air Filter," and "Replacing the Projection Lens," as necessary.

Startup Guide
Page 27
...disconnect device in a commercial environment. Use the approved Power Cord (3-core mains lead) / Appliance Connector / Plug with the instruction manual, may cause harmful interference to the following two conditions: (1) This device may not cause harmful interference, and (2) this equipment. This... above Power Cord / Appliance Connector / Plug, please consult a qualified service personnel. In a residential environment this manual thoroughly and retain it for peripheral device wiring that conforms to provide reasonable protection against harmful interference when the equipment is...
...disconnect device in a commercial environment. Use the approved Power Cord (3-core mains lead) / Appliance Connector / Plug with the instruction manual, may cause harmful interference to the following two conditions: (1) This device may not cause harmful interference, and (2) this equipment. This... above Power Cord / Appliance Connector / Plug, please consult a qualified service personnel. In a residential environment this manual thoroughly and retain it for peripheral device wiring that conforms to provide reasonable protection against harmful interference when the equipment is...

Startup Guide
Page 35
... plug holder over the AC power cord to fix to the AC power cord. ROM. 2 Select and click on the manual that you want to install the battery from your Sony dealer or Sony service counter. Be sure to read on a computer with Adobe Reader installed. Preparing 11 GB Note If you have... incorrectly replaced. Step 1 Preparing Checking the Supplied Accessories RM-PJ27 Remote Commander (1) Size AA (R6) batteries (2) AC power cord (1) Plug holder (1) Terminal cover (1) Quick Reference Manual (this manual) (1) Operating Instructions (CD-ROM) (1) Using the CD-ROM...
... plug holder over the AC power cord to fix to the AC power cord. ROM. 2 Select and click on the manual that you want to install the battery from your Sony dealer or Sony service counter. Be sure to read on a computer with Adobe Reader installed. Preparing 11 GB Note If you have... incorrectly replaced. Step 1 Preparing Checking the Supplied Accessories RM-PJ27 Remote Commander (1) Size AA (R6) batteries (2) AC power cord (1) Plug holder (1) Terminal cover (1) Quick Reference Manual (this manual) (1) Operating Instructions (CD-ROM) (1) Using the CD-ROM...

Startup Guide
Page 37
... HDMI-compatible equipment which has the HDMI Logo. • Use a high speed HDMI cable(s) on other connecting methods, refer to the instruction manuals of the equipment you are recommended.) • The HDMI terminal of picture signals or cause a malfunction. When pulling out a cable, be sure... proper cables for each connection. • Insert the cable plugs firmly; For information on which the cable type logo is specified. (Sony products are connecting. Loose connections may reduce performance of this projector is not compatible with DSD (Direct Stream Digital) signal or CEC (...
... HDMI-compatible equipment which has the HDMI Logo. • Use a high speed HDMI cable(s) on other connecting methods, refer to the instruction manuals of the equipment you are recommended.) • The HDMI terminal of picture signals or cause a malfunction. When pulling out a cable, be sure... proper cables for each connection. • Insert the cable plugs firmly; For information on which the cable type logo is specified. (Sony products are connecting. Loose connections may reduce performance of this projector is not compatible with DSD (Direct Stream Digital) signal or CEC (...

Startup Guide
Page 40
... the projected image Press the RESET key on the projector or the Remote Commander then press the V/ v/B/b key to adjust the size. When attaching the Manual zoom lens Turn the zoom lever to adjust the focus. Focus lever Zoom lever Peripheral focus ring GB 16 Projecting Press the LENS SHIFT/SHIFT... by rotating the peripheral focus ring. When attaching the Electric zoom lens Press the ZOOM key on the Remote Commander while adjusting. When attaching the Manual focus lens Turn the focus lever and peripheral focus ring to adjust the size.
... the projected image Press the RESET key on the projector or the Remote Commander then press the V/ v/B/b key to adjust the size. When attaching the Manual zoom lens Turn the zoom lever to adjust the focus. Focus lever Zoom lever Peripheral focus ring GB 16 Projecting Press the LENS SHIFT/SHIFT... by rotating the peripheral focus ring. When attaching the Electric zoom lens Press the ZOOM key on the Remote Commander while adjusting. When attaching the Manual focus lens Turn the focus lever and peripheral focus ring to adjust the size.

