
Operating Instructions
Page 1
Please check with your local Sony Authorized Dealer. © 2017 Sony Corporation VPL-DX271/DX241/DX221 VPL-DW241 Not all models are available in all countries and area. 4-698-369-12 (1) Data Projector Operating Instructions Before operating the unit, please read this manual and supplied Quick Reference Manual thoroughly and retain it for future reference.
Please check with your local Sony Authorized Dealer. © 2017 Sony Corporation VPL-DX271/DX241/DX221 VPL-DW241 Not all models are available in all countries and area. 4-698-369-12 (1) Data Projector Operating Instructions Before operating the unit, please read this manual and supplied Quick Reference Manual thoroughly and retain it for future reference.
Operating Instructions
Page 7
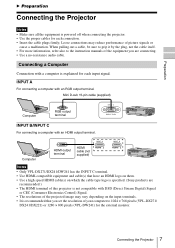
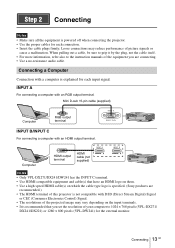
...also to 1024 × 768 pixels (VPL-DX271/ DX241/DX221) or 1280 × 800 pixels (VPL-DW241) for the external monitor. Computer HDMI output terminal HDMI cable (not supplied) Notes • Only VPL-DX271/DX241/DW241 has the INPUT C terminal... logo on them. • Use a high speed HDMI cable(s) on which the cable type logo is specified. (Sony products are connecting. • Use a no-resistance audio cable. Connecting a Computer Connection with DSD (Direct Stream Digital...set the resolution of your computer to the instruction manuals of picture signals or cause a malfunction.
...also to 1024 × 768 pixels (VPL-DX271/ DX241/DX221) or 1280 × 800 pixels (VPL-DW241) for the external monitor. Computer HDMI output terminal HDMI cable (not supplied) Notes • Only VPL-DX271/DX241/DW241 has the INPUT C terminal... logo on them. • Use a high speed HDMI cable(s) on which the cable type logo is specified. (Sony products are connecting. • Use a no-resistance audio cable. Connecting a Computer Connection with DSD (Direct Stream Digital...set the resolution of your computer to the instruction manuals of picture signals or cause a malfunction.
Operating Instructions
Page 14
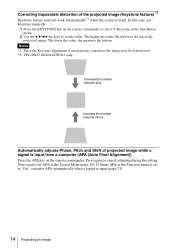
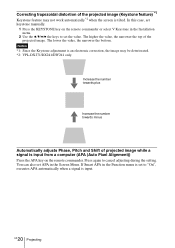
...menu. 2 Use the V/v/B/b the keys to set APA in the Function menu is set to cancel adjusting during the setting. In this case, set keystone manually. 1 Press the KEYSTONE key on the remote commander. Correcting trapezoidal distortion of the projected image (Keystone feature) *1 Keystone feature may not work automatically*2 when... the screen is an electronic correction, the image may be deteriorated. *2: VPL-DX271/DX241/DW241 only. The higher the value, the narrower the top of the projected image.
...menu. 2 Use the V/v/B/b the keys to set APA in the Function menu is set to cancel adjusting during the setting. In this case, set keystone manually. 1 Press the KEYSTONE key on the remote commander. Correcting trapezoidal distortion of the projected image (Keystone feature) *1 Keystone feature may not work automatically*2 when... the screen is an electronic correction, the image may be deteriorated. *2: VPL-DX271/DX241/DW241 only. The higher the value, the narrower the top of the projected image.
Operating Instructions
Page 20
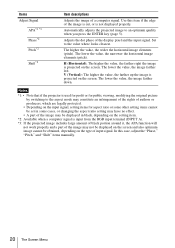
... item if the edge of a computer signal. The lower the value, the image farther down. Use this case, adjust the "Phase," "Pitch," and "Shift" items manually. 20 The Screen Menu
... item if the edge of a computer signal. The lower the value, the image farther down. Use this case, adjust the "Phase," "Pitch," and "Shift" items manually. 20 The Screen Menu

Operating Instructions
Page 26
... "Auto Power Saving" or "With No Input." *3: Select "Off" to avoid entering standby mode when there is no input signal. *4: As the lamp is set manually according to "On," "Sleep" cannot be detected depending on the input image. However, this case, set to the connected equipment. 26 The Connection/Power Menu...
... "Auto Power Saving" or "With No Input." *3: Select "Off" to avoid entering standby mode when there is no input signal. *4: As the lamp is set manually according to "On," "Sleep" cannot be detected depending on the input image. However, this case, set to the connected equipment. 26 The Connection/Power Menu...
Operating Instructions
Page 27
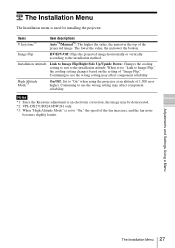
... Changes the cooling setting to suit to the installation method. Notes *1: Since the Keystone adjustment is an electronic correction, the image may be deteriorated. *2: VPL-DX271/DX241/DW241 only. *3: When "High Altitude Mode" is used for installing the projector. Image Flip HV/H/V/Off: Flips the projected image horizontally or vertically...m or higher. The lower the value, the narrower the bottom. Adjustments and Settings Using a Menu The Installation Menu 27 Items V keystone*1 Item descriptions Auto*2/Manual*1: The higher the value, the narrower the top of "Image Flip."
... Changes the cooling setting to suit to the installation method. Notes *1: Since the Keystone adjustment is an electronic correction, the image may be deteriorated. *2: VPL-DX271/DX241/DW241 only. *3: When "High Altitude Mode" is used for installing the projector. Image Flip HV/H/V/Off: Flips the projected image horizontally or vertically...m or higher. The lower the value, the narrower the bottom. Adjustments and Settings Using a Menu The Installation Menu 27 Items V keystone*1 Item descriptions Auto*2/Manual*1: The higher the value, the narrower the top of "Image Flip."

Operating Instructions
Page 32
... portion of image does not appear. No image. The aspect ratio of the projection 5, 14, angle. In this case, select 27 "Manual" to both the computer's display and an external monitor, the external monitor image may not display correctly because the input signal 5, 19, ... on . The image may not be turned on the projector. Set "V Keystone" to "Auto"*1 or "Manual" to set manually. 5, 14, 27 When the projector is set "Aspect" manually. 21 The image is not attached securely, the projector 34 cannot be displayed properly. The images become trapezoidal because...
... portion of image does not appear. No image. The aspect ratio of the projection 5, 14, angle. In this case, select 27 "Manual" to both the computer's display and an external monitor, the external monitor image may not display correctly because the input signal 5, 19, ... on . The image may not be turned on the projector. Set "V Keystone" to "Auto"*1 or "Manual" to set manually. 5, 14, 27 When the projector is set "Aspect" manually. 21 The image is not attached securely, the projector 34 cannot be displayed properly. The images become trapezoidal because...
Operating Instructions
Page 39
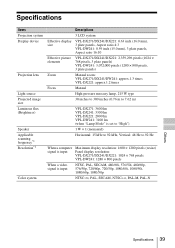
...,000 pixels (1280 × 800 pixels, 3 plate panels) Zoom Manual zoom: VPL-DX271/DX241/DW241: approx.1.3 times VPL-DX221: approx.1.2 times Focus Manual High-pressure mercury lamp, 215 W type 30 inches to 300 inches (0.76 m to 7.62 m) VPL-DX271: 3600 lm VPL-DX241: 3300 lm VPL-DX221: 2800 lm VPL-DW241: 3100 lm (when "Lamp Mode" is set to "High...
...,000 pixels (1280 × 800 pixels, 3 plate panels) Zoom Manual zoom: VPL-DX271/DX241/DW241: approx.1.3 times VPL-DX221: approx.1.2 times Focus Manual High-pressure mercury lamp, 215 W type 30 inches to 300 inches (0.76 m to 7.62 m) VPL-DX271: 3600 lm VPL-DX241: 3300 lm VPL-DX221: 2800 lm VPL-DW241: 3100 lm (when "Lamp Mode" is set to "High...
Operating Instructions
Page 41
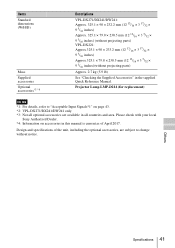
...Sony Authorized Dealer. *4: Information on page 43. *2: VPL-DX271/DX241/DW241 only. *3: Not all optional accessories are subject to change without notice. Others Specifications 41 Items Standard dimensions (W/H/D) Mass Supplied accessories Optional accessories*3 *4 Descriptions VPL...230.5 mm (12 13/16 × 3 5/32 × 9 1/16 inches) (without projecting parts) VPL-DX221: Approx.325.1 × 90 × 233.2 mm (12 13/16 × 3 17/32 &#.... 2.7 kg (5.9 lb) See "Checking the Supplied Accessories" in this manual is current as of the unit, including the optional accessories, are available ...
...Sony Authorized Dealer. *4: Information on page 43. *2: VPL-DX271/DX241/DW241 only. *3: Not all optional accessories are subject to change without notice. Others Specifications 41 Items Standard dimensions (W/H/D) Mass Supplied accessories Optional accessories*3 *4 Descriptions VPL...230.5 mm (12 13/16 × 3 5/32 × 9 1/16 inches) (without projecting parts) VPL-DX221: Approx.325.1 × 90 × 233.2 mm (12 13/16 × 3 17/32 &#.... 2.7 kg (5.9 lb) See "Checking the Supplied Accessories" in this manual is current as of the unit, including the optional accessories, are available ...

Operating Instructions
Page 53
Others Index 53 In this manual, ™ and ® marks are not specified. in the United States and/or other trademarks and registered trademarks are trademarks or registered trademarks of HDMI ...
Others Index 53 In this manual, ™ and ® marks are not specified. in the United States and/or other trademarks and registered trademarks are trademarks or registered trademarks of HDMI ...

Startup Guide
Page 34
Refer to pay attention when handling and using this unit. About the Quick Reference Manual This Quick Reference Manual explains the basic operations for projecting pictures. It also describes important notes and cautions to which you have to "Indicators," "Cleaning the Air Filter," as ... It to the Operating Instructions contained in the supplied CDROM. For details on the operations, refer to a Ceiling Page 28 2 GB About the Quick Reference Manual
Refer to pay attention when handling and using this unit. About the Quick Reference Manual This Quick Reference Manual explains the basic operations for projecting pictures. It also describes important notes and cautions to which you have to "Indicators," "Cleaning the Air Filter," as ... It to the Operating Instructions contained in the supplied CDROM. For details on the operations, refer to a Ceiling Page 28 2 GB About the Quick Reference Manual
Startup Guide
Page 35
...or disconnect the power plug. To avoid risk of explosion if battery is encouraged to try to connect peripherals must obey the law in this manual could void your authority to operate this apparatus to switch the power supply off and on the use a lithium battery (CR2025). If you dispose... may cause harmful interference to part 15 of the following measures: - When you have questions on , the user is incorrectly replaced. If this manual thoroughly and retain it for the RM-PJ8 Remote Commander. You are designed to comply with the same or equivalent type recommended by one or...
...or disconnect the power plug. To avoid risk of explosion if battery is encouraged to try to connect peripherals must obey the law in this manual could void your authority to operate this apparatus to switch the power supply off and on the use a lithium battery (CR2025). If you dispose... may cause harmful interference to part 15 of the following measures: - When you have questions on , the user is incorrectly replaced. If this manual thoroughly and retain it for the RM-PJ8 Remote Commander. You are designed to comply with the same or equivalent type recommended by one or...
Startup Guide
Page 42
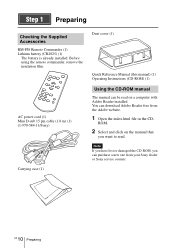
AC power cord (1) Mini D-sub 15 pin cable (1.8 m) (1) (1-970-584-11/Sony) Carrying case (1) Dust cover (1) Quick Reference Manual (this manual) (1) Operating Instructions (CD-ROM) (1) Using the CD-ROM manual The manual can be read . ROM. 2 Select and click on a computer with Adobe Reader installed. You can purchase a new ... battery is already installed. Note If you have lost or damaged the CD-ROM, you want to read on the manual that you can download Adobe Reader free from your Sony dealer or Sony service counter. Before using the remote commander, remove the insulation film.
AC power cord (1) Mini D-sub 15 pin cable (1.8 m) (1) (1-970-584-11/Sony) Carrying case (1) Dust cover (1) Quick Reference Manual (this manual) (1) Operating Instructions (CD-ROM) (1) Using the CD-ROM manual The manual can be read . ROM. 2 Select and click on a computer with Adobe Reader installed. You can purchase a new ... battery is already installed. Note If you have lost or damaged the CD-ROM, you want to read on the manual that you can download Adobe Reader free from your Sony dealer or Sony service counter. Before using the remote commander, remove the insulation film.
Startup Guide
Page 45
...that have an HDMI logo on them. • Use a high speed HDMI cable(s) on which the cable type logo is specified. (Sony products are connecting. • Use a no-resistance audio cable. When pulling out a cable, be sure to grip it by the ...DX221) or 1280 × 800 pixels (VPL-DW241) for the external monitor. Computer HDMI output terminal HDMI cable (not supplied) Notes • Only VPL-DX271/DX241/DW241 has the INPUT C terminal. • Use HDMI-compatible equipment and cable(s) that you are recommended.) • The HDMI terminal of your computer to the instruction manuals...
...that have an HDMI logo on them. • Use a high speed HDMI cable(s) on which the cable type logo is specified. (Sony products are connecting. • Use a no-resistance audio cable. When pulling out a cable, be sure to grip it by the ...DX221) or 1280 × 800 pixels (VPL-DW241) for the external monitor. Computer HDMI output terminal HDMI cable (not supplied) Notes • Only VPL-DX271/DX241/DW241 has the INPUT C terminal. • Use HDMI-compatible equipment and cable(s) that you are recommended.) • The HDMI terminal of your computer to the instruction manuals...
Startup Guide
Page 52
... plus Increase the number towards minus Automatically adjusts Phase, Pitch and Shift of the projected image (Keystone feature) *1 Keystone feature may be deteriorated. *2: VPL-DX271/DX241/DW241 only. GB 20 Projecting Correcting trapezoidal distortion of projected image while a signal is input from a computer (APA (Auto Pixel Alignment)) ... menu is set APA in the Installation menu. 2 Use the V/v/B/b the keys to set the value. In this case, set keystone manually. 1 Press the KEYSTONE key on the remote commander. The higher the value, the narrower the top of the projected image.
... plus Increase the number towards minus Automatically adjusts Phase, Pitch and Shift of the projected image (Keystone feature) *1 Keystone feature may be deteriorated. *2: VPL-DX271/DX241/DW241 only. GB 20 Projecting Correcting trapezoidal distortion of projected image while a signal is input from a computer (APA (Auto Pixel Alignment)) ... menu is set APA in the Installation menu. 2 Use the V/v/B/b the keys to set the value. In this case, set keystone manually. 1 Press the KEYSTONE key on the remote commander. The higher the value, the narrower the top of the projected image.


