
Operating Instructions
Page 8
... Security Lock (Password 33 Panel Key Lock 35 Security Lock (Mechanical) .......36 Using Various Functions During Projecting 36 Zoom a Part of the Image (Digital Zoom 36 To Freeze the Image Projected (Freeze 37 Pausing the Image 37 Lens Shutter (Recommended for Use on the Floor 37 Picture Muting (Recommended for Use Suspend from a Ceiling 38 Pausing the Sound (Audio Muting 38 Adjusting the Image Quality (Smart APA 39 Setting the Picture Mode 40 Starting the Network Function or the USB...
... Security Lock (Password 33 Panel Key Lock 35 Security Lock (Mechanical) .......36 Using Various Functions During Projecting 36 Zoom a Part of the Image (Digital Zoom 36 To Freeze the Image Projected (Freeze 37 Pausing the Image 37 Lens Shutter (Recommended for Use on the Floor 37 Picture Muting (Recommended for Use Suspend from a Ceiling 38 Pausing the Sound (Audio Muting 38 Adjusting the Image Quality (Smart APA 39 Setting the Picture Mode 40 Starting the Network Function or the USB...
Operating Instructions
Page 9
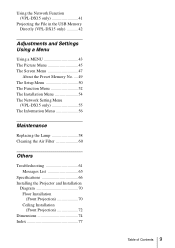
... the USB Memory Directly (VPL-DX15 only 42 Adjustments and Settings Using a Menu Using a MENU 43 The Picture Menu 45 The Screen Menu 47 About the Preset Memory No. ....49 The Setup Menu 50 The Function Menu 52 The Installation Menu 54 The Network Setting Menu (VPL-DX15 only 55 The Information Menu 56 Maintenance Replacing the Lamp 58 Cleaning the Air Filter 60 Others Troubleshooting 61 Messages List 65 Specifications 66 Installing the Projector and Installation Diagram 70 Floor Installation (Front Projection 70 Ceiling Installation (Front Projection...
... the USB Memory Directly (VPL-DX15 only 42 Adjustments and Settings Using a Menu Using a MENU 43 The Picture Menu 45 The Screen Menu 47 About the Preset Memory No. ....49 The Setup Menu 50 The Function Menu 52 The Installation Menu 54 The Network Setting Menu (VPL-DX15 only 55 The Information Menu 56 Maintenance Replacing the Lamp 58 Cleaning the Air Filter 60 Others Troubleshooting 61 Messages List 65 Specifications 66 Installing the Projector and Installation Diagram 70 Floor Installation (Front Projection 70 Ceiling Installation (Front Projection...

Operating Instructions
Page 10
... while the adjuster is required, consult with qualified Sony personnel. • Should any windows that face the screen with respect to be removed with a cloth lightly dampened with mild detergent solution, followed by the plug. As incorrect maintenance may be used for the air filter cleaning. To remove dust on page 60 for several days. • To disconnect the cord, pull it...
... while the adjuster is required, consult with qualified Sony personnel. • Should any windows that face the screen with respect to be removed with a cloth lightly dampened with mild detergent solution, followed by the plug. As incorrect maintenance may be used for the air filter cleaning. To remove dust on page 60 for several days. • To disconnect the cord, pull it...

Operating Instructions
Page 18
Control Panel PUSH ENTER 1 MENU 2 INPUT 3 LAMP/COVER 4 5 Top of projector a PUSH ENTER/v/V/b/B (Arrow) keys Used to enter the settings of its life or reaches a high temperature. Each time you press ?/1 key, this key flashes in green and then lights 18 Location and Function of Controls (Main Unit) in green when the projector is ready to clear the menu. For details, see page 64. To turn it on , and when it is high or...
Control Panel PUSH ENTER 1 MENU 2 INPUT 3 LAMP/COVER 4 5 Top of projector a PUSH ENTER/v/V/b/B (Arrow) keys Used to enter the settings of its life or reaches a high temperature. Each time you press ?/1 key, this key flashes in green and then lights 18 Location and Function of Controls (Main Unit) in green when the projector is ready to clear the menu. For details, see page 64. To turn it on , and when it is high or...

Operating Instructions
Page 26
... projector while pressing the Adjuster adjustment button. 2 Adjust the tilt of the picture. The adjusted value is valid until the power is automatically adjusted. Adjust the picture size using the Zoom ring and adjust the picture focus using "Status" on the room temperature or the screen angle. It may not be perfectly adjusted depending on the Setup menu. Each time you press the key, the input signal switches as follows: Input signal indicator 2 13 4 Notes • When you set the "V Keystone" to "Auto," the "V Keystone...
... projector while pressing the Adjuster adjustment button. 2 Adjust the tilt of the picture. The adjusted value is valid until the power is automatically adjusted. Adjust the picture size using the Zoom ring and adjust the picture focus using "Status" on the room temperature or the screen angle. It may not be perfectly adjusted depending on the Setup menu. Each time you press the key, the input signal switches as follows: Input signal indicator 2 13 4 Notes • When you set the "V Keystone" to "Auto," the "V Keystone...

Operating Instructions
Page 27
... input from Press INPUT to display Video equipment Video connected to the VIDEO input connector Video equipment connected to the S VIDEO input connector S-Video Computer connected to a Network LAN to use the network function USB memory connected USB to the USB connector When the selected input is a computer signal, APA (Auto Pixel Alignment) functions automatically to adjust the image from the connected equipment and displays the input signal where the input signals are to be turned off, press the ENTER key. Projecting 27 Projecting the Picture or...
... input from Press INPUT to display Video equipment Video connected to the VIDEO input connector Video equipment connected to the S VIDEO input connector S-Video Computer connected to a Network LAN to use the network function USB memory connected USB to the USB connector When the selected input is a computer signal, APA (Auto Pixel Alignment) functions automatically to adjust the image from the connected equipment and displays the input signal where the input signals are to be turned off, press the ENTER key. Projecting 27 Projecting the Picture or...

Operating Instructions
Page 31
... No Factory-preset items: "Contrast," "Brightness," "Color," "Hue," "Color Temp.," "Sharpness," "DDE," "Black Level Adj.," and "Gamma Mode" (can be set on the Remote Commander. Correcting the Trapezoidal Distortion Automatically (Auto V Keystone Correction) 31 INPUT NETWORK USB MENU APA ENTER RESET KEYSTONE AUTO FOCUS LENS /TILT PIC MUTING D ZOOM VOLUME FREEZE AUDIO MUTING 2 1 1 Press the KEYSTONE/TILT key. For details, see to Default Press the RESET key on Picture menu). Correcting the Trapezoidal Distortion Automatically (Auto V Keystone Correction...
... No Factory-preset items: "Contrast," "Brightness," "Color," "Hue," "Color Temp.," "Sharpness," "DDE," "Black Level Adj.," and "Gamma Mode" (can be set on the Remote Commander. Correcting the Trapezoidal Distortion Automatically (Auto V Keystone Correction) 31 INPUT NETWORK USB MENU APA ENTER RESET KEYSTONE AUTO FOCUS LENS /TILT PIC MUTING D ZOOM VOLUME FREEZE AUDIO MUTING 2 1 1 Press the KEYSTONE/TILT key. For details, see to Default Press the RESET key on Picture menu). Correcting the Trapezoidal Distortion Automatically (Auto V Keystone Correction...
Operating Instructions
Page 35
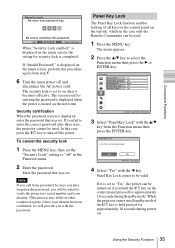
... call Sony personnel because you have forgotten the password, you will provide you with the password. The screen used . If "Invalid Password!" Be sure to turn off and disconnect the AC power cord. To cancel the security lock 1 Press the MENU key, then set to verify the projector's serial number and your identity. (This process may differ in the case only the Remote Commander can be turned on...
... call Sony personnel because you have forgotten the password, you will provide you with the password. The screen used . If "Invalid Password!" Be sure to turn off and disconnect the AC power cord. To cancel the security lock 1 Press the MENU key, then set to verify the projector's serial number and your identity. (This process may differ in the case only the Remote Commander can be turned on...

Operating Instructions
Page 46
... is input, "Progressive" is set to "Presentation", the setting item of the setting items cannot be displayed on the screen according to a progressive format. • Off: Plays a video signal in natural tones. • Text: Contrasts black and white. is not displayed. • For Picture Mode, a part of "Color Temp." Black Level Dark parts will be reproduced in an interlace format without converting. Setting items Functions Initial setting Color Temp. Adjusts the color temperature.
... is input, "Progressive" is set to "Presentation", the setting item of the setting items cannot be displayed on the screen according to a progressive format. • Off: Plays a video signal in natural tones. • Text: Contrasts black and white. is not displayed. • For Picture Mode, a part of "Color Temp." Black Level Dark parts will be reproduced in an interlace format without converting. Setting items Functions Initial setting Color Temp. Adjusts the color temperature.
Operating Instructions
Page 51
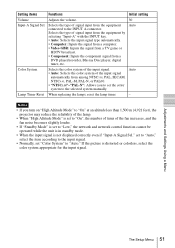
Notes • If you to set "Color System" to the selected system manually. Selects the type of the fan increases, and the fan noise becomes slightly louder. • If "Standby Mode" is set to the INPUT A connector. Adjustments and Settings Using a Menu The Setup Menu 51 Auto Lamp Timer Reset When replacing the lamps, reset the lamp timer. - Selects the type of the input signal automatically from among NTSC3.58, PAL, SECAM, NTSC4.43, PAL-M, PAL-N, or...
Notes • If you to set "Color System" to the selected system manually. Selects the type of the fan increases, and the fan noise becomes slightly louder. • If "Standby Mode" is set to the INPUT A connector. Adjustments and Settings Using a Menu The Setup Menu 51 Auto Lamp Timer Reset When replacing the lamps, reset the lamp timer. - Selects the type of the input signal automatically from among NTSC3.58, PAL, SECAM, NTSC4.43, PAL-M, PAL-N, or...

Operating Instructions
Page 52
... the input signal is detected. (* VPL-DX15 only) Network and USB are always displayed, as they have input signals (VPL-DX15 only). • Off: Sets when you want to switch the setting manually. Selects the background color of the projector so that Off the projector can be blue. The Function Menu The Function menu is used for about 10 seconds when the power is On input. Setting items Smart APA Auto Input Search Background Panel Key Lock...
... the input signal is detected. (* VPL-DX15 only) Network and USB are always displayed, as they have input signals (VPL-DX15 only). • Off: Sets when you want to switch the setting manually. Selects the background color of the projector so that Off the projector can be blue. The Function Menu The Function menu is used for about 10 seconds when the power is On input. Setting items Smart APA Auto Input Search Background Panel Key Lock...

Operating Instructions
Page 54
... item for installation for changing the settings of the projector. The Installation Menu The Installation menu is used during the projection. Standard • High: For the projected image to be deteriorated. • When the Lamp Mode is set to "High", the sound from the fan to be inactive For details, see "Correcting the Trapezoidal Distortion Automatically (Auto V Keystone Correction)" on the screen horizontally and/or Off vertically. You can turn the Off power on...
... item for installation for changing the settings of the projector. The Installation Menu The Installation menu is used during the projection. Standard • High: For the projected image to be deteriorated. • When the Lamp Mode is set to "High", the sound from the fan to be inactive For details, see "Correcting the Trapezoidal Distortion Automatically (Auto V Keystone Correction)" on the screen horizontally and/or Off vertically. You can turn the Off power on...

Operating Instructions
Page 57
...Item Hue Color Temp. z*3 z*3 Sharpness z z z - - - Screen menu Item Video/ S-Video Aspect z Adjust Signal APA - Adjustments and Settings Using a Menu The Information Menu 57 DDE z z z - - - Black Level Adj. Pitch - Video/ S-Video z*2 z Input signal Component Video GBR Computer z z - Gamma Mode - - z - z z z*3 Network*5 USB*5 - - z*4 z z z z : Adjustable/can be set - : Not adjustable/cannot be set *1: Except B & W *2: NTSC3.58 and NTSC4.43 only, except B & W *3: Adjustable only when the "Picture Mode" is set *6: VPL-DX15 only...
...Item Hue Color Temp. z*3 z*3 Sharpness z z z - - - Screen menu Item Video/ S-Video Aspect z Adjust Signal APA - Adjustments and Settings Using a Menu The Information Menu 57 DDE z z z - - - Black Level Adj. Pitch - Video/ S-Video z*2 z Input signal Component Video GBR Computer z z - Gamma Mode - - z - z z z*3 Network*5 USB*5 - - z*4 z z z z : Adjustable/can be set - : Not adjustable/cannot be set *1: Except B & W *2: NTSC3.58 and NTSC4.43 only, except B & W *3: Adjustable only when the "Picture Mode" is set *6: VPL-DX15 only...

Operating Instructions
Page 58
... Lamp The lamp used as the replacement lamp. appears on conditions of any other lamps than the LMP-D200 may burn your finger. Notes • If the lamp breaks, contact qualified Sony personnel. • Pull out the lamp by the handle (c). If you can see its underside. Turn the projector over . 3 Open the lamp cover by loosening one screw with a new one in orange (Repetition rate of 3 flashes...
... Lamp The lamp used as the replacement lamp. appears on conditions of any other lamps than the LMP-D200 may burn your finger. Notes • If the lamp breaks, contact qualified Sony personnel. • Pull out the lamp by the handle (c). If you can see its underside. Turn the projector over . 3 Open the lamp cover by loosening one screw with a new one in orange (Repetition rate of 3 flashes...

Operating Instructions
Page 59
Has the projection Lamp been replaced?" If not, the projector cannot be regulated due to environmental considerations. The Lamp Timer is displayed in the menu screen. is initialized to avoid electrical shock or fire. 5 Insert the new lamp all the way in until it is displayed in place (a). Lamp Timer Reset Settings for Lamp replacement. "Settings for Lamp replacement. For disposal or recycling information, please contact your hands into the lamp replacement slot, and...
Has the projection Lamp been replaced?" If not, the projector cannot be regulated due to environmental considerations. The Lamp Timer is displayed in the menu screen. is initialized to avoid electrical shock or fire. 5 Insert the new lamp all the way in until it is displayed in place (a). Lamp Timer Reset Settings for Lamp replacement. "Settings for Lamp replacement. For disposal or recycling information, please contact your hands into the lamp replacement slot, and...
Operating Instructions
Page 61
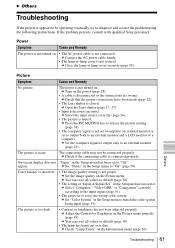
... dim. The power is connected properly. c Check if the connecting cable is not turned on. B Others Troubleshooting If the projector appears to be connected properly. c Check "Lamp Timer" on the Picture menu. c Close the lamp or lamp cover securely (page 59). c Open the Lens shutter (page 17, 37). • Input selection is not connected. c You can reset all values to default (page 30). • The lamp has burnt out or is not set to output...
... dim. The power is connected properly. c Check if the connecting cable is not turned on. B Others Troubleshooting If the projector appears to be connected properly. c Check "Lamp Timer" on the Picture menu. c Close the lamp or lamp cover securely (page 59). c Open the Lens shutter (page 17, 37). • Input selection is not connected. c You can reset all values to default (page 30). • The lamp has burnt out or is not set to output...

Operating Instructions
Page 62
... the Remote Commander. c Use a no-resistance stereo audio cable (page 22). • The sound is disconnected or the connections are wrong. c You can reset all values to default (page 30). c Adjust the sound with new batteries (page 21). • The Remote Commander is not adjusted properly. key on the screen and press the APA key. • The screen setting is one inactive for about two hours with the power on Screen setting menu...
... the Remote Commander. c Use a no-resistance stereo audio cable (page 22). • The sound is disconnected or the connections are wrong. c You can reset all values to default (page 30). c Adjust the sound with new batteries (page 21). • The Remote Commander is not adjusted properly. key on the screen and press the APA key. • The screen setting is one inactive for about two hours with the power on Screen setting menu...
Operating Instructions
Page 64
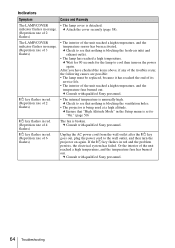
... turn the projector on the power again. c Ensure that nothing is blocking the ventilation holes. • The projector is broken. Indicators Symptom Cause and Remedy The LAMP/COVER • The lamp cover is set to "On." (page 50) ?/1 key flashes in red. (Repetition rate of the unit reached a high temperature, and the temperature fuse has burned out. c Check to see that "High Altitude Mode" in the Setup menu is detached. indicator flashes...
... turn the projector on the power again. c Ensure that nothing is blocking the ventilation holes. • The projector is broken. Indicators Symptom Cause and Remedy The LAMP/COVER • The lamp cover is set to "On." (page 50) ?/1 key flashes in red. (Repetition rate of the unit reached a high temperature, and the temperature fuse has burned out. c Check to see that "High Altitude Mode" in the Setup menu is detached. indicator flashes...
Operating Instructions
Page 66
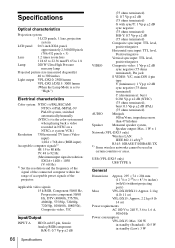
Specifications Optical characteristics Projection system 3 LCD panels, 1 lens, projection system LCD panel 0.63-inch XGA panel, approximately 2,360,000 pixels (786,432 pixels × 3) Lens 1.2 times zoom lens f 18.63 to 22.36 mm/F1.65 to 1.8 Lamp 200 W Ultra High Pressure mercury lamp Projected picture size (measured diagonally) 40 to 300 inches Light output VPL-DX10: 2500 lumen VPL-DX11/DX15: 3000 lumen (When the Lamp Mode is set to 92 Hz (Maximum input signal resolution: SXGA+ 1400 × 1050 fV: 60 Hz...
Specifications Optical characteristics Projection system 3 LCD panels, 1 lens, projection system LCD panel 0.63-inch XGA panel, approximately 2,360,000 pixels (786,432 pixels × 3) Lens 1.2 times zoom lens f 18.63 to 22.36 mm/F1.65 to 1.8 Lamp 200 W Ultra High Pressure mercury lamp Projected picture size (measured diagonally) 40 to 300 inches Light output VPL-DX10: 2500 lumen VPL-DX11/DX15: 3000 lumen (When the Lamp Mode is set to 92 Hz (Maximum input signal resolution: SXGA+ 1400 × 1050 fV: 60 Hz...

Operating Instructions
Page 77
... C Cleaning the air filter 60 Color 45 Color System 51 Color Temp 46 Connecting a computer 23 Connecting a VCR 24 Contrast 45 D DDE 46 Digital Zoom 36 Dimensions 74 Direct Power On 54 F fH 56 Freeze 37 fV 56 G Gamma Mode 46 H High Altitude Mode 50 Hue 45 I Image Flip 54 Input-A Signal Sel 51 Installation Diagram 70 Floor Installation (Front Projection) ... 70 Installation diagram Ceiling installation 72 Installing the projector 22 L Lamp Mode 54 Lamp Timer 56 Lamp Timer Reset 51 LAMP/COVER indicators 18 Language 50 Lens...
... C Cleaning the air filter 60 Color 45 Color System 51 Color Temp 46 Connecting a computer 23 Connecting a VCR 24 Contrast 45 D DDE 46 Digital Zoom 36 Dimensions 74 Direct Power On 54 F fH 56 Freeze 37 fV 56 G Gamma Mode 46 H High Altitude Mode 50 Hue 45 I Image Flip 54 Input-A Signal Sel 51 Installation Diagram 70 Floor Installation (Front Projection) ... 70 Installation diagram Ceiling installation 72 Installing the projector 22 L Lamp Mode 54 Lamp Timer 56 Lamp Timer Reset 51 LAMP/COVER indicators 18 Language 50 Lens...


