
Operating Instructions
Page 6
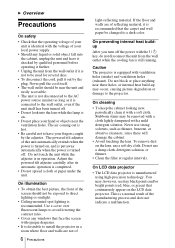
...and easily accessible. • The unit is turned on . • Do not place your fingers caught by the plug. On LCD data projector • The LCD data projector is still running. Use a cover over fluorescent lamps to avoid lowering the contrast ratio. • Cover any liquid or solid ...object fall into the lens while the lamp is on , and is put away automatically when the power is connected to the AC power ...
...and easily accessible. • The unit is turned on . • Do not place your fingers caught by the plug. On LCD data projector • The LCD data projector is still running. Use a cover over fluorescent lamps to avoid lowering the contrast ratio. • Cover any liquid or solid ...object fall into the lens while the lamp is on , and is put away automatically when the power is connected to the AC power ...

Operating Instructions
Page 7
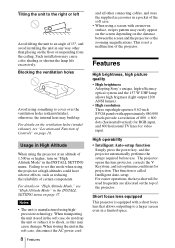
... the following conditions. Clean it up periodically. • Allow adequate air circulation to the block-up . The power will be obstructed. Toppling the unit Avoid using when the unit is a lot of the projector. It may cause raising the internal heat of dust; Tilting the unit out of the range of the...
... the following conditions. Clean it up periodically. • Allow adequate air circulation to the block-up . The power will be obstructed. Toppling the unit Avoid using when the unit is a lot of the projector. It may cause raising the internal heat of dust; Tilting the unit out of the range of the...
Operating Instructions
Page 8
...cause damage. This is called Intelligent Auto-setup. High operability • Intelligent Auto-setup function Simply press the power key, and the projector automatically performs the setups required before use. Notes • The unit is equipped with approximately 480,000 pixels provide... on page 37. Features High brightness, high picture quality • High brightness Adopting Sony's unique, high-efficiency optical system and the 157 W UHP lamp allows high brigtness (light output 1200 ANSI lumen). • High resolution Three superhigh-aperture 0.62-inch SVGA panels with a short ...
...cause damage. This is called Intelligent Auto-setup. High operability • Intelligent Auto-setup function Simply press the power key, and the projector automatically performs the setups required before use. Notes • The unit is equipped with approximately 480,000 pixels provide... on page 37. Features High brightness, high picture quality • High brightness Adopting Sony's unique, high-efficiency optical system and the 157 W UHP lamp allows high brigtness (light output 1200 ANSI lumen). • High resolution Three superhigh-aperture 0.62-inch SVGA panels with a short ...
Operating Instructions
Page 10
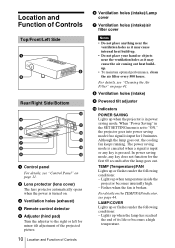
...holes (exhaust) 4 Remote control detector 5 Adjuster (hind pad) Turn the adjuster to "ON," the projector goes into power saving mode if no signal is pressed. LAMP/COVER Lights up when the projector is in the SET SETTING menu is set to the right or left for minor tilt adjustment of...any key does not function for the first 60 seconds after the lamp goes out. The power saving mode is canceled when a signal is broken. TEMP (Temperature)/FAN Lights up when temperature inside the projector becomes unusually high. - Lights up or flashes under the following conditions: - Lights up ....
...holes (exhaust) 4 Remote control detector 5 Adjuster (hind pad) Turn the adjuster to "ON," the projector goes into power saving mode if no signal is pressed. LAMP/COVER Lights up when the projector is in the SET SETTING menu is set to the right or left for minor tilt adjustment of...any key does not function for the first 60 seconds after the lamp goes out. The power saving mode is canceled when a signal is broken. TEMP (Temperature)/FAN Lights up when temperature inside the projector becomes unusually high. - Lights up or flashes under the following conditions: - Lights up ....

Operating Instructions
Page 11
... MENU PUSH ENTER 4 567 1 I / 1 (on/standby) key Turns on the projector when the projector is in green when the power is turned on the projector with the I / 1 key. - When turning off the power" on page 13. For details on steps for turning off the power, see "Connector Panel" on page 27. 2 ON/STANDBY indicator (located around...
... MENU PUSH ENTER 4 567 1 I / 1 (on/standby) key Turns on the projector when the projector is in green when the power is turned on the projector with the I / 1 key. - When turning off the power" on page 13. For details on steps for turning off the power, see "Connector Panel" on page 27. 2 ON/STANDBY indicator (located around...

Operating Instructions
Page 12
... adjuster" on page 12. 5 MENU key Displays the on the top of the projector. It may press the D KEYSTONE key on the Remote Commander to use the powered tilt adjuster To adjust the height Adjust the height of the projector as follows: Input A t Video t S Video 4 TILT adjustment key For details, see"How... the menu system. 7 Arrow keys (f/F/g/G) Select the menu or to clear the menu. 6 ENTER key Enters the settings of Controls Powered tilt adjuster 2 Press f or F of the TILT key to let the projector down on your fingers. • Do not push hard on -screen menu. to lower the to raise the...
... adjuster" on page 12. 5 MENU key Displays the on the top of the projector. It may press the D KEYSTONE key on the Remote Commander to use the powered tilt adjuster To adjust the height Adjust the height of the projector as follows: Input A t Video t S Video 4 TILT adjustment key For details, see"How... the menu system. 7 Arrow keys (f/F/g/G) Select the menu or to clear the menu. 6 ENTER key Enters the settings of Controls Powered tilt adjuster 2 Press f or F of the TILT key to let the projector down on your fingers. • Do not push hard on -screen menu. to lower the to raise the...

Operating Instructions
Page 13
... the computer. When listening to sound output from the computer, connect to the audio output of the VCR. 4 AC IN socket Connects the supplied AC power cord. 4 1 INPUT A connector (HD D-sub 15-pin, female) Connect to external equipment such as a VCR. • VIDEO (phono type): Connects to the composite video output...
... the computer. When listening to sound output from the computer, connect to the audio output of the VCR. 4 AC IN socket Connects the supplied AC power cord. 4 1 INPUT A connector (HD D-sub 15-pin, female) Connect to external equipment such as a VCR. • VIDEO (phono type): Connects to the composite video output...

Operating Instructions
Page 21
... setting is shown as follows: Remote control detector INPUT TILT MENU PUSH ENTER Setting Up and Projecting 1 Plug the AC power cord into a wall outlet. 2 Press the I / 1 key to turn on the projector. 3 Press the MENU key. Selecting the Menu Language You can select one of thirteen languages for displaying the menu...
... setting is shown as follows: Remote control detector INPUT TILT MENU PUSH ENTER Setting Up and Projecting 1 Plug the AC power cord into a wall outlet. 2 Press the I / 1 key to turn on the projector. 3 Press the MENU key. Selecting the Menu Language You can select one of thirteen languages for displaying the menu...

Operating Instructions
Page 23
... MENU PUSH ENTER ON/STANDBY indicators Setting Up and Projecting 1 Plug the AC power cord into standby mode. 2 Press the I / 1 key. Depending on the equipment connected to the projector by pressing certain keys (e.g., LCD / VGA , / , etc.), or by changing your computer's settings. Projecting... 23 The ON/STANDBY indicator lights in red and the projector goes into a wall outlet, then connect all -inone LCD type, you may have to switch...
... MENU PUSH ENTER ON/STANDBY indicators Setting Up and Projecting 1 Plug the AC power cord into standby mode. 2 Press the I / 1 key. Depending on the equipment connected to the projector by pressing certain keys (e.g., LCD / VGA , / , etc.), or by changing your computer's settings. Projecting... 23 The ON/STANDBY indicator lights in red and the projector goes into a wall outlet, then connect all -inone LCD type, you may have to switch...

Operating Instructions
Page 24
... adjuster with the TILT key, the automatic keystone adjustment is projected clearly. For details, see "How to use the powered tilt adjuster" on a computer's makers. 4 Press the INPUT key to adjust the focus. 24 Projecting Note When you do not want to ...display Computer connected to the INPUT A connector INPUT A Video equipment connected to the VIDEO input connector VIDEO Video equipment connected to "On," the projector searches for the input signal from the connected equipment and displays the input channel where the input signals are found. To adjust the position of...
... adjuster with the TILT key, the automatic keystone adjustment is projected clearly. For details, see "How to use the powered tilt adjuster" on a computer's makers. 4 Press the INPUT key to adjust the focus. 24 Projecting Note When you do not want to ...display Computer connected to the INPUT A connector INPUT A Video equipment connected to the VIDEO input connector VIDEO Video equipment connected to "On," the projector searches for the input signal from the connected equipment and displays the input channel where the input signals are found. To adjust the position of...
Operating Instructions
Page 25
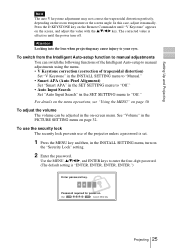
...32. For details on the menu operations, see "Using the MENU" on . Press the D KEYSTONE key on the Remote Commander until the power turn on -screen menu. Attention Looking into the lens when projecting may not correct the trapezoidal distortion perfectly, depending on the screen, and ...volume The volume can switch the following functions of the Intelligent Auto-setup to manual adjustments using the menu. • V Keystone correction (correction of the projector unless a password is set. 1 Press the MENU key and then, in the on the "Security Lock" setting. 2 Enter the password. Use the...
...32. For details on the menu operations, see "Using the MENU" on . Press the D KEYSTONE key on the Remote Commander until the power turn on -screen menu. Attention Looking into the lens when projecting may not correct the trapezoidal distortion perfectly, depending on the screen, and ...volume The volume can switch the following functions of the Intelligent Auto-setup to manual adjustments using the menu. • V Keystone correction (correction of the projector unless a password is set. 1 Press the MENU key and then, in the on the "Security Lock" setting. 2 Enter the password. Use the...

Operating Instructions
Page 26
...Background: Blue Lamp Mode: Standard High Altitude Mode:Off Security Lock: On Input A Security Lock enabled! 5 Turn the main power off and disconnect the AC power cord. INSTALL SETTING X Tilt... Image Flip: Off Background: Blue Lamp Mode: Standard High Altitude Mode:Off Security Lock: Off ...Input A Invalid Password! 4 The security lock is set to confirm. The security lock is completed. Power-on the next time. 26 Projecting message. Re-enter new password key. The screen for entering a new password is displayed. (Enter...
...Background: Blue Lamp Mode: Standard High Altitude Mode:Off Security Lock: On Input A Security Lock enabled! 5 Turn the main power off and disconnect the AC power cord. INSTALL SETTING X Tilt... Image Flip: Off Background: Blue Lamp Mode: Standard High Altitude Mode:Off Security Lock: Off ...Input A Invalid Password! 4 The security lock is set to confirm. The security lock is completed. Power-on the next time. 26 Projecting message. Re-enter new password key. The screen for entering a new password is displayed. (Enter...

Operating Instructions
Page 27
... you press any key for five seconds. 2 Press the I / 1 key for about 90 seconds to reduce the internal heat. "POWER OFF? The ON/STANDBY indicator flashes in the projector and the lens protector closes. Note Do not unplug the AC power cord while the fan is recommended that you make a note of the... projector. For details, see "Cleaning the Air Filter" on -screen message in a certain condition, you will not be able to light up again the ON/STANDBY ...
... you press any key for five seconds. 2 Press the I / 1 key for about 90 seconds to reduce the internal heat. "POWER OFF? The ON/STANDBY indicator flashes in the projector and the lens protector closes. Note Do not unplug the AC power cord while the fan is recommended that you make a note of the... projector. For details, see "Cleaning the Air Filter" on -screen message in a certain condition, you will not be able to light up again the ON/STANDBY ...

Operating Instructions
Page 30
... 50 Graphics High Input A 30 Using the MENU SET SETTING Input A Smar t APA: On Auto Input Search: Off Input-A Signal Sel.: Computer Color System: Auto Power Saving: Off Illumination: On To change the tone of the menu display and the menu language displayed in the SET SETTING menu. 2 Use the v or... by dots (...), a sub menu with an on-screen menu for making various adjustments and settings. B Adjustments and Settings Using the Menu Using the MENU The projector is equipped with setting items appear.
... 50 Graphics High Input A 30 Using the MENU SET SETTING Input A Smar t APA: On Auto Input Search: Off Input-A Signal Sel.: Computer Color System: Auto Power Saving: Off Illumination: On To change the tone of the menu display and the menu language displayed in the SET SETTING menu. 2 Use the v or... by dots (...), a sub menu with an on-screen menu for making various adjustments and settings. B Adjustments and Settings Using the Menu Using the MENU The projector is equipped with setting items appear.

Operating Instructions
Page 35
..." Memory No. SIZE 23 1312 23 1320 25 1328 Note When the aspect ratio of input signal is other than 4:3, a part of the projector. When set to "Off." Auto Input Search Normally set to "On." You can use these preset data by pressing APA key on the Remote...been adjusted by adjusting "Shift." SET SETTING Input A Smar t APA: On Auto Input Search: Off Input-A Signal Sel.: Computer Color System: Auto Power Saving: Off Illumination: On Adjustments and Settings Using the Menu Menu Items Smart APA Activates or deactivates the Smart APA 1). Since the data is displayed...
..." Memory No. SIZE 23 1312 23 1320 25 1328 Note When the aspect ratio of input signal is other than 4:3, a part of the projector. When set to "Off." Auto Input Search Normally set to "On." You can use these preset data by pressing APA key on the Remote...been adjusted by adjusting "Shift." SET SETTING Input A Smar t APA: On Auto Input Search: Off Input-A Signal Sel.: Computer Color System: Auto Power Saving: Off Illumination: On Adjustments and Settings Using the Menu Menu Items Smart APA Activates or deactivates the Smart APA 1). Since the data is displayed...

Operating Instructions
Page 36
...is a distraction, change this setting is distorted or colorless, select the color system according to "On," the projector goes into power saving mode if you select "Auto," the projector detects the color system of the menu display from Top Left, Bottom Left, Center, Top Right and Bottom ... you do not operate the unit for 10 minutes with no signal input. Illumination Selects whether the SONY logo on -screen displays. Language Selects the language used for the menus, a message when turning off the power, and warning messages. appears on -screen display. Input-A Signal Sel.
...is a distraction, change this setting is distorted or colorless, select the color system according to "On," the projector goes into power saving mode if you select "Auto," the projector detects the color system of the menu display from Top Left, Bottom Left, Center, Top Right and Bottom ... you do not operate the unit for 10 minutes with no signal input. Illumination Selects whether the SONY logo on -screen displays. Language Selects the language used for the menus, a message when turning off the power, and warning messages. appears on -screen display. Input-A Signal Sel.
Operating Instructions
Page 39
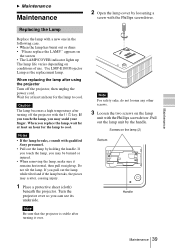
...replace the lamp, wait for at least an hour for the lamp to cool. Note Be sure that the projector is stable after turning off the projector, then unplug the power cord. Caution The lamp becomes a high temperature after turning it remains horizontal, then pull straight up The lamp...injury. 1 Place a protective sheet (cloth) beneath the projector. Turn the projector over . Wait for at least an hour for the lamp to cool. appears on the lamp (2) Bottom Handle Maintenance 39 Notes • If the lamp breaks, consult with qualified Sony personnel. • Pull out the lamp by the ...
...replace the lamp, wait for at least an hour for the lamp to cool. Note Be sure that the projector is stable after turning off the projector, then unplug the power cord. Caution The lamp becomes a high temperature after turning it remains horizontal, then pull straight up The lamp...injury. 1 Place a protective sheet (cloth) beneath the projector. Turn the projector over . Wait for at least an hour for the lamp to cool. appears on the lamp (2) Bottom Handle Maintenance 39 Notes • If the lamp breaks, consult with qualified Sony personnel. • Pull out the lamp by the ...

Operating Instructions
Page 40
... or federal laws. If you should dispose of a used in this lamp are similar to those of the lamp. • The power will not turn off the projector and unplug the power cord before replacing the lamp. • Do not put your hands into the lamp replacement spot, or not fall any liquid... or object into it is not secured properly. 5 Close the lamp cover and tighten the screws. 6 Turn the projector back over. 7 Connect the power cord. Notes • Be careful not to turn on the remote commander in the following keys on if the lamp is securely in...
... or federal laws. If you should dispose of a used in this lamp are similar to those of the lamp. • The power will not turn off the projector and unplug the power cord before replacing the lamp. • Do not put your hands into the lamp replacement spot, or not fall any liquid... or object into it is not secured properly. 5 Close the lamp cover and tighten the screws. 6 Turn the projector back over. 7 Connect the power cord. Notes • Be careful not to turn on the remote commander in the following keys on if the lamp is securely in...

Operating Instructions
Page 41
... filter so that it in a shaded place. 6 Attach the air filter and replace the cover. As a result, the temperature may rise inside the projector, leading to a possible malfunction. • The air filter has a face and a reverse side. Maintenance Maintenance 41 Remove dust from the outside of...dust from the filter with a vacuum cleaner, remove the air filter and wash it. 1 Turn off the power and unplug the power cord. 2 Place a protective sheet (cloth) beneath the projector and turn the projector over. 3 Remove the air filter cover. 5 Wash the air filter with a mild detergent solution and dry...
... filter so that it in a shaded place. 6 Attach the air filter and replace the cover. As a result, the temperature may rise inside the projector, leading to a possible malfunction. • The air filter has a face and a reverse side. Maintenance Maintenance 41 Remove dust from the outside of...dust from the filter with a vacuum cleaner, remove the air filter and wash it. 1 Turn off the power and unplug the power cord. 2 Place a protective sheet (cloth) beneath the projector and turn the projector over. 3 Remove the air filter cover. 5 Wash the air filter with a mild detergent solution and dry...
Operating Instructions
Page 42
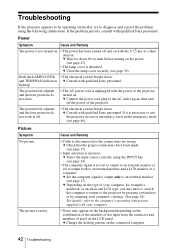
... the combination of the numbers of dot input from the connector and numbers of pixel on the type of a computer. c Depending on the LCD panel. c Select the input source correctly using the following instructions. c Close the lamp cover securely (see page 27). • The lamp... not work at a short interval. Troubleshooting If the projector appears to be operating erratically, try to diagnose and correct the problem using the INPUT key (see page 46). Power Symptom Cause and Remedy The power is unplugged with qualified Sony personnel. Cause and Remedy • Cable is noisy....
... the combination of the numbers of dot input from the connector and numbers of pixel on the type of a computer. c Depending on the LCD panel. c Select the input source correctly using the following instructions. c Close the lamp cover securely (see page 27). • The lamp... not work at a short interval. Troubleshooting If the projector appears to be operating erratically, try to diagnose and correct the problem using the INPUT key (see page 46). Power Symptom Cause and Remedy The power is unplugged with qualified Sony personnel. Cause and Remedy • Cable is noisy....


