

Operating Instructions
Page 5
.../Bottom 10 Control Panel 11 Connector Panel 13 Remote Commander 14 Setting Up and Projecting Installing the Projector 16 Connecting the Projector 17 Connecting with a Computer ...... 17 Connecting with a VCR or 15k RGB/Component Equipment 19 ...Selecting the Menu Language ..........21 Projecting 23 Effective Tools for Your Presentation 28 The MENU SETTING Menu .......... 36 The INSTALL SETTING Menu ..... 37 The INFORMATION Menu 38 Maintenance Maintenance 39 Replacing the Lamp...
.../Bottom 10 Control Panel 11 Connector Panel 13 Remote Commander 14 Setting Up and Projecting Installing the Projector 16 Connecting the Projector 17 Connecting with a Computer ...... 17 Connecting with a VCR or 15k RGB/Component Equipment 19 ...Selecting the Menu Language ..........21 Projecting 23 Effective Tools for Your Presentation 28 The MENU SETTING Menu .......... 36 The INSTALL SETTING Menu ..... 37 The INFORMATION Menu 38 Maintenance Maintenance 39 Replacing the Lamp...
Operating Instructions
Page 6
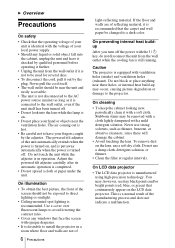
... clean it out by the plug. Stubborn stains may occur, causing picture degradation or damage to have it checked by the adjuster. On LCD data projector • The LCD data projector is completed. • Do not spread a cloth or paper under the unit. Never pull the cord itself has been turned off . On ... process and does not indicate a malfunction. This is in a room where floor and walls are of 6 Precautions light-reflecting material. Use a cover over fluorescent lamps to avoid lowering the contrast ratio. • Cover any liquid or solid object fall into the lens while the...
... clean it out by the plug. Stubborn stains may occur, causing picture degradation or damage to have it checked by the adjuster. On LCD data projector • The LCD data projector is completed. • Do not spread a cloth or paper under the unit. Never pull the cord itself has been turned off . On ... process and does not indicate a malfunction. This is in a room where floor and walls are of 6 Precautions light-reflecting material. Use a cover over fluorescent lamps to avoid lowering the contrast ratio. • Cover any liquid or solid object fall into the lens while the...

Operating Instructions
Page 7
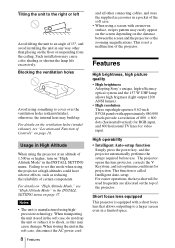
otherwise, the air filter will be turned off in 1 min." When the internal heat builds up due to the projector. Lamp off automatically after one minute. • Leave space of more than 30 cm (11 7/8 inches) around the unit. • Be careful that may ...adequate air circulation to prevent internal heat build-up , the temperature sensor will be obstructed. Overview Notes on Installation Unsuitable Installation Do not install the projector in the following conditions. Avoid using as a piece of dust; Tilting the unit out of the range of the adjuster setting • Avoid ...
otherwise, the air filter will be turned off in 1 min." When the internal heat builds up due to the projector. Lamp off automatically after one minute. • Leave space of more than 30 cm (11 7/8 inches) around the unit. • Be careful that may ...adequate air circulation to prevent internal heat build-up , the temperature sensor will be obstructed. Overview Notes on Installation Unsuitable Installation Do not install the projector in the following conditions. Avoid using as a piece of dust; Tilting the unit out of the range of the adjuster setting • Avoid ...
Operating Instructions
Page 8
...of certain components. Features High brightness, high picture quality • High brightness Adopting Sony's unique, high-efficiency optical system and the 157 W UHP lamp allows high brigtness (light output 1200 ANSI lumen). • High resolution Three superhigh-aperture 0.62-inch SVGA panels with approximately 480,... or suspending from the ceiling. High operability • Intelligent Auto-setup function Simply press the power key, and the projector automatically performs the setups required before use. For easier operations, the keys that allows outputting to a larger screen even...
...of certain components. Features High brightness, high picture quality • High brightness Adopting Sony's unique, high-efficiency optical system and the 157 W UHP lamp allows high brigtness (light output 1200 ANSI lumen). • High resolution Three superhigh-aperture 0.62-inch SVGA panels with approximately 480,... or suspending from the ceiling. High operability • Intelligent Auto-setup function Simply press the power key, and the projector automatically performs the setups required before use. For easier operations, the keys that allows outputting to a larger screen even...
Operating Instructions
Page 10
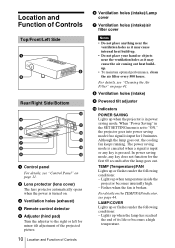
.... Fashes when the fan is pressed. TEMP (Temperature)/FAN Lights up when temperature inside the projector becomes unusually high. - Lights up or flashes under the following conditions: - LAMP/COVER Lights up when the projector is in the SET SETTING menu is set to the right or left for 10 minutes. ...automatically opens when the power is turned on. 3 Ventilation holes (exhaust) 4 Remote control detector 5 Adjuster (hind pad) Turn the adjuster to "ON," the projector goes into power saving mode if no signal is input or any key does not function for the first 60 seconds after the...
.... Fashes when the fan is pressed. TEMP (Temperature)/FAN Lights up when temperature inside the projector becomes unusually high. - Lights up or flashes under the following conditions: - LAMP/COVER Lights up when the projector is in the SET SETTING menu is set to the right or left for 10 minutes. ...automatically opens when the power is turned on. 3 Ventilation holes (exhaust) 4 Remote control detector 5 Adjuster (hind pad) Turn the adjuster to "ON," the projector goes into power saving mode if no signal is input or any key does not function for the first 60 seconds after the...

Operating Instructions
Page 11
... fan runs after the power is not secured firmly. Flashes in red when a AC power cord is turned on page 13. For details on the LAMP/COVER and the TEMP/FAN indicators, see "Connector Panel" on . - The fan runs for the first 60 seconds. Lights in standby mode. For ...details on the LAMP/COVER indicator, see "To turn on the projector when the projector is in green when the power is plugged into a wall outlet. Overview - qf Speaker qg Security lock Connects to an optional...
... fan runs after the power is not secured firmly. Flashes in red when a AC power cord is turned on page 13. For details on the LAMP/COVER and the TEMP/FAN indicators, see "Connector Panel" on . - The fan runs for the first 60 seconds. Lights in standby mode. For ...details on the LAMP/COVER indicator, see "To turn on the projector when the projector is in green when the power is plugged into a wall outlet. Overview - qf Speaker qg Security lock Connects to an optional...

Operating Instructions
Page 26
Be sure to confirm. Image Flip: Off Background: Blue Lamp Mode: Standard High Altitude Mode:Off Security Lock: On Input A Security Lock enabled! 5 Turn the main power off and disconnect the AC power cord. Use: ... a new password is displayed. (Enter the current password at this password. Power-on the next time. 26 Projecting V Keystone: Auto... Image Flip: Off Background: Blue Lamp Mode: Standard High Altitude Mode:Off Security Lock: Off Input A Invalid Password! 4 The security lock is entered incorrectly, the menu screen displays an "Invalid Password...
Be sure to confirm. Image Flip: Off Background: Blue Lamp Mode: Standard High Altitude Mode:Off Security Lock: On Input A Security Lock enabled! 5 Turn the main power off and disconnect the AC power cord. Use: ... a new password is displayed. (Enter the current password at this password. Power-on the next time. 26 Projecting V Keystone: Auto... Image Flip: Off Background: Blue Lamp Mode: Standard High Altitude Mode:Off Security Lock: Off Input A Invalid Password! 4 The security lock is entered incorrectly, the menu screen displays an "Invalid Password...

Operating Instructions
Page 38
... used time of the input signal. The displayed value is approximate. The displayed value is approximate. Lamp Timer Indicates how long the lamp has been turned on the screen. fV Displays the vertical frequency of the lamp. Note These only display on . You cannot alter the display. 38 The INFORMATION Menu I N... F O R M AT I O N fH: fV: Lamp Timer: 48.47kHz 60.00Hz No.23 1024x768 0H Input A Memory number ...
... used time of the input signal. The displayed value is approximate. The displayed value is approximate. Lamp Timer Indicates how long the lamp has been turned on the screen. fV Displays the vertical frequency of the lamp. Note These only display on . You cannot alter the display. 38 The INFORMATION Menu I N... F O R M AT I O N fH: fV: Lamp Timer: 48.47kHz 60.00Hz No.23 1024x768 0H Input A Memory number ...
Operating Instructions
Page 39
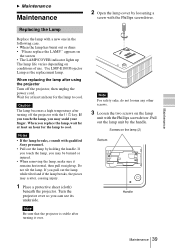
... pieces may scald your finger. Turn the projector over . Note For safety sake, do not loosen any other screws. 3 Loosen the two screws on conditions of use. Screws on the lamp (2) Bottom Handle Maintenance 39 Replacing the Lamp Replace the lamp with qualified Sony personnel. • Pull out the lamp by holding the handle. Caution The...
... pieces may scald your finger. Turn the projector over . Note For safety sake, do not loosen any other screws. 3 Loosen the two screws on conditions of use. Screws on the lamp (2) Bottom Handle Maintenance 39 Replacing the Lamp Replace the lamp with qualified Sony personnel. • Pull out the lamp by holding the handle. Caution The...

Operating Instructions
Page 40
... remote commander in the following keys on if the lamp is securely in red. 40 Maintenance Notes • Be careful not to touch the glass surface of a fluorescent lamp, you use the LMP-E180 Projector Lamp for less than LMP-E180, the projector may cause a malfunction. • Be sure to... those of the lamp. • The power will not turn off the projector and unplug the power cord before replacing the lamp. • Do not put...
... remote commander in the following keys on if the lamp is securely in red. 40 Maintenance Notes • Be careful not to touch the glass surface of a fluorescent lamp, you use the LMP-E180 Projector Lamp for less than LMP-E180, the projector may cause a malfunction. • Be sure to... those of the lamp. • The power will not turn off the projector and unplug the power cord before replacing the lamp. • Do not put...
Operating Instructions
Page 42
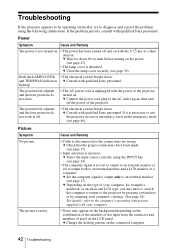
...is unplugged with qualified Sony personnel. c Consult with the power of the projector turned on. c Select the input source correctly using the following instructions. c Close the lamp cover securely (see page 27). • The lamp cover is detached. If it in -one LCD type, you may ... 90 seconds before turning on the LCD panel. Both the LAMP/COVER • The electrical system breaks down . c Depending on . • The power has been turned off the power of the projector. and TEMP/FAN indicators c Consult with qualified Sony personnel. c Set the computer signal...
...is unplugged with qualified Sony personnel. c Consult with the power of the projector turned on. c Select the input source correctly using the following instructions. c Close the lamp cover securely (see page 27). • The lamp cover is detached. If it in -one LCD type, you may ... 90 seconds before turning on the LCD panel. Both the LAMP/COVER • The electrical system breaks down . c Depending on . • The power has been turned off the power of the projector. and TEMP/FAN indicators c Consult with qualified Sony personnel. c Set the computer signal...

Operating Instructions
Page 43
... The picture is not adjusted properly. menu properly (see page 32). • The lamp has burnt or dims. c Replace the lamp with the power on . c Use a no-resistance stereo audio cable (see page 32). • Projector is colored incorrect. c Adjust the picture (see page 18). • The sound ...Adjust the sound (see page 34). strange. appears in the MENU SETTING menu to wrong color system. Color balance is incorrect. c Leave the projector for about two hours with a new one (see page 36). Sound Symptom No sound. in the INPUT SETTING menu properly (see page 25)....
... The picture is not adjusted properly. menu properly (see page 32). • The lamp has burnt or dims. c Replace the lamp with the power on . c Use a no-resistance stereo audio cable (see page 32). • Projector is colored incorrect. c Adjust the picture (see page 18). • The sound ...Adjust the sound (see page 34). strange. appears in the MENU SETTING menu to wrong color system. Color balance is incorrect. c Leave the projector for about two hours with a new one (see page 36). Sound Symptom No sound. in the INPUT SETTING menu properly (see page 25)....
Operating Instructions
Page 44
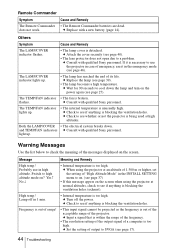
...c Wait for 90 seconds to see page 46). Lamp off the power. Remote Commander Symptom Cause and Remedy The Remote Commander • The Remote Commander batteries are dead. c Consult with qualified Sony personnel. c Check to use the projector in the INSTALL SETTING menu to on. (see...indicators c Consult with qualified Sony personnel. Frequency is out of output to see page 37) • If this message appers on the screen. Others Symptom Cause and Remedy The LAMP/COVER indicator flashes. • The lamp cover is too high. c When using the projector at an altitude of ...
...c Wait for 90 seconds to see page 46). Lamp off the power. Remote Commander Symptom Cause and Remedy The Remote Commander • The Remote Commander batteries are dead. c Consult with qualified Sony personnel. c Check to use the projector in the INSTALL SETTING menu to on. (see...indicators c Consult with qualified Sony personnel. Frequency is out of output to see page 37) • If this message appers on the screen. Others Symptom Cause and Remedy The LAMP/COVER indicator flashes. • The lamp cover is too high. c When using the projector at an altitude of ...

Operating Instructions
Page 45
Meaning and Remedy • You have pressed the wrong key. c Replace the lamp. (see page 39) • It is time to clean the filter. • Clean the filter. (see page 36). • It is set to "Component." Maintenance ... menu is time to check the meaning of the messages displayed on the screen. Please replace the LAMP. c Set "Input-A Signal Sel." correctly (see page 41) Caution Messages Use the list below to replace the lamp. Meaning and Remedy • You have input RGB signal from the computer when "Input-A Signal Sel...
Meaning and Remedy • You have pressed the wrong key. c Replace the lamp. (see page 39) • It is time to clean the filter. • Clean the filter. (see page 36). • It is set to "Component." Maintenance ... menu is time to check the meaning of the messages displayed on the screen. Please replace the LAMP. c Set "Input-A Signal Sel." correctly (see page 41) Caution Messages Use the list below to replace the lamp. Meaning and Remedy • You have input RGB signal from the computer when "Input-A Signal Sel...
Operating Instructions
Page 47
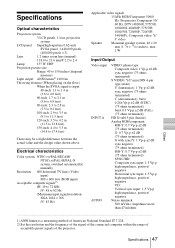
.../ negative Stereo minijack 500 mVrms, impedance more than 47 kilohms ... 1) ANSI lumen is input: 40-inch: 1.1 to 1.4 m (3.6 to 4.6 feet)...150 inches (diagonal measure) Light output ANSI lumen1) 1200 lm Throwing distance (When placing on ...projector. Other Specifications 47 Specifications Optical characteristics Projection system 3 LCD panels, 1 lens, projection system LCD... panel Superhigh-aperture 0.62-inch SVGA panel, 1,440,000 pixels (480,000 pixels × 3) Lens 1.2 times zoom lens (manual) f 18.0 to 21.6 mm/F 2.2 to 2.4 Lamp...
.../ negative Stereo minijack 500 mVrms, impedance more than 47 kilohms ... 1) ANSI lumen is input: 40-inch: 1.1 to 1.4 m (3.6 to 4.6 feet)...150 inches (diagonal measure) Light output ANSI lumen1) 1200 lm Throwing distance (When placing on ...projector. Other Specifications 47 Specifications Optical characteristics Projection system 3 LCD panels, 1 lens, projection system LCD... panel Superhigh-aperture 0.62-inch SVGA panel, 1,440,000 pixels (480,000 pixels × 3) Lens 1.2 times zoom lens (manual) f 18.0 to 21.6 mm/F 2.2 to 2.4 Lamp...

Operating Instructions
Page 48
..., female) 1 R/R-Y 9 N.C. 2 G/Y 10 GND 3 B/B-Y 11 GND 4 GND 12 DDC/SDA 5 GND 13 HD/C.Sync 6 GND (R) 14 VD 7 GND (G) 15 DDC/SCL 8 GND (B) 48 Specifications Optional accessories Projector Lamp LMP-E180 (for replacement) (1) Operating Instructions (1) Quick Reference Card (1) Security Label (1) Design and specifications are subject to change without notice.
..., female) 1 R/R-Y 9 N.C. 2 G/Y 10 GND 3 B/B-Y 11 GND 4 GND 12 DDC/SDA 5 GND 13 HD/C.Sync 6 GND (R) 14 VD 7 GND (G) 15 DDC/SCL 8 GND (B) 48 Specifications Optional accessories Projector Lamp LMP-E180 (for replacement) (1) Operating Instructions (1) Quick Reference Card (1) Security Label (1) Design and specifications are subject to change without notice.
Operating Instructions
Page 52
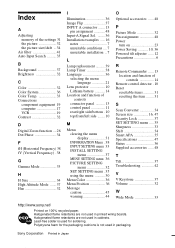
...-free solder is not used for soldering. Polystyrene foam for the packaging cushions is used in cabinets. Sony Corporation Printed in printed wiring boards. Index A Adjusting memory of the settings 31 the picture 32 the...connector ....... 13 pin assignment 48 Input-A Signal Sel. ........ 36 Installation examples ..... 16 notes 7 unsuitable conditions .... 7 unsuitable installation .. 7 L Lamp replacement .......... 39 Lamp Timer 38 Language 36 selecting the menu language 21 Lens protector 10 Lithium battery 14 Location and function of controls connector panel .......... 13 control...
...-free solder is not used for soldering. Polystyrene foam for the packaging cushions is used in cabinets. Sony Corporation Printed in printed wiring boards. Index A Adjusting memory of the settings 31 the picture 32 the...connector ....... 13 pin assignment 48 Input-A Signal Sel. ........ 36 Installation examples ..... 16 notes 7 unsuitable conditions .... 7 unsuitable installation .. 7 L Lamp replacement .......... 39 Lamp Timer 38 Language 36 selecting the menu language 21 Lens protector 10 Lithium battery 14 Location and function of controls connector panel .......... 13 control...


