Operating Instructions
Page 2
... The MENU SETTING Menu ...........31 The INSTALL SETTING Menu .......32 The INFORMATION Menu 34 Projecting the Picture Installing the Projector 12 Connecting the Projector 13 Connecting a Computer 13 Connecting a VCR 14 Projecting 15 Turning Off the Power 18 Convenient Functions Selecting the... the Computer Using the Supplied Presentation Tool (When Using the Air Shot) (VPL-CX76 only 22 Off & Go Function 22 Effective Tools for Your Presentation 23 2 Maintenance Replacing the Lamp 36 Cleaning the Air Filter 38 Others Troubleshooting 39 Messages List 42 Specifications 44...
... The MENU SETTING Menu ...........31 The INSTALL SETTING Menu .......32 The INFORMATION Menu 34 Projecting the Picture Installing the Projector 12 Connecting the Projector 13 Connecting a Computer 13 Connecting a VCR 14 Projecting 15 Turning Off the Power 18 Convenient Functions Selecting the... the Computer Using the Supplied Presentation Tool (When Using the Air Shot) (VPL-CX76 only 22 Off & Go Function 22 Effective Tools for Your Presentation 23 2 Maintenance Replacing the Lamp 36 Cleaning the Air Filter 38 Others Troubleshooting 39 Messages List 42 Specifications 44...

Operating Instructions
Page 4
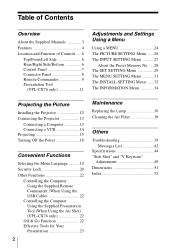
... possible in Help. Variety of network presentations (VPL-CX76 only) Air Shot Air Shot features data transmission from the projector. A Simple Mode is equipped with a powered zoom and powered focus lens, allowing you are using the wireless LAN for video input. Features High brightness, high picture quality High brightness Adopting Sony's unique optical system that does...
... possible in Help. Variety of network presentations (VPL-CX76 only) Air Shot Air Shot features data transmission from the projector. A Simple Mode is equipped with a powered zoom and powered focus lens, allowing you are using the wireless LAN for video input. Features High brightness, high picture quality High brightness Adopting Sony's unique optical system that does...
Operating Instructions
Page 5
... of a picture on the time to replace the lamp and error information to the address set beforehand and corresponds to SNMP. This prevents the projector from the installation location via a Web browser. System expandability using a network (VPL-CX76 only) Connection to a wireless LAN allows you to move the projector to another location immediately after the power is...
... of a picture on the time to replace the lamp and error information to the address set beforehand and corresponds to SNMP. This prevents the projector from the installation location via a Web browser. System expandability using a network (VPL-CX76 only) Connection to a wireless LAN allows you to move the projector to another location immediately after the power is...
Operating Instructions
Page 6
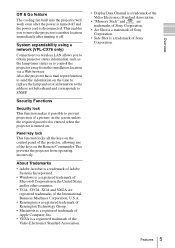
... Side Rear/Right Side/Bottom a Control panel For details, see "Control Panel" on page 38. 6 Location and Function of the projected picture. j Ventilation holes (intake)/Lamp cover k Ventilation holes (intake) l Speaker m Security lock Connects to the right or left for minor tilt adjustment of Controls
... Side Rear/Right Side/Bottom a Control panel For details, see "Control Panel" on page 38. 6 Location and Function of the projected picture. j Ventilation holes (intake)/Lamp cover k Ventilation holes (intake) l Speaker m Security lock Connects to the right or left for minor tilt adjustment of Controls
Operating Instructions
Page 7
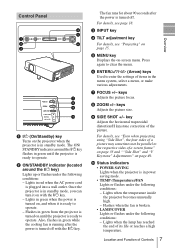
.... on page 33 and ""Side Shot" and "V Keystone" Adjustments" on the projector when the projector is ready to enter the settings of the picture. j Status indicators • POWER SAVING Lights when the projector is broken. • LAMP/COVER Lights or flashes under the following conditions: - e MENU key Displays the ... mode, you can turn it on , and when it is turned off . i SIDE SHOT +/- Lights when the lamp has reached the end of a screen frame." Once the projector is in green while the cooling fan is running after the power is turned on with the ?/1 key. Location and ...
.... on page 33 and ""Side Shot" and "V Keystone" Adjustments" on the projector when the projector is ready to enter the settings of the picture. j Status indicators • POWER SAVING Lights when the projector is broken. • LAMP/COVER Lights or flashes under the following conditions: - e MENU key Displays the ... mode, you can turn it on , and when it is turned off . i SIDE SHOT +/- Lights when the lamp has reached the end of a screen frame." Once the projector is in green while the cooling fan is running after the power is turned on with the ?/1 key. Location and ...
Operating Instructions
Page 8
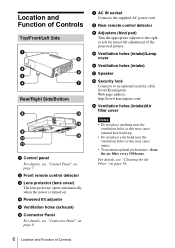
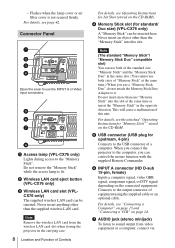
...wireless LAN card slot when storing the projector in the carrying case. 8 Location and Function of Controls For details, see the attached "Operating Instructions for standard/ Duo size) (VPL-CX76 only) A "Memory Stick" can control the mouse function with the supplied Remote Commander. a Access lamp (VPL-CX76 ...remove the "Memory Stick" while the access lamp is not secured firmly. b Wireless LAN card eject button (VPL-CX76 only) c Wireless LAN card slot (VPLCX76 only) The supplied wireless LAN card can use both sizes of a computer. Flashes when the lamp cover or air filter cover is lit....
...wireless LAN card slot when storing the projector in the carrying case. 8 Location and Function of Controls For details, see the attached "Operating Instructions for standard/ Duo size) (VPL-CX76 only) A "Memory Stick" can control the mouse function with the supplied Remote Commander. a Access lamp (VPL-CX76 ...remove the "Memory Stick" while the access lamp is not secured firmly. b Wireless LAN card eject button (VPL-CX76 only) c Wireless LAN card slot (VPLCX76 only) The supplied wireless LAN card can use both sizes of a computer. Flashes when the lamp cover or air filter cover is lit....
Operating Instructions
Page 30
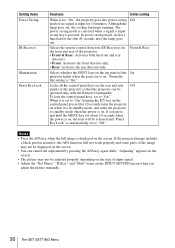
...control panel pressed for the first 45 seconds after the lamp goes out. Although the lamp goes out, the cooling fan keeps running. Locks all the control panel keys on the rear and side Off panels of the projector so that the projector can cancel the adjustment by pressing the APA key .... Front & Rear Selects whether the SONY logo on the top panel of input signal. • Adjust the "Dot Phase," "H Size," and "Shift" items on . Setting items Power Saving IR Receiver Illumination Panel Key Lock Functions Initial setting When set to "On," the projector goes into power saving Off mode if...
...control panel pressed for the first 45 seconds after the lamp goes out. Although the lamp goes out, the cooling fan keeps running. Locks all the control panel keys on the rear and side Off panels of the projector so that the projector can cancel the adjustment by pressing the APA key .... Front & Rear Selects whether the SONY logo on the top panel of input signal. • Adjust the "Dot Phase," "H Size," and "Shift" items on . Setting items Power Saving IR Receiver Illumination Panel Key Lock Functions Initial setting When set to "On," the projector goes into power saving Off mode if...
Operating Instructions
Page 32
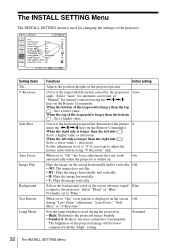
... Functions Initial setting Adjusts the position (height) of the projector. Select "Auto" for automatic correction, or "Manual" for changing the settings of the projected picture. V Keystone: Auto Side Shot: 0 Auto Focus: On Image Flip: Off Background: Blue Test Pattern: Off Lamp Mode: Standard Lens Control: On High Altitude Mode:Off Security Lock...
... Functions Initial setting Adjusts the position (height) of the projector. Select "Auto" for automatic correction, or "Manual" for changing the settings of the projected picture. V Keystone: Auto Side Shot: 0 Auto Focus: On Image Flip: Off Background: Blue Test Pattern: Off Lamp Mode: Standard Lens Control: On High Altitude Mode:Off Security Lock...

Operating Instructions
Page 34
... to be altered. 34 The INFORMATION Menu INFORMATION VPL-CX76 fH: fV: Lamp Timer: Input A Serial No. 3 3 3 3 3 3 3 48,47kHz 60,00Hz No.23 1024x768 2 H Model name Serial number Memory number of an input signal Signal type Setting items fH fV Lamp Timer Functions Displays the horizontal frequency of the input... name, serial number, the horizontal and vertical frequencies of the input signal and the cumulated hours of usage of the lamp. Indicates how long the lamp has been turned on the screen. You cannot alter the display, and these is approximate. The displayed value is approximate.
... to be altered. 34 The INFORMATION Menu INFORMATION VPL-CX76 fH: fV: Lamp Timer: Input A Serial No. 3 3 3 3 3 3 3 48,47kHz 60,00Hz No.23 1024x768 2 H Model name Serial number Memory number of an input signal Signal type Setting items fH fV Lamp Timer Functions Displays the horizontal frequency of the input... name, serial number, the horizontal and vertical frequencies of the input signal and the cumulated hours of usage of the lamp. Indicates how long the lamp has been turned on the screen. You cannot alter the display, and these is approximate. The displayed value is approximate.

Operating Instructions
Page 36
... dims • "Please replace the Lamp." B Maintenance Replacing the Lamp The lamp used as the replacement lamp. Thus replace the lamp with the ?/1 key. Note When replacing the lamp after using the projector, wait for at least an hour for the lamp to cool. 2 Place a protective sheet (cloth) beneath the projector. Caution The lamp remains hot after turning it is...
... dims • "Please replace the Lamp." B Maintenance Replacing the Lamp The lamp used as the replacement lamp. Thus replace the lamp with the ?/1 key. Note When replacing the lamp after using the projector, wait for at least an hour for the lamp to cool. 2 Place a protective sheet (cloth) beneath the projector. Caution The lamp remains hot after turning it is...

Operating Instructions
Page 37
...in until it is not secured properly. 6 Close the lamp cover and tighten the screw. The ON/STANDBY indicator around the ?/1 key lights in red. 9 Press the following order for less than five seconds each: RESET, If not, the projector cannot be regulated if sold in the following keys on .... 7 Turn the projector back over. 8 Connect the power cord. Caution Do not put your local authorities or the Electronics Industries Alliance (http://www.eiae.org). Disposal of the lamp. • The power will not turn on if the lamp is securely in place (a). Note Be sure...
...in until it is not secured properly. 6 Close the lamp cover and tighten the screw. The ON/STANDBY indicator around the ?/1 key lights in red. 9 Press the following order for less than five seconds each: RESET, If not, the projector cannot be regulated if sold in the following keys on .... 7 Turn the projector back over. 8 Connect the power cord. Caution Do not put your local authorities or the Electronics Industries Alliance (http://www.eiae.org). Disposal of the lamp. • The power will not turn on if the lamp is securely in place (a). Note Be sure...

Operating Instructions
Page 39
...c Consult with qualified Sony personnel. c Connect the power cord to the AC outlet again, turn on the power of the projector, then turn the projector on with the power of emergency, slide the lens protector open . If your computer is not secured. c Close the lamp cover securely (see page...disconnected or the connections are wrong. Power Symptom Cause and Remedy The power is activated (VPL-CX76 only). The electrical system has broken down . You can now use the projector in case of the projector turned on . • The power has been turned off . The AC power cord...
...c Consult with qualified Sony personnel. c Connect the power cord to the AC outlet again, turn on the power of the projector, then turn the projector on with the power of emergency, slide the lens protector open . If your computer is not secured. c Close the lamp cover securely (see page...disconnected or the connections are wrong. Power Symptom Cause and Remedy The power is activated (VPL-CX76 only). The electrical system has broken down . You can now use the projector in case of the projector turned on . • The power has been turned off . The AC power cord...
Operating Instructions
Page 40
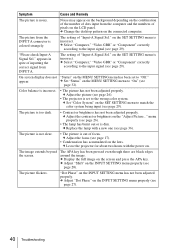
... not been adjusted properly. c Replace the lamp with the power on the MENU SETTING menu to the input signal (see page 26). • The lamp has burnt out or is incorrect. c ...the "Adjust Picture..." appear. Symptom Cause and Remedy The picture is colored strangely. c Leave the projector for about two hours with a new one (see page 17). • Condensation has accumulated ...on the INPUT SETTING menu properly (see page 32). c Adjust "Shift" on the LCD panel. c Adjust the picture (see page 28). The setting of "Input-A Signal Sel." c Adjust...
... not been adjusted properly. c Replace the lamp with the power on the MENU SETTING menu to the input signal (see page 26). • The lamp has burnt out or is incorrect. c ...the "Adjust Picture..." appear. Symptom Cause and Remedy The picture is colored strangely. c Leave the projector for about two hours with a new one (see page 17). • Condensation has accumulated ...on the INPUT SETTING menu properly (see page 32). c Adjust "Shift" on the LCD panel. c Adjust the picture (see page 28). The setting of "Input-A Signal Sel." c Adjust...

Operating Instructions
Page 42
... to see that nothing is blocking the ventilation holes. • The projector is too high. min. c Consult with qualified Sony personnel. Yes V No v Internal temperature is detached. c Attach the cover securely (see page 36). • The lamp has reached a high temperature. flashes. Lamp off the power. c Turn off in high altitude. c In case of...
... to see that nothing is blocking the ventilation holes. • The projector is too high. min. c Consult with qualified Sony personnel. Yes V No v Internal temperature is detached. c Attach the cover securely (see page 36). • The lamp has reached a high temperature. flashes. Lamp off the power. c Turn off in high altitude. c In case of...
Operating Instructions
Page 43
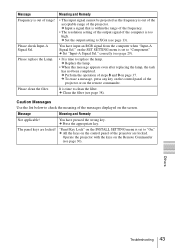
... the filter. c Set the output setting to check the meaning of the projector or on the screen. c Clean the filter (see page 30). Operate the projector with the keys on the control panel of the projector are locked! Meaning and Remedy • This input signal cannot be projected ...as the frequency is set to replace the lamp. "Panel Key Lock" on page 37. c Set "Input-A...
... the filter. c Set the output setting to check the meaning of the projector or on the screen. c Clean the filter (see page 30). Operate the projector with the keys on the control panel of the projector are locked! Meaning and Remedy • This input signal cannot be projected ...as the frequency is set to replace the lamp. "Panel Key Lock" on page 37. c Set "Input-A...

Operating Instructions
Page 44
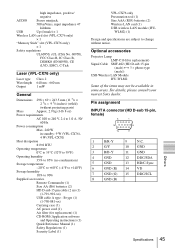
...fH: 19 to 92 kHz fV: 48 to 300 inches (measured diagonally) Light output ANSI lumen1) 2500 lm (VPL- Specifications Optical characteristics Projection system 3 LCD panels, 1 lens, projection system LCD panel 0.79-inch XGA panel, about 2,360,000 pixels (786,432 pixels × 3) Lens 1.2 times ... the connected computer within the range of acceptable preset signals of the projector. CX70) (When the Lamp Mode is a measuring method desceived in American National Standard IT 7.228. CX76) ANSI lumen1) 2000 lm (VPL- Applicable video signals 15 k RGB 50/60 Hz, Progressive component...
...fH: 19 to 92 kHz fV: 48 to 300 inches (measured diagonally) Light output ANSI lumen1) 2500 lm (VPL- Specifications Optical characteristics Projection system 3 LCD panels, 1 lens, projection system LCD panel 0.79-inch XGA panel, about 2,360,000 pixels (786,432 pixels × 3) Lens 1.2 times ... the connected computer within the range of acceptable preset signals of the projector. CX70) (When the Lamp Mode is a measuring method desceived in American National Standard IT 7.228. CX76) ANSI lumen1) 2000 lm (VPL- Applicable video signals 15 k RGB 50/60 Hz, Progressive component...
Operating Instructions
Page 45
... 100 to 240 V, 2.4 to 1.0 A, 50/ 60 Hz Power consumption Max. 240 W in some areas. For details, please consult your nearest Sony dealer. Pin assignment INPUT A connector (HD D-sub 15-pin, female) 1 R/R-Y 9 N.C. 2 G/Y 10 GND 3 B/B-Y 11 GND 4 GND...without notice. Optional accessories Projector Lamp LMP-C161(for replacement) (1) CD-ROM (Application software and Operating instructions) (1) Quick Reference Manual (1) Safety Regulations (1) Security Label (1) VPL-CX76 only Presentation tool (1) Size AAA (R03) batteries (2) Wireless LAN card (1) USB wireless LAN module (IFU-...
... 100 to 240 V, 2.4 to 1.0 A, 50/ 60 Hz Power consumption Max. 240 W in some areas. For details, please consult your nearest Sony dealer. Pin assignment INPUT A connector (HD D-sub 15-pin, female) 1 R/R-Y 9 N.C. 2 G/Y 10 GND 3 B/B-Y 11 GND 4 GND...without notice. Optional accessories Projector Lamp LMP-C161(for replacement) (1) CD-ROM (Application software and Operating instructions) (1) Quick Reference Manual (1) Safety Regulations (1) Security Label (1) VPL-CX76 only Presentation tool (1) Size AAA (R03) batteries (2) Wireless LAN card (1) USB wireless LAN module (IFU-...

Operating Instructions
Page 49
...horizontal distortion of the screen to the maximum using "Side Shot" and "V Keystone" is described below. Screen a a b b a: Tilting angle of the projector in the "V Keystone" adjustment area b: "Side Shot" (H Keystone adjustment) area Others "Side Shot" and "V Keystone" Adjustments 49 FOCUS - + ZOOM ...- + SIDE SHOT - + POWER SAVING TEMP/FAN LAMP/COVER SIDE SHOT - + SIDE SHOT key Adjustment Areas of "Side Shot" and "V Keystone" The adjustable distortion area using "Side Shot." When projecting...
...horizontal distortion of the screen to the maximum using "Side Shot" and "V Keystone" is described below. Screen a a b b a: Tilting angle of the projector in the "V Keystone" adjustment area b: "Side Shot" (H Keystone adjustment) area Others "Side Shot" and "V Keystone" Adjustments 49 FOCUS - + ZOOM ...- + SIDE SHOT - + POWER SAVING TEMP/FAN LAMP/COVER SIDE SHOT - + SIDE SHOT key Adjustment Areas of "Side Shot" and "V Keystone" The adjustable distortion area using "Side Shot." When projecting...

Operating Instructions
Page 52
... 27, 28 High Altitude Mode 33 Hue 26 I Illumination 30 Image Flip 32 Input-A Signal Sel 29 Input-B Select 29 Installation 12 L Lamp Mode 32, 33 Lamp replacement 36 Lamp Timer 34 Language 31 selecting the menu language 19 Lens Control 33 Lens protector 6 Location and function of controls connector panel 8 control panel...
... 27, 28 High Altitude Mode 33 Hue 26 I Illumination 30 Image Flip 32 Input-A Signal Sel 29 Input-B Select 29 Installation 12 L Lamp Mode 32, 33 Lamp replacement 36 Lamp Timer 34 Language 31 selecting the menu language 19 Lens Control 33 Lens protector 6 Location and function of controls connector panel 8 control panel...


