
Operating Instructions
Page 4
...and Function of Controls (Main Unit 13 Top/Front/Side 13 Rear/Side/Bottom 13 Control Panel 15 Connector Panel 16 Remote Commander 17 VPL-CX125/CX155 17 VPL-CX100/CX120/CX150 ...... 19 Effective Tools for Your Presentation 31 Controlling the Computer Using a Presentation Tool, RM-PJPK1 (... The Function Menu 38 The Installation Menu 40 The Setup Menu 42 The Information Menu 43 Projecting the Picture Installing the Projector 21 Connecting the Projector 22 Connecting a Computer 22 Connecting a VCR 23 Projecting 25 Turning Off the Power 27 Convenient Functions Selecting the Menu ...
...and Function of Controls (Main Unit 13 Top/Front/Side 13 Rear/Side/Bottom 13 Control Panel 15 Connector Panel 16 Remote Commander 17 VPL-CX125/CX155 17 VPL-CX100/CX120/CX150 ...... 19 Effective Tools for Your Presentation 31 Controlling the Computer Using a Presentation Tool, RM-PJPK1 (... The Function Menu 38 The Installation Menu 40 The Setup Menu 42 The Information Menu 43 Projecting the Picture Installing the Projector 21 Connecting the Projector 22 Connecting a Computer 22 Connecting a VCR 23 Projecting 25 Turning Off the Power 27 Convenient Functions Selecting the Menu ...

Operating Instructions
Page 6
... itself has been turned off the power with both sides of the unit with the I / 1 key on the control panel or on the Remote Commander, do not disconnect the unit from the AC power source (mains) as long as it is still running. Do not block or place...; The LCD projector is a normal result of the screen should be exposed to catch your local power supply. On illumination • To obtain the best picture, the front of the manufacturing process and does not indicate a malfunction. If voltage adaptation is equipped with qualified Sony personnel. • Should any windows ...
... itself has been turned off the power with both sides of the unit with the I / 1 key on the control panel or on the Remote Commander, do not disconnect the unit from the AC power source (mains) as long as it is still running. Do not block or place...; The LCD projector is a normal result of the screen should be exposed to catch your local power supply. On illumination • To obtain the best picture, the front of the manufacturing process and does not indicate a malfunction. If voltage adaptation is equipped with qualified Sony personnel. • Should any windows ...
Operating Instructions
Page 11
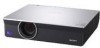
...projector, allowing use two or more projectors in a wider variety of the projector. Side Shot (VPL-CX125/CX155 only) The projector supports the Side Shot feature (horizontal trapezoidal correction function), enabling projection from operating incorrectly. Installation becomes possible in one Remote Commander when you to obtain projector...wireless connection, can be projected by tilting it is located at the rear of the projector. High picture quality Three super-high-aperture 0.79-inch XGA panels with a breaker or other switch without pressing the power key on the ceiling you...
...projector, allowing use two or more projectors in a wider variety of the projector. Side Shot (VPL-CX125/CX155 only) The projector supports the Side Shot feature (horizontal trapezoidal correction function), enabling projection from operating incorrectly. Installation becomes possible in one Remote Commander when you to obtain projector...wireless connection, can be projected by tilting it is located at the rear of the projector. High picture quality Three super-high-aperture 0.79-inch XGA panels with a breaker or other switch without pressing the power key on the ceiling you...

Operating Instructions
Page 13
Location and Function of Controls (Main Unit) 13 Location and Function of Controls (Main Unit) Top/Front/Side 4 1 Overview 2 5 3 6 Rear/Side/Bottom 7 8 9 NIENTPWUTORCK RGB MONITOR INPUT A AUDIO OUTPUT AUDIO RGB S VIDEO VVIDIDEEOOIN AUDIO INPUT B RRESM-2O32TCE 0 qa qs qd qf 6 qg qh a Lens Remove the lens cap before projection. b Front remote control detector c Air filter cover Note To maintain optimal performance, clean the air filter whenever you replace the lamp. For details, see "Cleaning the Air Filter" on page 47.
Location and Function of Controls (Main Unit) 13 Location and Function of Controls (Main Unit) Top/Front/Side 4 1 Overview 2 5 3 6 Rear/Side/Bottom 7 8 9 NIENTPWUTORCK RGB MONITOR INPUT A AUDIO OUTPUT AUDIO RGB S VIDEO VVIDIDEEOOIN AUDIO INPUT B RRESM-2O32TCE 0 qa qs qd qf 6 qg qh a Lens Remove the lens cap before projection. b Front remote control detector c Air filter cover Note To maintain optimal performance, clean the air filter whenever you replace the lamp. For details, see "Cleaning the Air Filter" on page 47.

Operating Instructions
Page 14
... remove the cover attached in the factory before use. p Speaker 14 Location and Function of Controls (Main Unit) g Lamp cover h Ventilation holes (intake) i Adjusters j Rear remote control detector k Connector/Connector Panel For details, see "Connector Panel" on page 15. Refer to it. l Zoom ring Adjusts the picture size. Web page address...
... remove the cover attached in the factory before use. p Speaker 14 Location and Function of Controls (Main Unit) g Lamp cover h Ventilation holes (intake) i Adjusters j Rear remote control detector k Connector/Connector Panel For details, see "Connector Panel" on page 15. Refer to it. l Zoom ring Adjusts the picture size. Web page address...

Operating Instructions
Page 16
... an optional cable. Connector Panel Side 1 2 3 NETWORK INPUT C RGB AUDIO INPUT A RGB AUDIO INPUT B MONITOR AUDIO S VIDEO VIDEO AUDIO OUTPUT VIDEO IN RS-232C REMOTE 4 5 67 a INPUT C (VPL-CX125/CX155 only) NETWORK connector (RJ-45) Connects to external equipment such as a computer. c INPUT B Analog RGB connector (HD D-sub 15-pin, female) Connect to...
... an optional cable. Connector Panel Side 1 2 3 NETWORK INPUT C RGB AUDIO INPUT A RGB AUDIO INPUT B MONITOR AUDIO S VIDEO VIDEO AUDIO OUTPUT VIDEO IN RS-232C REMOTE 4 5 67 a INPUT C (VPL-CX125/CX155 only) NETWORK connector (RJ-45) Connects to external equipment such as a computer. c INPUT B Analog RGB connector (HD D-sub 15-pin, female) Connect to...

Operating Instructions
Page 17
...B is output. f VIDEO IN (Video input) Connects to the video input connector of the monitor. g REMOTE RS-232C connector (D-sub 9-pin, female) Connects to a computer to operate the projector from the INPUT A or INPUT B. w; AUDIO - When VIDEO or S VIDEO is selected, the sound ...the computer. AUDIO jack (stereo minijack) Connects to the model. keys on the control panel function identically. Remote Commander The supplied remote commander differs according to external active speakers. VPL-CX125/CX155: Page 17. ql qk qj qh qg qf qd wa COMMAND OFF ON INPUT A INPUT D INPUT...
...B is output. f VIDEO IN (Video input) Connects to the video input connector of the monitor. g REMOTE RS-232C connector (D-sub 9-pin, female) Connects to a computer to operate the projector from the INPUT A or INPUT B. w; AUDIO - When VIDEO or S VIDEO is selected, the sound ...the computer. AUDIO jack (stereo minijack) Connects to the model. keys on the control panel function identically. Remote Commander The supplied remote commander differs according to external active speakers. VPL-CX125/CX155: Page 17. ql qk qj qh qg qf qd wa COMMAND OFF ON INPUT A INPUT D INPUT...

Operating Instructions
Page 18
... When you apply the same identification number as the projector to a Remote Commander you can easily adjust or control each projector with D ZOOM key to its factory preset value or returns the enlarged image with a Remote Commander whenever you press this projector. key Enlarges the image at a desired location on...(Trapezoidal distortion correction) key h ASPECT key Select the aspect ratio of an item to its clearest while a signal is not provided in this projector. To cancel the frozen picture, press the key again. m MUTING keys Cut off the picture and sound. • PIC: Cuts off ...
... When you apply the same identification number as the projector to a Remote Commander you can easily adjust or control each projector with D ZOOM key to its factory preset value or returns the enlarged image with a Remote Commander whenever you press this projector. key Enlarges the image at a desired location on...(Trapezoidal distortion correction) key h ASPECT key Select the aspect ratio of an item to its clearest while a signal is not provided in this projector. To cancel the frozen picture, press the key again. m MUTING keys Cut off the picture and sound. • PIC: Cuts off ...

Operating Instructions
Page 19
... VPL-CX100/CX120/CX150 The keys that nothing obstructs the infrared beam between the Remote Commander and the projector is not provided in this projector. e AUTO FOCUS key This function is input from the # side. 2 Replace the lid. Direct the Remote Commander toward the front or rear remote ...Auto Pixel Alignment) key Automatically adjusts a picture to its clearest while a signal is not provided in "The Function Menu" on the projector. Remote Commander 19 Overview To install batteries 1 Push and slide the lid to install the battery from a computer. To cancel the frozen ...
... VPL-CX100/CX120/CX150 The keys that nothing obstructs the infrared beam between the Remote Commander and the projector is not provided in this projector. e AUTO FOCUS key This function is input from the # side. 2 Replace the lid. Direct the Remote Commander toward the front or rear remote ...Auto Pixel Alignment) key Automatically adjusts a picture to its clearest while a signal is not provided in "The Function Menu" on the projector. Remote Commander 19 Overview To install batteries 1 Push and slide the lid to install the battery from a computer. To cancel the frozen ...
Operating Instructions
Page 20
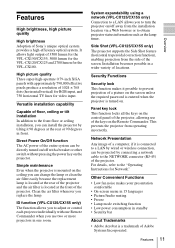
...key i D ZOOM (Digital Zoom) +/- Direct the Remote Commander toward the remote control detector. • The operation range is , the wider the angle within which the commander can control the projector becomes. 2 Install the lithium battery. 20 Remote Commander keys p AUDIO MUTING key Press to restore the... sound. key Enlarges the image at a desired location on the projector. Notes on the lithium battery • A button...
...key i D ZOOM (Digital Zoom) +/- Direct the Remote Commander toward the remote control detector. • The operation range is , the wider the angle within which the commander can control the projector becomes. 2 Install the lithium battery. 20 Remote Commander keys p AUDIO MUTING key Press to restore the... sound. key Enlarges the image at a desired location on the projector. Notes on the lithium battery • A button...

Operating Instructions
Page 22
...supplied) (Use a no-resistance cable.) B HD D-sub 15-pin cable Notes • The projector accepts VGA, SVGA, XGA, WXGA, SXGA and SXGA+ signals. For VPL-CX125/CX155, when connecting to a LAN using a LAN cable, see "Operating Instructions for the external ...monitor. To connect a computer Side NETWORK INPUT C RGB AUDIO INPUT A RGB AUDIO INPUT B MONITOR AUDIO OUTPUT S VIDEO VIDEO AUDIO VIDEO IN RS-232C REMOTE 22 Connecting the Projector...
...supplied) (Use a no-resistance cable.) B HD D-sub 15-pin cable Notes • The projector accepts VGA, SVGA, XGA, WXGA, SXGA and SXGA+ signals. For VPL-CX125/CX155, when connecting to a LAN using a LAN cable, see "Operating Instructions for the external ...monitor. To connect a computer Side NETWORK INPUT C RGB AUDIO INPUT A RGB AUDIO INPUT B MONITOR AUDIO OUTPUT S VIDEO VIDEO AUDIO VIDEO IN RS-232C REMOTE 22 Connecting the Projector...
Operating Instructions
Page 23
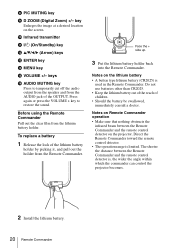
... output connector of a type having two rows of the external monitor may not appear properly. Connecting a VCR This section describes how to connect the projector to audio output (R) VCR A Stereo audio connecting cable (not supplied) (Use a no-resistance cable.) B Video cable (not supplied) or ... video output connector Side NETWORK INPUT C RGB AUDIO INPUT A RGB AUDIO INPUT B MONITOR AUDIO OUTPUT S VIDEO VIDEO AUDIO VIDEO IN RS-232C REMOTE Projecting the Picture to S video output to audio output (L) to video output to a VCR. For details, refer to only the external monitor....
... output connector of a type having two rows of the external monitor may not appear properly. Connecting a VCR This section describes how to connect the projector to audio output (R) VCR A Stereo audio connecting cable (not supplied) (Use a no-resistance cable.) B Video cable (not supplied) or ... video output connector Side NETWORK INPUT C RGB AUDIO INPUT A RGB AUDIO INPUT B MONITOR AUDIO OUTPUT S VIDEO VIDEO AUDIO VIDEO IN RS-232C REMOTE Projecting the Picture to S video output to audio output (L) to video output to a VCR. For details, refer to only the external monitor....
Operating Instructions
Page 24
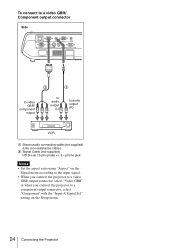
setting on the Signal menu according to the input signal. • When you connect the projector to a video GBR output connector, select "Video GBR" or when you connect the projector to audio output (R) VCR A Stereo audio connecting cable (not supplied) (Use a no-resistance cable.) B Signal Cable (...-pin (male) ↔ 3 × phono jack Notes • Set the aspect ratio using "Aspect" on the Setup menu. 24 Connecting the Projector To connect to a video GBR/ Component output connector Side NETWORK INPUT C RGB AUDIO INPUT A RGB AUDIO INPUT B MONITOR AUDIO OUTPUT S VIDEO VIDEO ...
setting on the Signal menu according to the input signal. • When you connect the projector to a video GBR output connector, select "Video GBR" or when you connect the projector to audio output (R) VCR A Stereo audio connecting cable (not supplied) (Use a no-resistance cable.) B Signal Cable (...-pin (male) ↔ 3 × phono jack Notes • Set the aspect ratio using "Aspect" on the Setup menu. 24 Connecting the Projector To connect to a video GBR/ Component output connector Side NETWORK INPUT C RGB AUDIO INPUT A RGB AUDIO INPUT B MONITOR AUDIO OUTPUT S VIDEO VIDEO ...
Operating Instructions
Page 25
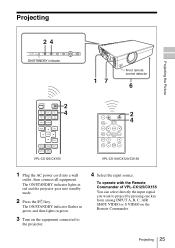
...VIDEO RGB VVIIDDEEOOIN INPUT B AUDIO AUDIO RRSE-M23O2TCE 17 Front remote control detector 6 COMMAND OFF ON INPUT A INPUT D INPUT B INPUT E INPUT C AIR SHOT VIDEO S VIDEO 2 4 MENU APA ENTER RESET FOCUS ZOOM SHIFT ASPECT KEY STONE VPL-CX125/CX155 APA INPUT KEY STONE /TILT LENS ENTER AUTO FOCUS... Press the ?/1 key. To operate with the Remote Commander of VPL-CX125/CX155 You can select directly the input signal you want to project by pressing one key from among INPUT A, B, C, AIR SHOT, VIDEO or S VIDEO on the equipment connected to the projector. 4 Select the input source.
...VIDEO RGB VVIIDDEEOOIN INPUT B AUDIO AUDIO RRSE-M23O2TCE 17 Front remote control detector 6 COMMAND OFF ON INPUT A INPUT D INPUT B INPUT E INPUT C AIR SHOT VIDEO S VIDEO 2 4 MENU APA ENTER RESET FOCUS ZOOM SHIFT ASPECT KEY STONE VPL-CX125/CX155 APA INPUT KEY STONE /TILT LENS ENTER AUTO FOCUS... Press the ?/1 key. To operate with the Remote Commander of VPL-CX125/CX155 You can select directly the input signal you want to project by pressing one key from among INPUT A, B, C, AIR SHOT, VIDEO or S VIDEO on the equipment connected to the projector. 4 Select the input source.

Operating Instructions
Page 26
or and * VPL-CX125/CX155 only To input from the connected equipment and displays the input channel where the input signals are found. • When the no signal is input to the VPLCX125/CX155, "Input-C" is performed at the same time. For details, see "Auto Input Search" in -one LCD type, you adjust ...the tilt of the projector with the Control Panel or the Remote Commander of VPL-CX100/CX120/CX150 Each time you do not want to perform the Depending on the type of your...
or and * VPL-CX125/CX155 only To input from the connected equipment and displays the input channel where the input signals are found. • When the no signal is input to the VPLCX125/CX155, "Input-C" is performed at the same time. For details, see "Auto Input Search" in -one LCD type, you adjust ...the tilt of the projector with the Control Panel or the Remote Commander of VPL-CX100/CX120/CX150 Each time you do not want to perform the Depending on the type of your...

Operating Instructions
Page 28
...RESET FOCUS ZOOM SHIFT ASPECT KEY STONE VPL-CX125/CX155 MPUITICNG PEUNSTHER MENU KEYSTONE INPUT SOTNA/NDBY LACMOPV/ER NEINTPWUOTRCK RGB MONITOR INPUT A AUDIO OUTPUT AUDIO S VIDEO RGB VVIIDDEEOOIN INPUT B AUDIO AUDIO RRSE-M23O2TCE 1 Front remote control detector APA INPUT KEY STONE /...VPL-CX100/CX120/CX150 1 Plug the AC power cord into a wall outlet. 2 Press the ?/1 key to select the Setup menu, then press the B or ENTER key. B Convenient Functions Selecting the Menu Language You can select one of fifteen languages for displaying the menu and other on the projector...
...RESET FOCUS ZOOM SHIFT ASPECT KEY STONE VPL-CX125/CX155 MPUITICNG PEUNSTHER MENU KEYSTONE INPUT SOTNA/NDBY LACMOPV/ER NEINTPWUOTRCK RGB MONITOR INPUT A AUDIO OUTPUT AUDIO S VIDEO RGB VVIIDDEEOOIN INPUT B AUDIO AUDIO RRSE-M23O2TCE 1 Front remote control detector APA INPUT KEY STONE /...VPL-CX100/CX120/CX150 1 Plug the AC power cord into a wall outlet. 2 Press the ?/1 key to select the Setup menu, then press the B or ENTER key. B Convenient Functions Selecting the Menu Language You can select one of fifteen languages for displaying the menu and other on the projector...

Operating Instructions
Page 31
... for the entire system on and off the power, you can select a section of the image where the icon is located is displayed on the Remote Commander. The portion of the image to enlarge. Use the arrow key (v/V/b/B) to move the icon. 3 Press the D ZOOM + key again. Convenient Functions Other Functions...
... for the entire system on and off the power, you can select a section of the image where the icon is located is displayed on the Remote Commander. The portion of the image to enlarge. Use the arrow key (v/V/b/B) to move the icon. 3 Press the D ZOOM + key again. Convenient Functions Other Functions...

Operating Instructions
Page 32
.... Displays/cancels a black screen during the slide show. * Even if the network presentation function is any obstruction between the presentation tool and the remote control detector on the projector, the presentation tool may not function properly. • A black screen may not be used. Notes • If there is not used, the LASER...
.... Displays/cancels a black screen during the slide show. * Even if the network presentation function is any obstruction between the presentation tool and the remote control detector on the projector, the presentation tool may not function properly. • A black screen may not be used. Notes • If there is not used, the LASER...

Operating Instructions
Page 34
... signal, are not displayed on the screen. Note The resetting item of the Picture menu. • "Dot Phase," "H Size," and "Shift" on the Remote Commander. "Complete!" For details, see page 44. 34 Using a MENU appears on the screen and the setting of the settings The settings are : •...Cannot adjust this item." Unadjustable items Items that you have been adjusted Select the item that cannot be reset are automatically stored in the projector memory when the ENTER key is pressed. To reset items that have selected is not memorized. menu of the Lamp timer setting is ...
... signal, are not displayed on the screen. Note The resetting item of the Picture menu. • "Dot Phase," "H Size," and "Shift" on the Remote Commander. "Complete!" For details, see page 44. 34 Using a MENU appears on the screen and the setting of the settings The settings are : •...Cannot adjust this item." Unadjustable items Items that you have been adjusted Select the item that cannot be reset are automatically stored in the projector memory when the ENTER key is pressed. To reset items that have selected is not memorized. menu of the Lamp timer setting is ...

Operating Instructions
Page 38
... When set to "On," a test pattern is displayed on the Off screen during "V Keystone" or *"Side Shot" adjustment. *VPL-CX125/CX155 only Set to "Off" to cut the sound of the projector. On When set to Standard low in Off the following order: Input A, B, *C/Video/S-Video. Setting items Smart APA Auto Input... consumption is set to "Off," "Speaker: Off" apears on the screen when you press the APA key on the Remote Commander even if "Smart APA" set to "On," the projector detects input signals in standby mode. 38 The Function Menu You can adjust the picture by the "Smart APA," it ...
... When set to "On," a test pattern is displayed on the Off screen during "V Keystone" or *"Side Shot" adjustment. *VPL-CX125/CX155 only Set to "Off" to cut the sound of the projector. On When set to Standard low in Off the following order: Input A, B, *C/Video/S-Video. Setting items Smart APA Auto Input... consumption is set to "Off," "Speaker: Off" apears on the screen when you press the APA key on the Remote Commander even if "Smart APA" set to "On," the projector detects input signals in standby mode. 38 The Function Menu You can adjust the picture by the "Smart APA," it ...


