Operating Instructions
Page 3
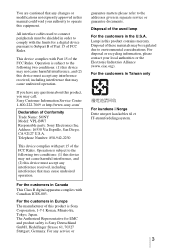
You are cautioned that any changes or modifications not expressly approved in this manual could void your local authorities or the Electronic Industries Alliance (www.eiae.org). This device complies with part 15 of this ...refer to operate this device must accept any questions about this product contains mercury. Disposal of Conformity Trade Name: SONY Model: VPL-BW7 Responsible party: Sony Electronics Inc. The Authorized Representative for a digital device pursuant to comply with Canadian ICES-003. For disposal or recycling information, please contact your authority to the...
You are cautioned that any changes or modifications not expressly approved in this manual could void your local authorities or the Electronic Industries Alliance (www.eiae.org). This device complies with part 15 of this ...refer to operate this device must accept any questions about this product contains mercury. Disposal of Conformity Trade Name: SONY Model: VPL-BW7 Responsible party: Sony Electronics Inc. The Authorized Representative for a digital device pursuant to comply with Canadian ICES-003. For disposal or recycling information, please contact your authority to the...
Operating Instructions
Page 12
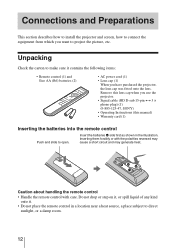
Remove this manual) • Warranty card (1) Inserting the batteries into the remote control Push and ...• Lens cap (1) When you use the projector. • Signal cable (HD D-sub 15-pin y 3 × phono plug) (1) (9-885-125-47, SONY) • Operating Instructions (this lens cap when you have purchased the projector, the lens cap was fitted onto the lens... Check the carton to project the picture, etc. Connections and Preparations This section describes how to install the projector and screen, how to connect the equipment from which you want to make sure it . • Do...
Remove this manual) • Warranty card (1) Inserting the batteries into the remote control Push and ...• Lens cap (1) When you use the projector. • Signal cable (HD D-sub 15-pin y 3 × phono plug) (1) (9-885-125-47, SONY) • Operating Instructions (this lens cap when you have purchased the projector, the lens cap was fitted onto the lens... Check the carton to project the picture, etc. Connections and Preparations This section describes how to install the projector and screen, how to connect the equipment from which you want to make sure it . • Do...

Operating Instructions
Page 20
To connect to the video output. 20 See also the instruction manual of the projector Speakers AV amplifier S VIDEO VIDEO INPUT A INPUT Video equipment to S video or video output S video or video cable (not supplied) : Video signal flow Tip In ...
To connect to the video output. 20 See also the instruction manual of the projector Speakers AV amplifier S VIDEO VIDEO INPUT A INPUT Video equipment to S video or video output S video or video cable (not supplied) : Video signal flow Tip In ...

Operating Instructions
Page 23
...menu screen. The V Keystone adjustment is automatically displayed by pressing INPUT. (1 page 39) 5 Adjust the upper or lower position of the projector with effective signals is performed automatically when you set "V Keystone" in the SET SETTING menu, the input terminal with the adjuster. adjusted ...depending on the top of the screen. Using the adjuster Lift the projector while pressing the adjuster adjustment button, and adjust the tilt of the picture. However, it manually. 7 Adjust the picture size using the zoom lever. 8 Adjust the focus using the ...
...menu screen. The V Keystone adjustment is automatically displayed by pressing INPUT. (1 page 39) 5 Adjust the upper or lower position of the projector with effective signals is performed automatically when you set "V Keystone" in the SET SETTING menu, the input terminal with the adjuster. adjusted ...depending on the top of the screen. Using the adjuster Lift the projector while pressing the adjuster adjustment button, and adjust the tilt of the picture. However, it manually. 7 Adjust the picture size using the zoom lever. 8 Adjust the focus using the ...
Operating Instructions
Page 40
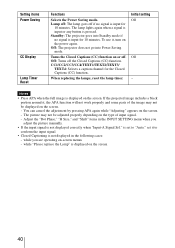
Lamp off: The lamp goes off if no signal is input for 10 minutes. Standby: The projector goes into Power Saving mode. Initial setting Off Off - The picture may not be adjusted properly depending on the screen. - You can cancel the adjustment ... be displayed on or off the Closed Captions (CC) function. while you adjust the picture manually. • If the input signal is displayed on the screen. To use it, turn on -screen menus - Off: The projector does not go into Standby mode if no signal is input for the Closed Captions (CC...
Lamp off: The lamp goes off if no signal is input for 10 minutes. Standby: The projector goes into Power Saving mode. Initial setting Off Off - The picture may not be adjusted properly depending on the screen. - You can cancel the adjustment ... be displayed on or off the Closed Captions (CC) function. while you adjust the picture manually. • If the input signal is displayed on the screen. To use it, turn on -screen menus - Off: The projector does not go into Standby mode if no signal is input for the Closed Captions (CC...
Operating Instructions
Page 42
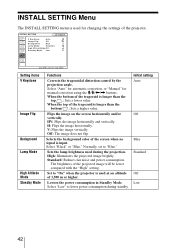
INSTALL SETTING V Keystone: Auto Image Flip: Off Background: Blue Lamp Mode: Standard High Altitude Mode:Off Standby Mode: Low Input-A Setting items V Keystone Image Flip Background Lamp Mode High Altitude Mode Standby Mode Functions Corrects the trapezoidal distortion caused by the projection angle. Select "Auto" for automatic correction, or "Manual" for changing the settings of the projector. INSTALL SETTING Menu The INSTALL SETTING menu is used for manual correction using the M/m/
INSTALL SETTING V Keystone: Auto Image Flip: Off Background: Blue Lamp Mode: Standard High Altitude Mode:Off Standby Mode: Low Input-A Setting items V Keystone Image Flip Background Lamp Mode High Altitude Mode Standby Mode Functions Corrects the trapezoidal distortion caused by the projection angle. Select "Auto" for automatic correction, or "Manual" for changing the settings of the projector. INSTALL SETTING Menu The INSTALL SETTING menu is used for manual correction using the M/m/
Operating Instructions
Page 52
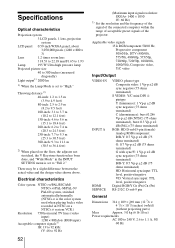
...sync input: TTL level, positive/negative VD: Vertical sync input: TTL level, positive/negative Digital RGB/Y CB (PB) CR (PR) RS-232C: D-sub 9 pin General Dimensions 314... frequency of the signal of the connected computer within the range of acceptable preset signals of the projector. Throwing distance 2) 40-inch: 1.2 to 1.5 m (3.9 to 4.9 feet) 80-inch: ...PAL-M/PAL-N/ PAL60 system, switched automatically/manually (NTSC4.43 is the color system ..."High." Specifications Optical characteristics Projection system 3 LCD panels, 1 lens, projection system LCD panel 0.59-inch WXGA panel, about ...
...sync input: TTL level, positive/negative VD: Vertical sync input: TTL level, positive/negative Digital RGB/Y CB (PB) CR (PR) RS-232C: D-sub 9 pin General Dimensions 314... frequency of the signal of the connected computer within the range of acceptable preset signals of the projector. Throwing distance 2) 40-inch: 1.2 to 1.5 m (3.9 to 4.9 feet) 80-inch: ...PAL-M/PAL-N/ PAL60 system, switched automatically/manually (NTSC4.43 is the color system ..."High." Specifications Optical characteristics Projection system 3 LCD panels, 1 lens, projection system LCD panel 0.59-inch WXGA panel, about ...

