
Operating Instructions
Page 6
Others Troubleshooting 51 Warning Indicators 53 Message Lists 54 Replacing the Lamp and the Air Filter and cleaning the Ventilation holes (intake 55 Replacing the Air Filter 58 Fitting the lens cap 58 Specifications 59 Preset Signals 61 Input Signals and Adjustable/ Setting Items 64 Ceiling Installation 66 When Using the PSS-H10 Projector Suspension Support ......... 66 When Using the PSS-610 Projector Suspension Support ......... 70 Index 73 6
Others Troubleshooting 51 Warning Indicators 53 Message Lists 54 Replacing the Lamp and the Air Filter and cleaning the Ventilation holes (intake 55 Replacing the Air Filter 58 Fitting the lens cap 58 Specifications 59 Preset Signals 61 Input Signals and Adjustable/ Setting Items 64 Ceiling Installation 66 When Using the PSS-H10 Projector Suspension Support ......... 66 When Using the PSS-610 Projector Suspension Support ......... 70 Index 73 6
Operating Instructions
Page 9
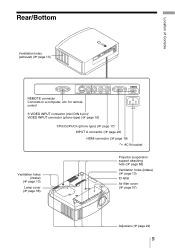
AC IN socket Ventilation holes (intake) (1 page 13) Lamp cover (1 page 56) Projector suspension support attaching hole (1 page 66) Ventilation holes (intake) (1 page 13) ID label Air filter cover (1 page 57) Adjusters (1 page 24) 9 Location of Controls Rear/Bottom Ventilation holes (exhaust) (1 page 13) REMOTE connector Connects to a computer, etc. for remote control S VIDEO INPUT connector (mini DIN 4-pin)/ VIDEO INPUT connector (phono type) (1 page 19) Y/PB/CB/PR/CR (phono type) (1 page 17) INPUT A connector (1 page 20) HDMI connector (1 page 18) -
AC IN socket Ventilation holes (intake) (1 page 13) Lamp cover (1 page 56) Projector suspension support attaching hole (1 page 66) Ventilation holes (intake) (1 page 13) ID label Air filter cover (1 page 57) Adjusters (1 page 24) 9 Location of Controls Rear/Bottom Ventilation holes (exhaust) (1 page 13) REMOTE connector Connects to a computer, etc. for remote control S VIDEO INPUT connector (mini DIN 4-pin)/ VIDEO INPUT connector (phono type) (1 page 19) Y/PB/CB/PR/CR (phono type) (1 page 17) INPUT A connector (1 page 20) HDMI connector (1 page 18) -

Operating Instructions
Page 11
...or with the polarities reversed may cause a short circuit and may generate heat. 11 Remove this lens cap when you have purchased the projector, the lens cap was fitted onto the lens. Unpacking Check the carton to make sure it contains the following items: • ...Remote control (1) and Size AA (R6) batteries (2) • Lens cap (1) When you use the projector. • Operating Instructions (this manual) • AC power cord (1) • Air filter (for replacement) (1) Inserting the batteries into the remote control Push and slide to project the picture, etc.
...or with the polarities reversed may cause a short circuit and may generate heat. 11 Remove this lens cap when you have purchased the projector, the lens cap was fitted onto the lens. Unpacking Check the carton to make sure it contains the following items: • ...Remote control (1) and Size AA (R6) batteries (2) • Lens cap (1) When you use the projector. • Operating Instructions (this manual) • AC power cord (1) • Air filter (for replacement) (1) Inserting the batteries into the remote control Push and slide to project the picture, etc.
Operating Instructions
Page 51
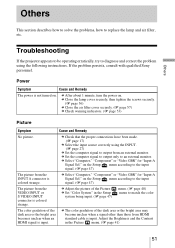
If the problem persists, consult with qualified Sony personnel. c After about 1 minute, turn the power on . c Set the computer signal to output only to replace the lamp and air filter, etc. c Select "Computer," "Component" or "Video GBR" for "Input-A Signal Sel." Adjust the Brightness and the Contrast... is input. c The color gradation of the Picture c Set "Color System" in the Picture menu. (1 page 41) 51 Troubleshooting If the projector appears to be operating erratically, try to diagnose and correct the problem using the INPUT. (1 page 27) c Set the computer signal to the ...
If the problem persists, consult with qualified Sony personnel. c After about 1 minute, turn the power on . c Set the computer signal to output only to replace the lamp and air filter, etc. c Select "Computer," "Component" or "Video GBR" for "Input-A Signal Sel." Adjust the Brightness and the Contrast... is input. c The color gradation of the Picture c Set "Color System" in the Picture menu. (1 page 41) 51 Troubleshooting If the projector appears to be operating erratically, try to diagnose and correct the problem using the INPUT. (1 page 27) c Set the computer signal to the ...
Operating Instructions
Page 53
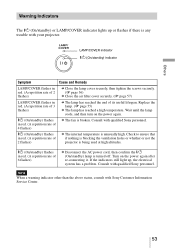
...red. (A repetition rate of its useful lifespan. If the indicators still light up or flashes if there is any trouble with qualified Sony personnel. Consult with your projector. Replace the lamp. (1 page 55) c The lamp has reached a high temperature. Wait until the lamp cools, and then ... flashes in red. (A repetition rate of 2 flashes) c Close the lamp cover securely, then tighten the screws securely. (1 page 56) c Close the air filter cover securely. (1 page 57) LAMP/COVER flashes in red. (A repetition rate of 4 flashes) c The fan is turned off. Note When a warning indicator...
...red. (A repetition rate of its useful lifespan. If the indicators still light up or flashes if there is any trouble with qualified Sony personnel. Consult with your projector. Replace the lamp. (1 page 55) c The lamp has reached a high temperature. Wait until the lamp cools, and then ... flashes in red. (A repetition rate of 2 flashes) c Close the lamp cover securely, then tighten the screws securely. (1 page 56) c Close the air filter cover securely. (1 page 57) LAMP/COVER flashes in red. (A repetition rate of 4 flashes) c The fan is turned off. Note When a warning indicator...
Operating Instructions
Page 54
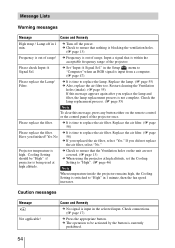
...c Frequency is time to replace the air filter. If you replace the lamp and filter, the lamp replacement process is time to replace the air filter. Check connections. (1 page 17) c Press the appropriate button. Please check Input-A Signal Sel. Projector temperature is switched to "High". (1 page... on the unit are not covered. (1 page 13) c When using the projector at high altitude. c It is not complete. c Set "Input-A Signal Sel." Replace the air filter. (1 page 58) Please replace the filter. Input a signal that nothing is blocking the ventilation holes. (1 page 13)...
...c Frequency is time to replace the air filter. If you replace the lamp and filter, the lamp replacement process is time to replace the air filter. Check connections. (1 page 17) c Press the appropriate button. Please check Input-A Signal Sel. Projector temperature is switched to "High". (1 page... on the unit are not covered. (1 page 13) c When using the projector at high altitude. c It is not complete. c Set "Input-A Signal Sel." Replace the air filter. (1 page 58) Please replace the filter. Input a signal that nothing is blocking the ventilation holes. (1 page 13)...
Operating Instructions
Page 55
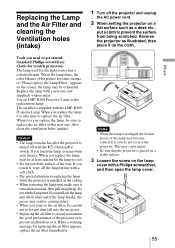
... new one . When you replace the lamp, it remains horizontal, then pull straight up. The air filter is turned off the projector and unplug the AC power cord. 2 When setting the projector on the lamp cover with a Philips screwdriver, and then open the lamp cover. 55 When you replace ... for at least an hour for replacing the air filter appears, replace the air filter immediately. If you remove the air filter, be careful not to let any dust fall into the projector. • Replacing the air filter is crucial to replace the air filter with a new one (not supplied) without delay...
... new one . When you replace the lamp, it remains horizontal, then pull straight up. The air filter is turned off the projector and unplug the AC power cord. 2 When setting the projector on the lamp cover with a Philips screwdriver, and then open the lamp cover. 55 When you replace ... for at least an hour for replacing the air filter appears, replace the air filter immediately. If you remove the air filter, be careful not to let any dust fall into the projector. • Replacing the air filter is crucial to replace the air filter with a new one (not supplied) without delay...
Operating Instructions
Page 56
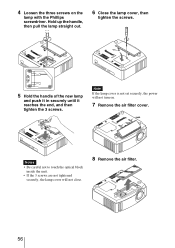
Notes • Be careful not to touch the optical block inside the unit. • If the 3 screws are not tightened securely, the lamp cover will not turn on the lamp with the Phillips screwdriver. 4 Loosen the three screws on . 7 Remove the air filter cover. Note If the lamp cover is not set securely, the power will not close. 8 Remove the air filter. 56 Hold up the handle, then pull the lamp straight out. 6 Close the lamp cover, then tighten the screws. 5 Hold the handle of the new lamp and push it in securely until it reaches the end, and then tighten the 3 screws.
Notes • Be careful not to touch the optical block inside the unit. • If the 3 screws are not tightened securely, the lamp cover will not turn on the lamp with the Phillips screwdriver. 4 Loosen the three screws on . 7 Remove the air filter cover. Note If the lamp cover is not set securely, the power will not close. 8 Remove the air filter. 56 Hold up the handle, then pull the lamp straight out. 6 Close the lamp cover, then tighten the screws. 5 Hold the handle of the new lamp and push it in securely until it reaches the end, and then tighten the 3 screws.
Operating Instructions
Page 57
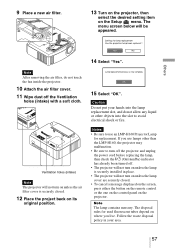
... • Be sure to use lamps other objects into the lamp replacement slot, and do not touch the fan inside the projector. 10 Attach the air filter cover. 11 Wipe dust off . • The projector will not turn on unless the lamp cover are securely closed . 12 Place the project back on the... projector. Others Note After removing the air filter, do not allow any liquid or other than the LMP-H160, the projector may malfunction. • Be sure to avoid electrical shock or fire. The menu screen below ...
... • Be sure to use lamps other objects into the lamp replacement slot, and do not touch the fan inside the projector. 10 Attach the air filter cover. 11 Wipe dust off . • The projector will not turn on unless the lamp cover are securely closed . 12 Place the project back on the... projector. Others Note After removing the air filter, do not allow any liquid or other than the LMP-H160, the projector may malfunction. • Be sure to avoid electrical shock or fire. The menu screen below ...
Operating Instructions
Page 58
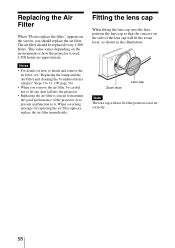
... to it. This value varies depending on the side of the projector or to prevent malfunction to 11. (1 page 56) • When you should be careful not to let any dust fall into the projector. • Replacing the air filter is used. 1,500 hours are approximate. Notes • For ...details on the screen, you remove the air filter, be replaced every 1,500 hours. Replacing the Air Filter When "Please replace the filter." Zoom lever Lens cap Note The...
... to it. This value varies depending on the side of the projector or to prevent malfunction to 11. (1 page 56) • When you should be careful not to let any dust fall into the projector. • Replacing the air filter is used. 1,500 hours are approximate. Notes • For ...details on the screen, you remove the air filter, be replaced every 1,500 hours. Replacing the Air Filter When "Please replace the filter." Zoom lever Lens cap Note The...
Operating Instructions
Page 60
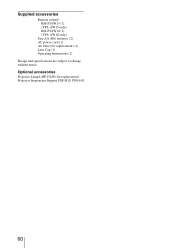
Supplied accessories Remote control RM-PJAW15 (1) (VPL-AW15 only) RM-PJAW10 (1) (VPL-AW10 only) Size AA (R6) batteries (2) AC power cord (1) Air filter (for replacement) Projector Suspension Support PSS-H10, PSS-610 60 Optional accessories Projector Lamp LMP-H160 (for replacement) (1) Lens Cap (1) Operating Instructions (1) Design and specifications are subject to change without notice.
Supplied accessories Remote control RM-PJAW15 (1) (VPL-AW15 only) RM-PJAW10 (1) (VPL-AW10 only) Size AA (R6) batteries (2) AC power cord (1) Air filter (for replacement) Projector Suspension Support PSS-H10, PSS-610 60 Optional accessories Projector Lamp LMP-H160 (for replacement) (1) Lens Cap (1) Operating Instructions (1) Design and specifications are subject to change without notice.
Marketing Specifications (VPL-AW10)
Page 2
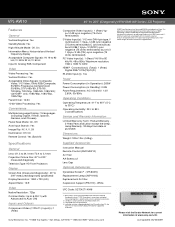
...° C) Operating Humidity: 35% to reslutions supported by both the PC and the Sony TV. Dimensions Weight: 12lbs 12oz (5.8kg) Supplied Accessories Instruction Manual Remote Control (RM-PJAW10) Air Filter AA Battery x2 Lens Cap Optional Accessories DynaClear Screen™ (VPS-80DS) Replacement Lamp ...sony.com/dn Last Updated: 06/25/2009 Progressive Compomnent 50/60Hz; DTV (480/60i, 575/50i, 720/60p, 720/50p, 1080/60i, 1080/50i); This projector incorperated High-Definition Multimedia Interface (HDMI) technology. VPL-AW10 40" to 200" (Diagonally) BRAVIA® AW Series LCD Projector ...
...° C) Operating Humidity: 35% to reslutions supported by both the PC and the Sony TV. Dimensions Weight: 12lbs 12oz (5.8kg) Supplied Accessories Instruction Manual Remote Control (RM-PJAW10) Air Filter AA Battery x2 Lens Cap Optional Accessories DynaClear Screen™ (VPS-80DS) Replacement Lamp ...sony.com/dn Last Updated: 06/25/2009 Progressive Compomnent 50/60Hz; DTV (480/60i, 575/50i, 720/60p, 720/50p, 1080/60i, 1080/50i); This projector incorperated High-Definition Multimedia Interface (HDMI) technology. VPL-AW10 40" to 200" (Diagonally) BRAVIA® AW Series LCD Projector ...


