
User Guide
Page 2
...Setting Up Your Computer 17 Shutting Down Your Computer Safely 25 Using the Power Saving Mode 26 Updating Your Computer 28 Using Your VAIO Computer 29 Using the Keyboard 30 Using the Mouse 36 Using the Touch Screen 42 Using the Built-in Camera 46 Using ...Connecting an External Microphone 92 Connecting a USB Device 93 Connecting an i.LINK Device 95 Customizing Your VAIO Computer 97 Setting the Password 98 Using the VAIO Control Center 103 Upgrading Your VAIO Computer 104 Adding and Removing Memory 105 Precautions 111 Safety Information 112 Care and Maintenance Information 114...
...Setting Up Your Computer 17 Shutting Down Your Computer Safely 25 Using the Power Saving Mode 26 Updating Your Computer 28 Using Your VAIO Computer 29 Using the Keyboard 30 Using the Mouse 36 Using the Touch Screen 42 Using the Built-in Camera 46 Using ...Connecting an External Microphone 92 Connecting a USB Device 93 Connecting an i.LINK Device 95 Customizing Your VAIO Computer 97 Setting the Password 98 Using the VAIO Control Center 103 Upgrading Your VAIO Computer 104 Adding and Removing Memory 105 Precautions 111 Safety Information 112 Care and Maintenance Information 114...

User Guide
Page 4
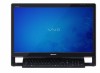
...External views illustrated in this Sony VAIO® computer, and welcome to the on your computer, visit the Sony online support web site at the following URLs: ❑ For customers in USA http://esupport.sony.com/EN/VAIO/ ❑ For customers in Canada http://sony.ca/support/ ❑ For... customers in Spanish-speaking Latin American countries or areas http://esupport.sony.com/ES/VAIO/LA ❑ For customers in audio, video, computing,...
...External views illustrated in this Sony VAIO® computer, and welcome to the on your computer, visit the Sony online support web site at the following URLs: ❑ For customers in USA http://esupport.sony.com/EN/VAIO/ ❑ For customers in Canada http://sony.ca/support/ ❑ For... customers in Spanish-speaking Latin American countries or areas http://esupport.sony.com/ES/VAIO/LA ❑ For customers in audio, video, computing,...

User Guide
Page 5
... entire built-in the form of components connection, set-up information, etc. ❑ Safety Information - An overview of VAIO tutorials, how-to articles, the VAIO technology page, specifications, and system and software information. To access Help and Support: 1 Click Start and Help and Support...with my VAIO Get help in storage device to find useful documentation such as below: - You can find the answers you need. On-screen Documentation ❑ Help and Support - Use my VAIO Access interactive help with VAIO Care, system restore, backup and recovery, and contact Sony support....
... entire built-in the form of components connection, set-up information, etc. ❑ Safety Information - An overview of VAIO tutorials, how-to articles, the VAIO technology page, specifications, and system and software information. To access Help and Support: 1 Click Start and Help and Support...with my VAIO Get help in storage device to find useful documentation such as below: - You can find the answers you need. On-screen Documentation ❑ Help and Support - Use my VAIO Access interactive help with VAIO Care, system restore, backup and recovery, and contact Sony support....
User Guide
Page 6
... access this on a specific program. ❑ SmartWi™ Connection Utility Help - You may not be available on your computer. Before Use > Finding More about Your VAIO Computer n6 N ❑ Program help menu on -screen guide: 1 Click Start, All Programs, and SmartWi Connection Utility. 2 Click SmartWi Connection Utility Help.
... access this on a specific program. ❑ SmartWi™ Connection Utility Help - You may not be available on your computer. Before Use > Finding More about Your VAIO Computer n6 N ❑ Program help menu on -screen guide: 1 Click Start, All Programs, and SmartWi Connection Utility. 2 Click SmartWi Connection Utility Help.

User Guide
Page 7
...Microsoft customer support at http://support.microsoft.com/directory/. Before Use > Finding More about Your VAIO Computer n7 N 3. Support Web Sites ❑ Sony online support web site The Sony online support web site provides instant access to information on commonly encountered problems. Type a description... the Knowledge Database searches for the corresponding solutions online. ❑ For customers in USA http://esupport.sony.com/EN/VAIO/ ❑ For customers in Canada http://sony.ca/support/ ❑ For customers in Spanish-speaking Latin American countries or areas http://esupport...
...Microsoft customer support at http://support.microsoft.com/directory/. Before Use > Finding More about Your VAIO Computer n7 N 3. Support Web Sites ❑ Sony online support web site The Sony online support web site provides instant access to information on commonly encountered problems. Type a description... the Knowledge Database searches for the corresponding solutions online. ❑ For customers in USA http://esupport.sony.com/EN/VAIO/ ❑ For customers in Canada http://sony.ca/support/ ❑ For customers in Spanish-speaking Latin American countries or areas http://esupport...

User Guide
Page 8
...to receive the fastest and most efficient services, have the following information readily available: 1 Your VAIO computer model You can find it on the Sony online support web site. Sony Style store and get personalized service and support for at a U.S. You can find the ...contact numbers on the bottom, the back panel, or inside the battery compartment of your computer 4 The hardware component or the software program that is causing the problem 5 A brief description of your new VAIO PC...
...to receive the fastest and most efficient services, have the following information readily available: 1 Your VAIO computer model You can find it on the Sony online support web site. Sony Style store and get personalized service and support for at a U.S. You can find the ...contact numbers on the bottom, the back panel, or inside the battery compartment of your computer 4 The hardware component or the software program that is causing the problem 5 A brief description of your new VAIO PC...
User Guide
Page 11
Upon completion, connect one device (for the first time, do not connect any other hardware that did not originally come with your VAIO computer. ! Before starting your computer for example, a printer, an external hard disk drive, a scanner, and so on) at a time, following the manufacturer's instructions. ❑ Locating ...
Upon completion, connect one device (for the first time, do not connect any other hardware that did not originally come with your VAIO computer. ! Before starting your computer for example, a printer, an external hard disk drive, a scanner, and so on) at a time, following the manufacturer's instructions. ❑ Locating ...

User Guide
Page 28
Your computer must be connected to the Internet to VAIO Web Support and then follow the on-screen instructions. ! Getting Started > Updating Your Computer n 28 N Updating Your Computer Be sure to install the latest updates on your computer with the following software applications so that the computer can run more efficiently. ❑ Windows Update Click Start, All Programs, and Windows Update and then follow the on-screen instructions. ❑ VAIO Update 4 Click Start, All Programs, VAIO Update 4, and Go to download the updates.
Your computer must be connected to the Internet to VAIO Web Support and then follow the on-screen instructions. ! Getting Started > Updating Your Computer n 28 N Updating Your Computer Be sure to install the latest updates on your computer with the following software applications so that the computer can run more efficiently. ❑ Windows Update Click Start, All Programs, and Windows Update and then follow the on-screen instructions. ❑ VAIO Update 4 Click Start, All Programs, VAIO Update 4, and Go to download the updates.
User Guide
Page 29
... This section describes how to get the most out of using your VAIO computer. ❑ Using the Keyboard (page 30) ❑ Using the Mouse (page 36) ❑ Using the Touch Screen (page 42) ❑ Using the Built-in ...
... This section describes how to get the most out of using your VAIO computer. ❑ Using the Keyboard (page 30) ❑ Using the Mouse (page 36) ❑ Using the Touch Screen (page 42) ❑ Using the Built-in ...
User Guide
Page 30
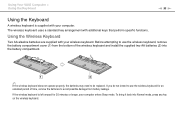
Using Your VAIO Computer > Using the Keyboard n 30 N Using the Keyboard A wireless keyboard is left unused for an extended period of the wireless keyboard and install the supplied ...
Using Your VAIO Computer > Using the Keyboard n 30 N Using the Keyboard A wireless keyboard is left unused for an extended period of the wireless keyboard and install the supplied ...
User Guide
Page 31
...61). Be sure to stop working properly. Using incompatible batteries or mixing used the keyboard with manganese batteries. Do not mix alkaline with another VAIO model, reconnect the keyboard. These devices may create interference, causing the keyboard to use the wireless keyboard in the wireless keyboard. If you used... different types of the battery. You cannot use the same type and manufacture of batteries can damage the wireless keyboard. Using Your VAIO Computer > Using the Keyboard n 31 N ! Do not place metal furniture or objects near the wireless keyboard.
...61). Be sure to stop working properly. Using incompatible batteries or mixing used the keyboard with manganese batteries. Do not mix alkaline with another VAIO model, reconnect the keyboard. These devices may create interference, causing the keyboard to use the wireless keyboard in the wireless keyboard. If you used... different types of the battery. You cannot use the same type and manufacture of batteries can damage the wireless keyboard. Using Your VAIO Computer > Using the Keyboard n 31 N ! Do not place metal furniture or objects near the wireless keyboard.

User Guide
Page 32
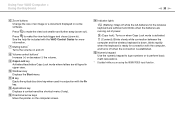
...HDMI/VIDEO input function, see Using the Power Saving Mode (page 26). E Sleep button Provides a lower level of the LCD screen. ! Using Your VAIO Computer > Using the Keyboard ✍ Illustrated above is activated or deactivated, the (Num lock) or (Scroll lock) icon appears on the taskbar, ... among software applications except the following combinations with the Fn key to indicate a mode change the LCD brightness of the LCD screen. C VAIO button Launches the Media Gallery. To change the brightness while using the HDMI/VIDEO input function, you cannot use this key in conjunction with...
...HDMI/VIDEO input function, see Using the Power Saving Mode (page 26). E Sleep button Provides a lower level of the LCD screen. ! Using Your VAIO Computer > Using the Keyboard ✍ Illustrated above is activated or deactivated, the (Num lock) or (Scroll lock) icon appears on the taskbar, ... among software applications except the following combinations with the Fn key to indicate a mode change the LCD brightness of the LCD screen. C VAIO button Launches the Media Gallery. To change the brightness while using the HDMI/VIDEO input function, you cannot use this key in conjunction with...
User Guide
Page 33
...for more information. Press to make the view look bigger and closer (zoom in upper case. See the help file included with the VAIO Control Center for connection with the Fn key. J Windows key Displays the Start menu. I Caps Lock key Activates/deactivates Caps Lock ...Press to perform basic math calculations. * Disabled while you are all typed in ). H Volume control buttons* Increase (+) or decrease (-) the volume. Using Your VAIO Computer > Using the Keyboard n 33 N F Zoom buttons Change the size of power. (Caps lock): Turns on when Caps Lock mode is activated. (Connect):...
...for more information. Press to make the view look bigger and closer (zoom in upper case. See the help file included with the VAIO Control Center for connection with the Fn key. J Windows key Displays the Start menu. I Caps Lock key Activates/deactivates Caps Lock ...Press to perform basic math calculations. * Disabled while you are all typed in ). H Volume control buttons* Increase (+) or decrease (-) the volume. Using Your VAIO Computer > Using the Keyboard n 33 N F Zoom buttons Change the size of power. (Caps lock): Turns on when Caps Lock mode is activated. (Connect):...
User Guide
Page 34
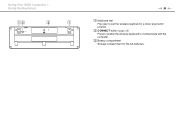
B CONNECT button (page 35) Press to enable the wireless keyboard to put the wireless keyboard in a more 'ergonomic' position. C Battery compartment Storage compartment for the AA batteries. Using Your VAIO Computer > Using the Keyboard n 34 N A Keyboard feet Flip open to communicate with the computer.
B CONNECT button (page 35) Press to enable the wireless keyboard to put the wireless keyboard in a more 'ergonomic' position. C Battery compartment Storage compartment for the AA batteries. Using Your VAIO Computer > Using the Keyboard n 34 N A Keyboard feet Flip open to communicate with the computer.
User Guide
Page 35
... period, the indicator light goes blinking slowly to indicate that the keyboard is down. Using Your VAIO Computer > Using the Keyboard n 35 N To connect the wireless keyboard ! The connect indicator light blinks rapidly for about one minute to the ON position. 4 Press the CONNECT button (1) on the bottom of the keyboard. 5 Press...
... period, the indicator light goes blinking slowly to indicate that the keyboard is down. Using Your VAIO Computer > Using the Keyboard n 35 N To connect the wireless keyboard ! The connect indicator light blinks rapidly for about one minute to the ON position. 4 Press the CONNECT button (1) on the bottom of the keyboard. 5 Press...
User Guide
Page 36
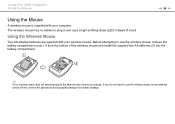
... supplied with your wireless mouse. If you do not intend to use the wireless mouse, remove the battery compartment cover (1) from battery leakage. Using Your VAIO Computer > Using the Mouse n 36 N Using the Mouse A wireless mouse is supplied with your computer. The wireless mouse has no cables to avoid possible damage...
... supplied with your wireless mouse. If you do not intend to use the wireless mouse, remove the battery compartment cover (1) from battery leakage. Using Your VAIO Computer > Using the Mouse n 36 N Using the Mouse A wireless mouse is supplied with your computer. The wireless mouse has no cables to avoid possible damage...

User Guide
Page 37
Do not mix alkaline with another VAIO model, reconnect the mouse. Always use the same type and manufacture of batteries can damage the wireless mouse. Use surfaces such as mirrors, smooth glass, ... or different types of the battery. If you find your wireless mouse not working properly. Avoid using any wireless devices that have half- Using Your VAIO Computer > Using the Mouse n 37 N ! Avoid using the wireless mouse on surfaces such as plain paper, card stock, or fabric that exchange radio signals on...
Do not mix alkaline with another VAIO model, reconnect the mouse. Always use the same type and manufacture of batteries can damage the wireless mouse. Use surfaces such as mirrors, smooth glass, ... or different types of the battery. If you find your wireless mouse not working properly. Avoid using any wireless devices that have half- Using Your VAIO Computer > Using the Mouse n 37 N ! Avoid using the wireless mouse on surfaces such as plain paper, card stock, or fabric that exchange radio signals on...
User Guide
Page 38
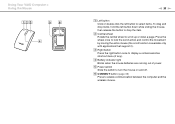
... switch to display a context-sensitive shortcut menu (if any). C Right button Press the right button once to turn the mouse on and off. Using Your VAIO Computer > Using the Mouse n 38 N A Left button Click or double-click the left button to select items. To drag and drop items, hold the left...
... switch to display a context-sensitive shortcut menu (if any). C Right button Press the right button once to turn the mouse on and off. Using Your VAIO Computer > Using the Mouse n 38 N A Left button Click or double-click the left button to select items. To drag and drop items, hold the left...
User Guide
Page 39
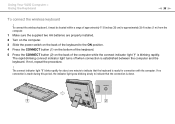
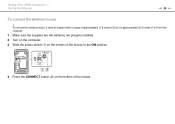
Using Your VAIO Computer > Using the Mouse n 39 N To connect the wireless mouse ! To connect the wireless mouse, it must be located within a range of approximately 11.8 inches (30 cm) to approximately 39.4 inches (1 m) from the computer. 1 Make sure the supplied two AA batteries are properly installed. 2 Turn on the computer. 3 Slide the power switch (1) on the bottom of the mouse to the ON position. 4 Press the CONNECT button (2) on the bottom of the mouse.
Using Your VAIO Computer > Using the Mouse n 39 N To connect the wireless mouse ! To connect the wireless mouse, it must be located within a range of approximately 11.8 inches (30 cm) to approximately 39.4 inches (1 m) from the computer. 1 Make sure the supplied two AA batteries are properly installed. 2 Turn on the computer. 3 Slide the power switch (1) on the bottom of the mouse to the ON position. 4 Press the CONNECT button (2) on the bottom of the mouse.

User Guide
Page 40
If not, repeat the procedure. Using Your VAIO Computer > Using the Mouse n 40 N 5 Press the CONNECT button (3) on the back of the computer within 10 seconds from step 4. Communication between the mouse and the computer should now be established.
If not, repeat the procedure. Using Your VAIO Computer > Using the Mouse n 40 N 5 Press the CONNECT button (3) on the back of the computer within 10 seconds from step 4. Communication between the mouse and the computer should now be established.


