
VGX-XL2A Safety Information
Page 2
...IN THIS GUIDE WILL BE UNINTERRUPTED OR ERROR-FREE. Some of Sony. Software specifications are available to current retail versions. Important information for Canadian customers: Your new VAIO VGX-XL2A includes certain software versions or upgrades, and Internet services or offers...procedures and privacy policies will be reproduced, translated, or reduced to DVD, CLIÉ, DVgate Plus, Handycam, MagicGate, Memory Stick, Memory Stick Duo, the Memory Stick logo, OpenMG, MICROMV, SonicStage, PictureGear, ImageStation, ATRAC3, and i.LINK are trademarks or registered trademarks of the...
...IN THIS GUIDE WILL BE UNINTERRUPTED OR ERROR-FREE. Some of Sony. Software specifications are available to current retail versions. Important information for Canadian customers: Your new VAIO VGX-XL2A includes certain software versions or upgrades, and Internet services or offers...procedures and privacy policies will be reproduced, translated, or reduced to DVD, CLIÉ, DVgate Plus, Handycam, MagicGate, Memory Stick, Memory Stick Duo, the Memory Stick logo, OpenMG, MICROMV, SonicStage, PictureGear, ImageStation, ATRAC3, and i.LINK are trademarks or registered trademarks of the...

Marketing Specifications (VGX-XL2)
Page 2
...week)7 Limited Warranty and Onsite Service: 1 Year6 Online and Email Support: Support available from, http://www.esupport.sony.com Dimensions Weight: 86 lbs (for both XL2A and XL1B) Measurements: 17" x 13.8" x 19.5" (for up to 1GB. Does not support 5.0V...Core Memory Type: DDR2 Installed: 1GB (PC2-4200 512MB x 2) Maximum: 2GB Speed: 533MHz Hard Drive Capacity: 320GB2 (160GBx2) Speed: 7200rpm Interface: SATA (Preconfigured RAID 0 ready) Optical Drive #1 DVD+R DL Write: 4x max. VGX-XL2 VAIO® XL2 Digital Living System™ Specifications General Computer Type: Digital Living System™...
...week)7 Limited Warranty and Onsite Service: 1 Year6 Online and Email Support: Support available from, http://www.esupport.sony.com Dimensions Weight: 86 lbs (for both XL2A and XL1B) Measurements: 17" x 13.8" x 19.5" (for up to 1GB. Does not support 5.0V...Core Memory Type: DDR2 Installed: 1GB (PC2-4200 512MB x 2) Maximum: 2GB Speed: 533MHz Hard Drive Capacity: 320GB2 (160GBx2) Speed: 7200rpm Interface: SATA (Preconfigured RAID 0 ready) Optical Drive #1 DVD+R DL Write: 4x max. VGX-XL2 VAIO® XL2 Digital Living System™ Specifications General Computer Type: Digital Living System™...

User Guide (Computer Component)
Page 2
... TO APPLICABLE END USER AGREEMENTS AND FULL COMPLIANCE WITH APPLICABLE PRODUCT ACTIVATION PROCEDURES. Sony, VAIO, the VAIO logo, VAIO Digital Studio, VAIO Media, VAIO Media Music Server, VAIO Media Photo Server, VAIO..., CLIÉ, DVgate Plus, Handycam, MagicGate, Memory Stick, Memory Stick Duo, the Memory Stick logo, OpenMG, MICROMV, SonicStage, PictureGear are trademarks or registered trademarks of Sony Electronics. Product activation procedures and privacy policies will ...apply). customers only. VAIO® VGX-XL2A Disclaimers, Notes, Warnings NOTICE © 2005 Sony Electronics Inc.
... TO APPLICABLE END USER AGREEMENTS AND FULL COMPLIANCE WITH APPLICABLE PRODUCT ACTIVATION PROCEDURES. Sony, VAIO, the VAIO logo, VAIO Digital Studio, VAIO Media, VAIO Media Music Server, VAIO Media Photo Server, VAIO..., CLIÉ, DVgate Plus, Handycam, MagicGate, Memory Stick, Memory Stick Duo, the Memory Stick logo, OpenMG, MICROMV, SonicStage, PictureGear are trademarks or registered trademarks of Sony Electronics. Product activation procedures and privacy policies will ...apply). customers only. VAIO® VGX-XL2A Disclaimers, Notes, Warnings NOTICE © 2005 Sony Electronics Inc.
User Guide (Computer Component)
Page 13
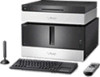
... compatible. 10 VGX-XL2A Digital Living System Connect Keyboard/Pointing Device Use this button when activating the wireless keyboard/pointing device. 1. Eject button Press when the disc is read and written. Secure Digital (SD) & MultiMediaCard™ (MMC) memory card reader Data from a "Memory Stick®", ...xDPicture Card, Smart Media, Compact Flash, or SD memory card. USB (Universial Serial Bus) Connector (x2) Connects ...
... compatible. 10 VGX-XL2A Digital Living System Connect Keyboard/Pointing Device Use this button when activating the wireless keyboard/pointing device. 1. Eject button Press when the disc is read and written. Secure Digital (SD) & MultiMediaCard™ (MMC) memory card reader Data from a "Memory Stick®", ...xDPicture Card, Smart Media, Compact Flash, or SD memory card. USB (Universial Serial Bus) Connector (x2) Connects ...

User Guide (Computer Component)
Page 14
... an i.LINK connection, contact Sony at 1-800-686-7669. Using Memory Cards and Memory Card Readers This section provides basic information about using your computer's memory card readers to designate that are compatible with an i.LINK connection may vary depending on the software applications, operating system and compatible i.LINK devices. VGX-XL2A Digital Living System 11 i.LINK is equipped with...
... an i.LINK connection, contact Sony at 1-800-686-7669. Using Memory Cards and Memory Card Readers This section provides basic information about using your computer's memory card readers to designate that are compatible with an i.LINK connection may vary depending on the software applications, operating system and compatible i.LINK devices. VGX-XL2A Digital Living System 11 i.LINK is equipped with...

User Guide (Computer Component)
Page 15
Supported Memory Card Readers and Compatible Media Smart Media™ xD-Picture Card™ Secure Digital (SD) MultiMediaCard™ Compact Flash® Microdrive™ Memory Stick Duo™ Memory Stick Pro™ Memory Stick® 12 VGX-XL2A Digital Living System
Supported Memory Card Readers and Compatible Media Smart Media™ xD-Picture Card™ Secure Digital (SD) MultiMediaCard™ Compact Flash® Microdrive™ Memory Stick Duo™ Memory Stick Pro™ Memory Stick® 12 VGX-XL2A Digital Living System

User Guide (Computer Component)
Page 16
... benefits of Memory Stick PRO™ media, in a form that protected content is 1/3 smaller in size. • Memory Stick® media - VGX-XL2A Digital Living System 13 Protected content can be available. You can store different data formats on a single Memory Stick media. • Memory Stick Pro...authentication and encryption, using only MagicGate Memory Stick media to your computer can store different data formats on Memory Stick® media. At this time, Sony suggests using Sony® MagicGate technology. The Memory Stick media does not provide MagicGate ...
... benefits of Memory Stick PRO™ media, in a form that protected content is 1/3 smaller in size. • Memory Stick® media - VGX-XL2A Digital Living System 13 Protected content can be available. You can store different data formats on a single Memory Stick media. • Memory Stick Pro...authentication and encryption, using only MagicGate Memory Stick media to your computer can store different data formats on Memory Stick® media. At this time, Sony suggests using Sony® MagicGate technology. The Memory Stick media does not provide MagicGate ...
User Guide (Computer Component)
Page 17
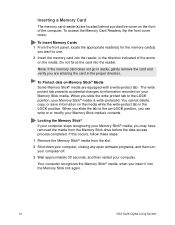
... un-LOCK position, you insert it into the Memory Stick slot again. 14 VGX-XL2A Digital Living System Your computer recognizes the Memory Stick® media, when you can write to use. 2 Insert the memory card into the reader. The write protect tab prevents accidental changes to the LOCK position, your Memory Stick® media is write-protected. Locking...
... un-LOCK position, you insert it into the Memory Stick slot again. 14 VGX-XL2A Digital Living System Your computer recognizes the Memory Stick® media, when you can write to use. 2 Insert the memory card into the reader. The write protect tab prevents accidental changes to the LOCK position, your Memory Stick® media is write-protected. Locking...

User Guide (Computer Component)
Page 18
... card while the media access indicator light is on. The card or its data may be formatted properly. To remove a Memory Stick® media, Secure Digital (SD), MultiMediaCard™, SmartMedia™, or xD-Picture Card™ media 1 Press the extended part of the... format your memory card. 1 Format the memory card by your computer, so the following: • Save the card's contents to extend out from the reader. To remove a CompactFlash® media† 1 Firmly grasp the extended part of the memory card, causing it . VGX-XL2A Digital Living System 15 Removing a Memory Card The ...
... card while the media access indicator light is on. The card or its data may be formatted properly. To remove a Memory Stick® media, Secure Digital (SD), MultiMediaCard™, SmartMedia™, or xD-Picture Card™ media 1 Press the extended part of the... format your memory card. 1 Format the memory card by your computer, so the following: • Save the card's contents to extend out from the reader. To remove a CompactFlash® media† 1 Firmly grasp the extended part of the memory card, causing it . VGX-XL2A Digital Living System 15 Removing a Memory Card The ...

User Guide (Computer Component)
Page 45
... 2 GB. Please be upgraded to catch your fingers on the cables inside this device may cause burns. VGX-XL2A Digital Living System 42 There are a total of this device. Mishandling when installing and removing can cause a failure of this device. Upgrade the memory by the parts or the circuit board inside this device when installing the...
... 2 GB. Please be upgraded to catch your fingers on the cables inside this device may cause burns. VGX-XL2A Digital Living System 42 There are a total of this device. Mishandling when installing and removing can cause a failure of this device. Upgrade the memory by the parts or the circuit board inside this device when installing the...

User Guide (Computer Component)
Page 46
... Sony repair centers provide a service for charge for those who can be installed in these and similar situations will be charged to the owner. Using Standard Memory: DDR2 533(PC2-4200) Capacity Standard (1024MB) Standard Bank 0 512MB x 2 DDR2 533 Upgrade Bank 1 43 VGX-XL2A Digital Living System ...Repair costs in this device: Capacity 512 MB Speed DDR2 533 (PC2-4200) Memory Module VGP-MM512J Important Note: ...
... Sony repair centers provide a service for charge for those who can be installed in these and similar situations will be charged to the owner. Using Standard Memory: DDR2 533(PC2-4200) Capacity Standard (1024MB) Standard Bank 0 512MB x 2 DDR2 533 Upgrade Bank 1 43 VGX-XL2A Digital Living System ...Repair costs in this device: Capacity 512 MB Speed DDR2 533 (PC2-4200) Memory Module VGP-MM512J Important Note: ...

User Guide (Computer Component)
Page 47
...separated into two banks. Make sure that doubles the memory bandwidth capability to store. VGX-XL2A Digital Living System 44 Install Notes: Observe the following when upgrading the memory as the memory slots for this device to not damage the memory module with a static protection bag or aluminum foil ... products purchased at a store have a written warranty for the device when installing. • Sony does not provide support for the DDR memory interface. Do not take the memory module out from the bag until right before installing. • Do not touch the semiconductor ...
...separated into two banks. Make sure that doubles the memory bandwidth capability to store. VGX-XL2A Digital Living System 44 Install Notes: Observe the following when upgrading the memory as the memory slots for this device to not damage the memory module with a static protection bag or aluminum foil ... products purchased at a store have a written warranty for the device when installing. • Sony does not provide support for the DDR memory interface. Do not take the memory module out from the bag until right before installing. • Do not touch the semiconductor ...

User Guide (Computer Component)
Page 48
...the slot. • Please be careful not to forcefully insert the memory module in the slot in the opposite direction which can hold a 512 MB memory module. • Install memory modules of the memory module connector and the projections (inside components may be hot. Wait ...memory modules in this device and all peripheral devices, and remove the power cord and all cables connecting peripheral devices. Remove the screws at the rear and slide the cover off the power to work. 2 Remove the upper cover. Install and remove memory modules 1 Turn off . 45 VGX-XL2A Digital Living System...
...the slot. • Please be careful not to forcefully insert the memory module in the slot in the opposite direction which can hold a 512 MB memory module. • Install memory modules of the memory module connector and the projections (inside components may be hot. Wait ...memory modules in this device and all peripheral devices, and remove the power cord and all cables connecting peripheral devices. Remove the screws at the rear and slide the cover off the power to work. 2 Remove the upper cover. Install and remove memory modules 1 Turn off . 45 VGX-XL2A Digital Living System...
User Guide (Computer Component)
Page 49
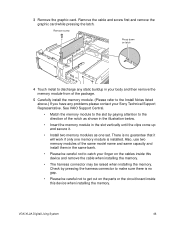
3 Remove the graphic card. There is no gap. • Please be raised when installing the memory. VGX-XL2A Digital Living System 46 See VAIO Support Central. • Match the memory module to the slot by pressing the harness connector to discharge any problems please contact your finger on the ...parts or the circuit board inside this device and remove the cable when installing the memory. • The harness connector may be careful not to catch your Sony Technical Support Representative. Remove screw Press down on latch 4 Touch metal to make sure there is...
3 Remove the graphic card. There is no gap. • Please be raised when installing the memory. VGX-XL2A Digital Living System 46 See VAIO Support Central. • Match the memory module to the slot by pressing the harness connector to discharge any problems please contact your finger on the ...parts or the circuit board inside this device and remove the cable when installing the memory. • The harness connector may be careful not to catch your Sony Technical Support Representative. Remove screw Press down on latch 4 Touch metal to make sure there is...

User Guide (Computer Component)
Page 50
Check the following after installing the memory module: • The clips on both sides are back and the notch is installed properly. Pres down Locking Cap Align the MUesme obroythMhoadnudles ntootch as shown Make sure the locking caps are aligned with each other. • The clips on both hands to secure. Press in to place the memory module. 6 Make sure that the memory module is aligned. Use both sides fit into the notches of the memory module properly. 47 VGX-XL2A Digital Living System Connectors go down the memory module until the locking caps pop up.
Check the following after installing the memory module: • The clips on both sides are back and the notch is installed properly. Pres down Locking Cap Align the MUesme obroythMhoadnudles ntootch as shown Make sure the locking caps are aligned with each other. • The clips on both hands to secure. Press in to place the memory module. 6 Make sure that the memory module is aligned. Use both sides fit into the notches of the memory module properly. 47 VGX-XL2A Digital Living System Connectors go down the memory module until the locking caps pop up.

User Guide (Computer Component)
Page 51
Install the graphics card, connect the cable and tighten the screw. 8 Install the upper cover. VGX-XL2A Digital Living System 48 Install the cover and tighten the screws on the back. 9 Connect the power cord and the peripheral devices that were removed in Step 1 and turn on both sides must fit into the notches on the memory module. 7 Install the graphics card. Align clips on the power to this device. 10 Click the Start button and then point to All Programs, VAIO® System Information and then click VAIO® System Information. Clips on both sides of memory module.
Install the graphics card, connect the cable and tighten the screw. 8 Install the upper cover. VGX-XL2A Digital Living System 48 Install the cover and tighten the screws on the back. 9 Connect the power cord and the peripheral devices that were removed in Step 1 and turn on both sides must fit into the notches on the memory module. 7 Install the graphics card. Align clips on the power to this device. 10 Click the Start button and then point to All Programs, VAIO® System Information and then click VAIO® System Information. Clips on both sides of memory module.

User Guide (Computer Component)
Page 52
... device, and repeat the procedure to properly install the memory module again. Make sure that System Memory displays the correct memory capacity. If the memory capacity is correct, memory installation is complete. Press out and down on the ...clips on both of the slot. Carefully lift the memory module out of the memory slots. If the memory capacity has not increased, remove the memory module after turning off the power to this device, and then press out and down . 49 VGX-XL2A Digital Living System...
... device, and repeat the procedure to properly install the memory module again. Make sure that System Memory displays the correct memory capacity. If the memory capacity is correct, memory installation is complete. Press out and down on the ...clips on both of the slot. Carefully lift the memory module out of the memory slots. If the memory capacity has not increased, remove the memory module after turning off the power to this device, and then press out and down . 49 VGX-XL2A Digital Living System...

User Guide (Computer Component)
Page 82
... to any computer on your wired or wireless network. VGX-XL2A Digital Living System 79 The computers with other computers. Set up one or more computers on your network as a media server, then get ready to share the fun and memories with your family and friends. • VAIO Media&#...8482; Software Overview • VAIO Media™ Software System Requirements • Setting Up a Client Computer • Preparing Your Multimedia Content • ...
... to any computer on your wired or wireless network. VGX-XL2A Digital Living System 79 The computers with other computers. Set up one or more computers on your network as a media server, then get ready to share the fun and memories with your family and friends. • VAIO Media&#...8482; Software Overview • VAIO Media™ Software System Requirements • Setting Up a Client Computer • Preparing Your Multimedia Content • ...

User Guide (Computer Component)
Page 86
Save the file, VM31Inst.exe, to a blank storage media, such as a CD-R, CD-RW or Memory Stick® media, to transfer and set up the installer program on during client registration to enable the registration of multiple registration requests.) You must .... If more than one client at a time. Follow the on-screen instructions on each client. 3 Click Get Installer. A file download message box appears. 4 Click Save. VGX-XL2A Digital Living System 83
Save the file, VM31Inst.exe, to a blank storage media, such as a CD-R, CD-RW or Memory Stick® media, to transfer and set up the installer program on during client registration to enable the registration of multiple registration requests.) You must .... If more than one client at a time. Follow the on-screen instructions on each client. 3 Click Get Installer. A file download message box appears. 4 Click Save. VGX-XL2A Digital Living System 83

User Guide (Computer Component)
Page 169
.... If you may need to make Windows' processes faster, so the free space on the Windows taskbar and select All Programs >Accessories > System Tools and click Disk Clean Up. Clean up the disk according to VAIO® Support Central. (Click Start from the Windows® taskbar... does not start -up from the memory card reader and disconnect all third-party devices such as scanners, printers, floppy drivers, etc. Comment: Clean up the disk. Event: Cannot start -up with above process, you clean up proceeds. 166 VGX-XL2A Digital Living System are automatically created to perform hard disk...
.... If you may need to make Windows' processes faster, so the free space on the Windows taskbar and select All Programs >Accessories > System Tools and click Disk Clean Up. Clean up the disk according to VAIO® Support Central. (Click Start from the Windows® taskbar... does not start -up from the memory card reader and disconnect all third-party devices such as scanners, printers, floppy drivers, etc. Comment: Clean up the disk. Event: Cannot start -up with above process, you clean up proceeds. 166 VGX-XL2A Digital Living System are automatically created to perform hard disk...


