
VGX-XL2A Safety Information
Page 2
... new VAIO VGX-XL2A includes certain software versions or upgrades, and Internet services or offers that are trademarks or registered trademarks of Sony. Intel and Pentium are subject to this product. Safety Information Notice © 2005 Sony Electronics Inc. Reproduction in whole or in part, may not... be reproduced, translated, or reduced to the terms and conditions of the Microsoft Corporation. SONY CANNOT WARRANT THAT THE FUNCTIONS DESCRIBED IN THIS GUIDE WILL...
... new VAIO VGX-XL2A includes certain software versions or upgrades, and Internet services or offers that are trademarks or registered trademarks of Sony. Intel and Pentium are subject to this product. Safety Information Notice © 2005 Sony Electronics Inc. Reproduction in whole or in part, may not... be reproduced, translated, or reduced to the terms and conditions of the Microsoft Corporation. SONY CANNOT WARRANT THAT THE FUNCTIONS DESCRIBED IN THIS GUIDE WILL...

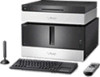
Marketing Specifications (VGX-XL2)
Page 2
... in use options and operations. DVD Read: 8x max. Sony will vary depending on VGX-XL2A Microphone Input: 1 S-Video Input(s): 1 (Front)/ 1 ...part without notice. Simulated graphic shown on your system and you must determine for themselves the suitability and compatibility of non-Sony products you can use , at which may not be reduced under reduced-functionality mode, limiting end-use . 9. Sony, i.LINK, VAIO Digital Living System...: 4x max. VGX-XL2 VAIO® XL2 Digital Living System™ Specifications General Computer Type: Digital Living System™ Type of...
... in use options and operations. DVD Read: 8x max. Sony will vary depending on VGX-XL2A Microphone Input: 1 S-Video Input(s): 1 (Front)/ 1 ...part without notice. Simulated graphic shown on your system and you must determine for themselves the suitability and compatibility of non-Sony products you can use , at which may not be reduced under reduced-functionality mode, limiting end-use . 9. Sony, i.LINK, VAIO Digital Living System...: 4x max. VGX-XL2 VAIO® XL2 Digital Living System™ Specifications General Computer Type: Digital Living System™ Type of...

User Guide (Computer Component)
Page 2
... or reconfigurations of license agreements enclosed with participating financial institutions. This manual and the software described herein, in whole or in part without notice. BE LIABLE FOR ANY INCIDENTAL, CONSEQUENTIAL, OR SPECIAL DAMAGES, WHETHER BASED ON TORT, CONTRACT, OR OTHERWISE, ARISING... additional charge. Sony, VAIO, the VAIO logo, VAIO Digital Studio, VAIO Media, VAIO Media Music Server, VAIO Media Photo Server, VAIO Media Video Server, VAIO Zone, Click to current retail versions. VAIO® VGX-XL2A Disclaimers, Notes, Warnings NOTICE © 2005 Sony Electronics Inc. ...
... or reconfigurations of license agreements enclosed with participating financial institutions. This manual and the software described herein, in whole or in part without notice. BE LIABLE FOR ANY INCIDENTAL, CONSEQUENTIAL, OR SPECIAL DAMAGES, WHETHER BASED ON TORT, CONTRACT, OR OTHERWISE, ARISING... additional charge. Sony, VAIO, the VAIO logo, VAIO Digital Studio, VAIO Media, VAIO Media Music Server, VAIO Media Photo Server, VAIO Media Video Server, VAIO Zone, Click to current retail versions. VAIO® VGX-XL2A Disclaimers, Notes, Warnings NOTICE © 2005 Sony Electronics Inc. ...

User Guide (Computer Component)
Page 18
To remove a Memory Stick® media, Secure Digital (SD), MultiMediaCard™, SmartMedia™, or xD-Picture Card™ media 1 Press the extended part of the memory card. 2 Pull to your hard disk drive. • Reformat the memory card using it . Sharing Memory Cards If... you plan to format your VAIO® computer and devices such as a digital camera or music player, the card must be damaged. VGX-XL2A Digital Living System 15 The card...
To remove a Memory Stick® media, Secure Digital (SD), MultiMediaCard™, SmartMedia™, or xD-Picture Card™ media 1 Press the extended part of the memory card. 2 Pull to your hard disk drive. • Reformat the memory card using it . Sharing Memory Cards If... you plan to format your VAIO® computer and devices such as a digital camera or music player, the card must be damaged. VGX-XL2A Digital Living System 15 The card...

User Guide (Computer Component)
Page 45
... device may be careful not to get cut by the parts or the circuit board inside this device when installing the memory. • Be careful not to install memory modules and it can be done by installing memory modules sold separately. VGX-XL2A Digital Living System 42 Upgrading memory increases the data processing speed and allows...
... device may be careful not to get cut by the parts or the circuit board inside this device when installing the memory. • Be careful not to install memory modules and it can be done by installing memory modules sold separately. VGX-XL2A Digital Living System 42 Upgrading memory increases the data processing speed and allows...
User Guide (Computer Component)
Page 49
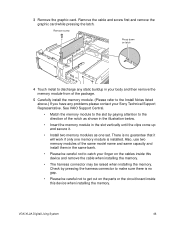
... to the Install Notes listed above.) If you have any static buildup in your finger on the parts or the circuit board inside this device when installing the memory. Remove the cable and screw first ...cable when installing the memory. • The harness connector may be careful not to discharge any problems please contact your Sony Technical Support Representative. 3 Remove the graphic card. Remove screw Press down on latch 4 Touch metal to catch your ...memory module to the slot by pressing the harness connector to make sure there is installed. VGX-XL2A Digital Living System 46
... to the Install Notes listed above.) If you have any static buildup in your finger on the parts or the circuit board inside this device when installing the memory. Remove the cable and screw first ...cable when installing the memory. • The harness connector may be careful not to discharge any problems please contact your Sony Technical Support Representative. 3 Remove the graphic card. Remove screw Press down on latch 4 Touch metal to catch your ...memory module to the slot by pressing the harness connector to make sure there is installed. VGX-XL2A Digital Living System 46

User Guide (Computer Component)
Page 53
...communicate with any Sony device having an i.LINK connection for information on the hard disk used only to upgrade. The i.LINK connection may be installed in a RAID 0 configuration. For information on the hard disk used to designate that comes with each other. VGX-XL2A Digital Living System 50 Add ...inside this device. Mishandling when installing and removing can be charged if a failure or accident happens when installing the hard disk by the parts or the circuit board inside this device when installing the hard disk. • Turning the power on with an i.LINK connection may...
...communicate with any Sony device having an i.LINK connection for information on the hard disk used only to upgrade. The i.LINK connection may be installed in a RAID 0 configuration. For information on the hard disk used to designate that comes with each other. VGX-XL2A Digital Living System 50 Add ...inside this device. Mishandling when installing and removing can be charged if a failure or accident happens when installing the hard disk by the parts or the circuit board inside this device when installing the hard disk. • Turning the power on with an i.LINK connection may...

User Guide (Computer Component)
Page 55
3 Remove the inside panel and remove the panel. 4 Remove the hard disk bay. VGX-XL2A Digital Living System 52 Be careful not to the hard disk installed at the time of purchase and remove the hard disk drive bay. Remove the screws from the inside panel. Remove the cables connected to drop the screws inside this device when unscrewing. Note: Touching other parts can cause a failure when installing the hard disk drive bay.
3 Remove the inside panel and remove the panel. 4 Remove the hard disk bay. VGX-XL2A Digital Living System 52 Be careful not to the hard disk installed at the time of purchase and remove the hard disk drive bay. Remove the screws from the inside panel. Remove the cables connected to drop the screws inside this device when unscrewing. Note: Touching other parts can cause a failure when installing the hard disk drive bay.

User Guide (Computer Component)
Page 57
Note: Touching other parts when installing the hard disk drive bay can cause damage. VGX-XL2A Digital Living System 54 Cables may be pulled out to open/close the cover if serial ATA cables with a L shaped connector areas is the location of serial ATA cables with a straight connectors are used. However, the use of the main unit expansion connector. Below is recommended. 7 Install the hard disk drive bay in the original location.
Note: Touching other parts when installing the hard disk drive bay can cause damage. VGX-XL2A Digital Living System 54 Cables may be pulled out to open/close the cover if serial ATA cables with a L shaped connector areas is the location of serial ATA cables with a straight connectors are used. However, the use of the main unit expansion connector. Below is recommended. 7 Install the hard disk drive bay in the original location.

User Guide (Computer Component)
Page 127
When complete, click Next. Sony recommends using CD media 1 Start the VAIO HDD Recovery program. Always use a poor...Create Recovery Discs (Step 1 of each recovery discs to avoid confusion when using CD-R or DVD media. VGX-XL2A Digital Living System 124 A message appears informing you insert the next disc, if necessary. The Time Remaining field displays the ... on page 3. 2 From the VAIO® HDD Recovery menu screen, click Create Recovery Discs. 3 Read the on your part. 7 Click Next. Click OK to insert a blank disc. 6 Insert a blank media disc and click OK. A time...
When complete, click Next. Sony recommends using CD media 1 Start the VAIO HDD Recovery program. Always use a poor...Create Recovery Discs (Step 1 of each recovery discs to avoid confusion when using CD-R or DVD media. VGX-XL2A Digital Living System 124 A message appears informing you insert the next disc, if necessary. The Time Remaining field displays the ... on page 3. 2 From the VAIO® HDD Recovery menu screen, click Create Recovery Discs. 3 Read the on your part. 7 Click Next. Click OK to insert a blank disc. 6 Insert a blank media disc and click OK. A time...
User Guide (Computer Component)
Page 132
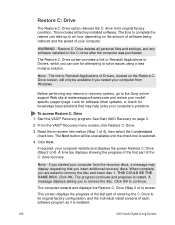
.... Look for software driver updates, or check for attempting to the Sony online support Web site at www.esupport.sony.com and review your computer's problems. To access Restore C: Drive .... The Next button will only be unavailable until the check box is installed. 129 VGX-XL2A Digital Living System Note - When complete, you restart your computer from the recovery discs, a message ... modelspecific support page. Click OK to restart. A time bar displays showing the progress of the first part of 4) screen. The computer restarts and displays the Restore C: Drive (Step 3 of the C: ...
.... Look for software driver updates, or check for attempting to the Sony online support Web site at www.esupport.sony.com and review your computer's problems. To access Restore C: Drive .... The Next button will only be unavailable until the check box is installed. 129 VGX-XL2A Digital Living System Note - When complete, you restart your computer from the recovery discs, a message ... modelspecific support page. Click OK to restart. A time bar displays showing the progress of the first part of 4) screen. The computer restarts and displays the Restore C: Drive (Step 3 of the C: ...

User Guide (Computer Component)
Page 135
...be asked to automatically restart the computer and resume the recovery process. 12 Click OK. VGX-XL2A Digital Living System 132 This step recreates your part. The computer restarts and the Restore Complete System (Step 3 of media. Note: When you purchased your computer previously started from Step 9),... and click OK. During this part of the application install screens. This completes (Step 3 of 5) displays and automatically starts loading all original system and packaged software that was pre loaded on your choice of 5) screen...
...be asked to automatically restart the computer and resume the recovery process. 12 Click OK. VGX-XL2A Digital Living System 132 This step recreates your part. The computer restarts and the Restore Complete System (Step 3 of media. Note: When you purchased your computer previously started from Step 9),... and click OK. During this part of the application install screens. This completes (Step 3 of 5) displays and automatically starts loading all original system and packaged software that was pre loaded on your choice of 5) screen...

User Guide (Computer Component)
Page 137
...to complete the installation. The Intel® Matrix Storage Console provides RAID volume management within the Windows operating system and displays SATA device and RAID volume information. Complete System. You can access the Intel® Matrix Storage Console from VAIO® Recovery or from the list...: If you need to insert recovery disc 1. 6 Insert recovery disc 1 and click OK. Follow the on your part to remove the disc. 5 Remove the disc and click OK. RAID volume management includes creating, deleting, and migrating RAID volume arrays. VGX-XL2A Digital Living System 134
...to complete the installation. The Intel® Matrix Storage Console provides RAID volume management within the Windows operating system and displays SATA device and RAID volume information. Complete System. You can access the Intel® Matrix Storage Console from VAIO® Recovery or from the list...: If you need to insert recovery disc 1. 6 Insert recovery disc 1 and click OK. Follow the on your part to remove the disc. 5 Remove the disc and click OK. RAID volume management includes creating, deleting, and migrating RAID volume arrays. VGX-XL2A Digital Living System 134

User Guide (Computer Component)
Page 164
For additional information, see the nVideo user guide. Event: Part of the top, bottom, left or right of the screen is not displayed and is dark Comment: • Adjust the brightness of TV. Comment: Adjust ... device are properly connected. • When the TV is connected using a Digital video cable, make sure to use a resolution that matches the Digital terminal of TV. VGX-XL2A Digital Living System 161 Comment: Adjust the over scan width using . Event: The screen is black. Event: Part of the top, bottom, left or right of the screen is not...
For additional information, see the nVideo user guide. Event: Part of the top, bottom, left or right of the screen is not displayed and is dark Comment: • Adjust the brightness of TV. Comment: Adjust ... device are properly connected. • When the TV is connected using a Digital video cable, make sure to use a resolution that matches the Digital terminal of TV. VGX-XL2A Digital Living System 161 Comment: Adjust the over scan width using . Event: The screen is black. Event: Part of the top, bottom, left or right of the screen is not...


