
User Guide
Page 2
n2 N Contents Before Use ...6 Documentation ...6 Ergonomic Considerations ...9 Getting Started ...11 Locating Controls and Ports...12 About the Indicator Lights ...17 Connecting a Power Source ...18 Using the Battery Pack ...20 Shutting Down Your Computer Safely ...25 Using Your VAIO Computer ...26 Using the Keyboard ...27 Using the Touch Pad ...29 Using the Optical Disc Drive ...30 Using the ExpressCard Module ...39 Using the Memory Stick Media ...42 Using Other Memory Cards ...48 Using the Internet...51 Using Wireless LAN (WLAN) ...52
n2 N Contents Before Use ...6 Documentation ...6 Ergonomic Considerations ...9 Getting Started ...11 Locating Controls and Ports...12 About the Indicator Lights ...17 Connecting a Power Source ...18 Using the Battery Pack ...20 Shutting Down Your Computer Safely ...25 Using Your VAIO Computer ...26 Using the Keyboard ...27 Using the Touch Pad ...29 Using the Optical Disc Drive ...30 Using the ExpressCard Module ...39 Using the Memory Stick Media ...42 Using Other Memory Cards ...48 Using the Internet...51 Using Wireless LAN (WLAN) ...52

User Guide
Page 7
... of your entire hard disk drive to the Sony online support Web site at: http://esupport.sony.com/EN/VAIO/ for customers in USA, http://www.sony.ca/support for customers in Canada, http://esupport.sony.com/ES/VAIO/ for customers in Spanish speaking Latin American countries...features of your computer, as well as information on -screen guide: 1 Click Start and Help and Support. 2 Click Manuals & Specifications. 3 Click VAIO Recovery Guide. Provides information about the software programs included with your VAIO computer. n7 N Before Use Non-printed Documentation ❑ User Guide (this...
... of your entire hard disk drive to the Sony online support Web site at: http://esupport.sony.com/EN/VAIO/ for customers in USA, http://www.sony.ca/support for customers in Canada, http://esupport.sony.com/ES/VAIO/ for customers in Spanish speaking Latin American countries...features of your computer, as well as information on -screen guide: 1 Click Start and Help and Support. 2 Click Manuals & Specifications. 3 Click VAIO Recovery Guide. Provides information about the software programs included with your VAIO computer. n7 N Before Use Non-printed Documentation ❑ User Guide (this...

User Guide
Page 8
...Microsoft and Sony. ❑ VAIO Sites Contains links to other VAIO documents, and system and software information for your computer. ❑ VAIO Support Access interactive help in the form of VAIO tutorials, an escalation page containing support and contact information, and various links to VAIO online ...a single location for information and technical assistance for your VAIO computer. To access Help and Support, click Start and Help and Support. ❑ Manuals & Specifications Here you need. Run utilities that include VAIO Media Setup and Windows Network and Sharing, and access ...
...Microsoft and Sony. ❑ VAIO Sites Contains links to other VAIO documents, and system and software information for your computer. ❑ VAIO Support Access interactive help in the form of VAIO tutorials, an escalation page containing support and contact information, and various links to VAIO online ...a single location for information and technical assistance for your VAIO computer. To access Help and Support, click Start and Help and Support. ❑ Manuals & Specifications Here you need. Run utilities that include VAIO Media Setup and Windows Network and Sharing, and access ...

User Guide
Page 11
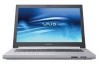
n 11 N Getting Started Getting Started This section describes how to start up your computer with your computer for example, a printer, an external hard disk drive, a scanner, and so on) at a time, following the manufacturers' instructions. ❑ ... a Power Source (page 18) ❑ Using the Battery Pack (page 20) ❑ Shutting Down Your Computer Safely (page 25) Make sure to get started using your VAIO computer. ! Before starting your computer. Upon completion, connect one device (for the first time, do not connect any other hardware that did not originally come with...
n 11 N Getting Started Getting Started This section describes how to start up your computer with your computer for example, a printer, an external hard disk drive, a scanner, and so on) at a time, following the manufacturers' instructions. ❑ ... a Power Source (page 18) ❑ Using the Battery Pack (page 20) ❑ Shutting Down Your Computer Safely (page 25) Make sure to get started using your VAIO computer. ! Before starting your computer. Upon completion, connect one device (for the first time, do not connect any other hardware that did not originally come with...

User Guide
Page 12
... media slot* (page 43) * Your computer supports Memory Stick PRO media and Memory Stick Duo media with high speed and high capacity capabilities. n 12 N Getting Started Locating Controls and Ports Take a moment to identify the controls and ports shown on the following pages.
... media slot* (page 43) * Your computer supports Memory Stick PRO media and Memory Stick Duo media with high speed and high capacity capabilities. n 12 N Getting Started Locating Controls and Ports Take a moment to identify the controls and ports shown on the following pages.

User Guide
Page 13
Back A Network (Ethernet) port (page 73) B Modem port (page 51) C Battery connector (page 20) D DC IN port (page 18) n 13 N Getting Started
Back A Network (Ethernet) port (page 73) B Modem port (page 51) C Battery connector (page 20) D DC IN port (page 18) n 13 N Getting Started

User Guide
Page 14
Right n 14 N Getting Started A WIRELESS switch (page 52) B Headphones jack (page 59) C Microphone jack (page 66) D Hi-Speed USB (USB 2.0) ports*1 (page 67) E ExpressCard™/34 slot*2 (page 39) F Air vents G Monitor (VGA) port (page 60) H i.LINK (IEEE 1394) S400 port (page 71) *1 Supports high-/full-/low- speeds. *2 Referred to as the ExpressCard slot hereinafter.
Right n 14 N Getting Started A WIRELESS switch (page 52) B Headphones jack (page 59) C Microphone jack (page 66) D Hi-Speed USB (USB 2.0) ports*1 (page 67) E ExpressCard™/34 slot*2 (page 39) F Air vents G Monitor (VGA) port (page 60) H i.LINK (IEEE 1394) S400 port (page 71) *1 Supports high-/full-/low- speeds. *2 Referred to as the ExpressCard slot hereinafter.

User Guide
Page 15
Left n 15 N Getting Started A Security slot B Optical disc drive (page 30) C Optical disc drive indicator (page 17) D Drive eject button (page 30) E Manual eject hole (page 120)
Left n 15 N Getting Started A Security slot B Optical disc drive (page 30) C Optical disc drive indicator (page 17) D Drive eject button (page 30) E Manual eject hole (page 120)
User Guide
Page 16
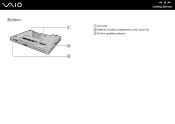
Bottom n 16 N Getting Started A Air vents B Memory module compartment cover (page 88) C Built-in speakers (stereo)
Bottom n 16 N Getting Started A Air vents B Memory module compartment cover (page 88) C Built-in speakers (stereo)
User Guide
Page 17
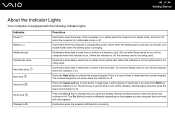
... double-blinks when the battery pack is charging. Press the Caps Lock key to turn off the computer when this indicator is on . n 17 N Getting Started About the Indicator Lights Your computer is equipped with all programs. Illuminates when the wireless LAN function is running out of the computer is on...
... double-blinks when the battery pack is charging. Press the Caps Lock key to turn off the computer when this indicator is on . n 17 N Getting Started About the Indicator Lights Your computer is equipped with all programs. Illuminates when the wireless LAN function is running out of the computer is on...

User Guide
Page 18
n 18 N Getting Started Connecting a Power Source You can use the AC adapter 1 Plug one end of the power cord (1) into the AC adapter (3). 2 Plug the other end of ...
n 18 N Getting Started Connecting a Power Source You can use the AC adapter 1 Plug one end of the power cord (1) into the AC adapter (3). 2 Plug the other end of ...

User Guide
Page 19
If you do not use your computer completely from AC power, unplug the AC adapter. n 19 N Getting Started ✍ To disconnect your computer for a long period of shutting down . See Using Hibernate Mode (page 82). Make sure that the AC outlet is easily accessible. This power saving mode saves the time of time, place the computer into Hibernate mode. The plug attachment can be detached and reattached with the plug turned upside down or resuming.
If you do not use your computer completely from AC power, unplug the AC adapter. n 19 N Getting Started ✍ To disconnect your computer for a long period of shutting down . See Using Hibernate Mode (page 82). Make sure that the AC outlet is easily accessible. This power saving mode saves the time of time, place the computer into Hibernate mode. The plug attachment can be detached and reattached with the plug turned upside down or resuming.

User Guide
Page 20
Using the Battery Pack The battery pack supplied with your computer is not fully charged at the time of purchase. n 20 N Getting Started Installing the Battery Pack To install the battery pack 1 Turn off the computer and close the LCD screen lid. 2 Slide the battery lock switch (1) to the UNLOCK position. 3 Slide the battery pack into the battery compartment until it clicks into place.
Using the Battery Pack The battery pack supplied with your computer is not fully charged at the time of purchase. n 20 N Getting Started Installing the Battery Pack To install the battery pack 1 Turn off the computer and close the LCD screen lid. 2 Slide the battery lock switch (1) to the UNLOCK position. 3 Slide the battery pack into the battery compartment until it clicks into place.

User Guide
Page 21
n 21 N Getting Started This computer is directly connected to operate only with genuine Sony batteries. 4 Slide the battery lock switch (1) to the LOCK position to secure the battery pack on the computer. ✍ When your computer is designed to AC power and has a battery pack installed, it uses power from the AC outlet. !
n 21 N Getting Started This computer is directly connected to operate only with genuine Sony batteries. 4 Slide the battery lock switch (1) to the LOCK position to secure the battery pack on the computer. ✍ When your computer is designed to AC power and has a battery pack installed, it uses power from the AC outlet. !

User Guide
Page 22
... indicator light status On Blinks Double blinks Off Meaning The computer is using AC power. The battery pack is running out of purchase. n 22 N Getting Started Charging the Battery Pack The battery pack supplied with your computer is not fully charged at the time of power. When the battery pack is...
... indicator light status On Blinks Double blinks Off Meaning The computer is using AC power. The battery pack is running out of purchase. n 22 N Getting Started Charging the Battery Pack The battery pack supplied with your computer is not fully charged at the time of power. When the battery pack is...

User Guide
Page 23
...battery pack in this manual from the AC outlet. When battery life is running out of power, both the battery and power indicator lights start flashing. When the battery pack is nearly depleted, both the battery and power indicator lights blink. For some software applications and some peripheral...state is on while you should save your data frequently. When your computer while it uses power from the first time. n 23 N Getting Started ✍ You can be recharged any unsaved data. The battery indicator light is impossible. To avoid loss of data, you will lose any ...
...battery pack in this manual from the AC outlet. When battery life is running out of power, both the battery and power indicator lights start flashing. When the battery pack is nearly depleted, both the battery and power indicator lights blink. For some software applications and some peripheral...state is on while you should save your data frequently. When your computer while it uses power from the first time. n 23 N Getting Started ✍ You can be recharged any unsaved data. The battery indicator light is impossible. To avoid loss of data, you will lose any ...

User Guide
Page 24
You may lose data if you remove the battery pack while the computer is on and not connected to the UNLOCK position. 3 Slide and hold the battery release latch (2) and slide the battery pack away from the computer. n 24 N Getting Started Removing the Battery Pack ! To remove the battery pack 1 Turn off the computer and close the LCD screen lid. 2 Slide the battery lock switch (1) to the AC adapter or if you remove the battery pack while your computer is in Sleep mode.
You may lose data if you remove the battery pack while the computer is on and not connected to the UNLOCK position. 3 Slide and hold the battery release latch (2) and slide the battery pack away from the computer. n 24 N Getting Started Removing the Battery Pack ! To remove the battery pack 1 Turn off the computer and close the LCD screen lid. 2 Slide the battery lock switch (1) to the AC adapter or if you remove the battery pack while your computer is in Sleep mode.

User Guide
Page 25
The power indicator light turns off automatically. n 25 N Getting Started Shutting Down Your Computer Safely To avoid losing unsaved data, be sure to turn off . To shut down your computer 1 Turn off any peripherals connected to the computer. 2 Click Start, the arrow next to the Lock button, and Shut Down. 3 Respond to any prompts warning you to save documents or to consider other users and wait for the computer to shut down your computer properly, as described below.
The power indicator light turns off automatically. n 25 N Getting Started Shutting Down Your Computer Safely To avoid losing unsaved data, be sure to turn off . To shut down your computer 1 Turn off any peripherals connected to the computer. 2 Click Start, the arrow next to the Lock button, and Shut Down. 3 Respond to any prompts warning you to save documents or to consider other users and wait for the computer to shut down your computer properly, as described below.
User Guide
Page 37
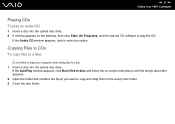
... To copy files to select an option. If the AutoPlay window appears, click Burn files to disc and follow the on the desktop, then click Start, All Programs, and the desired CD software to the empty disc folder. 3 Close the disc folder. Do not strike or shake your computer while writing... them to play an audio CD 1 Insert a disc into the optical disc drive. If the Audio CD window appears, click to a disc ! n 37 N Using Your VAIO Computer Playing CDs To play the CD.
... To copy files to select an option. If the AutoPlay window appears, click Burn files to disc and follow the on the desktop, then click Start, All Programs, and the desired CD software to the empty disc folder. 3 Close the disc folder. Do not strike or shake your computer while writing... them to play an audio CD 1 Insert a disc into the optical disc drive. If the Audio CD window appears, click to a disc ! n 37 N Using Your VAIO Computer Playing CDs To play the CD.

User Guide
Page 38
...AC adapter to the computer. 2 Insert a disc into the optical disc drive. 3 If nothing appears on the desktop, then click Start, All Programs, and the desired DVD software to play a DVD 1 Close all running software applications. 2 Insert a DVD into the ...optical disc drive. 3 If nothing appears on the desktop, then click Start, All Programs, and the desired DVD software to copy files to the disc. For instructions on how to use the ..., see the help file on your DVD software. n 38 N Using Your VAIO Computer Playing DVDs To play the DVD.
...AC adapter to the computer. 2 Insert a disc into the optical disc drive. 3 If nothing appears on the desktop, then click Start, All Programs, and the desired DVD software to play a DVD 1 Close all running software applications. 2 Insert a DVD into the ...optical disc drive. 3 If nothing appears on the desktop, then click Start, All Programs, and the desired DVD software to copy files to the disc. For instructions on how to use the ..., see the help file on your DVD software. n 38 N Using Your VAIO Computer Playing DVDs To play the DVD.

