
User Guide
Page 3
......54 Connecting External Speakers ...55 Connecting an External Display ...56 Selecting Display Modes...60 Using the Multiple Monitors Function ...61 Connecting an External Microphone ...63 Connecting a Universal Serial Bus (USB) Device...64 Connecting a Printer ...67 Connecting an i.LINK Device ...68 Connecting to a Network (LAN) ...70 Customizing Your VAIO Computer ...71 Setting the Password ...72 Setting Up Your Computer with VAIO Central ...75 Using the Power Saving Modes ...76 Managing Power with VAIO Power Management ...81 Upgrading Your VAIO Computer...84 Adding and Removing Memory...85
......54 Connecting External Speakers ...55 Connecting an External Display ...56 Selecting Display Modes...60 Using the Multiple Monitors Function ...61 Connecting an External Microphone ...63 Connecting a Universal Serial Bus (USB) Device...64 Connecting a Printer ...67 Connecting an i.LINK Device ...68 Connecting to a Network (LAN) ...70 Customizing Your VAIO Computer ...71 Setting the Password ...72 Setting Up Your Computer with VAIO Central ...75 Using the Power Saving Modes ...76 Managing Power with VAIO Power Management ...81 Upgrading Your VAIO Computer...84 Adding and Removing Memory...85
User Guide
Page 7
.... The online Specifications describe the hardware and software configuration of your computer, as well as information on solving common problems. ❑ Specifications - Contains features of your entire hard disk drive to the original factory installed settings. It also includes information about restoring individual software programs, software drivers, and drive partition(s) or your VAIO computer. n7 N Before Use Non-printed Documentation ❑ User Guide (this online guide: 1 Click Start, point to the Sony online support Web site...
.... The online Specifications describe the hardware and software configuration of your computer, as well as information on solving common problems. ❑ Specifications - Contains features of your entire hard disk drive to the original factory installed settings. It also includes information about restoring individual software programs, software drivers, and drive partition(s) or your VAIO computer. n7 N Before Use Non-printed Documentation ❑ User Guide (this online guide: 1 Click Start, point to the Sony online support Web site...

User Guide
Page 10
... new hardware that did not normally come with your computer. Upon completion, connect one device (for example, a printer, external hard disk drive, scanner, and so on) at a time, following the manufacturer's instructions. ❑ Locating Controls and Ports (page 11) ❑ About the Indicator Lights (page 17) ❑ Connecting a Power Source (page 18) ❑ Using the Battery Pack (page 19) ❑ Shutting Down Your Computer Safely (page 24) n 10 N Getting Started...
... new hardware that did not normally come with your computer. Upon completion, connect one device (for example, a printer, external hard disk drive, scanner, and so on) at a time, following the manufacturer's instructions. ❑ Locating Controls and Ports (page 11) ❑ About the Indicator Lights (page 17) ❑ Connecting a Power Source (page 18) ❑ Using the Battery Pack (page 19) ❑ Shutting Down Your Computer Safely (page 24) n 10 N Getting Started...

User Guide
Page 17
... to change how you are using battery power, blinks when the battery is running . Press the Num Lk key to deactivate the numeric keypad. Press the Caps Lock key to the Memory Stick media. (Do not enter Standby mode or turn off the indicator. The numeric keypad is not active when the indicator is off. Normal scrolling resumes when the Scroll lock indicator is off. Indicator Power 1 Battery e Memory Stick PRO/Duo Hard disk/Optical disc drive Num lock Caps lock Scroll lock WIRELESS LAN Functions Illuminates...
... to change how you are using battery power, blinks when the battery is running . Press the Num Lk key to deactivate the numeric keypad. Press the Caps Lock key to the Memory Stick media. (Do not enter Standby mode or turn off the indicator. The numeric keypad is not active when the indicator is off. Normal scrolling resumes when the Scroll lock indicator is off. Indicator Power 1 Battery e Memory Stick PRO/Duo Hard disk/Optical disc drive Num lock Caps lock Scroll lock WIRELESS LAN Functions Illuminates...

User Guide
Page 31
..., DVD-R, DVD-RW, DVD+R, DVD+R DL (Double Layer), DVD-R DL (Dual Layer), and DVD+RW CD-R, CD-RW, DVD-R, DVD-RW, DVD+R, DVD+R DL (Double Layer), DVD-R DL (Dual Layer), DVD+RW, and DVD-RAM* Check your specifications for the type of media your model. Use the table below to - n 31 N Using Your VAIO Computer Reading and Writing CDs and DVDs Your computer plays and records CDs and DVDs, depending on your optical disc drive supports.
..., DVD-R, DVD-RW, DVD+R, DVD+R DL (Double Layer), DVD-R DL (Dual Layer), and DVD+RW CD-R, CD-RW, DVD-R, DVD-RW, DVD+R, DVD+R DL (Double Layer), DVD-R DL (Dual Layer), DVD+RW, and DVD-RAM* Check your specifications for the type of media your model. Use the table below to - n 31 N Using Your VAIO Computer Reading and Writing CDs and DVDs Your computer plays and records CDs and DVDs, depending on your optical disc drive supports.

User Guide
Page 34
...-virus software before playing a DVD movie. ❑ Do not use memory-resident utility software to make the new setting effective. ❑ If the computer has Wireless LAN and Wireless LAN is playing a DVD. ❑ Region code indicators are playing a DVD (video or audio) and you stop the DVD first. When you will not be able to change it to speed up disc access when playing a DVD. Reconfiguring the computer does not reset this number, the drive's DVD region code...
...-virus software before playing a DVD movie. ❑ Do not use memory-resident utility software to make the new setting effective. ❑ If the computer has Wireless LAN and Wireless LAN is playing a DVD. ❑ Region code indicators are playing a DVD (video or audio) and you stop the DVD first. When you will not be able to change it to speed up disc access when playing a DVD. Reconfiguring the computer does not reset this number, the drive's DVD region code...

User Guide
Page 36
... find about the supported disc media. Do not strike or shake the computer while writing data onto a disc. 1 Insert a blank disc into the optical disc drive. A new window appears with the file(s) or folder(s) you want to copy listed under Devices with Removable Storage. n 36 N Using Your VAIO Computer Copying Files to CDs See the online Specifications to find the type of your system's hardware configuration. To copy...
... find about the supported disc media. Do not strike or shake the computer while writing data onto a disc. 1 Insert a blank disc into the optical disc drive. A new window appears with the file(s) or folder(s) you want to copy listed under Devices with Removable Storage. n 36 N Using Your VAIO Computer Copying Files to CDs See the online Specifications to find the type of your system's hardware configuration. To copy...
User Guide
Page 37
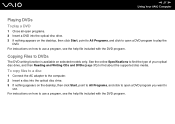
... instructions on selected models only. See the online Specifications to find about the supported disc media. n 37 N Using Your VAIO Computer Playing DVDs To play the DVD. For instructions on how to play a DVD 1 Close all open programs. 2 Insert a DVD into the optical disc drive. 3 If nothing appears on the desktop, then click Start, point to All Programs, and click to open a DVD program you want to DVDs The DVD writing function...
... instructions on selected models only. See the online Specifications to find about the supported disc media. n 37 N Using Your VAIO Computer Playing DVDs To play the DVD. For instructions on how to play a DVD 1 Close all open programs. 2 Insert a DVD into the optical disc drive. 3 If nothing appears on the desktop, then click Start, point to All Programs, and click to open a DVD program you want to DVDs The DVD writing function...

User Guide
Page 47
... the The key is provided for me automatically option button. Select the Enable 2.4 GHz Wireless LAN check box and click OK. 2 Click Start and then Control Panel. 3 Click Network and Internet Connections. 4 Click Network Connections. The Wireless network properties window appears. 8 Enter a network name (SSID)*2. button. The Wireless Network Connection Properties window appears. 6 Select the Wireless Networks tab. 7 Click the Add... n 47 N Using Your VAIO Computer To communicate without an access point (ad-hoc) 1 Turn on the taskbar to display the Wireless Device Switch window.
... the The key is provided for me automatically option button. Select the Enable 2.4 GHz Wireless LAN check box and click OK. 2 Click Start and then Control Panel. 3 Click Network and Internet Connections. 4 Click Network Connections. The Wireless network properties window appears. 8 Enter a network name (SSID)*2. button. The Wireless Network Connection Properties window appears. 6 Select the Wireless Networks tab. 7 Click the Add... n 47 N Using Your VAIO Computer To communicate without an access point (ad-hoc) 1 Turn on the taskbar to display the Wireless Device Switch window.
User Guide
Page 51
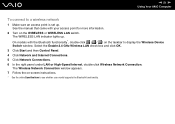
... Enable 2.4 GHz Wireless LAN check box and click OK. 3 Click Start and then Control Panel. 4 Click Network and Internet Connections. 5 Click Network Connections. 6 In the right panel under LAN or High-Speed Internet, double-click Wireless Network Connection. n 51 N Using Your VAIO Computer To connect to display the Wireless Device Switch window. The WIRELESS LAN indicator lights up . On models with your model supports the Bluetooth functionality. The Wireless Network Connection window appears. 7 Follow the on-screen instructions. * See the online Specifications to see whether your access...
... Enable 2.4 GHz Wireless LAN check box and click OK. 3 Click Start and then Control Panel. 4 Click Network and Internet Connections. 5 Click Network Connections. 6 In the right panel under LAN or High-Speed Internet, double-click Wireless Network Connection. n 51 N Using Your VAIO Computer To connect to display the Wireless Device Switch window. The WIRELESS LAN indicator lights up . On models with your model supports the Bluetooth functionality. The Wireless Network Connection window appears. 7 Follow the on-screen instructions. * See the online Specifications to see whether your access...

User Guide
Page 52
.... 3 Click Start, point to display the Wireless Device Switch window. The WIRELESS LAN indicator lights up. On models with the Bluetooth functionality*, double-click ( / ) on the taskbar to All Programs, and click Wireless Setup Utility. See the manual that came with your model supports the Bluetooth functionality. The Wireless Setup Utility appears. 4 Follow the on-screen instructions. * See the online Specifications to see whether your access point for more detailed information about wireless connections. 1 Make sure an access point is set up process...
.... 3 Click Start, point to display the Wireless Device Switch window. The WIRELESS LAN indicator lights up. On models with the Bluetooth functionality*, double-click ( / ) on the taskbar to All Programs, and click Wireless Setup Utility. See the manual that came with your model supports the Bluetooth functionality. The Wireless Setup Utility appears. 4 Follow the on-screen instructions. * See the online Specifications to see whether your access point for more detailed information about wireless connections. 1 Make sure an access point is set up process...

User Guide
Page 54
Using Peripheral Devices You can add functionality to your computer by using the various ports on the computer. ❑ Connecting External Speakers (page 55) ❑ Connecting an External Display (page 56) ❑ Selecting Display Modes (page 60) ❑ Using the Multiple Monitors Function (page 61) ❑ Connecting an External Microphone (page 63) ❑ Connecting a Universal Serial Bus (USB) Device (page 64) ❑ Connecting a Printer (page 67) ❑ Connecting an i.LINK Device (page 68) ❑ Connecting to a Network (LAN) (page 70) n 54 N Using Peripheral Devices
Using Peripheral Devices You can add functionality to your computer by using the various ports on the computer. ❑ Connecting External Speakers (page 55) ❑ Connecting an External Display (page 56) ❑ Selecting Display Modes (page 60) ❑ Using the Multiple Monitors Function (page 61) ❑ Connecting an External Microphone (page 63) ❑ Connecting a Universal Serial Bus (USB) Device (page 64) ❑ Connecting a Printer (page 67) ❑ Connecting an i.LINK Device (page 68) ❑ Connecting to a Network (LAN) (page 70) n 54 N Using Peripheral Devices

User Guide
Page 70
... to the connector may cause damage, overheating or fire. - If the Network (LAN) connector is connected to the telephone lines mentioned below, high electric current to 100BASE-TX/10BASE-T-type networks via an Ethernet network cable. PBX (private branch exchange) ! Telephone lines cannot be connected to the Network (Ethernet) port on your network. Connect one end of an optional network cable to the network with the default settings. !
... to the connector may cause damage, overheating or fire. - If the Network (LAN) connector is connected to the telephone lines mentioned below, high electric current to 100BASE-TX/10BASE-T-type networks via an Ethernet network cable. PBX (private branch exchange) ! Telephone lines cannot be connected to the Network (Ethernet) port on your network. Connect one end of an optional network cable to the network with the default settings. !

User Guide
Page 72
... service for password reset. If you forget the power-on or display the BIOS setup screen. The BIOS setup screen appears. n 72 N Customizing Your VAIO Computer Setting the Password Use one of the BIOS functions to set the power-on password will allow you to protect your computer. Adding the Power-on the computer. 2 Press the F2 key when the VAIO logo appears. Once you have to enter the password after the VAIO logo appears to start...
... service for password reset. If you forget the power-on or display the BIOS setup screen. The BIOS setup screen appears. n 72 N Customizing Your VAIO Computer Setting the Password Use one of the BIOS functions to set the power-on password will allow you to protect your computer. Adding the Power-on the computer. 2 Press the F2 key when the VAIO logo appears. Once you have to enter the password after the VAIO logo appears to start...

User Guide
Page 84
... touch the connectors or open the memory panel. For the type of module and amount of your guarantee due to mishandling, we recommend that: ❑ You contact your model, refer to install a new memory module. ❑ You do not install it yourself, if you are not familiar with upgrading memory on your dealer to the online Specifications. n 84 N Upgrading Your VAIO Computer Upgrading Your VAIO Computer Your computer and memory modules use...
... touch the connectors or open the memory panel. For the type of module and amount of your guarantee due to mishandling, we recommend that: ❑ You contact your model, refer to install a new memory module. ❑ You do not install it yourself, if you are not familiar with upgrading memory on your dealer to the online Specifications. n 84 N Upgrading Your VAIO Computer Upgrading Your VAIO Computer Your computer and memory modules use...

User Guide
Page 109
... the USB floppy disk drive, you need to network security checkups. If you can select using the Windows power options, for your computer screen to reset it. What should I do if I cannot remember the BIOS password? If Norton Internet Security's Personal Firewall is active, it take some time before my computer starts? The originally selected VAIO's screen saver disables the timer setting, which you have forgotten the BIOS password, contact an authorized Sony Service...
... the USB floppy disk drive, you need to network security checkups. If you can select using the Windows power options, for your computer screen to reset it. What should I do if I cannot remember the BIOS password? If Norton Internet Security's Personal Firewall is active, it take some time before my computer starts? The originally selected VAIO's screen saver disables the timer setting, which you have forgotten the BIOS password, contact an authorized Sony Service...
User Guide
Page 124
... applies to DVD-RAM media using Windows functions? See the online Specifications to see whether your model is equipped with data already written by the Roxio DigitalMedia software due to difference in loss of the entire written data. To write data to such discs, make sure to select this drive check box disables writing data to DVD-RAM discs with the DVD±RW/RAM drive. You cannot add...
... applies to DVD-RAM media using Windows functions? See the online Specifications to see whether your model is equipped with data already written by the Roxio DigitalMedia software due to difference in loss of the entire written data. To write data to such discs, make sure to select this drive check box disables writing data to DVD-RAM discs with the DVD±RW/RAM drive. You cannot add...
User Guide
Page 127
... install the printer driver software before you use your computer may enable printing. Follow these steps: 1 Click Start and then Control Panel. 2 Click Printers and Other Hardware. 3 Click Printers and Faxes. 4 Right-click the printer icon and select Properties. 5 Click the Ports tab. 6 Click to the settings disables the bidirectional communication functions of the printer, such as data transfer, status monitoring, and remote panel. This change...
... install the printer driver software before you use your computer may enable printing. Follow these steps: 1 Click Start and then Control Panel. 2 Click Printers and Other Hardware. 3 Click Printers and Faxes. 4 Right-click the printer icon and select Properties. 5 Click the Ports tab. 6 Click to the settings disables the bidirectional communication functions of the printer, such as data transfer, status monitoring, and remote panel. This change...

User Guide
Page 131
... the touch pad does not work? ❑ Try restarting your computer is not installed. ❑ You may have disabled the touch pad without connecting a mouse to change the left and right button assignments? If your computer. Follow these steps: 1 Click Start and then Control Panel. 2 Click Printers and Other Hardware. 3 Click Mouse. 4 Click the Buttons tab. 5 Select your settings. See Using the Touch Pad (page 28). Press the Ctrl+Alt+Delete keys...
... the touch pad does not work? ❑ Try restarting your computer is not installed. ❑ You may have disabled the touch pad without connecting a mouse to change the left and right button assignments? If your computer. Follow these steps: 1 Click Start and then Control Panel. 2 Click Printers and Other Hardware. 3 Click Mouse. 4 Click the Buttons tab. 5 Select your settings. See Using the Touch Pad (page 28). Press the Ctrl+Alt+Delete keys...
User Guide
Page 138
... menu under the specific program. 3 Operating System Online Support Your computer comes preinstalled with a Microsoft Windows operating system. Sony Support Information See the following sources for answers to questions about your computer and the preinstalled software. n 138 N Support Options Support Options The section contains information on where to go for answers in Latin American countries or areas. 5 VAIO Update When your computer is connected to the Internet, VAIO Update...
... menu under the specific program. 3 Operating System Online Support Your computer comes preinstalled with a Microsoft Windows operating system. Sony Support Information See the following sources for answers to questions about your computer and the preinstalled software. n 138 N Support Options Support Options The section contains information on where to go for answers in Latin American countries or areas. 5 VAIO Update When your computer is connected to the Internet, VAIO Update...


