User Guide
Page 8
... Start and Help and Support. 2 Click Manuals & Specifications. 3 Click VAIO Recovery Center User Guide. ❑ Media Center User Guide (Selected models only) - n8 N Before Use ❑ VAIO Recovery Center User Guide - To access this on -screen guide: 1 Click Start and Help and Support. 2 Click Manuals & Specifications. 3 Click Media Center User Guide. Provides information about using Windows Media Center. Provides information about restoring individual software programs, software drivers, and drive partition(s) or your entire hard disk drive to the original factory installed settings...
... Start and Help and Support. 2 Click Manuals & Specifications. 3 Click VAIO Recovery Center User Guide. ❑ Media Center User Guide (Selected models only) - n8 N Before Use ❑ VAIO Recovery Center User Guide - To access this on -screen guide: 1 Click Start and Help and Support. 2 Click Manuals & Specifications. 3 Click Media Center User Guide. Provides information about using Windows Media Center. Provides information about restoring individual software programs, software drivers, and drive partition(s) or your entire hard disk drive to the original factory installed settings...
User Guide
Page 19
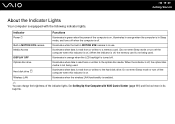
... VAIO Control Center (page 111) and find out more in its help file. Optical disc drive Illuminates when data is off . Hard disk drive Illuminates when data is read from or written to a memory card. (Do not enter Sleep mode or turn off the computer when this indicator is on.) When the indicator is read from or written to the optical disc media. Media Access Illuminates when data is off . DISPLAY...
... VAIO Control Center (page 111) and find out more in its help file. Optical disc drive Illuminates when data is off . Hard disk drive Illuminates when data is read from or written to a memory card. (Do not enter Sleep mode or turn off the computer when this indicator is on.) When the indicator is read from or written to the optical disc media. Media Access Illuminates when data is off . DISPLAY...
User Guide
Page 21
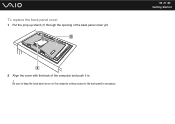
n 21 N Getting Started 2 Align the cover with the back of the back panel cover (2). Be sure to keep the back panel cover on the computer unless access to the back panel is necessary. To replace the back panel cover 1 Put the prop-up stand (1) through the opening of the computer and push it in. !
n 21 N Getting Started 2 Align the cover with the back of the back panel cover (2). Be sure to keep the back panel cover on the computer unless access to the back panel is necessary. To replace the back panel cover 1 Put the prop-up stand (1) through the opening of the computer and push it in. !
User Guide
Page 25
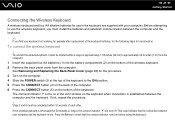
Press the Fn key to the ON position. 5 Press the CONNECT button (4) on the back of the computer. 6 Press the CONNECT button (5) on before using the keyboard. See Removing and Replacing the Back Panel Cover (page 20) for the procedure. 3 Turn on the computer. 4 Slide the POWER switch (3) at the top of the keyboard to check that the connection between the computer and the keyboard. To connect the wireless keyboard, it...
Press the Fn key to the ON position. 5 Press the CONNECT button (4) on the back of the computer. 6 Press the CONNECT button (5) on before using the keyboard. See Removing and Replacing the Back Panel Cover (page 20) for the procedure. 3 Turn on the computer. 4 Slide the POWER switch (3) at the top of the keyboard to check that the connection between the computer and the keyboard. To connect the wireless keyboard, it...

User Guide
Page 46
Use the table below to see which types of optical disc drive installed on the model you purchased. n 46 N Using Your VAIO Computer Reading and Writing Optical Discs Your computer plays and records CDs, DVDs, and Blu-ray Disc™ media, depending on your optical disc drive supports. Check your specifications for the type of media your model.
Use the table below to see which types of optical disc drive installed on the model you purchased. n 46 N Using Your VAIO Computer Reading and Writing Optical Discs Your computer plays and records CDs, DVDs, and Blu-ray Disc™ media, depending on your optical disc drive supports. Check your specifications for the type of media your model.

User Guide
Page 54
... supported disc media. See the online specifications to find out the type of your optical disc drive, and then Reading and Writing Optical Discs (page 46) to the disc. For instructions on how to use the software, see the help file on the desktop, then click Start, All Programs, and the desired Blu-ray Disc software to use the software, see the help file on selected models only. The Blu-ray Disc...
... supported disc media. See the online specifications to find out the type of your optical disc drive, and then Reading and Writing Optical Discs (page 46) to the disc. For instructions on how to use the software, see the help file on the desktop, then click Start, All Programs, and the desired Blu-ray Disc software to use the software, see the help file on selected models only. The Blu-ray Disc...
User Guide
Page 56
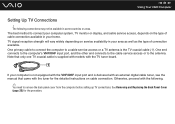
... cable tuner, see the manual that came with the TV tuner board. If your home. One primary cable to connect the computer to the antenna. The best method to remove the back panel cover from the computer before setting up TV connections. TV signal reception strength will vary widely depending on service availability in your computer system, TV monitor or display, and cable service access, depends on cable connection. n 56 N Using Your VAIO Computer Setting Up TV Connections...
... cable tuner, see the manual that came with the TV tuner board. If your home. One primary cable to connect the computer to the antenna. The best method to remove the back panel cover from the computer before setting up TV connections. TV signal reception strength will vary widely depending on service availability in your computer system, TV monitor or display, and cable service access, depends on cable connection. n 56 N Using Your VAIO Computer Setting Up TV Connections...
User Guide
Page 105
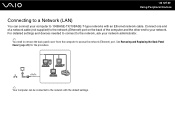
... network administrator. ✍ You need to remove the back panel cover from the computer to access the network (Ethernet) port. See Removing and Replacing the Back Panel Cover (page 20) for the procedure. ✍ Your computer can connect your computer to 100BASE-TX/10BASE-T-type networks with the default settings. For detailed settings and devices needed to connect to the network, ask your network. n 105 N Using Peripheral Devices Connecting to a Network (LAN) You can be connected to the network with an Ethernet network cable...
... network administrator. ✍ You need to remove the back panel cover from the computer to access the network (Ethernet) port. See Removing and Replacing the Back Panel Cover (page 20) for the procedure. ✍ Your computer can connect your computer to 100BASE-TX/10BASE-T-type networks with the default settings. For detailed settings and devices needed to connect to the network, ask your network. n 105 N Using Peripheral Devices Connecting to a Network (LAN) You can be connected to the network with an Ethernet network cable...
User Guide
Page 109
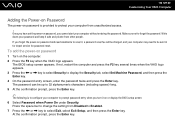
... Disabled to Enabled. 7 Press the < or , key to display the Security tab, select Set Machine Password, and then press the Enter key. 4 On the password entry screen, enter the password twice and press the Enter key. Make sure not to protect your computer to be sent in for depot service for password reset. The password can be charged, and your password and keep it safe and private from unauthorized access. ! Once you turn...
... Disabled to Enabled. 7 Press the < or , key to display the Security tab, select Set Machine Password, and then press the Enter key. 4 On the password entry screen, enter the password twice and press the Enter key. Make sure not to protect your computer to be sent in for depot service for password reset. The password can be charged, and your password and keep it safe and private from unauthorized access. ! Once you turn...
User Guide
Page 113
... mode. ! Turn off your computer if you press and hold the power button for more than four seconds, your computer is in Sleep mode, you can press the sleep button on the wireless keyboard or the remote commander to use it for a certain period of time. You will enter Sleep mode. If the computer is on the wireless keyboard. ! Alternatively, you can change the Sleep mode settings 1 Click Start, Control Panel, Hardware and Sound, and Power Options. 2 Click Change...
... mode. ! Turn off your computer if you press and hold the power button for more than four seconds, your computer is in Sleep mode, you can press the sleep button on the wireless keyboard or the remote commander to use it for a certain period of time. You will enter Sleep mode. If the computer is on the wireless keyboard. ! Alternatively, you can change the Sleep mode settings 1 Click Start, Control Panel, Hardware and Sound, and Power Options. 2 Click Change...
User Guide
Page 122
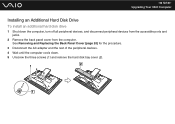
See Removing and Replacing the Back Panel Cover (page 20) for the procedure. 3 Disconnect the AC adapter and the rest of the peripheral devices. 4 Wait until the computer cools down the computer, turn off all peripheral devices, and disconnect peripheral devices from the accessible ports and jacks. 2 Remove the back panel cover from the computer. n 122 N Upgrading Your VAIO Computer Installing an Additional Hard Disk Drive To install an additional hard disk drive 1 Shut down . 5 Unscrew the three screws (1) and remove the hard disk bay cover (2).
See Removing and Replacing the Back Panel Cover (page 20) for the procedure. 3 Disconnect the AC adapter and the rest of the peripheral devices. 4 Wait until the computer cools down the computer, turn off all peripheral devices, and disconnect peripheral devices from the accessible ports and jacks. 2 Remove the back panel cover from the computer. n 122 N Upgrading Your VAIO Computer Installing an Additional Hard Disk Drive To install an additional hard disk drive 1 Shut down . 5 Unscrew the three screws (1) and remove the hard disk bay cover (2).
User Guide
Page 146
... Screen Saver disables the timer setting, which you have installed the latest video driver. ❑ On some time before my computer starts? A reset fee will be charged. What should I cannot remember the BIOS password? Why does it take some VAIO models, the graphics memory is shared with the system. If you have forgotten the BIOS password, contact an authorized Sony Service Center to download. ❑ Make sure you can select using the Windows power options...
... Screen Saver disables the timer setting, which you have installed the latest video driver. ❑ On some time before my computer starts? A reset fee will be charged. What should I cannot remember the BIOS password? Why does it take some VAIO models, the graphics memory is shared with the system. If you have forgotten the BIOS password, contact an authorized Sony Service Center to download. ❑ Make sure you can select using the Windows power options...

User Guide
Page 152
... automatically enters Sleep mode, change the corresponding power saving mode setting. n 152 N Troubleshooting Why can't I do if my computer becomes unstable when it enters a power saving mode while the built-in MOTION EYE camera is using the camera, exit the application before using the built-in MOTION EYE camera. ❑ If your camera and click Update Driver Software. Follow these steps: 1 Click Start, Control Panel, Hardware and Sound, and Device Manager. 2 Double-click Imaging devices...
... automatically enters Sleep mode, change the corresponding power saving mode setting. n 152 N Troubleshooting Why can't I do if my computer becomes unstable when it enters a power saving mode while the built-in MOTION EYE camera is using the camera, exit the application before using the built-in MOTION EYE camera. ❑ If your camera and click Update Driver Software. Follow these steps: 1 Click Start, Control Panel, Hardware and Sound, and Device Manager. 2 Double-click Imaging devices...

User Guide
Page 159
... Device Manager on the listed device, you may need to the manufacturer's instructions. ❑ If a disc is dirty or damaged, your computer. ❑ Make sure the correct driver software is turned off or minimized by the muting or volume button, respectively, on the wireless keyboard or the remote commander. ❑ Right-click the volume icon on the taskbar and click Open Volume Mixer to check the settings...
... Device Manager on the listed device, you may need to the manufacturer's instructions. ❑ If a disc is dirty or damaged, your computer. ❑ Make sure the correct driver software is turned off or minimized by the muting or volume button, respectively, on the wireless keyboard or the remote commander. ❑ Right-click the volume icon on the taskbar and click Open Volume Mixer to check the settings...

User Guide
Page 161
... your optical disc drive, and then Reading and Writing Optical Discs (page 46) to the Internet, see Using the Internet (page 90). What should I do if I cannot play Blu-ray Disc media? ! This Q & A entry applies to launch automatically, not even a screen saver. ❑ Stop using the keyboard. ❑ If you neither launch any software application nor allow any to selected models only. To download and install the updates...
... your optical disc drive, and then Reading and Writing Optical Discs (page 46) to the Internet, see Using the Internet (page 90). What should I do if I cannot play Blu-ray Disc media? ! This Q & A entry applies to launch automatically, not even a screen saver. ❑ Stop using the keyboard. ❑ If you neither launch any software application nor allow any to selected models only. To download and install the updates...

User Guide
Page 162
... rewritable. You cannot add or erase data to selected models only. This Q & A entry applies to or from the BD-R Disc media. n 162 N Troubleshooting What should I do not work. See the online specifications to find out about the supported disc media. ❑ Make sure your optical disc drive. The DVD±RW/±R DL/RAM drive does not support it. ❑ BD-R Disc media are using the correct DVD recordable media. ❑ Check which...
... rewritable. You cannot add or erase data to selected models only. This Q & A entry applies to or from the BD-R Disc media. n 162 N Troubleshooting What should I do not work. See the online specifications to find out about the supported disc media. ❑ Make sure your optical disc drive. The DVD±RW/±R DL/RAM drive does not support it. ❑ BD-R Disc media are using the correct DVD recordable media. ❑ Check which...

User Guide
Page 165
... your computer may need to install the printer driver software before you use your computer. ❑ You may enable printing. Follow these steps: 1 Click Start and Control Panel. 2 Click Printer under Hardware and Sound. 3 Right-click the printer icon and select Properties. 4 Click the Ports tab. 5 Click to the settings disables the bidirectional communication functions of the printer, such as data transfer, status monitoring, and remote panel.
... your computer may need to install the printer driver software before you use your computer. ❑ You may enable printing. Follow these steps: 1 Click Start and Control Panel. 2 Click Printer under Hardware and Sound. 3 Right-click the printer icon and select Properties. 4 Click the Ports tab. 5 Click to the settings disables the bidirectional communication functions of the printer, such as data transfer, status monitoring, and remote panel.

User Guide
Page 171
... change the keyboard configuration, follow these steps: 1 Click Start and Control Panel. 2 Click Clock, Language, and Region, and click Regional and Language Options. 3 Change the settings as this may create interference, causing the keyboard to re-establish the connection between the two devices. What should I do if the keyboard configuration is in the ON position. ❑ Make sure the supplied AA batteries are properly installed. ❑ Press the CONNECT button...
... change the keyboard configuration, follow these steps: 1 Click Start and Control Panel. 2 Click Clock, Language, and Region, and click Regional and Language Options. 3 Change the settings as this may create interference, causing the keyboard to re-establish the connection between the two devices. What should I do if the keyboard configuration is in the ON position. ❑ Make sure the supplied AA batteries are properly installed. ❑ Press the CONNECT button...
User Guide
Page 173
... the Microsoft Windows operating system installed on the left pane. You may need to install driver software if you may need to display the properties window. 6 Select the Driver tab and click Update Driver. n 173 N Troubleshooting PC Cards What should I do if my PC Card does not work , you are not using a Sony PC Card. ❑ If your PC Card for more information. Follow these steps: 1 Click Start and Control Panel. 2 Click System and Maintenance. 3 Click System. 4 Click Device Manager on...
... the Microsoft Windows operating system installed on the left pane. You may need to install driver software if you may need to display the properties window. 6 Select the Driver tab and click Update Driver. n 173 N Troubleshooting PC Cards What should I do if my PC Card does not work , you are not using a Sony PC Card. ❑ If your PC Card for more information. Follow these steps: 1 Click Start and Control Panel. 2 Click System and Maintenance. 3 Click System. 4 Click Device Manager on...
User Guide
Page 191
... the external camera connected to configure your VAIO computer and view your computer's configuration and specifications. VAIO® Hardware Diagnostic Sony Electronics Inc. VAIO® Control Center Sony Electronics Inc. For contacts about the software, see Program Support Information (page 184). VAIO Edit Component provides enhanced editing functionality when using Adobe® Premiere® Pro or Adobe Premiere Elements on your VAIO computer. VAIO Control Center provides a centralized location that gathers resources to a USB port...
... the external camera connected to configure your VAIO computer and view your computer's configuration and specifications. VAIO® Hardware Diagnostic Sony Electronics Inc. VAIO® Control Center Sony Electronics Inc. For contacts about the software, see Program Support Information (page 184). VAIO Edit Component provides enhanced editing functionality when using Adobe® Premiere® Pro or Adobe Premiere Elements on your VAIO computer. VAIO Control Center provides a centralized location that gathers resources to a USB port...


