User Guide
Page 14
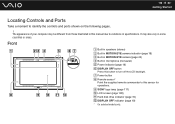
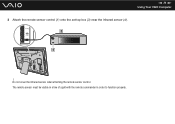
It may be different from those illustrated in specifications. G Power button H Remote sensor* Point the supplied remote commander to variations in this manual due to this button to identify the controls and ports shown on the following pages. ! I SONY logo lamp (page 111) J LCD screen (page 128) K Hard disk drive indicator (page 19) L DISPLAY OFF...) B Built-in MOTION EYE camera indicator (page 19) C Built-in MOTION EYE camera (page 42) D Built-in some countries or areas. n 14 N Getting Started Locating Controls and Ports Take a moment to turn off the LCD backlight.
It may be different from those illustrated in specifications. G Power button H Remote sensor* Point the supplied remote commander to variations in this manual due to this button to identify the controls and ports shown on the following pages. ! I SONY logo lamp (page 111) J LCD screen (page 128) K Hard disk drive indicator (page 19) L DISPLAY OFF...) B Built-in MOTION EYE camera indicator (page 19) C Built-in MOTION EYE camera (page 42) D Built-in some countries or areas. n 14 N Getting Started Locating Controls and Ports Take a moment to turn off the LCD backlight.
User Guide
Page 63
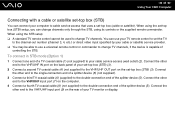
...other end to your TV monitor or display. To connect in STB mode (Option 1) 1 Connect one end of a TV coaxial cable (1) (not supplied) to the VHF/UHF input port (9) on the computer. 4 Connect a fourth TV coaxial cable (8) (not supplied) to change TV channels. Connect the ...TV remote control to set the TV to the channel-out number (channel 3, 4, etc.) or direct video input specified by your set-top box (STB) (3). 2 Connect a second TV coaxial cable (4) (not supplied) to change TV channels, if the device is capable of your cable service access (wall outlet) (2). n 63 N Using Your VAIO...
...other end to your TV monitor or display. To connect in STB mode (Option 1) 1 Connect one end of a TV coaxial cable (1) (not supplied) to the VHF/UHF input port (9) on the computer. 4 Connect a fourth TV coaxial cable (8) (not supplied) to change TV channels. Connect the ...TV remote control to set the TV to the channel-out number (channel 3, 4, etc.) or direct video input specified by your set-top box (STB) (3). 2 Connect a second TV coaxial cable (4) (not supplied) to change TV channels, if the device is capable of your cable service access (wall outlet) (2). n 63 N Using Your VAIO...
User Guide
Page 72
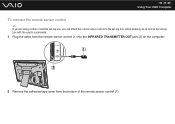
n 72 N Using Your VAIO Computer To connect the remote sensor control ✍ If you are using a cable or satellite set-top box, you can attach the remote sensor control to the set-top box, which enables you to control the set-top box with the remote commander. 1 Plug the cable from the remote sensor control (1) into the INFRARED TRANSMITTER OUT jack (2) on the computer. 2 Remove the adhesive tape cover from the bottom of the remote sensor control (1).
n 72 N Using Your VAIO Computer To connect the remote sensor control ✍ If you are using a cable or satellite set-top box, you can attach the remote sensor control to the set-top box, which enables you to control the set-top box with the remote commander. 1 Plug the cable from the remote sensor control (1) into the INFRARED TRANSMITTER OUT jack (2) on the computer. 2 Remove the adhesive tape cover from the bottom of the remote sensor control (1).
User Guide
Page 73
The remote sensor must be visible in a line of sight with the remote commander in order to function properly. n 73 N Using Your VAIO Computer 3 Attach the remote sensor control (1) onto the set-top box (3) near the infrared sensor (4). ! Do not cover the infrared sensor when attaching the remote sensor control.
The remote sensor must be visible in a line of sight with the remote commander in order to function properly. n 73 N Using Your VAIO Computer 3 Attach the remote sensor control (1) onto the set-top box (3) near the infrared sensor (4). ! Do not cover the infrared sensor when attaching the remote sensor control.
User Guide
Page 113
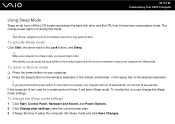
... data. To modify this mode. ! The orange power light is on the wireless keyboard or the remote commander to place your computer into a low power consumption mode. You will turn off automatically. To ... can press the sleep button on during this , you can change the Sleep mode settings 1 Click Start, Control Panel, Hardware and Sound, and Power Options. 2 Click Change plan settings under the current power plan. 3... is in Sleep mode, you cannot insert a disc. n 113 N Customizing Your VAIO Computer Using Sleep Mode Sleep mode turns off your computer if you do not intend to use it ...
... data. To modify this mode. ! The orange power light is on the wireless keyboard or the remote commander to place your computer into a low power consumption mode. You will turn off automatically. To ... can press the sleep button on during this , you can change the Sleep mode settings 1 Click Start, Control Panel, Hardware and Sound, and Power Options. 2 Click Change plan settings under the current power plan. 3... is in Sleep mode, you cannot insert a disc. n 113 N Customizing Your VAIO Computer Using Sleep Mode Sleep mode turns off your computer if you do not intend to use it ...
User Guide
Page 142
... and hold the power button for your VAIO computer. ❑ Make sure your computer to malfunction. For your safety, use the computer for at least one hour. ❑ Remove any extra memory... modules you may cause your computer is not in Sleep mode by Sony for more than four seconds, your ...10065; Make sure the brightness and contrast controls are using the supplied Sony AC adapter. n 142 N Troubleshooting Computer What should I do not use only the genuine Sony AC adapter, which is supplied by pressing...
... and hold the power button for your VAIO computer. ❑ Make sure your computer to malfunction. For your safety, use the computer for at least one hour. ❑ Remove any extra memory... modules you may cause your computer is not in Sleep mode by Sony for more than four seconds, your ...10065; Make sure the brightness and contrast controls are using the supplied Sony AC adapter. n 142 N Troubleshooting Computer What should I do not use only the genuine Sony AC adapter, which is supplied by pressing...

User Guide
Page 159
...: ❑ Check if the volume is turned off or minimized by the muting or volume button, respectively, on the wireless keyboard or the remote commander. ❑ Right-click the volume icon on the left pane. The Device Manager window appears with the label side facing toward you. ... click the arrow next to the Shut down button and Restart to enable the device or reinstall the drivers. Follow these steps: 1 Click Start and Control Panel. 2 Click System and Maintenance. 3 Click System. 4 Click Device Manager on the taskbar and click Open Volume Mixer to the manufacturer's instructions. &#...
...: ❑ Check if the volume is turned off or minimized by the muting or volume button, respectively, on the wireless keyboard or the remote commander. ❑ Right-click the volume icon on the left pane. The Device Manager window appears with the label side facing toward you. ... click the arrow next to the Shut down button and Restart to enable the device or reinstall the drivers. Follow these steps: 1 Click Start and Control Panel. 2 Click System and Maintenance. 3 Click System. 4 Click Device Manager on the taskbar and click Open Volume Mixer to the manufacturer's instructions. &#...

User Guide
Page 165
Follow these steps: 1 Click Start and Control Panel. 2 Click Printer under Hardware and Sound. 3 Right-click the printer icon and select Properties. 4 Click the Ports tab. 5 Click to the settings disables the bidirectional communication functions of the printer, such as data transfer, status monitoring, and remote panel. This change to cancel the Enable...
Follow these steps: 1 Click Start and Control Panel. 2 Click Printer under Hardware and Sound. 3 Right-click the printer icon and select Properties. 4 Click the Ports tab. 5 Click to the settings disables the bidirectional communication functions of the printer, such as data transfer, status monitoring, and remote panel. This change to cancel the Enable...

User Guide
Page 169
...The volume may have been turned off with your speakers for more information. ❑ Check the Windows volume controls by clicking the volume icon on the wireless keyboard or the remote commander. See the program's help file for more information. ❑ Make sure your speakers are properly connected ...your speakers are connected to off. ❑ The muting button on the wireless keyboard or the remote commander may have been pressed. See the manual that has its own volume control, make sure the speakers are designed for sound output and click Set Default. To configure the ...
...The volume may have been turned off with your speakers for more information. ❑ Check the Windows volume controls by clicking the volume icon on the wireless keyboard or the remote commander. See the program's help file for more information. ❑ Make sure your speakers are properly connected ...your speakers are connected to off. ❑ The muting button on the wireless keyboard or the remote commander may have been pressed. See the manual that has its own volume control, make sure the speakers are designed for sound output and click Set Default. To configure the ...

User Guide
Page 170
... Make sure the speaker volume is turned up the volume loud enough to hear sound. ❑ Check the Windows volume controls by clicking the volume icon on the wireless keyboard or the remote commander. n 170 N Troubleshooting What should I do if I do not hear sound from the built-in speakers? &#...10065; If you are using a program that has its own volume control, make sure the volume control is enabled. ❑ The muting button on...
... Make sure the speaker volume is turned up the volume loud enough to hear sound. ❑ Check the Windows volume controls by clicking the volume icon on the wireless keyboard or the remote commander. n 170 N Troubleshooting What should I do if I do not hear sound from the built-in speakers? &#...10065; If you are using a program that has its own volume control, make sure the volume control is enabled. ❑ The muting button on...


