User Guide
Page 13
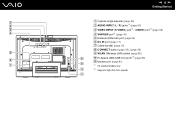
speeds. n 13 N Getting Started A Capture angle adjuster (page 35) B AUDIO INPUT (L / R) jacks*1 (page 55) C VIDEO INPUT (S VIDEO) jack*1 / (VIDEO) port*1 (page 55) D VHF/UHF port*1 (page 46) E Network (Ethernet) port (page 94) F DC IN port (page 17) G Cable bundler (page 19) H CONNECT button (page 22), (page 29) I WLAN (Wireless LAN) switch (page 82) J Hi-Speed USB (USB 2.0) ports*2 (page 89) K Modem port (page 81) *1 On selected models only. *2 Supports high-/full-/low-
speeds. n 13 N Getting Started A Capture angle adjuster (page 35) B AUDIO INPUT (L / R) jacks*1 (page 55) C VIDEO INPUT (S VIDEO) jack*1 / (VIDEO) port*1 (page 55) D VHF/UHF port*1 (page 46) E Network (Ethernet) port (page 94) F DC IN port (page 17) G Cable bundler (page 19) H CONNECT button (page 22), (page 29) I WLAN (Wireless LAN) switch (page 82) J Hi-Speed USB (USB 2.0) ports*2 (page 89) K Modem port (page 81) *1 On selected models only. *2 Supports high-/full-/low-

User Guide
Page 19
n 19 N Getting Started ✍ You can bundle the AC adapter cable along with other cables to keep them tidy. Make sure that the AC outlet is easily accessible. Snap open the cable bundler, route the cables through it, and then snap the cable bundler back shut as shown below: To disconnect your computer completely from AC power, unplug the AC adapter.
n 19 N Getting Started ✍ You can bundle the AC adapter cable along with other cables to keep them tidy. Make sure that the AC outlet is easily accessible. Snap open the cable bundler, route the cables through it, and then snap the cable bundler back shut as shown below: To disconnect your computer completely from AC power, unplug the AC adapter.