User Guide
Page 2
... Using the Power Saving Mode 21 Updating Your Computer 23 Using Your VAIO Computer 24 Using the Keyboard 25 Using the Built-in Camera 27 Using the Optical Disc Drive 28 Using "Memory Stick 35 Using Other Modules / Memory Cards 41 Using the Internet 45 Using the Network (LAN 46 Using the Wireless LAN 47 Using the Bluetooth Function 50 Using Peripheral Devices 55 Connecting External Speakers or Headphones ..........56 Connecting a USB Device 57 Connecting an i.LINK Device 59 Customizing Your VAIO Computer 61 Setting the Password 62 Using the VAIO Control Center 67 Upgrading...
... Using the Power Saving Mode 21 Updating Your Computer 23 Using Your VAIO Computer 24 Using the Keyboard 25 Using the Built-in Camera 27 Using the Optical Disc Drive 28 Using "Memory Stick 35 Using Other Modules / Memory Cards 41 Using the Internet 45 Using the Network (LAN 46 Using the Wireless LAN 47 Using the Bluetooth Function 50 Using Peripheral Devices 55 Connecting External Speakers or Headphones ..........56 Connecting a USB Device 57 Connecting an i.LINK Device 59 Customizing Your VAIO Computer 61 Setting the Password 62 Using the VAIO Control Center 67 Upgrading...
User Guide
Page 5
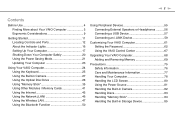
... VAIO technology page, specifications, and system and software information. Use my VAIO Access interactive help with VAIO Care, system restore, backup and recovery, and contact Sony support. Software Information Troubleshoot my VAIO Maintain and troubleshoot your VAIO computer with Internet and wireless setup, security setup, personalizing your VAIO computer, and creating recovery discs and more. Information about your VAIO computer. VAIO User Guide (This manual) - General information and technical assistance for your VAIO computer. 1. You can find the answers you need...
... VAIO technology page, specifications, and system and software information. Use my VAIO Access interactive help with VAIO Care, system restore, backup and recovery, and contact Sony support. Software Information Troubleshoot my VAIO Maintain and troubleshoot your VAIO computer with Internet and wireless setup, security setup, personalizing your VAIO computer, and creating recovery discs and more. Information about your VAIO computer. VAIO User Guide (This manual) - General information and technical assistance for your VAIO computer. 1. You can find the answers you need...
User Guide
Page 8
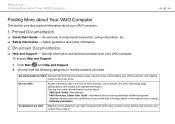
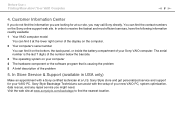
... Service & Support (available in USA only) Make an appointment with the setup of your new VAIO PC, system optimization, data rescue, and any repair service you are looking for your Sony VAIO computer. The serial number is the last 7 digits of the number below the barcode. 3 The operating system on your computer 4 The hardware component or the software program that is causing the problem 5 A brief description of your VAIO PC...
... Service & Support (available in USA only) Make an appointment with the setup of your new VAIO PC, system optimization, data rescue, and any repair service you are looking for your Sony VAIO computer. The serial number is the last 7 digits of the number below the barcode. 3 The operating system on your computer 4 The hardware component or the software program that is causing the problem 5 A brief description of your VAIO PC...
User Guide
Page 11
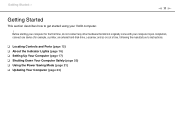
... the manufacturer's instructions. ❑ Locating Controls and Ports (page 12) ❑ About the Indicator Lights (page 16) ❑ Setting Up Your Computer (page 17) ❑ Shutting Down Your Computer Safely (page 20) ❑ Using the Power Saving Mode (page 21) ❑ Updating Your Computer (page 23) Getting Started > n 11 N Getting Started This section describes how to get started using your computer. Upon completion, connect one device (for...
... the manufacturer's instructions. ❑ Locating Controls and Ports (page 12) ❑ About the Indicator Lights (page 16) ❑ Setting Up Your Computer (page 17) ❑ Shutting Down Your Computer Safely (page 20) ❑ Using the Power Saving Mode (page 21) ❑ Updating Your Computer (page 23) Getting Started > n 11 N Getting Started This section describes how to get started using your computer. Upon completion, connect one device (for...
User Guide
Page 15
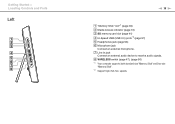
G Line In jack Connect an external audio device to receive audio signals. H WIRELESS switch (page 47), (page 50) *1 Your computer supports both standard-size "Memory Stick" and Duo-size "Memory Stick". *2 Support high-/full-/low- speeds. Getting Started > Locating Controls and Ports Left n 15 N A "Memory Stick" slot*1 (page 35) B Media Access indicator (page 16) C SD memory card slot (page 41) D Hi-Speed USB (USB 2.0) ports*2 (page 57) E Headphones jack (page 56) F Microphone jack Connect an external microphone.
G Line In jack Connect an external audio device to receive audio signals. H WIRELESS switch (page 47), (page 50) *1 Your computer supports both standard-size "Memory Stick" and Duo-size "Memory Stick". *2 Support high-/full-/low- speeds. Getting Started > Locating Controls and Ports Left n 15 N A "Memory Stick" slot*1 (page 35) B Media Access indicator (page 16) C SD memory card slot (page 41) D Hi-Speed USB (USB 2.0) ports*2 (page 57) E Headphones jack (page 56) F Microphone jack Connect an external microphone.
User Guide
Page 16
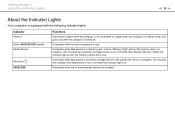
... place the computer into Sleep mode or turn it off while this indicator light is lit.) When the indicator light is unlit, the memory card is turned off while this indicator light is in use . Getting Started > About the Indicator Lights n 16 N About the Indicator Lights Your computer is equipped with the following indicator lights: Indicator Power 1 Built-in MOTION EYE camera Media Access Disc drive WIRELESS Functions Illuminates in...
... place the computer into Sleep mode or turn it off while this indicator light is lit.) When the indicator light is unlit, the memory card is turned off while this indicator light is in use . Getting Started > About the Indicator Lights n 16 N About the Indicator Lights Your computer is equipped with the following indicator lights: Indicator Power 1 Built-in MOTION EYE camera Media Access Disc drive WIRELESS Functions Illuminates in...

User Guide
Page 30
... Speed CD-RW discs is not supported. Use non-cartridge discs or discs with a removable cartridge. *2 Writing data to find out which type of optical disc drive supports which types of 25 GB, dual-layer discs with DVD-RAM Version 1.0 is not supported. *3 The Blu-ray Disc drive on the model you purchased. Video Music CD CD-R/ DVD- BD- DVD-RAM Version 2.2/12X-SPEED DVD-RAM Revision 5.0 disc is not supported. RE Part1 Version 2.1 discs (single-layer discs with the capacity of media...
... Speed CD-RW discs is not supported. Use non-cartridge discs or discs with a removable cartridge. *2 Writing data to find out which type of optical disc drive supports which types of 25 GB, dual-layer discs with DVD-RAM Version 1.0 is not supported. *3 The Blu-ray Disc drive on the model you purchased. Video Music CD CD-R/ DVD- BD- DVD-RAM Version 2.2/12X-SPEED DVD-RAM Revision 5.0 disc is not supported. RE Part1 Version 2.1 discs (single-layer discs with the capacity of media...
User Guide
Page 31
... through digital connections, such as it is not possible. As with other optical media devices, circumstances may not be compatible with this unit. Therefore, these discs may limit compatibility or prevent Blu-ray Disc media playback. USING NON-COMPLIANT DISCS CAN CAUSE FATAL DAMAGE TO YOUR VAIO PC OR CREATE SOFTWARE CONFLICTS AND CAUSE SYSTEM HANGING. The AACS key update requires Internet access. Region settings are not...
... through digital connections, such as it is not possible. As with other optical media devices, circumstances may not be compatible with this unit. Therefore, these discs may limit compatibility or prevent Blu-ray Disc media playback. USING NON-COMPLIANT DISCS CAN CAUSE FATAL DAMAGE TO YOUR VAIO PC OR CREATE SOFTWARE CONFLICTS AND CAUSE SYSTEM HANGING. The AACS key update requires Internet access. Region settings are not...

User Guide
Page 32
... the power saving mode while your computer while the optical disc drive is writing data to a disc. ❑ Do not plug or unplug the power cord or the AC adapter while the optical disc drive is playing a disc. To play DVDs created with the DVD+R DL, DVD-R DL, DVD+R, DVD+RW, DVD-R, DVD-RW, or DVD-RAM media. ❑ You may not be able to a disc. Using Your VAIO Computer > Using the Optical Disc Drive n 32 N Notes on Using the Optical Disc Drive Notes...
... the power saving mode while your computer while the optical disc drive is writing data to a disc. ❑ Do not plug or unplug the power cord or the AC adapter while the optical disc drive is playing a disc. To play DVDs created with the DVD+R DL, DVD-R DL, DVD+R, DVD+RW, DVD-R, DVD-RW, or DVD-RAM media. ❑ You may not be able to a disc. Using Your VAIO Computer > Using the Optical Disc Drive n 32 N Notes on Using the Optical Disc Drive Notes...

User Guide
Page 46
Using Your VAIO Computer > Using the Network (LAN) n 46 N Using the Network (LAN) You can connect your computer to 1000BASE-T/100BASE-TX/10BASE-T type networks with a LAN cable. If the network (LAN) port is connected to one end of a LAN cable (not supplied) to any network without changing the default settings. ! Private branch exchange (PBX) For detailed settings and devices required for LAN access, ask your network administrator. ✍ You can connect your computer to the network (LAN) port on your network. Home (intercom speakerphone) or...
Using Your VAIO Computer > Using the Network (LAN) n 46 N Using the Network (LAN) You can connect your computer to 1000BASE-T/100BASE-TX/10BASE-T type networks with a LAN cable. If the network (LAN) port is connected to one end of a LAN cable (not supplied) to any network without changing the default settings. ! Private branch exchange (PBX) For detailed settings and devices required for LAN access, ask your network administrator. ✍ You can connect your computer to the network (LAN) port on your network. Home (intercom speakerphone) or...

User Guide
Page 56
... can connect an S/PDIF device such as speakers or headphones, to your computer. For the detailed instructions, see the manual that came with a speaker cable (3) (not supplied). Turn down the volume of the speakers before you can connect external sound output devices (not supplied), such as digital headphones or an audio/video amplifier to the port and enhance the sound quality of outputting digital signals through the OPTICAL OUT port, you turn...
... can connect an S/PDIF device such as speakers or headphones, to your computer. For the detailed instructions, see the manual that came with a speaker cable (3) (not supplied). Turn down the volume of the speakers before you can connect external sound output devices (not supplied), such as digital headphones or an audio/video amplifier to the port and enhance the sound quality of outputting digital signals through the OPTICAL OUT port, you turn...

User Guide
Page 58
... a bag or carrying case when it has USB devices connected. See the manual that came with the USB device for more information. ❑ Be sure to use a USB printer compatible with your version of Windows to print documents. ❑ For information on connecting a USB device ❑ You may need to install the driver software supplied with USB devices connected, avoid exposing the USB ports to remove a USB device, see the manual that came with the device. ❑ To...
... a bag or carrying case when it has USB devices connected. See the manual that came with the USB device for more information. ❑ Be sure to use a USB printer compatible with your version of Windows to print documents. ❑ For information on connecting a USB device ❑ You may need to install the driver software supplied with USB devices connected, avoid exposing the USB ports to remove a USB device, see the manual that came with the device. ❑ To...
User Guide
Page 59
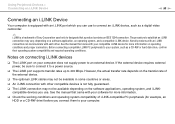
...-RW or hard disk drive, confirm their operating system compatibility and required operating conditions. Using Peripheral Devices > Connecting an i.LINK Device n 59 N Connecting an i.LINK Device Your computer is equipped with your compatible i.LINK device for more information. ❑ Check the working conditions and operating system compatibility of the external device. ❑ The optional i.LINK cables may not be sure to connect it to a power source. ❑ The i.LINK port supports transfer...
...-RW or hard disk drive, confirm their operating system compatibility and required operating conditions. Using Peripheral Devices > Connecting an i.LINK Device n 59 N Connecting an i.LINK Device Your computer is equipped with your compatible i.LINK device for more information. ❑ Check the working conditions and operating system compatibility of the external device. ❑ The optional i.LINK cables may not be sure to connect it to a power source. ❑ The i.LINK port supports transfer...
User Guide
Page 63
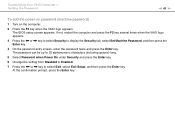
... the Enter key. 6 Change the setting from Disabled to Enabled. 7 Press the < or , key to display the Security tab, select Set Machine Password, and then press the Enter key. 4 On the password entry screen, enter the password twice and press the Enter key. At the confirmation prompt, press the Enter key. Customizing Your VAIO Computer > Setting the Password n 63 N To add the power-on password (machine password) 1 Turn on the computer. 2 Press the F2 key when the VAIO logo appears. The BIOS setup screen appears...
... the Enter key. 6 Change the setting from Disabled to Enabled. 7 Press the < or , key to display the Security tab, select Set Machine Password, and then press the Enter key. 4 On the password entry screen, enter the password twice and press the Enter key. At the confirmation prompt, press the Enter key. Customizing Your VAIO Computer > Setting the Password n 63 N To add the power-on password (machine password) 1 Turn on the computer. 2 Press the F2 key when the VAIO logo appears. The BIOS setup screen appears...

User Guide
Page 65
... Power-on Password To change or remove the power-on password (machine password) 1 Turn on the computer. 2 Press the F2 key when the VAIO logo appears. If not, restart the computer and press the F2 key several times when the VAIO logo appears. 3 Enter the machine password and press the Enter key. 4 Press the < or , key to select Security to select Exit, select Exit Setup, and then press the Enter key. The BIOS setup screen...
... Power-on Password To change or remove the power-on password (machine password) 1 Turn on the computer. 2 Press the F2 key when the VAIO logo appears. If not, restart the computer and press the F2 key several times when the VAIO logo appears. 3 Enter the machine password and press the Enter key. 4 Press the < or , key to select Security to select Exit, select Exit Setup, and then press the Enter key. The BIOS setup screen...
User Guide
Page 66
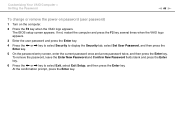
To remove the password, leave the Enter New Password and Confirm New Password fields blank and press the Enter key. 6 Press the < or , key to display the Security tab, select Set User Password, and then press the Enter key. 5 On the password entry screen, enter the current password once and a new password twice, and then press the Enter key. At the confirmation prompt, press the Enter key. Customizing Your VAIO Computer > Setting the Password n 66 N To change or remove the power-on password (user password) 1 Turn on...
To remove the password, leave the Enter New Password and Confirm New Password fields blank and press the Enter key. 6 Press the < or , key to display the Security tab, select Set User Password, and then press the Enter key. 5 On the password entry screen, enter the current password once and a new password twice, and then press the Enter key. At the confirmation prompt, press the Enter key. Customizing Your VAIO Computer > Setting the Password n 66 N To change or remove the power-on password (user password) 1 Turn on...
User Guide
Page 68
Upgrading Your VAIO Computer > n 68 N Upgrading Your VAIO Computer Your VAIO computer and memory modules use high precision components and electronic connectors technology. To find out about Your VAIO Computer (page 5). To avoid invalidation of your computer. For assistance, contact an authorized Sony Service Center. See the specifications to install a new memory module. ❑ You should not install it yourself, if you purchased. The type of module and the...
Upgrading Your VAIO Computer > n 68 N Upgrading Your VAIO Computer Your VAIO computer and memory modules use high precision components and electronic connectors technology. To find out about Your VAIO Computer (page 5). To avoid invalidation of your computer. For assistance, contact an authorized Sony Service Center. See the specifications to install a new memory module. ❑ You should not install it yourself, if you purchased. The type of module and the...

User Guide
Page 91
... press the Enter key. 6 Press the < or , key to change the boot device order? If you have forgotten the power-on your desired priority under Boot Priority and press the Enter key. 5 Press the M or m key to select the device to which you have installed the latest video driver software. ❑ On some VAIO models, the graphics memory is not guaranteed. Follow these steps: 1 Turn on password, contact an authorized Sony Service Center to reset it...
... press the Enter key. 6 Press the < or , key to change the boot device order? If you have forgotten the power-on your desired priority under Boot Priority and press the Enter key. 5 Press the M or m key to select the device to which you have installed the latest video driver software. ❑ On some VAIO models, the graphics memory is not guaranteed. Follow these steps: 1 Turn on password, contact an authorized Sony Service Center to reset it...

User Guide
Page 104
... with the optical disc drive. Troubleshooting > Optical Discs n 104 N ❑ Make sure the correct driver software is not affixed to open a list of the optical disc drives of your desired drive. Follow these steps: 1 Click Start and Control Panel. 2 Click System and Security. 3 Click System. 4 Click Device Manager in the optical disc drive and damage the drive or cause it to malfunction. ❑ If a region code warning appears, the disc may be incompatible with the optical disc drive. ❑...
... with the optical disc drive. Troubleshooting > Optical Discs n 104 N ❑ Make sure the correct driver software is not affixed to open a list of the optical disc drives of your desired drive. Follow these steps: 1 Click Start and Control Panel. 2 Click System and Security. 3 Click System. 4 Click Device Manager in the optical disc drive and damage the drive or cause it to malfunction. ❑ If a region code warning appears, the disc may be incompatible with the optical disc drive. ❑...
User Guide
Page 108
... from Sleep mode, then restart the computer. ❑ If the bidirectional communication functions are provided with the Windows operating system installed on your computer may need to cancel the Enable bidirectional support check box. 5 Click OK. Follow these steps: 1 Click Start and Devices and Printers. 2 Right-click the printer icon and select Properties. 3 Click the Ports tab. 4 Click to install the printer driver software...
... from Sleep mode, then restart the computer. ❑ If the bidirectional communication functions are provided with the Windows operating system installed on your computer may need to cancel the Enable bidirectional support check box. 5 Click OK. Follow these steps: 1 Click Start and Devices and Printers. 2 Right-click the printer icon and select Properties. 3 Click the Ports tab. 4 Click to install the printer driver software...


