User Guide
Page 3
... Connecting External Speakers ...58 Connecting a Universal Serial Bus (USB) Device...60 Connecting a Printer ...62 Connecting an i.LINK Device ...63 Customizing Your VAIO Computer ...65 Setting the Password ...66 Setting Up Your Computer with the VAIO Control Center 71 Using the Power Saving Mode...72 Upgrading Your VAIO Computer...75 Adding and Removing Memory...76 Precautions ...82 Handling the LCD Screen ...83 Using the Power Source ...84 Handling Your Computer ...85 Handling the Built-in MOTION EYE Camera...87 Handling Floppy Disks ...88 Handling Discs...
... Connecting External Speakers ...58 Connecting a Universal Serial Bus (USB) Device...60 Connecting a Printer ...62 Connecting an i.LINK Device ...63 Customizing Your VAIO Computer ...65 Setting the Password ...66 Setting Up Your Computer with the VAIO Control Center 71 Using the Power Saving Mode...72 Upgrading Your VAIO Computer...75 Adding and Removing Memory...76 Precautions ...82 Handling the LCD Screen ...83 Using the Power Source ...84 Handling Your Computer ...85 Handling the Built-in MOTION EYE Camera...87 Handling Floppy Disks ...88 Handling Discs...
User Guide
Page 7
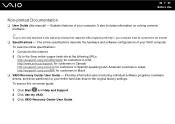
... about restoring individual software programs, hardware drivers, and drive partition(s) or your computer must be connected to the original factory settings. It also includes information on -screen guide: 1 Click Start and Help and Support. 2 Click Use my VAIO. 3 Click VAIO Recovery Center User Guide. To view the online specifications: 1 Connect to the Internet. 2 Go to the Sony online support web site at the following URLs: http://esupport.sony.com/EN/VAIO/ for customers in USA http://www.sony.ca/support...
... about restoring individual software programs, hardware drivers, and drive partition(s) or your computer must be connected to the original factory settings. It also includes information on -screen guide: 1 Click Start and Help and Support. 2 Click Use my VAIO. 3 Click VAIO Recovery Center User Guide. To view the online specifications: 1 Connect to the Internet. 2 Go to the Sony online support web site at the following URLs: http://esupport.sony.com/EN/VAIO/ for customers in USA http://www.sony.ca/support...

User Guide
Page 15
size Memory Stick. *2 Support high-/full-/low- G Line In jack Connect an external audio device for audio input. H WIRELESS switch (page 49) *1 Your computer supports both the standard-size Memory Stick and the Duo- speeds. Left n 15 N Getting Started A Memory Stick slot*1 (page 38) B Media Access indicator (page 16) C SD memory card slot (page 44) D Hi-Speed USB (USB 2.0) ports*2 (page 60) E Headphones jack (page 58) F Microphone jack Connect an external microphone.
size Memory Stick. *2 Support high-/full-/low- G Line In jack Connect an external audio device for audio input. H WIRELESS switch (page 49) *1 Your computer supports both the standard-size Memory Stick and the Duo- speeds. Left n 15 N Getting Started A Memory Stick slot*1 (page 38) B Media Access indicator (page 16) C SD memory card slot (page 44) D Hi-Speed USB (USB 2.0) ports*2 (page 60) E Headphones jack (page 58) F Microphone jack Connect an external microphone.
User Guide
Page 30
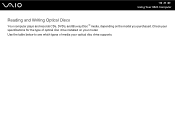
n 30 N Using Your VAIO Computer Reading and Writing Optical Discs Your computer plays and records CDs, DVDs, and Blu-ray Disc™ media, depending on your model. Check your optical disc drive supports. Use the table below to see which types of media your specifications for the type of optical disc drive installed on the model you purchased.
n 30 N Using Your VAIO Computer Reading and Writing Optical Discs Your computer plays and records CDs, DVDs, and Blu-ray Disc™ media, depending on your model. Check your optical disc drive supports. Use the table below to see which types of media your specifications for the type of optical disc drive installed on the model you purchased.
User Guide
Page 33
... a disc. n 33 N Using Your VAIO Computer Notes on writing data to a disc ❑ Only use discs in any other shape (star, heart, card, etc.), as this may become unstable during AVC HD playback. ❑ Do not place your computer into the power saving mode while your computer while the optical disc drive is writing data to a disc. ❑ Do not plug or unplug the AC adapter while the optical disc drive...
... a disc. n 33 N Using Your VAIO Computer Notes on writing data to a disc ❑ Only use discs in any other shape (star, heart, card, etc.), as this may become unstable during AVC HD playback. ❑ Do not place your computer into the power saving mode while your computer while the optical disc drive is writing data to a disc. ❑ Do not plug or unplug the AC adapter while the optical disc drive...
User Guide
Page 37
... with your software. The Blu-ray Disc writing function is available on the desktop, click Start, All Programs, and the desired Blu-ray Disc software to a Blu-ray Disc media 1 Close all running software applications. 2 Insert a recordable Blu-ray Disc media into the optical disc drive. 3 If nothing appears on how to find out about the supported disc media. For instructions on selected models only. n 37 N Using Your VAIO Computer Playing Blu-ray Disc Media !
... with your software. The Blu-ray Disc writing function is available on the desktop, click Start, All Programs, and the desired Blu-ray Disc software to a Blu-ray Disc media 1 Close all running software applications. 2 Insert a recordable Blu-ray Disc media into the optical disc drive. 3 If nothing appears on how to find out about the supported disc media. For instructions on selected models only. n 37 N Using Your VAIO Computer Playing Blu-ray Disc Media !
User Guide
Page 52
... the WIRELESS switch before starting the Bluetooth function. You can establish wireless communications between these devices without cables at a range of up to set up and using the Bluetooth function, search for Bluetooth information using Windows Help and Support. Be sure to find out whether your computer and other Bluetooth devices such as another computer or a mobile phone. See the online specifications to turn on selected models...
... the WIRELESS switch before starting the Bluetooth function. You can establish wireless communications between these devices without cables at a range of up to set up and using the Bluetooth function, search for Bluetooth information using Windows Help and Support. Be sure to find out whether your computer and other Bluetooth devices such as another computer or a mobile phone. See the online specifications to turn on selected models...
User Guide
Page 58
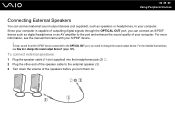
... manual that came with your computer is capable of outputting digital signals through the OPTICAL OUT port, you can connect external sound output devices (not supplied), such as digital headphones or an AV amplifier to the port and enhance the sound quality of the speakers before you need to change the sound output device? (page 125). For more information, see How do I change the sound output device. To connect external speakers 1 Plug the speaker cable...
... manual that came with your computer is capable of outputting digital signals through the OPTICAL OUT port, you can connect external sound output devices (not supplied), such as digital headphones or an AV amplifier to the port and enhance the sound quality of the speakers before you need to change the sound output device? (page 125). For more information, see How do I change the sound output device. To connect external speakers 1 Plug the speaker cable...
User Guide
Page 62
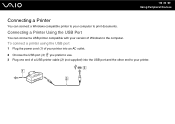
To connect a printer using the USB port 1 Plug the power cord (1) of your printer into the USB port and the other end to your printer. Connecting a Printer Using the USB Port You can connect a Windows-compatible printer to your computer to print documents. n 62 N Using Peripheral Devices Connecting a Printer You can connect a USB printer compatible with your version of a USB printer cable (2) (not supplied) into an AC outlet. 2 Choose the USB port (3) you prefer to use. 3 Plug one end of Windows to the computer.
To connect a printer using the USB port 1 Plug the power cord (1) of your printer into the USB port and the other end to your printer. Connecting a Printer Using the USB Port You can connect a Windows-compatible printer to your computer to print documents. n 62 N Using Peripheral Devices Connecting a Printer You can connect a USB printer compatible with your version of a USB printer cable (2) (not supplied) into an AC outlet. 2 Choose the USB port (3) you prefer to use. 3 Plug one end of Windows to the computer.

User Guide
Page 70
... the Enter key. The BIOS setup screen appears. n 70 N Customizing Your VAIO Computer To change or remove the power-on password (user password) 1 Turn on the computer. 2 Press the F2 key when the VAIO logo appears. To remove the password, leave the Enter New Password and Confirm New Password fields blank and press the Enter key. 6 Press the < or , key to display the Security tab, select Set User Password, and then press the Enter key. 5 On the password entry screen, enter the current password once and a new password twice...
... the Enter key. The BIOS setup screen appears. n 70 N Customizing Your VAIO Computer To change or remove the power-on password (user password) 1 Turn on the computer. 2 Press the F2 key when the VAIO logo appears. To remove the password, leave the Enter New Password and Confirm New Password fields blank and press the Enter key. 6 Press the < or , key to display the Security tab, select Set User Password, and then press the Enter key. 5 On the password entry screen, enter the current password once and a new password twice...
User Guide
Page 99
... you have installed the latest video driver. ❑ On some VAIO models, the graphics memory is not guaranteed. If you have forgotten the power-on password, contact an authorized Sony Service Center to download. ❑ Make sure you want to assign the priority and press the Enter key. 6 Press the < or , key to change the boot device order? The BIOS setup screen appears. n 99 N Troubleshooting What should I do if my game software does not work or...
... you have installed the latest video driver. ❑ On some VAIO models, the graphics memory is not guaranteed. If you have forgotten the power-on password, contact an authorized Sony Service Center to download. ❑ Make sure you want to assign the priority and press the Enter key. 6 Press the < or , key to change the boot device order? The BIOS setup screen appears. n 99 N Troubleshooting What should I do if my game software does not work or...
User Guide
Page 112
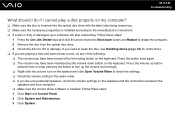
... using external speakers, check the volume settings on the keyboard. Follow these steps: 1 Click Start and Control Panel. 2 Click System and Maintenance. 3 Click System. n 112 N Troubleshooting What should I cannot play a disc properly on my computer? ❑ Make sure the disc is inserted into the optical disc drive with the label side facing toward you. ❑ Make sure the necessary program(s) is installed according to restart the computer. 2 Remove the disc from the optical disc drive...
... using external speakers, check the volume settings on the keyboard. Follow these steps: 1 Click Start and Control Panel. 2 Click System and Maintenance. 3 Click System. n 112 N Troubleshooting What should I cannot play a disc properly on my computer? ❑ Make sure the disc is inserted into the optical disc drive with the label side facing toward you. ❑ Make sure the necessary program(s) is installed according to restart the computer. 2 Remove the disc from the optical disc drive...
User Guide
Page 114
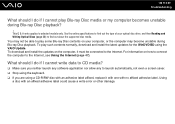
..., download and install the latest updates for the WinDVD BD using a CD-R/RW disc with an adhesive label affixed, replace it must be able to play some Blu-ray Disc contents on how to connect the computer to the Internet, see Using the Internet (page 47). n 114 N Troubleshooting What should I do if I cannot write data to CD media? ❑ Make sure you neither launch any software...
..., download and install the latest updates for the WinDVD BD using a CD-R/RW disc with an adhesive label affixed, replace it must be able to play some Blu-ray Disc contents on how to connect the computer to the Internet, see Using the Internet (page 47). n 114 N Troubleshooting What should I do if I cannot write data to CD media? ❑ Make sure you neither launch any software...
User Guide
Page 115
... your optical disc drive supports the Blu-ray Disc writing function. Why can't I cannot write data to Blu-ray Disc media? ! This Q & A entry applies to or from the BD-R Disc media. See the online specifications to find out the type of DVD recordable media do if I write data to DVD media? ❑ Make sure you are not rewritable. n 115 N Troubleshooting What should I do not work. You cannot add or...
... your optical disc drive supports the Blu-ray Disc writing function. Why can't I cannot write data to Blu-ray Disc media? ! This Q & A entry applies to or from the BD-R Disc media. See the online specifications to find out the type of DVD recordable media do if I write data to DVD media? ❑ Make sure you are not rewritable. n 115 N Troubleshooting What should I do not work. You cannot add or...

User Guide
Page 117
... the Windows operating system installed on your printer. This disables the bidirectional communication functions of the printer, such as data transfer, status monitoring, and remote panel. See the manual that came with your printer for more information. ❑ If your printer is compatible with your printer, disabling the functions on your computer. ❑ You may need to cancel the Enable bidirectional support check...
... the Windows operating system installed on your printer. This disables the bidirectional communication functions of the printer, such as data transfer, status monitoring, and remote panel. See the manual that came with your printer for more information. ❑ If your printer is compatible with your printer, disabling the functions on your computer. ❑ You may need to cancel the Enable bidirectional support check...
Quick Start Guide
Page 1
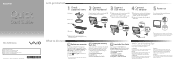
... Start, Help and Support, Use my VAIO, and VAIO User Guide. Locate the User Guide You can restore your investment and maximize its lifespan, we encourage you may cause damage to factory-installed settings in case of your computer. 1 Plug the power cord into the AC adapter and an AC outlet, and then plug the AC adapter cable into contact with the following categories: Get started 1 Check supplied items AC adapter Power cord 2 3 Connect USB keyboard Connect USB mouse 4 Connect AC adapter Plug the keyboard cable...
... Start, Help and Support, Use my VAIO, and VAIO User Guide. Locate the User Guide You can restore your investment and maximize its lifespan, we encourage you may cause damage to factory-installed settings in case of your computer. 1 Plug the power cord into the AC adapter and an AC outlet, and then plug the AC adapter cable into contact with the following categories: Get started 1 Check supplied items AC adapter Power cord 2 3 Connect USB keyboard Connect USB mouse 4 Connect AC adapter Plug the keyboard cable...
Safety Information
Page 2
... VARIOUS SOURCES AND MAY BE INACCURATE. Sony Electronics Inc. Software specifications are located on the bottom or back panel of license agreements enclosed with this manual or the information contained herein at any machine-readable form without prior written approval. Refer to the model and serial numbers when you call your Sony VAIO® computer. This manual and the software described herein, in whole or...
... VARIOUS SOURCES AND MAY BE INACCURATE. Sony Electronics Inc. Software specifications are located on the bottom or back panel of license agreements enclosed with this manual or the information contained herein at any machine-readable form without prior written approval. Refer to the model and serial numbers when you call your Sony VAIO® computer. This manual and the software described herein, in whole or...

Safety Information
Page 4
... provided with this device. 4 Information about compatible models can be found at least 8 inches (20 cm) away from the pacemaker. ❑ Sony is at http://www.sony.com/vaio/. ❑ Do not use a compatible genuine Sony battery pack or AC adapter. See the online specifications sheet for details on hospital premises. For questions regarding your installed optical drives. strong magnets or speakers that you...
... provided with this device. 4 Information about compatible models can be found at least 8 inches (20 cm) away from the pacemaker. ❑ Sony is at http://www.sony.com/vaio/. ❑ Do not use a compatible genuine Sony battery pack or AC adapter. See the online specifications sheet for details on hospital premises. For questions regarding your installed optical drives. strong magnets or speakers that you...
Marketing Specifications (Matte Black)
Page 1
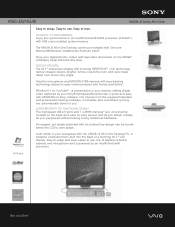
...-in-One Desktop comes pre-installed with stunning XBRITE-ECO™ LCD technology delivers deeper blacks, brighter whites, true-to-life color and razor-sharp detail from the supplied templates and professional looking cutaways, cross-fades and soundtrack syncing are conveniently located on the 320GB2 (7200rpm) Serial ATA hard disk drive. ENDLESS FEATURES The 20.1"7 widescreen display with Genuine Microsoft® Windows Vista...
...-in-One Desktop comes pre-installed with stunning XBRITE-ECO™ LCD technology delivers deeper blacks, brighter whites, true-to-life color and razor-sharp detail from the supplied templates and professional looking cutaways, cross-fades and soundtrack syncing are conveniently located on the 320GB2 (7200rpm) Serial ATA hard disk drive. ENDLESS FEATURES The 20.1"7 widescreen display with Genuine Microsoft® Windows Vista...
Marketing Specifications (Matte Black)
Page 2
...) Microphone Input: 1 USB Port(s): 5 (2.0 compliant) DC-In: 1 i.LINK® Connection: 1 (4pin) i.LINK® connector (IEEE 1394)10 Headphone Output(s): 1 S/PDIF Output(s): 1 Ethernet Connection (s): 1 Networking/Modem Ethernet Protocol: 10Base-T / 100Base-TX / 1000Base-T (Gigabit) Ethernet Speed: Fast Ethernet (RJ-45) Wireless LAN: Atheros Wireless Network Connection (802.11b/g/n)3 Power Power Requirements: 168W + 10% Input Voltage: 100-240V Software Operating System: Genuine Microsoft® Windows Vista® Home Premium 64-bit6 Supplied Software: Microsoft® Works SE 9.0 w/ 60...
...) Microphone Input: 1 USB Port(s): 5 (2.0 compliant) DC-In: 1 i.LINK® Connection: 1 (4pin) i.LINK® connector (IEEE 1394)10 Headphone Output(s): 1 S/PDIF Output(s): 1 Ethernet Connection (s): 1 Networking/Modem Ethernet Protocol: 10Base-T / 100Base-TX / 1000Base-T (Gigabit) Ethernet Speed: Fast Ethernet (RJ-45) Wireless LAN: Atheros Wireless Network Connection (802.11b/g/n)3 Power Power Requirements: 168W + 10% Input Voltage: 100-240V Software Operating System: Genuine Microsoft® Windows Vista® Home Premium 64-bit6 Supplied Software: Microsoft® Works SE 9.0 w/ 60...


