
Operating Instructions
Page 1
Model No. Serial No. STR-DG1000 ©2006 Sony Corporation Record the serial number in Malaysia 2-697-465-11(2) Multi Channel AV Receiver Operating Instructions Owner's Record The model and serial numbers are located on the rear of the unit. Refer to them whenever you call upon your Sony dealer regarding this product. Sony Corporation Printed in the space provided below.
Model No. Serial No. STR-DG1000 ©2006 Sony Corporation Record the serial number in Malaysia 2-697-465-11(2) Multi Channel AV Receiver Operating Instructions Owner's Record The model and serial numbers are located on the rear of the unit. Refer to them whenever you call upon your Sony dealer regarding this product. Sony Corporation Printed in the space provided below.

Operating Instructions
Page 2
...or modification not expressly approved in this manual could void your authority to operate this apparatus to rain or moisture. Reorient or relocate the receiving antenna. - WARNING This equipment has been tested and found to Part 15 of the FCC Rules. Consult the dealer or an experienced ...: - This equipment generates, uses, and can be determined by turning the equipment off and on a circuit different from that to which the receiver is intended to alert the user to the presence of uninsulated "dangerous voltage" within the product's enclosure that the cable ground shall be of ...
...or modification not expressly approved in this manual could void your authority to operate this apparatus to rain or moisture. Reorient or relocate the receiving antenna. - WARNING This equipment has been tested and found to Part 15 of the FCC Rules. Consult the dealer or an experienced ...: - This equipment generates, uses, and can be determined by turning the equipment off and on a circuit different from that to which the receiver is intended to alert the user to the presence of uninsulated "dangerous voltage" within the product's enclosure that the cable ground shall be of ...

Operating Instructions
Page 3
...patents issued and pending. All Rights Reserved. "Dolby", "Pro Logic", "Surround EX", and the double-D symbol are trademarks of Dolby Laboratories. ** Manufactured under license from Neural Audio Corporation. This receiver incorporates High-Definition Multimedia Interface (HDMI™) technology. XM is manufactured under... the US and foreign patents pending and other U.S. Sony Corporation hereby grants the user a nonexclusive, non-transferable, limited license right to use the controls on the receiver if they have the same or similar names as those on the ...
...patents issued and pending. All Rights Reserved. "Dolby", "Pro Logic", "Surround EX", and the double-D symbol are trademarks of Dolby Laboratories. ** Manufactured under license from Neural Audio Corporation. This receiver incorporates High-Definition Multimedia Interface (HDMI™) technology. XM is manufactured under... the US and foreign patents pending and other U.S. Sony Corporation hereby grants the user a nonexclusive, non-transferable, limited license right to use the controls on the receiver if they have the same or similar names as those on the ...
Operating Instructions
Page 4
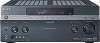
...93 Watching component images from other inputs (COMPONENT VIDEO ASSIGN) ...... 94 4GB Table of Contents Getting Started Description and location of the receiver on the TV screen 89 Naming inputs 90 Switching between digital and analog audio (INPUT MODE 91 Listening to a Super Audio CD/...Amplifier Operations Navigating through menus 54 Adjusting the level (Level Settings menu 58 Adjusting the equalizer (EQ Settings menu 59 Settings for the surround sound (Sur Settings menu 61 Settings for the tuner (Tuner Settings menu 63 Settings for the audio (Audio Settings menu 64 Settings for...
...93 Watching component images from other inputs (COMPONENT VIDEO ASSIGN) ...... 94 4GB Table of Contents Getting Started Description and location of the receiver on the TV screen 89 Naming inputs 90 Switching between digital and analog audio (INPUT MODE 91 Listening to a Super Audio CD/...Amplifier Operations Navigating through menus 54 Adjusting the level (Level Settings menu 58 Adjusting the equalizer (EQ Settings menu 59 Settings for the surround sound (Sur Settings menu 61 Settings for the tuner (Tuner Settings menu 63 Settings for the audio (Audio Settings menu 64 Settings for...

Operating Instructions
Page 5
Changing the display 95 Using the Sleep Timer 96 Recording using the receiver 96 Listening to the sound in another zone (Zone 2 operations 98 Using a bi-amplifier connection 101 Using the Remote Operating each component using the remote 103 Programming the remote 104 Performing several commands in sequence automatically (Macro Play 107 Setting remote control codes that are not stored in the commander 109 Clearing all the contents of the remote's memory 111 Additional Information Glossary 112 Precautions 114 Troubleshooting 115 Specifications 119 Index 122 5GB
Changing the display 95 Using the Sleep Timer 96 Recording using the receiver 96 Listening to the sound in another zone (Zone 2 operations 98 Using a bi-amplifier connection 101 Using the Remote Operating each component using the remote 103 Programming the remote 104 Performing several commands in sequence automatically (Macro Play 107 Setting remote control codes that are not stored in the commander 109 Clearing all the contents of the remote's memory 111 Additional Information Glossary 112 Precautions 114 Troubleshooting 115 Specifications 119 Index 122 5GB

Operating Instructions
Page 6
When you remove the cover, keep it out of parts Front panel To remove the cover Press PUSH. Getting Started Description and location of reach from children. Name Function A POWER Press to the jack supplied optimizer microphone for the Digital Cinema Auto Calibration function (page 41). 6GB B AUTO CAL MIC Connects to turn the receiver on or off (page 37, 50, 51, 52, 53, 79).
When you remove the cover, keep it out of parts Front panel To remove the cover Press PUSH. Getting Started Description and location of reach from children. Name Function A POWER Press to the jack supplied optimizer microphone for the Digital Cinema Auto Calibration function (page 41). 6GB B AUTO CAL MIC Connects to turn the receiver on or off (page 37, 50, 51, 52, 53, 79).

Operating Instructions
Page 7
D Remote sensor Receives signals from the component connected to select the audio input signal from remote commander. Press to the MULTI CHANNEL INPUT jack (page 48). L PHONES jack Connects to enable operations in zone 2. Getting Started Name ...Function C TONE MODE TONE Adjusts FRONT BASS and FRONT TREBLE. MOVIE MUSIC I POWER SELECT J MULTI CH IN Press POWER (ZONE) to headphones (page 75). TUNING F CATEGORY MODE Used when listening to select sound...
D Remote sensor Receives signals from the component connected to select the audio input signal from remote commander. Press to the MULTI CHANNEL INPUT jack (page 48). L PHONES jack Connects to enable operations in zone 2. Getting Started Name ...Function C TONE MODE TONE Adjusts FRONT BASS and FRONT TREBLE. MOVIE MUSIC I POWER SELECT J MULTI CH IN Press POWER (ZONE) to headphones (page 75). TUNING F CATEGORY MODE Used when listening to select sound...

Operating Instructions
Page 8
... Center (monaural) Surround Left Surround Right Surround (monaural or the surround components obtained by Pro Logic processing) Surround Back Left Surround Back Right Surround Back (the surround back components obtained by 6.1 channel decoding) Example: Recording format (Front/ Surround): 3/2.1 Output channel: Surround speakers are set to "YES" and the audio signal is set to show how the receiver downmixes the source sound (based on the...
... Center (monaural) Surround Left Surround Right Surround (monaural or the surround components obtained by Pro Logic processing) Surround Back Left Surround Back Right Surround Back (the surround back components obtained by 6.1 channel decoding) Example: Recording format (Front/ Surround): 3/2.1 Output channel: Surround speakers are set to "YES" and the audio signal is set to show how the receiver downmixes the source sound (based on the...

Operating Instructions
Page 9
...Digital format disc, be sure that you have made digital connections and that INPUT MODE is activated (page 59). Lights up when surround back sound decoding is set to the current input. One of the input indicators also lights up constantly. D INPUT Lights up according to ...jack, or when INPUT MODE is activated (page 59). Lights up when MULTI IN is decoding Dolby Digital Surround signals. Getting Started Name Function C ;DIGITAL Lights up when the receiver (EX) is selected (page 48). F HDMI 1 2 Lights up when dynamic range compression is not set...
...Digital format disc, be sure that you have made digital connections and that INPUT MODE is activated (page 59). Lights up when surround back sound decoding is set to the current input. One of the input indicators also lights up constantly. D INPUT Lights up according to ...jack, or when INPUT MODE is activated (page 59). Lights up when MULTI IN is decoding Dolby Digital Surround signals. Getting Started Name Function C ;DIGITAL Lights up when the receiver (EX) is selected (page 48). F HDMI 1 2 Lights up when dynamic range compression is not set...

Operating Instructions
Page 10
... (page 62). "SP-OFF" lights up when the Pro Logic II MOVIE/MUSIC/GAME decoder is activated. Lights up when the receiver applies Pro Logic processing to 2 channel signals in all parts of the input signal the bar indication will fluctuate (and may turn off) during XM Radio operation (page... 85). ";PRO LOGIC II" also lights up when "SP-OFF" is selected or headphones are set to output the center and surround channel signals. wj Tuner indicators Lights up when a memory function, such as Name Input (page 90) etc., is activated. wk MEMORY Lights up when ...
... (page 62). "SP-OFF" lights up when the Pro Logic II MOVIE/MUSIC/GAME decoder is activated. Lights up when the receiver applies Pro Logic processing to 2 channel signals in all parts of the input signal the bar indication will fluctuate (and may turn off) during XM Radio operation (page... 85). ";PRO LOGIC II" also lights up when "SP-OFF" is selected or headphones are set to output the center and surround channel signals. wj Tuner indicators Lights up when a memory function, such as Name Input (page 90) etc., is activated. wk MEMORY Lights up when ...

Operating Instructions
Page 11
..., 29). HDMI IN/OUT Connects to a Super Audio CD player or DVD player with an analog audio jack for 7.1 channel or 5.1 channel sound (page 19, 22). An image and the sound are output to a DVD player, Super Audio CD player, etc. B DIGITAL INPUT/OUTPUT section OPTICAL IN/ OUT jacks ... (page 19, 23). AM ANTENNA jack Connects to an external power amplifier. PRE OUT jacks Connects to the AM loop antenna (aerial) supplied with this receiver (page 36). XM ANTENNA jack Connects to a DVD VIDEO (Y, PB/ player, TV, or a CB, PR/CR) satellite tuner. (page INPUT/ 27, 29...
..., 29). HDMI IN/OUT Connects to a Super Audio CD player or DVD player with an analog audio jack for 7.1 channel or 5.1 channel sound (page 19, 22). An image and the sound are output to a DVD player, Super Audio CD player, etc. B DIGITAL INPUT/OUTPUT section OPTICAL IN/ OUT jacks ... (page 19, 23). AM ANTENNA jack Connects to an external power amplifier. PRE OUT jacks Connects to the AM loop antenna (aerial) supplied with this receiver (page 36). XM ANTENNA jack Connects to a DVD VIDEO (Y, PB/ player, TV, or a CB, PR/CR) satellite tuner. (page INPUT/ 27, 29...

Operating Instructions
Page 13
... ZONE 2 (D), only the receiver in zone 2 is assigned to operate (page 104). You can use . Getting Started Remote commander You can program the remote to control non-Sony components following the steps in "Programming the remote" (page 104). Press to select a sound field (page 72). When ...you want to use the supplied remote RM-AAL003 to operate the receiver and to control the Sony audio/video components that the remote is turned on . To turn off all components,...
... ZONE 2 (D), only the receiver in zone 2 is assigned to operate (page 104). You can use . Getting Started Remote commander You can program the remote to control non-Sony components following the steps in "Programming the remote" (page 104). Press to select a sound field (page 72). When ...you want to use the supplied remote RM-AAL003 to operate the receiver and to control the Sony audio/video components that the remote is turned on . To turn off all components,...

Operating Instructions
Page 14
Press 0/10 to enter the value after selecting a channel, disc or track using the numeric buttons. select channel numbers of the receiver, DVD player, or TV, etc. Press to select track number 10. - Then press to select the input signal (TV input or... x a) X a) H b) ./> a) Press to select information displayed on the display window, TV screen of the CD player, DVD player or MD deck. Name P PRESET + b)/- Press RECEIVER (6) and then press MACRO 1 or MACRO 2 to perform a menu operations (page 103). Then use V/v/B/b and to select the wide picture mode. TUNING +/- select track numbers...
Press 0/10 to enter the value after selecting a channel, disc or track using the numeric buttons. select channel numbers of the receiver, DVD player, or TV, etc. Press to select track number 10. - Then press to select the input signal (TV input or... x a) X a) H b) ./> a) Press to select information displayed on the display window, TV screen of the CD player, DVD player or MD deck. Name P PRESET + b)/- Press RECEIVER (6) and then press MACRO 1 or MACRO 2 to perform a menu operations (page 103). Then use V/v/B/b and to select the wide picture mode. TUNING +/- select track numbers...
Operating Instructions
Page 15
... SET UP Press to light up the remote. Notes • Some functions explained in this section may operate differently than described. 15GB to display the receiver status. W ON SCREEN Press to adjust the volume level of the TV. Press to continuous playback, etc. V RETURN/ EXIT O Press to return ... function to enable TV operation. Use as an example only. clear a mistake when you press MENU (qd), the menus of operation. TV VOL +/- channel numbers of the VCR, satellite tuner, CD player or MD deck. - a)See the table on page 103 for information on the TV screen (page ...
... SET UP Press to light up the remote. Notes • Some functions explained in this section may operate differently than described. 15GB to display the receiver status. W ON SCREEN Press to adjust the volume level of the TV. Press to continuous playback, etc. V RETURN/ EXIT O Press to return ... function to enable TV operation. Use as an example only. clear a mistake when you press MENU (qd), the menus of operation. TV VOL +/- channel numbers of the VCR, satellite tuner, CD player or MD deck. - a)See the table on page 103 for information on the TV screen (page ...
Operating Instructions
Page 16
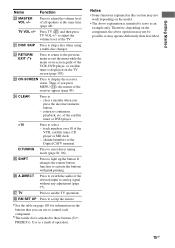
... place it wherever you to use a 7.1 channel system (7 speakers and one additional surround back speaker (6.1 channel system) or two surround back speakers (7.1 channel system). (see "Using the surround back decoding mode (SB DECODING)" on page 62). 1: Installing speakers This receiver allows you want. Enjoying a 5.1/7.1 channel system To fully enjoy theater-like multi-channel surround sound requires five speakers (two front speakers...
... place it wherever you to use a 7.1 channel system (7 speakers and one additional surround back speaker (6.1 channel system) or two surround back speakers (7.1 channel system). (see "Using the surround back decoding mode (SB DECODING)" on page 62). 1: Installing speakers This receiver allows you want. Enjoying a 5.1/7.1 channel system To fully enjoy theater-like multi-channel surround sound requires five speakers (two front speakers...

Operating Instructions
Page 19
...and 96 kHz sampling frequencies. 19GB Component to be connected Super Audio CD player/ CD player With digital audio output With multi-channel audio output With analog audio output only MD/DAT With digital audio output With analog audio output only Tape deck, Analog disc ... components This section describes how to hook up all your components, proceed to this receiver. After hooking up your components to "4: Connecting the antennas (aerials)" (page 36). Digital Analog High quality sound Notes • When connecting optical digital cords, insert the plugs straight in until...
...and 96 kHz sampling frequencies. 19GB Component to be connected Super Audio CD player/ CD player With digital audio output With multi-channel audio output With analog audio output only MD/DAT With digital audio output With analog audio output only Tape deck, Analog disc ... components This section describes how to hook up all your components, proceed to this receiver. After hooking up your components to "4: Connecting the antennas (aerials)" (page 36). Digital Analog High quality sound Notes • When connecting optical digital cords, insert the plugs straight in until...

Operating Instructions
Page 21
Refer to digital sound from other inputs (DIGITAL ASSIGN)" (page 92). If you play a Super Audio CD, connect the player to the MULTI CHANNEL INPUT or SA-CD/CD IN jacks. You must use an RF demodulator for recording in this case. • When connecting optical digital cords, insert ... or tie digital optical cords. Getting Started Notes on playing a Super Audio CD on a Super Audio CD player • No sound is output when playing a Super Audio CD on this receiver. Tip You cannot connect an LD player's DOLBY DIGITAL RF OUT jack directly to only the COAXIAL SA-CD/ CD IN...
Refer to digital sound from other inputs (DIGITAL ASSIGN)" (page 92). If you play a Super Audio CD, connect the player to the MULTI CHANNEL INPUT or SA-CD/CD IN jacks. You must use an RF demodulator for recording in this case. • When connecting optical digital cords, insert ... or tie digital optical cords. Getting Started Notes on playing a Super Audio CD on a Super Audio CD player • No sound is output when playing a Super Audio CD on this receiver. Tip You cannot connect an LD player's DOLBY DIGITAL RF OUT jack directly to only the COAXIAL SA-CD/ CD IN...

Operating Instructions
Page 22
...8226; DVD and Super Audio CD players do not have the SURROUND BACK jacks. • When "SUR BACK SP" is set to "ZONE 2" in the Speaker Settings menu, the input to enjoy multichannel sound. Connecting components with multi-channel output jacks If your DVD or Super Audio CD player is... equipped with multi-channel output jacks, you can be used to connect an external multi-channel decoder. Alternatively, the multichannel input jacks can connect it to the MULTI CHANNEL INPUT jacks of this receiver ...
...8226; DVD and Super Audio CD players do not have the SURROUND BACK jacks. • When "SUR BACK SP" is set to "ZONE 2" in the Speaker Settings menu, the input to enjoy multichannel sound. Connecting components with multi-channel output jacks If your DVD or Super Audio CD player is... equipped with multi-channel output jacks, you can be used to connect an external multi-channel decoder. Alternatively, the multichannel input jacks can connect it to the MULTI CHANNEL INPUT jacks of this receiver ...

Operating Instructions
Page 24
... image 24GB Before you begin, refer to "Component to be connected The image quality depends on your components. After hooking up your components to this receiver. Page 27 29-30 31 25 32 32 Video input/output jacks to be connected" below for the pages which describe how to connect each...
... image 24GB Before you begin, refer to "Component to be connected The image quality depends on your components. After hooking up your components to this receiver. Page 27 29-30 31 25 32 32 Video input/output jacks to be connected" below for the pages which describe how to connect each...

Operating Instructions
Page 25
... HDMI signals. continued 25GB Audio/video signals A A A A HDMI cable (not supplied) We recommend that you use a Sony HDMI cable. Audio signals are not output from the speakers and the PRE OUT jacks on this receiver. Getting Started Connecting components with HDMI jacks HDMI is converted. It is an interface which transmits video...
... HDMI signals. continued 25GB Audio/video signals A A A A HDMI cable (not supplied) We recommend that you use a Sony HDMI cable. Audio signals are not output from the speakers and the PRE OUT jacks on this receiver. Getting Started Connecting components with HDMI jacks HDMI is converted. It is an interface which transmits video...


