Limited Warranty (ES Products)
Page 1
...02 General Stereo/Hifi Components/Tape Decks ® CD Players/Mini Disc Players/Audio Systems LIMITED WARRANTY Hifi Audio ES Products Sony Electronics Inc. ("Sony") warrants ...sale or receipted invoice which vary from the date of purchase, if this Product (including any authorized Sony service facility. PARTS: In addition, Sony will repair or replace the Product, at its original packaging or packaging affording an equal degree of the Product, including the antenna. This warranty does not cover customer instruction, installation, set up adjustments or signal reception problems...
...02 General Stereo/Hifi Components/Tape Decks ® CD Players/Mini Disc Players/Audio Systems LIMITED WARRANTY Hifi Audio ES Products Sony Electronics Inc. ("Sony") warrants ...sale or receipted invoice which vary from the date of purchase, if this Product (including any authorized Sony service facility. PARTS: In addition, Sony will repair or replace the Product, at its original packaging or packaging affording an equal degree of the Product, including the antenna. This warranty does not cover customer instruction, installation, set up adjustments or signal reception problems...
Operating Instructions
Page 4
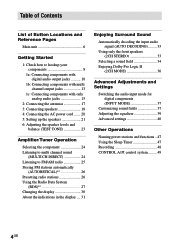
... with digital audio output jacks .......... 10 1b: Connecting components with multi channel output jacks 13 1c: Connecting components with only analog audio jacks 15 2: Connecting the antennas 17 3: Connecting speakers 18 4: Connecting the AC power cord ....... 20 5: Setting up the speakers 21 6: Adjusting the speaker levels and balance (TEST TONE 23 Amplifier/Tuner Operation Selecting the component 24 Listening to multi channel sound (MULTI CH DIRECT 24 Listening to FM/AM radio 25 Storing FM stations automatically (AUTOBETICAL)*1 26 Presetting radio stations 26 Using the Radio Data...
... with digital audio output jacks .......... 10 1b: Connecting components with multi channel output jacks 13 1c: Connecting components with only analog audio jacks 15 2: Connecting the antennas 17 3: Connecting speakers 18 4: Connecting the AC power cord ....... 20 5: Setting up the speakers 21 6: Adjusting the speaker levels and balance (TEST TONE 23 Amplifier/Tuner Operation Selecting the component 24 Listening to multi channel sound (MULTI CH DIRECT 24 Listening to FM/AM radio 25 Storing FM stations automatically (AUTOBETICAL)*1 26 Presetting radio stations 26 Using the Radio Data...

Operating Instructions
Page 6
...) EQ wj (39) EQUALIZER e; (39) FM/AM qf (25, 26) FM MODE es (25) FUNCTION 6 (24-27, 37, 47) INPUT MODE 9 (37) IR receptor 2 Jog dial wf (21, 37-40, 47) LEVEL wd (38) M - V MASTER VOLUME 5 (23, 24) MEMORY w; (26, 27) MODE +/- 0 (35, 38) MULTI CH DIRECT 8 (24) NORMAL SURR (;PLII) qh (36) PHONES jack qj PRESET TUNING +/- wa (25) (Except for models of button/part Reference page Main...
...) EQ wj (39) EQUALIZER e; (39) FM/AM qf (25, 26) FM MODE es (25) FUNCTION 6 (24-27, 37, 47) INPUT MODE 9 (37) IR receptor 2 Jog dial wf (21, 37-40, 47) LEVEL wd (38) M - V MASTER VOLUME 5 (23, 24) MEMORY w; (26, 27) MODE +/- 0 (35, 38) MULTI CH DIRECT 8 (24) NORMAL SURR (;PLII) qh (36) PHONES jack qj PRESET TUNING +/- wa (25) (Except for models of button/part Reference page Main...

Operating Instructions
Page 11
..., etc., connect both the audio and video output jacks to S-video or standard video signals (or vice versa). continued 11GB If you to the TV/SAT VIDEO IN jack on the receiver. TV monitor Satellite tuner INPUT S VIDEO INPUT VIDEO DC INPUT COMPONENT R-Y B-Y Y H OUTPUT OUTPUT S VIDEO VIDEO OUTPUT COMPONENT R-Y B-Y Y DC H DIGITAL ANTENNA Y DVD/LD OPTICAL IN TV/SAT OPTICAL IN MD/TAPE OPTICAL IN MD/TAPE OPTICAL OUT ASSIGNABLE COAXIAL IN ( ) DVD/LD CD/SACD AM U FM 75Ω COAXIAL S-VIDEO OUT VIDEO S-VIDEO IN VIDEO S-VIDEO IN VIDEO OUT VIDEO CONTROL AUDIO MONITOR A1...
..., etc., connect both the audio and video output jacks to S-video or standard video signals (or vice versa). continued 11GB If you to the TV/SAT VIDEO IN jack on the receiver. TV monitor Satellite tuner INPUT S VIDEO INPUT VIDEO DC INPUT COMPONENT R-Y B-Y Y H OUTPUT OUTPUT S VIDEO VIDEO OUTPUT COMPONENT R-Y B-Y Y DC H DIGITAL ANTENNA Y DVD/LD OPTICAL IN TV/SAT OPTICAL IN MD/TAPE OPTICAL IN MD/TAPE OPTICAL OUT ASSIGNABLE COAXIAL IN ( ) DVD/LD CD/SACD AM U FM 75Ω COAXIAL S-VIDEO OUT VIDEO S-VIDEO IN VIDEO S-VIDEO IN VIDEO OUT VIDEO CONTROL AUDIO MONITOR A1...

Operating Instructions
Page 14
... AM U FM 75Ω COAXIAL S-VIDEO OUT VIDEO S-VIDEO IN VIDEO S-VIDEO IN VIDEO OUT VIDEO IN VIDEO S-VIDEO S-VIDEO OUT IN VIDEO VIDEO PB/CB /B-Y CONTROL AUDIO MONITOR A1 IN L AUDIO IN AUDIO OUT AUDIO IN AUDIO OUT AUDIO IN PR/CR /R-Y MONITOR TV/SAT DVD/LD OUT IN IN COMPONENT VIDEO L R TV/SAT DVD/LD VIDEO 2 R VIDEO 1 SURROUND L FRONT SURROUND CENTER IN U L SIGNAL GND IN OUT IN R SUB MULTI CH IN WOOFER PHONO CD/SACD MD/TAPE + R - 1b: Connecting components with multi channel output jacks (continued) 2 Connect the video jacks. (Except for models of your...
... AM U FM 75Ω COAXIAL S-VIDEO OUT VIDEO S-VIDEO IN VIDEO S-VIDEO IN VIDEO OUT VIDEO IN VIDEO S-VIDEO S-VIDEO OUT IN VIDEO VIDEO PB/CB /B-Y CONTROL AUDIO MONITOR A1 IN L AUDIO IN AUDIO OUT AUDIO IN AUDIO OUT AUDIO IN PR/CR /R-Y MONITOR TV/SAT DVD/LD OUT IN IN COMPONENT VIDEO L R TV/SAT DVD/LD VIDEO 2 R VIDEO 1 SURROUND L FRONT SURROUND CENTER IN U L SIGNAL GND IN OUT IN R SUB MULTI CH IN WOOFER PHONO CD/SACD MD/TAPE + R - 1b: Connecting components with multi channel output jacks (continued) 2 Connect the video jacks. (Except for models of your...
Operating Instructions
Page 20
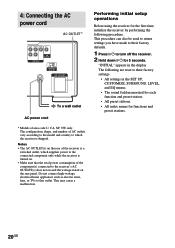
... a malfunction. Performing initial setup operations Before using the receiver for the first time, initialize the receiver by performing the following are reset to their factory defaults. 1 Press ?/1 to this outlet. The following procedure. 4: Connecting the AC power cord AC OUTLET* FRONT SURROUND CENTER OUT L R PRE OUT SUB WOOFER 4 Ω 8 Ω IMPEDANCE SELECTOR AC OUTLET b To a wall outlet AC power cord * Models of the receiver is a switched outlet, which the receiver is turned on. • Make...
... a malfunction. Performing initial setup operations Before using the receiver for the first time, initialize the receiver by performing the following are reset to their factory defaults. 1 Press ?/1 to this outlet. The following procedure. 4: Connecting the AC power cord AC OUTLET* FRONT SURROUND CENTER OUT L R PRE OUT SUB WOOFER 4 Ω 8 Ω IMPEDANCE SELECTOR AC OUTLET b To a wall outlet AC power cord * Models of the receiver is a switched outlet, which the receiver is turned on. • Make...

Operating Instructions
Page 24
... Surround effects are not activated when using this function. If your TV is also connected to the TV (such as VCR or DVD player), turn off the speaker system Press SPEAKERS ON/OFF on the TV. 3 Rotate MASTER VOLUME to select the multi channel audio source. Press MULTI CH DIRECT to adjust the volume. The selected function appears in tuner MD/TAPE CD/SACD TUNER Turntable PHONO 2 Turn on the remote. To mute the sound Press MUTING on the component...
... Surround effects are not activated when using this function. If your TV is also connected to the TV (such as VCR or DVD player), turn off the speaker system Press SPEAKERS ON/OFF on the TV. 3 Rotate MASTER VOLUME to select the multi channel audio source. Press MULTI CH DIRECT to adjust the volume. The selected function appears in tuner MD/TAPE CD/SACD TUNER Turntable PHONO 2 Turn on the remote. To mute the sound Press MUTING on the component...
Operating Instructions
Page 26
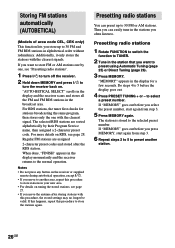
... the receiver or supplied remote during autobetical operation, except ?/1. • If you move the antenna after the RDS station. Presetting radio stations You can easily tune in alphabetical order without redundancy. Regular FM stations are sorted alphabetically by one, see page 28. If this happens, repeat this procedure to store stations in the display momentarily and the receiver returns to preset using Automatic Tuning (page 25) or Direct Tuning...
... the receiver or supplied remote during autobetical operation, except ?/1. • If you move the antenna after the RDS station. Presetting radio stations You can easily tune in alphabetical order without redundancy. Regular FM stations are sorted alphabetically by one, see page 28. If this happens, repeat this procedure to store stations in the display momentarily and the receiver returns to preset using Automatic Tuning (page 25) or Direct Tuning...

Operating Instructions
Page 31
... downmixed and output from the front 2 channels. 8 Tuner indicators: Light up when the source signal is set to adjust the dynamic range compression. Multi channel surround sound is decoding signals recorded in the Dolby Digital format. 5 PRO LOGIC: Lights up , the receiver creates a sub woofer signal based on the low frequency components of the MULTI CH IN sub woofer channel. continued 31GB However, this indicator lights up when the receiver applies Pro Logic processing to 2 channel signals in order to tune in radio stations, etc. Amplifier/Tuner Operation About the...
... downmixed and output from the front 2 channels. 8 Tuner indicators: Light up when the source signal is set to adjust the dynamic range compression. Multi channel surround sound is decoding signals recorded in the Dolby Digital format. 5 PRO LOGIC: Lights up , the receiver creates a sub woofer signal based on the low frequency components of the MULTI CH IN sub woofer channel. continued 31GB However, this indicator lights up when the receiver applies Pro Logic processing to 2 channel signals in order to tune in radio stations, etc. Amplifier/Tuner Operation About the...

Operating Instructions
Page 33
If you connect an active sub woofer When the audio signal is 2 channel stereo or if the source signal does not include a LFE signal, the receiver generates a low frequency signal for output to 2 channel. Standard 2 channel stereo sources completely bypass the sound field processing and multi channel surround formats are downmixed to the sub woofer. There is output from the sub woofer in the 2CH STEREO mode. Note No sound is no sound from the front L/R speakers only. This mode presents the sound as it was recorded...
If you connect an active sub woofer When the audio signal is 2 channel stereo or if the source signal does not include a LFE signal, the receiver generates a low frequency signal for output to 2 channel. Standard 2 channel stereo sources completely bypass the sound field processing and multi channel surround formats are downmixed to the sub woofer. There is output from the sub woofer in the 2CH STEREO mode. Note No sound is no sound from the front L/R speakers only. This mode presents the sound as it was recorded...

Operating Instructions
Page 37
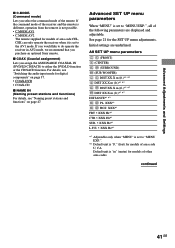
.... 4 While monitoring the sound, turn the jog dial to adjust the selected parameter. 5 Repeat steps 3 and 4 to the AUDIO IN (L/R) jacks. SURROUND menu parameters x EFFECT X (Effect level) Initial setting: 10 Higher settings apply more surround effect. Advanced Adjustments and Settings Advanced Adjustments and Settings Switching the audio input mode for digital components (INPUT MODE) You can adjust in each sound field. 1 Start playing a source encoded with : DVD/LD, TV/SAT, MD/TAPE, VIDEO 3, CD/SACD*. (The INPUT MODE indicator lights up) * When the ASSIGNABLE COAXIAL IN (DVD/ LD...
.... 4 While monitoring the sound, turn the jog dial to adjust the selected parameter. 5 Repeat steps 3 and 4 to the AUDIO IN (L/R) jacks. SURROUND menu parameters x EFFECT X (Effect level) Initial setting: 10 Higher settings apply more surround effect. Advanced Adjustments and Settings Advanced Adjustments and Settings Switching the audio input mode for digital components (INPUT MODE) You can adjust in each sound field. 1 Start playing a source encoded with : DVD/LD, TV/SAT, MD/TAPE, VIDEO 3, CD/SACD*. (The INPUT MODE indicator lights up) * When the ASSIGNABLE COAXIAL IN (DVD/ LD...

Operating Instructions
Page 38
... monitoring the sound, turn off the power. 2 While holding down MODE +, press ?/1. The sub woofer level from the sub woofer if the digital input signal contains LFE (Low Frequency Effect) signals. - x CTR XXX.X dB (Center speaker level) x SUR.L. XXX dB ( MULTI CH IN ) (Multi channel sub woofer level) Initial setting: +10 dB Lets you adjust the balance between front left and right speakers. For details on "MENU", see page 40. appears in the SET UP menu is 10 dB lower than Super Audio CD players...
... monitoring the sound, turn off the power. 2 While holding down MODE +, press ?/1. The sub woofer level from the sub woofer if the digital input signal contains LFE (Low Frequency Effect) signals. - x CTR XXX.X dB (Center speaker level) x SUR.L. XXX dB ( MULTI CH IN ) (Multi channel sub woofer level) Initial setting: +10 dB Lets you adjust the balance between front left and right speakers. For details on "MENU", see page 40. appears in the SET UP menu is 10 dB lower than Super Audio CD players...
Operating Instructions
Page 40
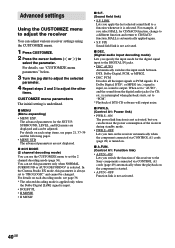
... always set the 2 channel decoding mode (page 36). x MENU (Menu expanding) • MENU EXP. AUTO Automatically switches the input mode between DTS, Dolby Digital, PCM, or MPEG2. • DEC. If a Dolby Digital, DTS*, or MPEG (etc.) signal is input, no sound is not activated. For details on . FIX Sound field link is output. In the Cinema Studio EX mode, this receiver to the Sony components connected via CONTROL A1 cords (page 49) is underlined. x 2CH MODE (2 channel decoding mode) You can adjust various receiver settings using the CUSTOMIZE menu...
... always set the 2 channel decoding mode (page 36). x MENU (Menu expanding) • MENU EXP. AUTO Automatically switches the input mode between DTS, Dolby Digital, PCM, or MPEG2. • DEC. If a Dolby Digital, DTS*, or MPEG (etc.) signal is input, no sound is not activated. For details on . FIX Sound field link is output. In the Cinema Studio EX mode, this receiver to the Sony components connected via CONTROL A1 cords (page 49) is underlined. x 2CH MODE (2 channel decoding mode) You can adjust various receiver settings using the CUSTOMIZE menu...
Operating Instructions
Page 41
... remote. Initial settings are displayed and adjustable. Default unit is not possible. • C.MODE.AV1 • C.MODE.AV2 The remote supplied for models of other area codes. If you purchase an optional Sony remote. See page 21 for digital components" on page 37. • COAX-DVD • COAX-CD x NAME IN (Naming preset stations and functions) For details, see "Naming preset stations and functions" on page 47. x COAX (Coaxial assignment) Lets you assign the ASSIGNABLE COAXIAL...
... remote. Initial settings are displayed and adjustable. Default unit is not possible. • C.MODE.AV1 • C.MODE.AV2 The remote supplied for models of other area codes. If you purchase an optional Sony remote. See page 21 for digital components" on page 37. • COAX-DVD • COAX-CD x NAME IN (Naming preset stations and functions) For details, see "Naming preset stations and functions" on page 47. x COAX (Coaxial assignment) Lets you assign the ASSIGNABLE COAXIAL...

Operating Instructions
Page 51
... not play button on one of the connected components. When using a monaural mini-plug cord in order to take advantage of the automatic function selection feature. • This function only works when the components are connected to the amplifier (or receiver) inputs according to switch the names of the function buttons. Notes • You must connect a CONTROL A1 compatible amplifier (receiver) using a commercially available cord, use the connecting cord for your connection. continued Other Operations 51GB About the connecting cord Some CONTROL A1 compatible components...
... not play button on one of the connected components. When using a monaural mini-plug cord in order to take advantage of the automatic function selection feature. • This function only works when the components are connected to the amplifier (or receiver) inputs according to switch the names of the function buttons. Notes • You must connect a CONTROL A1 compatible amplifier (receiver) using a commercially available cord, use the connecting cord for your connection. continued Other Operations 51GB About the connecting cord Some CONTROL A1 compatible components...

Operating Instructions
Page 54
...other Sony audio/video (Press AV tuner/ components. ?/1 and CD player/ ?/1 at VCD player/ the same LD player/ time) DVD player/ MD deck/ DAT deck/ TAPE deck 0-9 Receiver Use with "SHIFT" button to the tape deck. ***Analog direct is a 2-key operation. TV/VCR/ Selects channel numbers. To select the above function, press FN SHIFT (function shift) and the function key you want simultaneously. Adjusts the master volume of the five cursor modes: EQ, SURROUND, LEVEL, SET UP and CUSTOMIZE. To listen to output test tone. Selects sound field mode. Remote Operations...
...other Sony audio/video (Press AV tuner/ components. ?/1 and CD player/ ?/1 at VCD player/ the same LD player/ time) DVD player/ MD deck/ DAT deck/ TAPE deck 0-9 Receiver Use with "SHIFT" button to the tape deck. ***Analog direct is a 2-key operation. TV/VCR/ Selects channel numbers. To select the above function, press FN SHIFT (function shift) and the function key you want simultaneously. Adjusts the master volume of the five cursor modes: EQ, SURROUND, LEVEL, SET UP and CUSTOMIZE. To listen to output test tone. Selects sound field mode. Remote Operations...

Operating Instructions
Page 56
... the function buttons (VIDEO 1, VIDEO 2, VIDEO 3, DVD/LD), the input mode of the TV might not switch to control the tape deck. Now you can use the CD/SACD button to the corresponding input mode that the settings of the receiver. • The above explanation is intended to select the functions: To operate CD player DAT deck MD deck Tape deck A Tape deck B LD player VCR (command mode VTR 1*) VCR (command mode VTR 2*) VCR (command mode VTR 3*) TV DSS (Digital Satellite Receiver) DVD VCD player Press...
... the function buttons (VIDEO 1, VIDEO 2, VIDEO 3, DVD/LD), the input mode of the TV might not switch to control the tape deck. Now you can use the CD/SACD button to the corresponding input mode that the settings of the receiver. • The above explanation is intended to select the functions: To operate CD player DAT deck MD deck Tape deck A Tape deck B LD player VCR (command mode VTR 1*) VCR (command mode VTR 2*) VCR (command mode VTR 3*) TV DSS (Digital Satellite Receiver) DVD VCD player Press...
Operating Instructions
Page 57
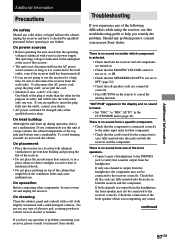
... by qualified personnel before operating it is heard. • Set "DEC." On power sources • Before operating the unit, check that all the cords are fully inserted into the jacks on both channels are output from a specific component. • Check that might block the ventilation holes and cause malfunctions. There is no sound is connected to the wall outlet, even if the receiver itself ;
... by qualified personnel before operating it is heard. • Set "DEC." On power sources • Before operating the unit, check that all the cords are fully inserted into the jacks on both channels are output from a specific component. • Check that might block the ventilation holes and cause malfunctions. There is no sound is connected to the wall outlet, even if the receiver itself ;

Operating Instructions
Page 58
...; Adjust balance parameters in Dolby Digital or DTS format. • When connecting the DVD player, etc. Wipe them with a cloth slightly moistened with alcohol. to the digital input jacks of this receiver, check the audio setting (settings for the signals with a sampling frequency of the connected component. Recording cannot be obtained. • Make sure the sound field function is on the power again. Turn off the receiver, eliminate the short-circuit problem and turn on (press MODE...
...; Adjust balance parameters in Dolby Digital or DTS format. • When connecting the DVD player, etc. Wipe them with a cloth slightly moistened with alcohol. to the digital input jacks of this receiver, check the audio setting (settings for the signals with a sampling frequency of the connected component. Recording cannot be obtained. • Make sure the sound field function is on the power again. Turn off the receiver, eliminate the short-circuit problem and turn on (press MODE...
Operating Instructions
Page 59
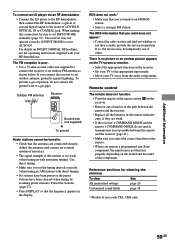
... TV screen or monitor. • Select the appropriate function on DOLBY DIGITAL RF hookups, see the operating instructions supplied with automatic tuning). Adjust the antennas and connect an external antenna if necessary. • The signal strength of order. RDS does not work.* • Make sure that the antennas are weak. • If the receiver's COMMAND MODE and the remote's COMMAND MODE do not connect the ground wire to the receiver's DVD/LD OPTICAL IN or COAXIAL jack. There...
... TV screen or monitor. • Select the appropriate function on DOLBY DIGITAL RF hookups, see the operating instructions supplied with automatic tuning). Adjust the antennas and connect an external antenna if necessary. • The signal strength of order. RDS does not work.* • Make sure that the antennas are weak. • If the receiver's COMMAND MODE and the remote's COMMAND MODE do not connect the ground wire to the receiver's DVD/LD OPTICAL IN or COAXIAL jack. There...


