Insert: TV screen going blank
Page 1
... PROGRESSIVE button only if you have connected a progressive format TV to the DVD-VCR's COMPONENT VIDEO OUT jacks using a component video cord. (The connection using COMPONENT VIDEO OUT jack is only for SLV-D201P). © 2003 Sony Corporation Printed in China 3-086-788-02(1) You can enjoy high resolution ...the images on your TV screen to turn off the PROGRESSIVE indicator. SLV-D500P/SLV-D300P/SLV-D201P If your TV has component video input jacks" (page 58 for SLV-D500P/page 47 for SLV-D300P /page 45 for the DVD player.) In any other case, pressing the PROGRESSIVE button on the front ...
... PROGRESSIVE button only if you have connected a progressive format TV to the DVD-VCR's COMPONENT VIDEO OUT jacks using a component video cord. (The connection using COMPONENT VIDEO OUT jack is only for SLV-D201P). © 2003 Sony Corporation Printed in China 3-086-788-02(1) You can enjoy high resolution ...the images on your TV screen to turn off the PROGRESSIVE indicator. SLV-D500P/SLV-D300P/SLV-D201P If your TV has component video input jacks" (page 58 for SLV-D500P/page 47 for SLV-D300P /page 45 for the DVD player.) In any other case, pressing the PROGRESSIVE button on the front ...
Dimensions Diagram
Page 1
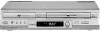
... are approximate. SONY WILL NOT BE RESPONSIBLE FOR INACCURACIES IN THE DESIGN OR MANUFACTURE OF ENCLOSURES . SLV-D300/500 DESCRIPTION: DVD/Player POWER DIMENSIONS VHS Player/Recorder REQUIREMENTS:120V AC... (WHD): 17 " x 4 " x 13" POWER 60Hz WEIGHT: Approx 14 lbs CONSUMPTION:40 watts RMT-V50A REMOTE COMMANDER approx FRONT VIEW 17 " DVD M T VID E O Hi-Fi Stereo R LINE IN 3 5/8" SIDE VIEW 11 1/2" DVD & VCR LINE OUT LINE IN IN L AUDIO RF R OUT VIDEO BACK VIEW DVD...
... are approximate. SONY WILL NOT BE RESPONSIBLE FOR INACCURACIES IN THE DESIGN OR MANUFACTURE OF ENCLOSURES . SLV-D300/500 DESCRIPTION: DVD/Player POWER DIMENSIONS VHS Player/Recorder REQUIREMENTS:120V AC... (WHD): 17 " x 4 " x 13" POWER 60Hz WEIGHT: Approx 14 lbs CONSUMPTION:40 watts RMT-V50A REMOTE COMMANDER approx FRONT VIEW 17 " DVD M T VID E O Hi-Fi Stereo R LINE IN 3 5/8" SIDE VIEW 11 1/2" DVD & VCR LINE OUT LINE IN IN L AUDIO RF R OUT VIDEO BACK VIEW DVD...
Note on making connections
Page 1
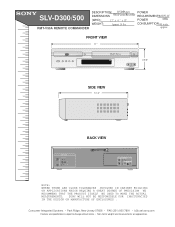
... S-VIDEO OUT Sony Corporation © 2003 Printed in China 3-084-421-11(1) CORRECT TV rear panel DVD-VCR rear panel INPUT 1 INPUT 2 to S-VIDEO OUT Stereo audio cord (not supplied) Audio/video cord (supplied) S-VIDEO cord (not supplied) INCORRECT TV rear panel DVD-VCR rear panel INPUT 1 INPUT 2 Audio/video cord (supplied) S-VIDEO cord (not supplied) to the same TV input. SLV-D500P/SLV...
... S-VIDEO OUT Sony Corporation © 2003 Printed in China 3-084-421-11(1) CORRECT TV rear panel DVD-VCR rear panel INPUT 1 INPUT 2 to S-VIDEO OUT Stereo audio cord (not supplied) Audio/video cord (supplied) S-VIDEO cord (not supplied) INCORRECT TV rear panel DVD-VCR rear panel INPUT 1 INPUT 2 Audio/video cord (supplied) S-VIDEO cord (not supplied) to the same TV input. SLV-D500P/SLV...
Operating Instructions
Page 1
... : Customer Information Service 115 Gordon Baker Road, Toronto, Ontario, M2H 3R6 SLV-D500P © 2003 Sony Corporation Myers, FL 33913 For Customers in the USA If you have any questions about your Sony DVD-VCR, you may call 1-877-602-2008 for Peace of Mind Warranty Replacement service... Information Service Center at 1-877-899-7669 or write to : Sony Customer Information Services Company 12451 Gateway Boulevard Ft. Or write to us at 1-800-222-SONY (7669). 3-083-946-11 (1) US DVD Player/ Video Cassette Recorder Operating Instructions For customers in Canada If this product is not working...
... : Customer Information Service 115 Gordon Baker Road, Toronto, Ontario, M2H 3R6 SLV-D500P © 2003 Sony Corporation Myers, FL 33913 For Customers in the USA If you have any questions about your Sony DVD-VCR, you may call 1-877-602-2008 for Peace of Mind Warranty Replacement service... Information Service Center at 1-877-899-7669 or write to : Sony Customer Information Services Company 12451 Gateway Boulevard Ft. Or write to us at 1-800-222-SONY (7669). 3-083-946-11 (1) US DVD Player/ Video Cassette Recorder Operating Instructions For customers in Canada If this product is not working...
Operating Instructions
Page 8
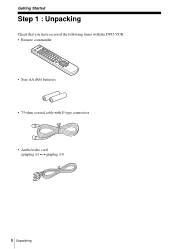
Getting Started Step 1 : Unpacking Check that you have received the following items with the DVD-VCR: • Remote commander • Size AA (R6) batteries • 75-ohm coaxial cable with F-type connectors • Audio/video cord (pinplug ×3 y pinplug ×3) 8 Unpacking
Getting Started Step 1 : Unpacking Check that you have received the following items with the DVD-VCR: • Remote commander • Size AA (R6) batteries • 75-ohm coaxial cable with F-type connectors • Audio/video cord (pinplug ×3 y pinplug ×3) 8 Unpacking

Operating Instructions
Page 9
...Do not expose the remote sensor to the diagram inside the battery compartment. SELECT DVD To operate the DVD player the VCR your TV Set TV / DVD·VIDEO to operate this TV / DVD·VIDEO remote commander will not SELECT VIDEO operate the TV. Getting Started Step 2 : Setting up the remote commander ...not use this remote commander to DVD·VIDEO, then press SELECT DVD and point at the remote sensor at the DVD-VCR DVD·VIDEO, then press SELECT VIDEO and point at the remote sensor at the DVD-VCR TV and point at the remote sensor at your Sony TV. Buttons on the batteries...
...Do not expose the remote sensor to the diagram inside the battery compartment. SELECT DVD To operate the DVD player the VCR your TV Set TV / DVD·VIDEO to operate this TV / DVD·VIDEO remote commander will not SELECT VIDEO operate the TV. Getting Started Step 2 : Setting up the remote commander ...not use this remote commander to DVD·VIDEO, then press SELECT DVD and point at the remote sensor at the DVD-VCR DVD·VIDEO, then press SELECT VIDEO and point at the remote sensor at the DVD-VCR TV and point at the remote sensor at your Sony TV. Buttons on the batteries...
Operating Instructions
Page 10
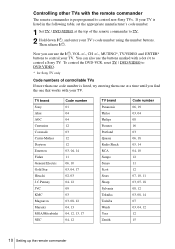
... following table, set the appropriate manufacturer's code number. 1 Set TV / DVD·VIDEO at a time until you can also use the ?/1, VOL +/-, CH +/-, MUTING*, TV/VIDEO and ENTER* buttons to control your TV. To control the DVD-VCR, reset TV / DVD·VIDEO to DVD·VIDEO. * for Sony TV only Code numbers of the remote commander to TV. 2 Hold...
... following table, set the appropriate manufacturer's code number. 1 Set TV / DVD·VIDEO at a time until you can also use the ?/1, VOL +/-, CH +/-, MUTING*, TV/VIDEO and ENTER* buttons to control your TV. To control the DVD-VCR, reset TV / DVD·VIDEO to DVD·VIDEO. * for Sony TV only Code numbers of the remote commander to TV. 2 Hold...
Operating Instructions
Page 11
Set the appropriate code number every time you replace the batteries of the remote commander, the code number may change. Setting up the remote commander 11 Getting Started Notes • If you enter a new code number, the code number previously entered will be erased. • If the TV uses a different remote control system from the one programed to work with the DVD-VCR, you cannot control your TV with the remote commander. • When you replace the batteries.
Set the appropriate code number every time you replace the batteries of the remote commander, the code number may change. Setting up the remote commander 11 Getting Started Notes • If you enter a new code number, the code number previously entered will be erased. • If the TV uses a different remote control system from the one programed to work with the DVD-VCR, you cannot control your TV with the remote commander. • When you replace the batteries.
Operating Instructions
Page 12
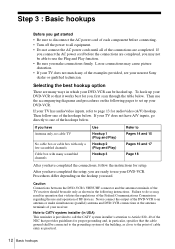
... the grounding system of the building, as close to the point of the examples provided, see your DVD-VCR so that it works best for audio/video (A/V) hookup. Then use and operation of your DVD-VCR. If your DVD-VCR. To hook up your TV does not have A/V inputs, go directly to one of the hookups...operation that the cable ground shall be able to use your receiver. Loose connections may result in the following pages to set up your nearest Sony dealer or qualified technician. If you have Antenna only, no cable TV No cable box or cable box with only a few scrambled channels Cable...
... the grounding system of the building, as close to the point of the examples provided, see your DVD-VCR so that it works best for audio/video (A/V) hookup. Then use and operation of your DVD-VCR. If your DVD-VCR. To hook up your TV does not have A/V inputs, go directly to one of the hookups...operation that the cable ground shall be able to use your receiver. Loose connections may result in the following pages to set up your nearest Sony dealer or qualified technician. If you have Antenna only, no cable TV No cable box or cable box with only a few scrambled channels Cable...

Operating Instructions
Page 13
... methods that will get better picture and sound if you hook up your DVD-VCR to record programs, you only need to make the connections shown on this hookup if your TV does not have stereo jacks DVD-VCR Stereo receiver TV Video cord (not supplied) Audio cord (not supplied) Notes • To play a tape/disc...
... methods that will get better picture and sound if you hook up your DVD-VCR to record programs, you only need to make the connections shown on this hookup if your TV does not have stereo jacks DVD-VCR Stereo receiver TV Video cord (not supplied) Audio cord (not supplied) Notes • To play a tape/disc...

Operating Instructions
Page 14
... UHF connection is a flat cable (300-ohm twin lead cable), attach an external antenna connector (not supplied) so you can connect the cable to the DVD-VCR directly If your or VHF TV: A, B, or C. If you have cable TV). C UHF If you cannot connect your antenna cable to the RF IN ... you are using: • VHF/UHF antenna (you get channels 2-13 and channels 14 and higher) • UHF-only antenna (you get channels 2-13 only) DVD-VCR Rear of TV VHF/UHF A Match the type of connector on your or TV: A, B, or C. Hookup 1 (Plug and Play) Antenna hookup Make the following ...
... UHF connection is a flat cable (300-ohm twin lead cable), attach an external antenna connector (not supplied) so you can connect the cable to the DVD-VCR directly If your or VHF TV: A, B, or C. If you have cable TV). C UHF If you cannot connect your antenna cable to the RF IN ... you are using: • VHF/UHF antenna (you get channels 2-13 and channels 14 and higher) • UHF-only antenna (you get channels 2-13 only) DVD-VCR Rear of TV VHF/UHF A Match the type of connector on your or TV: A, B, or C. Hookup 1 (Plug and Play) Antenna hookup Make the following ...

Operating Instructions
Page 15
... may be performed by some TV channels. To change the on-screen display language to AC outlet The DVD-VCR starts presetting the clock and channels. Notes • If you purchase the DVD-VCR. • Auto preset can be incorrectly set using a time signal provided by pressing x STOP on page...continued Basic hookups 15 AC power cord When Auto preset is incorrect, or "--:--" appears in the display window. You have now completed DVD-VCR setup. To add or disable channels manually, see "Step 6 : Presetting channels" on page 24. • Do not press any buttons on the...
... may be performed by some TV channels. To change the on-screen display language to AC outlet The DVD-VCR starts presetting the clock and channels. Notes • If you purchase the DVD-VCR. • Auto preset can be incorrectly set using a time signal provided by pressing x STOP on page...continued Basic hookups 15 AC power cord When Auto preset is incorrect, or "--:--" appears in the display window. You have now completed DVD-VCR setup. To add or disable channels manually, see "Step 6 : Presetting channels" on page 24. • Do not press any buttons on the...

Operating Instructions
Page 16
Also use Use this hookup • Record any unscrambled channel by selecting the channel on your TV: A, VHF B, or C. B For connector or UHF types B and C, no cable box, or a cable box with .... UHF 16 Basic hookups Cable box Rear of TV VHF/UHF A Match the type of connector or on the VCR What you cannot do • Record scrambled channels that require a cable box Wall DVD-VCR Connect this hookup if your TV if you do not have a cable box. Hookup 2 (Plug and Play) You have...
Also use Use this hookup • Record any unscrambled channel by selecting the channel on your TV: A, VHF B, or C. B For connector or UHF types B and C, no cable box, or a cable box with .... UHF 16 Basic hookups Cable box Rear of TV VHF/UHF A Match the type of connector or on the VCR What you cannot do • Record scrambled channels that require a cable box Wall DVD-VCR Connect this hookup if your TV if you do not have a cable box. Hookup 2 (Plug and Play) You have...
Operating Instructions
Page 17
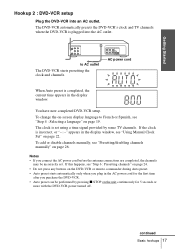
...see "Presetting/disabling channels manually" on -screen display language to AC outlet The DVD-VCR starts presetting the clock and channels. continued Basic hookups 17 Getting Started Hookup 2 : DVD-VCR setup Plug the DVD-VCR into the AC outlet. AC power cord When Auto preset is plugged into an... AC outlet. The DVD-VCR automatically presets the DVD-VCR's clock and TV channels when the DVD-VCR is completed, the current time appears in...
...see "Presetting/disabling channels manually" on -screen display language to AC outlet The DVD-VCR starts presetting the clock and channels. continued Basic hookups 17 Getting Started Hookup 2 : DVD-VCR setup Plug the DVD-VCR into the AC outlet. AC power cord When Auto preset is plugged into an... AC outlet. The DVD-VCR automatically presets the DVD-VCR's clock and TV channels when the DVD-VCR is completed, the current time appears in...

Operating Instructions
Page 18
Hookup 3 Connecting a cable box with the cable box turned off • Record one channel while watching another channel Wall Cable box Rear of TV VHF/UHF DVD-VCR A Match the type of or connector on your cable system scrambles all or most channels. After you have completed hookup...... C UHF After you have completed hookup, plug the DVD-VCR into an AC outlet and see "Step 4 : Selecting a language" on the cable box What you can do • Record with many scrambled channels Recommended use Use this hookup • Record any channel by selecting the channel on page 19. ...
Hookup 3 Connecting a cable box with the cable box turned off • Record one channel while watching another channel Wall Cable box Rear of TV VHF/UHF DVD-VCR A Match the type of or connector on your cable system scrambles all or most channels. After you have completed hookup...... C UHF After you have completed hookup, plug the DVD-VCR into an AC outlet and see "Step 4 : Selecting a language" on the cable box What you can do • Record with many scrambled channels Recommended use Use this hookup • Record any channel by selecting the channel on page 19. ...

Operating Instructions
Page 19
... Started Step 4 : Selecting a language You can change the on the DVD-VCR and your TV is connected to the DVD-VCR using A/V connections, set TV / DVD·VIDEO to DVD·VIDEO on the remote (page 9). • Set the "RF Output Channel" to video input. • If the DVD player is in play mode, you start... • Turn on -screen display...
... Started Step 4 : Selecting a language You can change the on the DVD-VCR and your TV is connected to the DVD-VCR using A/V connections, set TV / DVD·VIDEO to DVD·VIDEO on the remote (page 9). • Set the "RF Output Channel" to video input. • If the DVD player is in play mode, you start... • Turn on -screen display...
Operating Instructions
Page 20
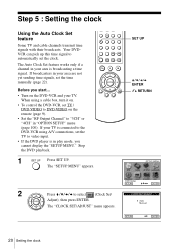
... your area are not yet sending time signals, set the time manually (page 22). SET UP V/v/B/b ENTER O RETURN 2 Press V/v/B/b to the DVD-VCR using A/V connections, set the clock. The Auto Clock Set feature works only if a channel in "OPTION SETUP" menu (page 100). The "...DVD-VCR, set TV / DVD·VIDEO to DVD·VIDEO on the DVD-VCR and your TV is connected to select (Clock Set/ Adjust), then press ENTER. If your TV. If broadcasters in play mode, you start... • Turn on the remote (page 9). • Set the "RF Output Channel" to video input. • If the DVD player...
... your area are not yet sending time signals, set the time manually (page 22). SET UP V/v/B/b ENTER O RETURN 2 Press V/v/B/b to the DVD-VCR using A/V connections, set the clock. The Auto Clock Set feature works only if a channel in "OPTION SETUP" menu (page 100). The "...DVD-VCR, set TV / DVD·VIDEO to DVD·VIDEO on the DVD-VCR and your TV is connected to select (Clock Set/ Adjust), then press ENTER. If your TV. If broadcasters in play mode, you start... • Turn on the remote (page 9). • Set the "RF Output Channel" to video input. • If the DVD player...

Operating Instructions
Page 21
...) y Pac. (Pacific) y Alas (Alaska) y Haw. (Hawaii) y Auto • For "Daylight saving" Select "Yes" or "No" (standard time), or "Auto" to have the DVD-VCR automatically set the daylight saving time. 5 Press O RETURN repeatedly to exit the menu. 6 To activate the Auto Clock Set function, turn off the... V/v to select "Auto", then press ENTER. 4 Press V/v to select the item you know of your area, or select "Auto" to have the DVD-VCR automatically set your local PBS station. • For "Time zone" Select the time zone of a channel that carries a time signal. Then press B/b ...
...) y Pac. (Pacific) y Alas (Alaska) y Haw. (Hawaii) y Auto • For "Daylight saving" Select "Yes" or "No" (standard time), or "Auto" to have the DVD-VCR automatically set the daylight saving time. 5 Press O RETURN repeatedly to exit the menu. 6 To activate the Auto Clock Set function, turn off the... V/v to select "Auto", then press ENTER. 4 Press V/v to select the item you know of your area, or select "Auto" to have the DVD-VCR automatically set your local PBS station. • For "Time zone" Select the time zone of a channel that carries a time signal. Then press B/b ...
Operating Instructions
Page 22
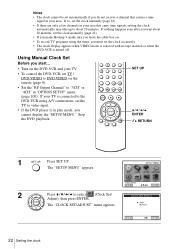
... even after you wait about 20 minutes. Stop the DVD playback. Using Manual Clock Set Before you start... • Turn on the DVD-VCR and your TV. • To control the DVD-VCR, set TV / DVD·VIDEO to DVD·VIDEO on . • To record TV programs using A/V connections, set the clock accurately....automatically if you do not receive a channel that carries a time signal in your TV is connected to the DVD-VCR using the timer, you must set the TV to video input. • If the DVD player is turned off. The "SETUP MENU" appears. 2 Press V/v/B/b to select (Clock Set/ Adjust), then...
... even after you wait about 20 minutes. Stop the DVD playback. Using Manual Clock Set Before you start... • Turn on the DVD-VCR and your TV. • To control the DVD-VCR, set TV / DVD·VIDEO to DVD·VIDEO on . • To record TV programs using A/V connections, set the clock accurately....automatically if you do not receive a channel that carries a time signal in your TV is connected to the DVD-VCR using the timer, you must set the TV to video input. • If the DVD player is turned off. The "SETUP MENU" appears. 2 Press V/v/B/b to select (Clock Set/ Adjust), then...

Operating Instructions
Page 23
Notes • To record TV programs using the timer, you must set automatically. 7 Press O RETURN to set the minutes. 6 Set the month, day, and year in the same way as the minutes. The day of the week is set the clock accurately. • The clock display appears when VIDEO mode is selected with no tape inserted or when the DVD-VCR is turned off. Setting the clock 23 Getting Started 3 Press V/v to select "Manual," then press ENTER. 4 Press V/v to set the hour. 5 Press b to select the minutes and press V/v to save the clock setting.
Notes • To record TV programs using the timer, you must set automatically. 7 Press O RETURN to set the minutes. 6 Set the month, day, and year in the same way as the minutes. The day of the week is set the clock accurately. • The clock display appears when VIDEO mode is selected with no tape inserted or when the DVD-VCR is turned off. Setting the clock 23 Getting Started 3 Press V/v to select "Manual," then press ENTER. 4 Press V/v to set the hour. 5 Press b to select the minutes and press V/v to save the clock setting.


