
Limited Warranty (U.S. Only)
Page 1
3-062-244-14 ® CD/DVD Player LIMITED WARRANTY (U.S. Only) Sony Electronics Inc. ("Sony") warrants this Limited Warranty, "refurbished" means a product or part that such data, software, or other materials will be lost or reformatted during service and Sony will , at its original packaging or packaging affording ...defective. It is still in the Product; Some states do so for any enclosed software Limited Warranty. In the event of the Sony product. This Limited Warranty covers only the hardware components packaged with a new or refurbished product. it will , at its original ...
3-062-244-14 ® CD/DVD Player LIMITED WARRANTY (U.S. Only) Sony Electronics Inc. ("Sony") warrants this Limited Warranty, "refurbished" means a product or part that such data, software, or other materials will be lost or reformatted during service and Sony will , at its original packaging or packaging affording ...defective. It is still in the Product; Some states do so for any enclosed software Limited Warranty. In the event of the Sony product. This Limited Warranty covers only the hardware components packaged with a new or refurbished product. it will , at its original ...

Instruction Manual
Page 1
3-093-964-11 (1) DVD Player/ Video Cassette Recorder Operating Instructions US Manual de instrucciones ES For customers in the USA If you have any questions about your Sony DVD-VCR, you may call Sony Customer Information Center at 1-800-VHS-SONY (847-7669). Or write to: Sony Customer Information Center 12451 Gateway Boulevard Ft. Myers, FL 33913 SLV-D380P © 2007 Sony Corporation For all other Sony product questions, please call Sony Customer Information Center at 1-800-222-SONY (7669).
3-093-964-11 (1) DVD Player/ Video Cassette Recorder Operating Instructions US Manual de instrucciones ES For customers in the USA If you have any questions about your Sony DVD-VCR, you may call Sony Customer Information Center at 1-800-VHS-SONY (847-7669). Or write to: Sony Customer Information Center 12451 Gateway Boulevard Ft. Myers, FL 33913 SLV-D380P © 2007 Sony Corporation For all other Sony product questions, please call Sony Customer Information Center at 1-800-222-SONY (7669).
Instruction Manual
Page 2
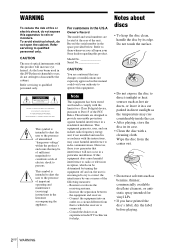
...voltage" within the product's enclosure that to which can radiate radio frequency energy and, if not installed and used in this DVD player is no guarantee that any changes or modifications not expressly approved in a residential installation. Record the serial number in its edge....reception, which the receiver is encouraged to try to provide reasonable protection against harmful interference in this manual could void your Sony dealer regarding this product will increase eye hazard. Refer servicing to qualified personnel only. Connect the equipment into an outlet ...
...voltage" within the product's enclosure that to which can radiate radio frequency energy and, if not installed and used in this DVD player is no guarantee that any changes or modifications not expressly approved in a residential installation. Record the serial number in its edge....reception, which the receiver is encouraged to try to provide reasonable protection against harmful interference in this manual could void your Sony dealer regarding this product will increase eye hazard. Refer servicing to qualified personnel only. Connect the equipment into an outlet ...
Instruction Manual
Page 5
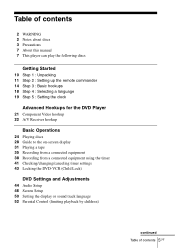
... up the remote commander 14 Step 3 : Basic hookups 18 Step 4 : Selecting a language 19 Step 5 : Setting the clock Advanced Hookups for the DVD Player 21 Component Video hookup 22 A/V Receiver hookup Basic Operations 24 Playing discs 28 Guide to the on-screen display 31 Playing a tape 35 Recording from... a connected equipment 38 Recording from a connected equipment using the timer 41 Checking/changing/canceling timer settings 43 Locking the DVD-VCR (Child Lock) DVD Settings and Adjustments 44 Audio Setup 46 Screen Setup 50 Setting the display or sound track language 52 Parental Control (limiting...
... up the remote commander 14 Step 3 : Basic hookups 18 Step 4 : Selecting a language 19 Step 5 : Setting the clock Advanced Hookups for the DVD Player 21 Component Video hookup 22 A/V Receiver hookup Basic Operations 24 Playing discs 28 Guide to the on-screen display 31 Playing a tape 35 Recording from... a connected equipment 38 Recording from a connected equipment using the timer 41 Checking/changing/canceling timer settings 43 Locking the DVD-VCR (Child Lock) DVD Settings and Adjustments 44 Audio Setup 46 Screen Setup 50 Setting the display or sound track language 52 Parental Control (limiting...
Instruction Manual
Page 11
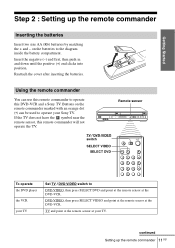
...SELECT VIDEO and point at the remote sensor at the DVD-VCR. Getting Started Step 2 : Setting up the remote commander 11US Remote sensor TV / DVD·VIDEO switch SELECT VIDEO SELECT DVD To operate the DVD player the VCR your TV Set TV / DVD·VIDEO switch to operate your TV. Insert the negative...at the remote sensor at your Sony TV. continued Setting up the remote commander Inserting the batteries Insert two size AA (R6) batteries by matching the + and - If the TV does not have the symbol near the remote sensor, this DVD-VCR and a Sony TV. Reattach the cover after ...
...SELECT VIDEO and point at the remote sensor at the DVD-VCR. Getting Started Step 2 : Setting up the remote commander 11US Remote sensor TV / DVD·VIDEO switch SELECT VIDEO SELECT DVD To operate the DVD player the VCR your TV Set TV / DVD·VIDEO switch to operate your TV. Insert the negative...at the remote sensor at your Sony TV. continued Setting up the remote commander Inserting the batteries Insert two size AA (R6) batteries by matching the + and - If the TV does not have the symbol near the remote sensor, this DVD-VCR and a Sony TV. Reattach the cover after ...
Instruction Manual
Page 15
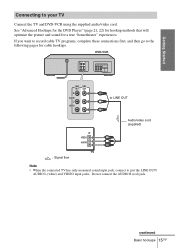
... R (red) jack. continued Basic hookups 15US Getting Started Connecting to the following pages for a true "hometheater" experiences. See "Advanced Hookups for the DVD Player" (page 21, 22) for hookup methods that will optimize the picture and sound for cable hookups. If you want to record cable TV programs, complete... these connections first, and then go to your TV Connect the TV and DVD-VCR using the supplied audio/video cord. DVD-VCR to LINE OUT Audio/video cord (supplied) TV : Signal flow Note • When the connected TV has only ...
... R (red) jack. continued Basic hookups 15US Getting Started Connecting to the following pages for a true "hometheater" experiences. See "Advanced Hookups for the DVD Player" (page 21, 22) for hookup methods that will optimize the picture and sound for cable hookups. If you want to record cable TV programs, complete... these connections first, and then go to your TV Connect the TV and DVD-VCR using the supplied audio/video cord. DVD-VCR to LINE OUT Audio/video cord (supplied) TV : Signal flow Note • When the connected TV has only ...
Instruction Manual
Page 18
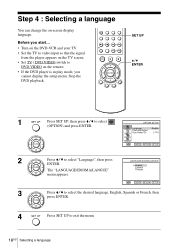
...SET UP V/v ENTER 1 Press SET UP, then press V/v to select (OPTION) and press ENTER. 2 Press V/v to DVD·VIDEO on the remote. • If the DVD player is in play mode, you start... • Turn on the DVD-VCR and your TV. • Set the TV to video input so that the signal from the... player appears on -screen display language. Before you cannot display the setup menu. Stop the DVD playback. Step 4 : Selecting a ...
...SET UP V/v ENTER 1 Press SET UP, then press V/v to select (OPTION) and press ENTER. 2 Press V/v to DVD·VIDEO on the remote. • If the DVD player is in play mode, you start... • Turn on the DVD-VCR and your TV. • Set the TV to video input so that the signal from the... player appears on -screen display language. Before you cannot display the setup menu. Stop the DVD playback. Step 4 : Selecting a ...
Instruction Manual
Page 19
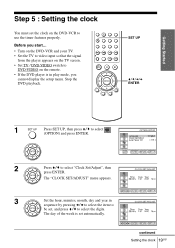
... and your TV. • Set the TV to video input so that the signal from the player appears on the TV screen. • Set TV / DVD·VIDEO switch to DVD·VIDEO on the DVD-VCR to use the timer features properly. The day of the week is in sequence by pressing B/b to... select the item to be set the clock on the remote. • If the DVD player is set automatically. Getting Started Step 5 : Setting the clock You must set , and press V/v to select the digits. Before you cannot display the setup menu...
... and your TV. • Set the TV to video input so that the signal from the player appears on the TV screen. • Set TV / DVD·VIDEO switch to DVD·VIDEO on the DVD-VCR to use the timer features properly. The day of the week is in sequence by pressing B/b to... select the item to be set the clock on the remote. • If the DVD player is set automatically. Getting Started Step 5 : Setting the clock You must set , and press V/v to select the digits. Before you cannot display the setup menu...
Instruction Manual
Page 21
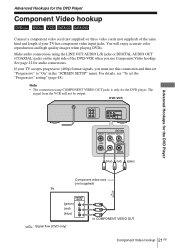
... connections using COMPONENT VIDEO OUT jacks is only for audio connections. DVD-VCR Advanced Hookups for the DVD Player Component Video hookup Connect a component video cord (not supplied) or three video cords (not supplied) of the DVD-VCR when you must use Component Video hookup. Note • ..." setting" (page 48). The signal from the VCR will enjoy accurate color reproduction and high quality images when playing DVDs. You will not be output. Advanced Hookups for the DVD Player (blue) (red) (green) Component video cord (not supplied) TV (green) (red) (blue) : Signal flow...
... connections using COMPONENT VIDEO OUT jacks is only for audio connections. DVD-VCR Advanced Hookups for the DVD Player Component Video hookup Connect a component video cord (not supplied) or three video cords (not supplied) of the DVD-VCR when you must use Component Video hookup. Note • ..." setting" (page 48). The signal from the VCR will enjoy accurate color reproduction and high quality images when playing DVDs. You will not be output. Advanced Hookups for the DVD Player (blue) (red) (green) Component video cord (not supplied) TV (green) (red) (blue) : Signal flow...
Instruction Manual
Page 22
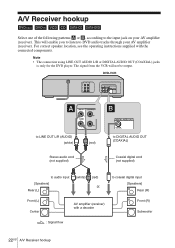
For correct speaker location, see the operating instructions supplied with a decoder Front (R) Subwoofer : Signal flow 22US A/V Receiver hookup DVD-VCR to LINE OUT L/R (AUDIO) (white) Stereo audio cord (not supplied) (red) to DIGITAL AUDIO OUT (COAXIAL) Coaxial digital cord (not ...components. The signal from the VCR will enable you to listen to DVD audio tracks through your AV amplifier (receiver). Note • The connection using LINE OUT AUDIO L/R or DIGITAL AUDIO OUT (COAXIAL) jacks is only for the DVD player. A/V Receiver hookup Select one of the following patterns A or ...
For correct speaker location, see the operating instructions supplied with a decoder Front (R) Subwoofer : Signal flow 22US A/V Receiver hookup DVD-VCR to LINE OUT L/R (AUDIO) (white) Stereo audio cord (not supplied) (red) to DIGITAL AUDIO OUT (COAXIAL) Coaxial digital cord (not ...components. The signal from the VCR will enable you to listen to DVD audio tracks through your AV amplifier (receiver). Note • The connection using LINE OUT AUDIO L/R or DIGITAL AUDIO OUT (COAXIAL) jacks is only for the DVD player. A/V Receiver hookup Select one of the following patterns A or ...

Instruction Manual
Page 23
Advanced Hookups for the DVD Player A Connecting to a digital audio (COAXIAL) input jack Use this connection if your AV amplifier (receiver) has a Dolby*1 Digital or DTS*2 decoder and a digital input jack. ...
Advanced Hookups for the DVD Player A Connecting to a digital audio (COAXIAL) input jack Use this connection if your AV amplifier (receiver) has a Dolby*1 Digital or DTS*2 decoder and a digital input jack. ...
Instruction Manual
Page 24
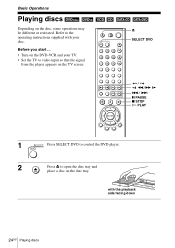
with your TV. • Set the TV to video input so that the signal from the player appears on the DVD-VCR and your disc. Before you start ... • Turn on the TV screen. Z SELECT DVD / m/M y ./ > X PAUSE x STOP H PLAY 1 Press SELECT DVD to control the DVD player. 2 Press Z to the operating instructions supplied with the playback side facing down 24US Playing discs Refer to open the disc tray and place a disc on the disc, some operations may be different or restricted. Basic Operations Playing discs Depending on the disc tray.
with your TV. • Set the TV to video input so that the signal from the player appears on the DVD-VCR and your disc. Before you start ... • Turn on the TV screen. Z SELECT DVD / m/M y ./ > X PAUSE x STOP H PLAY 1 Press SELECT DVD to control the DVD player. 2 Press Z to the operating instructions supplied with the playback side facing down 24US Playing discs Refer to open the disc tray and place a disc on the disc, some operations may be different or restricted. Basic Operations Playing discs Depending on the disc tray.

Instruction Manual
Page 25
...recorded in another unit or PC may appear on page 46). • Stop VIDEO playback while playing back a disc. • If you pause the DVD player for more than 10 hours recorded in VR mode is loaded. Notes • You can change the screen type using the "SCREEN SETUP" menu (see... "Screen Setup" on the TV screen. The disc tray closes and the DVD player starts playback. For DVDs, see page 79. * "- - - -" appears when no disc is not guaranteed. • When 10 hours have passed, the counter in the display window...
...recorded in another unit or PC may appear on page 46). • Stop VIDEO playback while playing back a disc. • If you pause the DVD player for more than 10 hours recorded in VR mode is loaded. Notes • You can change the screen type using the "SCREEN SETUP" menu (see... "Screen Setup" on the TV screen. The disc tray closes and the DVD player starts playback. For DVDs, see page 79. * "- - - -" appears when no disc is not guaranteed. • When 10 hours have passed, the counter in the display window...
Instruction Manual
Page 27
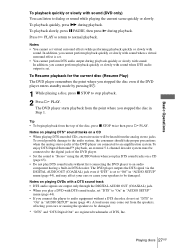
... an audio component having a built-in "AUDIO SETUP" menu (page 44), and may come out from the top of DTS, Inc. The DVD player outputs the DTS signal via the DIGITAL AUDIO OUT (COAXIAL) jack even if "DTS" is set "DTS" to "Off" in DTS decoder. To playback... or slowly. To playback quickly, press M during playback. Notes • You cannot set . To Resume playback for the current disc (Resume Play) The DVD player remembers the point where you cannot perform playback quickly or slowly with sound when DTS audio output is set virtual surround effects while performing playback...
... an audio component having a built-in "AUDIO SETUP" menu (page 44), and may come out from the top of DTS, Inc. The DVD player outputs the DTS signal via the DIGITAL AUDIO OUT (COAXIAL) jack even if "DTS" is set "DTS" to "Off" in DTS decoder. To playback... or slowly. To playback quickly, press M during playback. Notes • You cannot set . To Resume playback for the current disc (Resume Play) The DVD player remembers the point where you cannot perform playback quickly or slowly with sound when DTS audio output is set virtual surround effects while performing playback...
Instruction Manual
Page 37
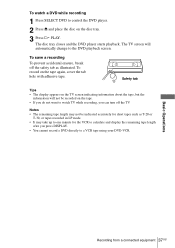
.... Safety tab Tips • The display appears on the TV screen indicating information about the tape, but the information will automatically change to control the DVD player. 2 Press Z and place the disc on the tape again, cover the tab hole with adhesive tape. To record on the disc tray. 3 ...may not be recorded on the tape. • If you press DISPLAY. • You cannot record a DVD directly to a VCR tape using your DVD-VCR. The disc tray closes and the DVD player starts playback. Notes • The remaining tape length may take up to one minute for short tapes such as...
.... Safety tab Tips • The display appears on the TV screen indicating information about the tape, but the information will automatically change to control the DVD player. 2 Press Z and place the disc on the tape again, cover the tab hole with adhesive tape. To record on the disc tray. 3 ...may not be recorded on the tape. • If you press DISPLAY. • You cannot record a DVD directly to a VCR tape using your DVD-VCR. The disc tray closes and the DVD player starts playback. Notes • The remaining tape length may take up to one minute for short tapes such as...
Instruction Manual
Page 38
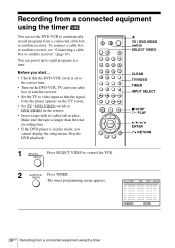
...8226; Check that the signal from the player appears on the TV screen. • Set TV / DVD·VIDEO switch to control the VCR. 2 Press TIMER. Make sure the tape is longer than the total recording time. • If the DVD player is set the DVD-VCR to automatically record programs from a... connected equipment using the timer You can preset up to eight programs at a time. Stop the DVD playback. Before you cannot display the setup menu.
...8226; Check that the signal from the player appears on the TV screen. • Set TV / DVD·VIDEO switch to control the VCR. 2 Press TIMER. Make sure the tape is longer than the total recording time. • If the DVD player is set the DVD-VCR to automatically record programs from a... connected equipment using the timer You can preset up to eight programs at a time. Stop the DVD playback. Before you cannot display the setup menu.
Instruction Manual
Page 40
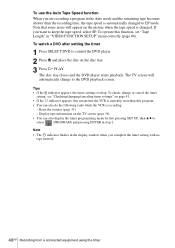
Reset the counter (page 33). - If you want to control the DVD player. 2 Press Z and place the disc on the disc tray. 3 Press H PLAY. To watch a DVD after setting the timer 1 Press SELECT DVD to keep the tape speed, select SP. The TV screen will appear on the TV screen (page 36). • You... screen. Display tape information on the picture when the tape speed is recording: - The disc tray closes and the DVD player starts playback. Note • The indicator flashes in the display window when you complete the timer setting with no tape inserted. 40US Recording from a ...
Reset the counter (page 33). - If you want to control the DVD player. 2 Press Z and place the disc on the disc tray. 3 Press H PLAY. To watch a DVD after setting the timer 1 Press SELECT DVD to keep the tape speed, select SP. The TV screen will appear on the TV screen (page 36). • You... screen. Display tape information on the picture when the tape speed is recording: - The disc tray closes and the DVD player starts playback. Note • The indicator flashes in the display window when you complete the timer setting with no tape inserted. 40US Recording from a ...
Instruction Manual
Page 41
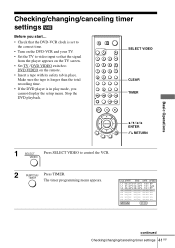
.... Make sure the tape is longer than the total recording time. • If the DVD player is in play mode, you start... • Check that the DVD-VCR clock is set to the correct time. • Turn on the DVD-VCR and your TV. • Set the TV to video input so that the... signal from the player appears on the TV screen. • Set TV / DVD·VIDEO switch to control the VCR. 2 Press TIMER. Checking/changing/canceling timer settings...
.... Make sure the tape is longer than the total recording time. • If the DVD player is in play mode, you start... • Check that the DVD-VCR clock is set to the correct time. • Turn on the DVD-VCR and your TV. • Set the TV to video input so that the... signal from the player appears on the TV screen. • Set TV / DVD·VIDEO switch to control the VCR. 2 Press TIMER. Checking/changing/canceling timer settings...
Instruction Manual
Page 44
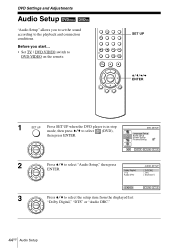
SET UP V/v/B/b ENTER 1 Press SET UP when the DVD player is in stop mode, then press V/v to select (DVD), then press ENTER. 2 Press V/v to select "Audio Setup," then press ENTER. 3 Press V/v to the playback and connection conditions. DVD Settings and Adjustments Audio Setup "Audio Setup" allows you start... • Set TV / DVD·VIDEO switch to DVD·VIDEO on the remote. Before you to set the sound according to select the setup item from the displayed list: "Dolby Digital," "DTS" or "Audio DRC." 44US Audio Setup
SET UP V/v/B/b ENTER 1 Press SET UP when the DVD player is in stop mode, then press V/v to select (DVD), then press ENTER. 2 Press V/v to select "Audio Setup," then press ENTER. 3 Press V/v to the playback and connection conditions. DVD Settings and Adjustments Audio Setup "Audio Setup" allows you start... • Set TV / DVD·VIDEO switch to DVD·VIDEO on the remote. Before you to set the sound according to select the setup item from the displayed list: "Dolby Digital," "DTS" or "Audio DRC." 44US Audio Setup
Instruction Manual
Page 46
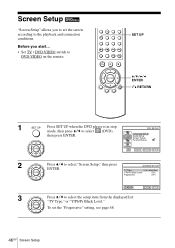
Before you to set the "Progressive" setting, see page 48. 46US Screen Setup SET UP V/v/B/b ENTER O RETURN 1 Press SET UP when the DVD player is in stop mode, then press V/v to select (DVD), then press ENTER. 2 Press V/v to select "Screen Setup," then press ENTER. 3 Press V/v to DVD·VIDEO on the remote. To set the screen according to the playback and connection conditions. Screen Setup "Screen Setup" allows you start... • Set TV / DVD·VIDEO switch to select the setup item from the displayed list: "TV Type," or "Y/Pb/Pr Black Level."
Before you to set the "Progressive" setting, see page 48. 46US Screen Setup SET UP V/v/B/b ENTER O RETURN 1 Press SET UP when the DVD player is in stop mode, then press V/v to select (DVD), then press ENTER. 2 Press V/v to select "Screen Setup," then press ENTER. 3 Press V/v to DVD·VIDEO on the remote. To set the screen according to the playback and connection conditions. Screen Setup "Screen Setup" allows you start... • Set TV / DVD·VIDEO switch to select the setup item from the displayed list: "TV Type," or "Y/Pb/Pr Black Level."


