
Operating Instructions (primary manual)
Page 5
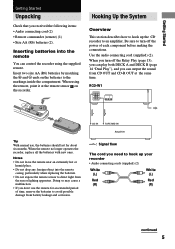
...the batteries. • Do not expose the remote sensor to the markings inside the compartment. RCD-W1 Tip With normal use the remote for about six months. CD IN TAPE/MD IN Amplifier l: Signal flow The cord you can control the recorder using the remote, point it at the same time. Be ...sure to hook up the CD recorder to avoid possible damage from CD OUT and CD-R OUT at the remote ...
...the batteries. • Do not expose the remote sensor to the markings inside the compartment. RCD-W1 Tip With normal use the remote for about six months. CD IN TAPE/MD IN Amplifier l: Signal flow The cord you can control the recorder using the remote, point it at the same time. Be ...sure to hook up the CD recorder to avoid possible damage from CD OUT and CD-R OUT at the remote ...
Operating Instructions (primary manual)
Page 7
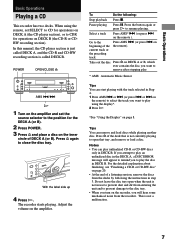
... page 8. Basic Operations Basic Operations Playing a CD This recorder has two decks. In this manual, the CD player section is just called DECK A, and the CD-R and CD-RW recording section is not a malfunction. 7 Pause playing Press X. Adjust the volume on the remote). This is called DECK B. or > (... H 1 Turn on the amplifier and set SELECT to CD for operations on DECK A (the CD player section), or to CDR for the DECK A (or B). 2 Press POWER. 3 Press A and place a disc on DECK B (the CD-R or CDRW recording section). Press A again to the position for operations on...
... page 8. Basic Operations Basic Operations Playing a CD This recorder has two decks. In this manual, the CD player section is just called DECK A, and the CD-R and CD-RW recording section is not a malfunction. 7 Pause playing Press X. Adjust the volume on the remote). This is called DECK B. or > (... H 1 Turn on the amplifier and set SELECT to CD for operations on DECK A (the CD player section), or to CDR for the DECK A (or B). 2 Press POWER. 3 Press A and place a disc on DECK B (the CD-R or CDRW recording section). Press A again to the position for operations on...
Operating Instructions (primary manual)
Page 9
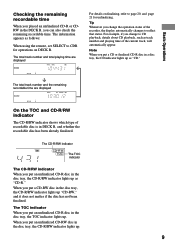
...B, and whether the recordable disc has been already finalized. Note When you put a CD or finalized CD-R disc in the disc tray, the CD-R/RW indicator lights up as follows: When using the remote, set SELECT to page 20, and page 21 for operations on finalizing, refer to CDR for unfinalizing. The ...TOC indicator When you can also check the remaining recordable time. When you put a CD-RW disc in a disc tray, the CD indicator lights up "CD-RW," and it ...
...B, and whether the recordable disc has been already finalized. Note When you put a CD or finalized CD-R disc in the disc tray, the CD-R/RW indicator lights up as follows: When using the remote, set SELECT to page 20, and page 21 for operations on finalizing, refer to CDR for unfinalizing. The ...TOC indicator When you can also check the remaining recordable time. When you put a CD-RW disc in a disc tray, the CD indicator lights up "CD-RW," and it ...

Operating Instructions (primary manual)
Page 10
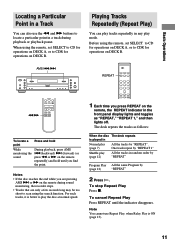
... track number you press 1 (or 2 ,etc.), "1--" appears on DECK A, or to play. Example: When you want to CDR for operations on the front panel display. and > buttons on the remote, or number buttons on the remote) after you press the first digit. AMS ./> SELECT Number buttons ./> To locate Do the following: Stop playback... press the second digit immediately, track 1 will be played shortly after you press the number buttons. and > (Automatic Music Sensor) on DECK B. When using the remote, set SELECT to CD for operations on the deck, . of a track, press AMS .
... track number you press 1 (or 2 ,etc.), "1--" appears on DECK A, or to play. Example: When you want to CDR for operations on the front panel display. and > buttons on the remote, or number buttons on the remote) after you press the first digit. AMS ./> SELECT Number buttons ./> To locate Do the following: Stop playback... press the second digit immediately, track 1 will be played shortly after you press the number buttons. and > (Automatic Music Sensor) on DECK B. When using the remote, set SELECT to CD for operations on the deck, . of a track, press AMS .
Operating Instructions (primary manual)
Page 11
...disappears. The deck repeats the tracks as "REPEAT," "REPEAT 1," and then lights off. Before using the remote, set SELECT to CD for operations on DECK A, or to CDR for operations on the remote repeatedly) and hold While monitoring the sound During playback, press AMS .(backward) > (forward) (or press... Play All the same Program by "REPEAT". To cancel Repeat Play Press REPEAT until you press REPEAT on the remote, the REPEAT indicator in a track during sound monitoring, the recorder stops. • Tracks that are pressing AMS > or M on DECK B. For such tracks, it is...
...disappears. The deck repeats the tracks as "REPEAT," "REPEAT 1," and then lights off. Before using the remote, set SELECT to CD for operations on DECK A, or to CDR for operations on the remote repeatedly) and hold While monitoring the sound During playback, press AMS .(backward) > (forward) (or press... Play All the same Program by "REPEAT". To cancel Repeat Play Press REPEAT until you press REPEAT on the remote, the REPEAT indicator in a track during sound monitoring, the recorder stops. • Tracks that are pressing AMS > or M on DECK B. For such tracks, it is...
Operating Instructions (primary manual)
Page 12
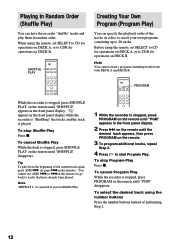
When using the remote, set SELECT to CD for operations on DECK A, or to CDR for operations on DECK B. To cancel Shuffle Play While the deck is stopped, press PROGRAM on the remote). To select the desired track using the remote, set Shuffle Play. 1 While the recorder is played. Note You cannot ... display while the recorder is "Shuffling" the tracks, and the track is stopped, press PROGRAM on the remote until the desired track appears, then press PROGRAM on the remote) to go back to start Program Play. Note "REPEAT 1" is canceled if you set SELECT to CD for operations on ...
When using the remote, set SELECT to CD for operations on DECK A, or to CDR for operations on DECK B. To cancel Shuffle Play While the deck is stopped, press PROGRAM on the remote). To select the desired track using the remote, set Shuffle Play. 1 While the recorder is played. Note You cannot ... display while the recorder is "Shuffling" the tracks, and the track is stopped, press PROGRAM on the remote until the desired track appears, then press PROGRAM on the remote) to go back to start Program Play. Note "REPEAT 1" is canceled if you set SELECT to CD for operations on ...
Operating Instructions (primary manual)
Page 13
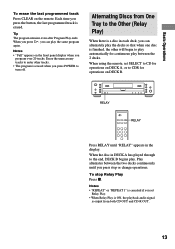
... programmed track Press CLEAR on the front panel display when you program over 20 tracks. Erase the unnecessary tracks to enter other will begin to CDR for continuous play automatically for operations on DECK A, or to play between the two decks continuously until "RELAY" appears in DECK A has played ... programmed track is erased when you press POWER to turn off. Tip The program remains even after Program Play ends. Alternating Discs from both CD OUT and CD-R OUT. 13 Notes • "Full" appears on the remote. When the disc in the display. Each time you set SELECT to...
... programmed track Press CLEAR on the front panel display when you program over 20 tracks. Erase the unnecessary tracks to enter other will begin to CDR for continuous play automatically for operations on DECK A, or to play between the two decks continuously until "RELAY" appears in DECK A has played ... programmed track is erased when you press POWER to turn off. Tip The program remains even after Program Play ends. Alternating Discs from both CD OUT and CD-R OUT. 13 Notes • "Full" appears on the remote. When the disc in the display. Each time you set SELECT to...
Operating Instructions (primary manual)
Page 14
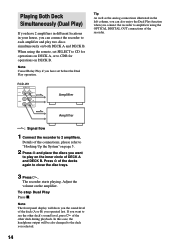
...SELECT to CD for operations on DECK B. The recorder starts playing. Note The front panel display will be also changed to play two discs simultaneously on page 5. 2 Press A and place the discs you want to see the other deck during playback. RCD-W1 ANALOG RL CD OUT IN CDR OUT Amplifier...of DECK A and DECK B. To stop Dual Play Press x. In this case, the headphone output will show you connect the recorder to amplifiers using the remote, set before the Dual Play operation. Note Cancel Relay Play if you have 2 amplifiers in different locations in the left column,...
...SELECT to CD for operations on DECK B. The recorder starts playing. Note The front panel display will be also changed to play two discs simultaneously on page 5. 2 Press A and place the discs you want to see the other deck during playback. RCD-W1 ANALOG RL CD OUT IN CDR OUT Amplifier...of DECK A and DECK B. To stop Dual Play Press x. In this case, the headphone output will show you connect the recorder to amplifiers using the remote, set before the Dual Play operation. Note Cancel Relay Play if you have 2 amplifiers in different locations in the left column,...
Operating Instructions (primary manual)
Page 15
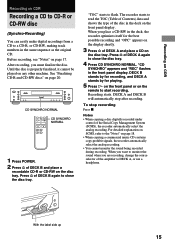
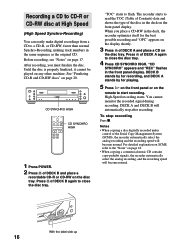
... A of the disc in the deck, the recorder optimizes itself for playing. 5 Press H on the front panel or on the remote to start recording. DECK A and DECK B will automatically stop recording Press x. After recording, you place a CD-RW in the deck on the front panel display...17. With the label side up 15 "CD SYNCHRO" appears and "REC" flashes in the same sequence as the original CD. Recording on CDR Recording on CDR Recording a CD to CD-R or CD-RW disc (Synchro-Recording) You can easily make digital recordings from a CD to a CD-R, or CD-RW, making track numbers in the front ...
... A of the disc in the deck, the recorder optimizes itself for playing. 5 Press H on the front panel or on the remote to start recording. DECK A and DECK B will automatically stop recording Press x. After recording, you place a CD-RW in the deck on the front panel display...17. With the label side up 15 "CD SYNCHRO" appears and "REC" flashes in the same sequence as the original CD. Recording on CDR Recording on CDR Recording a CD to CD-R or CD-RW disc (Synchro-Recording) You can easily make digital recordings from a CD to a CD-R, or CD-RW, making track numbers in the front ...
Operating Instructions (primary manual)
Page 16
... DECK A again to close the disc tray. To stop after recording. High-Speed recording starts. For detailed explanation on SCMS, refer to the "Notes" on the remote to start recording. CD SYNCHRO HIGH CD SYNCHRO HIGH 1 Press POWER. 2 Press A of the disc in the deck, the recorder optimizes itself for playing. 5 Press H on the front panel or...
... DECK A again to close the disc tray. To stop after recording. High-Speed recording starts. For detailed explanation on SCMS, refer to the "Notes" on the remote to start recording. CD SYNCHRO HIGH CD SYNCHRO HIGH 1 Press POWER. 2 Press A of the disc in the deck, the recorder optimizes itself for playing. 5 Press H on the front panel or...
Operating Instructions (primary manual)
Page 18
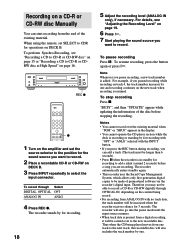
... the display. • You cannot operate the CD player section while the deck is recording or standing by one and recording continues on the amplifier and set SELECT to CDR for the sound source you want to select the input connector. Therefore you are recording. When using the remote, set the source selector to the position for...
... the display. • You cannot operate the CD player section while the deck is recording or standing by one and recording continues on the amplifier and set SELECT to CDR for the sound source you want to select the input connector. Therefore you are recording. When using the remote, set the source selector to the position for...
Operating Instructions (primary manual)
Page 20
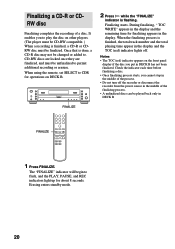
...Erasing enters standby mode. 20 When using the remote, set SELECT to CDR for operations on other players. (The player must be unfinalized to . When the finalizing process is done, a CD-R disc may not be changed or added to permit additional recording or erasure. Notes • The TOC (... appears in DECK B has not been finalized. FINALIZE 2 Press H while the "FINALIZE" indicator is finished, a CD-R or CDRW disc must be CD-RW compatible. ) When a recording is flashing. Check the indicator each time before finalizing a disc. • Once finalizing process starts, you put in...
...Erasing enters standby mode. 20 When using the remote, set SELECT to CDR for operations on other players. (The player must be unfinalized to . When the finalizing process is done, a CD-R disc may not be changed or added to permit additional recording or erasure. Notes • The TOC (... appears in DECK B has not been finalized. FINALIZE 2 Press H while the "FINALIZE" indicator is finished, a CD-R or CDRW disc must be CD-RW compatible. ) When a recording is flashing. Check the indicator each time before finalizing a disc. • Once finalizing process starts, you put in...
Operating Instructions (primary manual)
Page 21
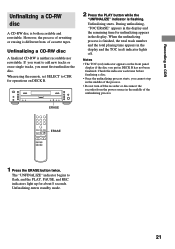
Unfinalizing starts. Notes • The TOC (red) indicator appears on CDR Unfinalizing a CD-RW disc A CD-RW disc is both recordable and rewritable. Unfinalizing enters standby mode. 21 When using the remote, set SELECT to CDR for about 8 seconds. The "UNFINALIZE" indicator begins to add new tracks or erase ... the total playing time appears in the display and the TOC (red) indicator lights off the recorder or disconnect the recorder from of rewriting or erasing is neither recordable nor rewritable. During unfinalizing, "TOC ERASE" appears in the display and the remaining time for ...
Unfinalizing starts. Notes • The TOC (red) indicator appears on CDR Unfinalizing a CD-RW disc A CD-RW disc is both recordable and rewritable. Unfinalizing enters standby mode. 21 When using the remote, set SELECT to CDR for about 8 seconds. The "UNFINALIZE" indicator begins to add new tracks or erase ... the total playing time appears in the display and the TOC (red) indicator lights off the recorder or disconnect the recorder from of rewriting or erasing is neither recordable nor rewritable. During unfinalizing, "TOC ERASE" appears in the display and the remaining time for ...
Operating Instructions (primary manual)
Page 22
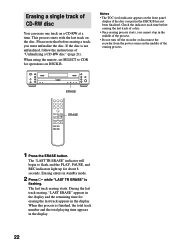
...the disc. Erasing enters in the middle of the process. • Do not turn off the recorder or disconnect the recorder from the power source in standby mode. 2 Press H while "LAST TR ERASE" is flashing.... Notes • The TOC (red) indicator appears on a CD-RW at a time. The "LAST TR ERASE" indicator will begin to CDR for operations on the disc. During the last track erasing, "LAST...last track erasing starts. Erasing a single track of "Unfinalizing a CD-RW disc" (page 21). ERASE ERASE 1 Press the ERASE button. When using the remote, set SELECT to flash, and the PLAY, PAUSE, and REC...
...the disc. Erasing enters in the middle of the process. • Do not turn off the recorder or disconnect the recorder from the power source in standby mode. 2 Press H while "LAST TR ERASE" is flashing.... Notes • The TOC (red) indicator appears on a CD-RW at a time. The "LAST TR ERASE" indicator will begin to CDR for operations on the disc. During the last track erasing, "LAST...last track erasing starts. Erasing a single track of "Unfinalizing a CD-RW disc" (page 21). ERASE ERASE 1 Press the ERASE button. When using the remote, set SELECT to flash, and the PLAY, PAUSE, and REC...
Operating Instructions (primary manual)
Page 23
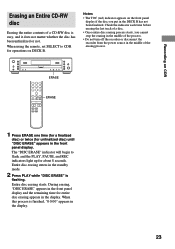
...cannot stop the erasing in the middle of the process. • Do not turn off the recorder or disconnect the recorder from the power source in the middle of the erasing process. When using the remote, set SELECT to flash, and the PLAY, PAUSE, and REC indicators light up for unfinalized ... been finalized. When this process is easy, and it does not matter whether the disc has been unfinalized or not. Recording on CDR Erasing an Entire CD-RW disc Erasing the entire contents of a CD-RW disc is finished, "0 0:00" appears in the display. 23 Entire disc erasing enters in the standby mode. ...
...cannot stop the erasing in the middle of the process. • Do not turn off the recorder or disconnect the recorder from the power source in the middle of the erasing process. When using the remote, set SELECT to flash, and the PLAY, PAUSE, and REC indicators light up for unfinalized ... been finalized. When this process is easy, and it does not matter whether the disc has been unfinalized or not. Recording on CDR Erasing an Entire CD-RW disc Erasing the entire contents of a CD-RW disc is finished, "0 0:00" appears in the display. 23 Entire disc erasing enters in the standby mode. ...

Operating Instructions (primary manual)
Page 25
... and leave the recorder in the remote. Strong magnetism from the source of strong magnetism. Move the recorder away from a television or a similar device is interfering with operations. Should any of the following difficulties while using the recorder, use this troubleshooting guide to the selected input connector. DECK A (the CD player section) The player does not start...
... and leave the recorder in the remote. Strong magnetism from the source of strong magnetism. Move the recorder away from a television or a similar device is interfering with operations. Should any of the following difficulties while using the recorder, use this troubleshooting guide to the selected input connector. DECK A (the CD player section) The player does not start...


