
Operating Instructions
Page 14
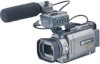
qa qs qd qf 1 AC-L10A/L10B/L10C AC power adaptor (1), power cord (1) (p. 16) 2 NP-FM50 battery pack (1) (p. 15, 16) 3 A/V connecting cable (1) (p. 47) 4 Wireless Remote Commander (1) (p. 258) 5 Size AA (R6)..."Memory Stick" (1) (p. 135) 9 USB cable (1) (p. 190) 0 CD-ROM (SPVD-008 USB Driver) (1) (p. 195) qa Cleaning cloth (1) (p. 245) qs Wide lens hood (1) (p. 32) qd XLR adaptor (with your camcorder. 1 2 3 4 5 6 7 8 9 q; Checking supplied accessories Make sure that the following accessories are supplied with a Microphone holder) (1) (p. 29) qf Microphone (1), Wind screen (1) ...
qa qs qd qf 1 AC-L10A/L10B/L10C AC power adaptor (1), power cord (1) (p. 16) 2 NP-FM50 battery pack (1) (p. 15, 16) 3 A/V connecting cable (1) (p. 47) 4 Wireless Remote Commander (1) (p. 258) 5 Size AA (R6)..."Memory Stick" (1) (p. 135) 9 USB cable (1) (p. 190) 0 CD-ROM (SPVD-008 USB Driver) (1) (p. 195) qa Cleaning cloth (1) (p. 245) qs Wide lens hood (1) (p. 32) qd XLR adaptor (with your camcorder. 1 2 3 4 5 6 7 8 9 q; Checking supplied accessories Make sure that the following accessories are supplied with a Microphone holder) (1) (p. 29) qf Microphone (1), Wind screen (1) ...

Operating Instructions
Page 17
...275 165 Approximate minutes when you use a fully charged battery and the XLR adaptor is extremely high or low because of the AC power adaptor. The actual battery life may cause a short-circuit, damaging the AC power adaptor. Remaining battery time indicator The remaining battery time indicator in the display ...window. When you use the AC power adaptor Place the AC power adaptor near a wall outlet. This may be shorter. 17 Charging time Battery pack NP-FM50 (supplied) NP-FM70 NP-QM71 NP-FM90...
...275 165 Approximate minutes when you use a fully charged battery and the XLR adaptor is extremely high or low because of the AC power adaptor. The actual battery life may cause a short-circuit, damaging the AC power adaptor. Remaining battery time indicator The remaining battery time indicator in the display ...window. When you use the AC power adaptor Place the AC power adaptor near a wall outlet. This may be shorter. 17 Charging time Battery pack NP-FM50 (supplied) NP-FM70 NP-QM71 NP-FM90...

Operating Instructions
Page 29
...record pictures with the LCD panel closed, check the picture with the viewfinder. Installing the supplied microphone Install the supplied XLR adaptor and microphone. Adjust the viewfinder lens to your eyesight so that the images in the menu settings when using the ... adjustment lever Viewfinder backlight You can get the desired audio quality. (1) AttachtheXLRadaptortotheaccessoryshoeonthecamcorderandtightenthe screw of the XLR adaptor. (2) ConnectthehotshoeplugoftheXLRadaptortotheintelligentaccessoryshoe of the backlight. Select VF B.L. in the viewfinder come into sharp focus.
...record pictures with the LCD panel closed, check the picture with the viewfinder. Installing the supplied microphone Install the supplied XLR adaptor and microphone. Adjust the viewfinder lens to your eyesight so that the images in the menu settings when using the ... adjustment lever Viewfinder backlight You can get the desired audio quality. (1) AttachtheXLRadaptortotheaccessoryshoeonthecamcorderandtightenthe screw of the XLR adaptor. (2) ConnectthehotshoeplugoftheXLRadaptortotheintelligentaccessoryshoe of the backlight. Select VF B.L. in the viewfinder come into sharp focus.

Operating Instructions
Page 31
...that you use equipment other than a 48-V microphone with the +48V switch set the INPUT LEVEL selector to ON, a malfunction of the XLR adaptor. 31 When you set to LINE. When you use the external microphone at a distance from the intelligent accessory shoe beforehand. When you ...connect equipment other than a microphone Set the +48V switch to OFF and the INPUT LEVEL selector to OFF. Detach the XLR adaptor after having loosened the screw of the equipment may occur. When the REC CH SELECT switch is reduced. Recording - Basics Recording a picture...
...that you use equipment other than a 48-V microphone with the +48V switch set the INPUT LEVEL selector to ON, a malfunction of the XLR adaptor. 31 When you set to LINE. When you use the external microphone at a distance from the intelligent accessory shoe beforehand. When you ...connect equipment other than a microphone Set the +48V switch to OFF and the INPUT LEVEL selector to OFF. Detach the XLR adaptor after having loosened the screw of the equipment may occur. When the REC CH SELECT switch is reduced. Recording - Basics Recording a picture...

Operating Instructions
Page 78
...adjustment of the channel 1, then press the dial. We recommend using headphones to monitor the sound when you use the XLR adaptor or the built-in the standby or recording mode. (7) Turn the SEL/PUSH EXEC dial to be adjusted Item Setting ... 2 linked (LINKED) or separated (SEPARATE). * LINKEDisonlyavailablewhenbothCH1LEVELandCH2LEVELaresetto MANUAL. (6) Press AUDIO LEVEL to adjust the recording level of the XLR adaptor (1) Install the supplied XLR adaptor. Sound recording level You can adjust the recording sound level. Sets the recording levels of the item, then press the dial....
...adjustment of the channel 1, then press the dial. We recommend using headphones to monitor the sound when you use the XLR adaptor or the built-in the standby or recording mode. (7) Turn the SEL/PUSH EXEC dial to be adjusted Item Setting ... 2 linked (LINKED) or separated (SEPARATE). * LINKEDisonlyavailablewhenbothCH1LEVELandCH2LEVELaresetto MANUAL. (6) Press AUDIO LEVEL to adjust the recording level of the XLR adaptor (1) Install the supplied XLR adaptor. Sound recording level You can adjust the recording sound level. Sets the recording levels of the item, then press the dial....

Operating Instructions
Page 79
... to automatic recording sound level Set CH1 LEVEL to AUTO when you automatically adjust the recording level of the channel 1. When the XLR adaptor is changed as follows. CH1 CH2 30 20 12 0 dB CH1,2 79 When MAN GAIN is set CH2 LEVEL to LINKED ... [c] 8 CH1 CH2 30 20 12 0 dB CH1 CH2 MENU 3,4 TAPE SET REC MODE AUD I O MODE REMA I N M I C NR M I C LEVEL XLR SET TAPE SET XLR SET CH1 LEVEL CH2 LEVEL MAN GA I N RETURN AUTO [MENU] : END [MENU] : END [a] Recordinglevelmeter [b] Decreasestherecordinglevel [c] Increasestherecordinglevel To clear the recording level adjustment display ...
... to automatic recording sound level Set CH1 LEVEL to AUTO when you automatically adjust the recording level of the channel 1. When the XLR adaptor is changed as follows. CH1 CH2 30 20 12 0 dB CH1,2 79 When MAN GAIN is set CH2 LEVEL to LINKED ... [c] 8 CH1 CH2 30 20 12 0 dB CH1 CH2 MENU 3,4 TAPE SET REC MODE AUD I O MODE REMA I N M I C NR M I C LEVEL XLR SET TAPE SET XLR SET CH1 LEVEL CH2 LEVEL MAN GA I N RETURN AUTO [MENU] : END [MENU] : END [a] Recordinglevelmeter [b] Decreasestherecordinglevel [c] Increasestherecordinglevel To clear the recording level adjustment display ...
Operating Instructions
Page 220
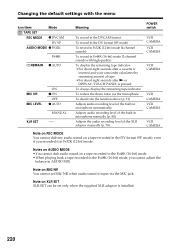
... in Fs32K (12-bit) mode. Note on MIC NR You cannot set only when the supplied XLR adaptor is installed. 220 Adjusts the audio recording level of the built-in microphone manually (p. 80). Note on XLR SET XLR SET can be set MIC NR when audio sound is input via the microphone To deactivate... in Fs48K (16-bit) mode (2-channel sounds with the menu Icon/item Mode TAPE SET REC MODE z DVCAM DV SP AUDIO MODE z FS32K FS48K qREMAIN z AUTO MIC NR MIC LEVEL ON z ON OFF z AUTO MANUAL XLR SET -- Notes on AUDIO MODE •You cannot dub audio sound on a tape recorded in the...
... in Fs32K (12-bit) mode. Note on MIC NR You cannot set only when the supplied XLR adaptor is installed. 220 Adjusts the audio recording level of the built-in microphone manually (p. 80). Note on XLR SET XLR SET can be set MIC NR when audio sound is input via the microphone To deactivate... in Fs48K (16-bit) mode (2-channel sounds with the menu Icon/item Mode TAPE SET REC MODE z DVCAM DV SP AUDIO MODE z FS32K FS48K qREMAIN z AUTO MIC NR MIC LEVEL ON z ON OFF z AUTO MANUAL XLR SET -- Notes on AUDIO MODE •You cannot dub audio sound on a tape recorded in the...

Operating Instructions
Page 225
... is not installed. c Set it off or the power supply is not suitable for the situations (The indicator flashes). c Remove the XLR adaptor or input audio via the builtin microphone. • The XLR adaptor is reduced. Troubleshooting (continued on the screen. • The backlight is too high. c Set it to MELODY or NORMAL (p. 222...
... is not installed. c Set it off or the power supply is not suitable for the situations (The indicator flashes). c Remove the XLR adaptor or input audio via the builtin microphone. • The XLR adaptor is reduced. Troubleshooting (continued on the screen. • The backlight is too high. c Set it to MELODY or NORMAL (p. 222...

Operating Instructions
Page 250
... × 8 in.) (w/h/d) Mass (Approx.) 950 g (2 lb 1 oz) main unit only 1.4 kg (3 lb) including the battery pack NP-FM50, the XLR adaptor, the Microphone, cassette PDVM40ME, the lens cap and the shoulder strap Supplied accessories See page 14. Specifications Video camera recorder System Video recording system 2 rotary...when using the battery pack) During camera recording using the battery pack: Approx. 2 min. and 30 seconds When using cassette PDVM-40ME) DVCAM format: 40 min. DV format SP mode: 1 hour Fastforward/rewind time (using cassette PDVM-40ME) When using LCD 6.5 W Viewfinder 5.2...
... × 8 in.) (w/h/d) Mass (Approx.) 950 g (2 lb 1 oz) main unit only 1.4 kg (3 lb) including the battery pack NP-FM50, the XLR adaptor, the Microphone, cassette PDVM40ME, the lens cap and the shoulder strap Supplied accessories See page 14. Specifications Video camera recorder System Video recording system 2 rotary...when using the battery pack) During camera recording using the battery pack: Approx. 2 min. and 30 seconds When using cassette PDVM-40ME) DVCAM format: 40 min. DV format SP mode: 1 hour Fastforward/rewind time (using cassette PDVM-40ME) When using LCD 6.5 W Viewfinder 5.2...

Operating Instructions
Page 257
... (p. 31) ug HOT SHOE plug uh INPUT2 connector (p. 30, 78, 116) uj INPUT1 connector (p. 30, 78, 116) uk Microphone (p. 30) 257 Identifying parts and controls XLR adaptor / Microphone yk yl u; INPUT1 REC CH SELECT switch (p. 30) ua INPUT1 INPUT LEVEL selector (p.30) us REC CH INPUT SELECT LEVEL +48V INPUT LEVEL +48V...
... (p. 31) ug HOT SHOE plug uh INPUT2 connector (p. 30, 78, 116) uj INPUT1 connector (p. 30, 78, 116) uk Microphone (p. 30) 257 Identifying parts and controls XLR adaptor / Microphone yk yl u; INPUT1 REC CH SELECT switch (p. 30) ua INPUT1 INPUT LEVEL selector (p.30) us REC CH INPUT SELECT LEVEL +48V INPUT LEVEL +48V...

Operating Instructions
Page 262
Index 262 A, B Accessory shoe 29, 253 AC power adaptor 16 Adjusting viewfinder 29 Audio dubbing 116 AUDIO LEVEL 78 AUDIO MIX 120, 216 Audio mode 220 AUTO LOCK ...Data code 43 DATE SEARCH 90 Delete 184 DIGITAL EFFECT 58, 95 Digital program editing 101, 167 Digital zoom 33 DISPLAY 43 DOT 55 DVCAM cassette 236 E EDITSEARCH 39 END SEARCH 39, 45 Exposure 73 F, G, H FADER 55 Fade in/out 55 FLASH MOTION 58 Flexible...angle 33 Wide lens hood 32 Wide mode 53 WIPE 55 Write-protect switch 135 Write-protect tab 22 XLR adaptor ...... 29, 79, 116, 257 Zebra pattern 64 Zoom 33
Index 262 A, B Accessory shoe 29, 253 AC power adaptor 16 Adjusting viewfinder 29 Audio dubbing 116 AUDIO LEVEL 78 AUDIO MIX 120, 216 Audio mode 220 AUTO LOCK ...Data code 43 DATE SEARCH 90 Delete 184 DIGITAL EFFECT 58, 95 Digital program editing 101, 167 Digital zoom 33 DISPLAY 43 DOT 55 DVCAM cassette 236 E EDITSEARCH 39 END SEARCH 39, 45 Exposure 73 F, G, H FADER 55 Fade in/out 55 FLASH MOTION 58 Flexible...angle 33 Wide lens hood 32 Wide mode 53 WIPE 55 Write-protect switch 135 Write-protect tab 22 XLR adaptor ...... 29, 79, 116, 257 Zebra pattern 64 Zoom 33


