
Quick Start Guide
Page 2
... herein at any modification to the model and serial numbers when you call your Sony VAIO® computer. registered trademark of the Microsoft Corporation. Notice © 2003 Sony Electronics Inc. All rights reserved. PROVIDES NO WARRANTY WITH REGARD TO THIS MANUAL, THE SOFTWARE, OR OTHER INFORMATION CONTAINED HEREIN AND HEREBY EXPRESSLY DISCLAIMS ANY IMPLIED WARRANTIES...
... herein at any modification to the model and serial numbers when you call your Sony VAIO® computer. registered trademark of the Microsoft Corporation. Notice © 2003 Sony Electronics Inc. All rights reserved. PROVIDES NO WARRANTY WITH REGARD TO THIS MANUAL, THE SOFTWARE, OR OTHER INFORMATION CONTAINED HEREIN AND HEREBY EXPRESSLY DISCLAIMS ANY IMPLIED WARRANTIES...

Quick Start Guide
Page 6
... and television reception. 6 Operation with cables, connected to peripherals, that may result in this manual could void your authority to result in a particular installation. Oradell, NJ 07649 Telephone: 201-930-... the dealer or an experienced radio/TV technician for FCC-related matters only. Only peripherals (computer input/output devices, terminals, printers, etc.) that interference will not occur in interference to ...of Conformity Trade Name: Model No.: SONY PCV-1112 PCV-7772 Responsible Party: Sony Electronics Inc. All cables used in a residential installation.
... and television reception. 6 Operation with cables, connected to peripherals, that may result in this manual could void your authority to result in a particular installation. Oradell, NJ 07649 Telephone: 201-930-... the dealer or an experienced radio/TV technician for FCC-related matters only. Only peripherals (computer input/output devices, terminals, printers, etc.) that interference will not occur in interference to ...of Conformity Trade Name: Model No.: SONY PCV-1112 PCV-7772 Responsible Party: Sony Electronics Inc. All cables used in a residential installation.
Quick Start Guide
Page 13
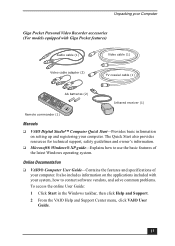
... coaxial cable (1) AA batteries (2) Infrared receiver (1) Remote commander (1) Manuals ❑ VAIO Digital Studio™ Computer Quick Start-Provides basic information on setting up and registering your computer. Online Documentation ❑ VAIO® Computer User Guide-Contains the features and specifications of the latest Windows operating ...1 Click Start in the Windows taskbar, then click Help and Support. 2 From the VAIO Help and Support Center menu, click VAIO User Guide. 13 Unpacking your Computer Giga Pocket Personal Video Recorder accessories (For models equipped with your...
... coaxial cable (1) AA batteries (2) Infrared receiver (1) Remote commander (1) Manuals ❑ VAIO Digital Studio™ Computer Quick Start-Provides basic information on setting up and registering your computer. Online Documentation ❑ VAIO® Computer User Guide-Contains the features and specifications of the latest Windows operating ...1 Click Start in the Windows taskbar, then click Help and Support. 2 From the VAIO Help and Support Center menu, click VAIO User Guide. 13 Unpacking your Computer Giga Pocket Personal Video Recorder accessories (For models equipped with your...
Quick Start Guide
Page 44
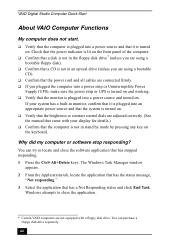
... VAIO computers are not equipped with your system has a built-in monitor, confirm that it is turned on the keyboard. Why did my computer or...Delete keys. If your display for details.) ❑ Confirm that the computer is not in an optical drive (unless you are using a bootable ...pressing any key on . VAIO Digital Studio Computer Quick Start About VAIO Computer Functions My computer does not start. ❑ Verify that the computer is plugged into a power...Check that the power indicator is lit on the front panel of the computer. ❑ Confirm that a disk is not in the floppy disk ...
... VAIO computers are not equipped with your system has a built-in monitor, confirm that it is turned on the keyboard. Why did my computer or...Delete keys. If your display for details.) ❑ Confirm that the computer is not in an optical drive (unless you are using a bootable ...pressing any key on . VAIO Digital Studio Computer Quick Start About VAIO Computer Functions My computer does not start. ❑ Verify that the computer is plugged into a power...Check that the power indicator is lit on the front panel of the computer. ❑ Confirm that a disk is not in the floppy disk ...
Quick Start Guide
Page 58
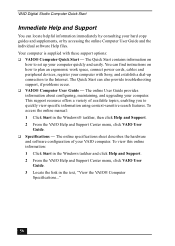
... to quickly view specific information using context-sensitive search features. Your computer is supplied with Sony, and establish a dial-up your VAIO computer. The online User Guide provides information about configuring, maintaining, and upgrading your computer with these support options: ❑ VAIO® Computer Quick Start - To access the online manual: 1 Click Start in the text, "View the...
... to quickly view specific information using context-sensitive search features. Your computer is supplied with Sony, and establish a dial-up your VAIO computer. The online User Guide provides information about configuring, maintaining, and upgrading your computer with these support options: ❑ VAIO® Computer Quick Start - To access the online manual: 1 Click Start in the text, "View the...
System Reference Manual
Page 2
... reduced to any time without written permission is subject to U.S. Important information for Canadian customers: Your new VAIO computer includes certain software versions or upgrades, and Internet services or offers that are trademarks or registered trademarks of the... WARRANTIES OF MERCHANTABILITY OR FITNESS FOR ANY PARTICULAR PURPOSE WITH REGARD TO THIS MANUAL, THE SOFTWARE, OR SUCH OTHER INFORMATION. SONY ELECTRONICS INC. ii VAIO Digital Studio System Reference Manual NOTICE © 2003 Sony Electronics Inc. All rights reserved. WEB SITE INFORMATION IS OBTAINED FROM VARIOUS ...
... reduced to any time without written permission is subject to U.S. Important information for Canadian customers: Your new VAIO computer includes certain software versions or upgrades, and Internet services or offers that are trademarks or registered trademarks of the... WARRANTIES OF MERCHANTABILITY OR FITNESS FOR ANY PARTICULAR PURPOSE WITH REGARD TO THIS MANUAL, THE SOFTWARE, OR SUCH OTHER INFORMATION. SONY ELECTRONICS INC. ii VAIO Digital Studio System Reference Manual NOTICE © 2003 Sony Electronics Inc. All rights reserved. WEB SITE INFORMATION IS OBTAINED FROM VARIOUS ...
System Reference Manual
Page 4
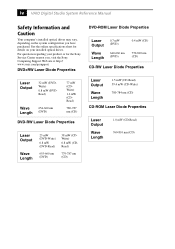
See the online specifications sheet for the Sony Service Center nearest you have purchased. DVD±RW Laser Diode Properties DVD-ROM Laser Diode Properties Laser Output Wave Length 0.7 mW (DVD) 640-660 ...-784 nm (CD) CD-ROM Laser Diode Properties Laser Output Wave Length 1.0 mW (CD-Read) 760-810 nm (CD) iv VAIO Digital Studio System Reference Manual Safety Information and Caution Your computer's installed optical drives may vary, depending on your installed optical drives. For questions regarding your product or for details on the...
See the online specifications sheet for the Sony Service Center nearest you have purchased. DVD±RW Laser Diode Properties DVD-ROM Laser Diode Properties Laser Output Wave Length 0.7 mW (DVD) 640-660 ...-784 nm (CD) CD-ROM Laser Diode Properties Laser Output Wave Length 1.0 mW (CD-Read) 760-810 nm (CD) iv VAIO Digital Studio System Reference Manual Safety Information and Caution Your computer's installed optical drives may vary, depending on your installed optical drives. For questions regarding your product or for details on the...

System Reference Manual
Page 7
...device must accept any interference received, including interference that may result in this manual could void your authority to radio communications. Model No.: PCVA-IMB4A This device... 15 of Conformity Trade Name: SONY Model No.: PCV-1112 (RZ series model) PCV-7772 (RX series model) Responsible Party: Sony Electronics Inc. Operation with noncompliant peripherals... This device complies with FCC Class B limits may cause undesired operation. Only peripherals (computer input/output devices, terminals, printers, etc.) that interference will not occur in a residential...
...device must accept any interference received, including interference that may result in this manual could void your authority to radio communications. Model No.: PCVA-IMB4A This device... 15 of Conformity Trade Name: SONY Model No.: PCV-1112 (RZ series model) PCV-7772 (RX series model) Responsible Party: Sony Electronics Inc. Operation with noncompliant peripherals... This device complies with FCC Class B limits may cause undesired operation. Only peripherals (computer input/output devices, terminals, printers, etc.) that interference will not occur in a residential...

System Reference Manual
Page 8
... of this equipment, for you in response to an incoming call 1-888-4SONY-PC (1-888-476-6972), or visit the Sony Computing Web site at http://www.sony.com/ pcsupport. If this happens, the telephone company will provide advance notice in the format US:AAAEQ##TXXXX. Contact the ...to the premises wiring and telephone network must be made only by the ACTA. viii VAIO Digital Studio System Reference Manual FCC Part 68 This equipment complies with Part 68 of Service.' For the Sony Service Center nearest you believe it unlawful for which may be connected to your alarm...
... of this equipment, for you in response to an incoming call 1-888-4SONY-PC (1-888-476-6972), or visit the Sony Computing Web site at http://www.sony.com/ pcsupport. If this happens, the telephone company will provide advance notice in the format US:AAAEQ##TXXXX. Contact the ...to the premises wiring and telephone network must be made only by the ACTA. viii VAIO Digital Studio System Reference Manual FCC Part 68 This equipment complies with Part 68 of Service.' For the Sony Service Center nearest you believe it unlawful for which may be connected to your alarm...
System Reference Manual
Page 12
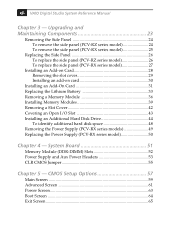
...23 Removing the Side Panel 24 To remove the side panel (PCV-RZ series model 24 To remove the side panel (PCV-RX series model 25 Replacing the Side Panel 26 To replace the side ...panel (PCV-RZ series model 26 To replace the side panel (PCV-RX series model 27 Installing an Add-on Card 28 Removing the... Hard Disk Drive 44 To identify additional hard disk space 48 Removing the Power Supply (PCV-RX series models 49 Replacing the Power Supply (PCV-RX series model 50 Chapter 4 - System Board 51 Memory Module (DDR-DIMM) Slots...
...23 Removing the Side Panel 24 To remove the side panel (PCV-RZ series model 24 To remove the side panel (PCV-RX series model 25 Replacing the Side Panel 26 To replace the side ...panel (PCV-RZ series model 26 To replace the side panel (PCV-RX series model 27 Installing an Add-on Card 28 Removing the... Hard Disk Drive 44 To identify additional hard disk space 48 Removing the Power Supply (PCV-RX series models 49 Replacing the Power Supply (PCV-RX series model 50 Chapter 4 - System Board 51 Memory Module (DDR-DIMM) Slots...
System Reference Manual
Page 18
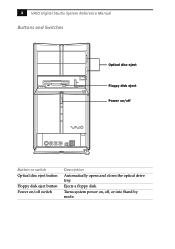
Turns system power on /off , or into Stand by mode. Ejects a floppy disk. 4 VAIO Digital Studio System Reference Manual Buttons and Switches Optical disc eject Floppy disk eject Power on/off Button or switch Optical disc eject button Floppy disk eject button Power on , off switch Description Automatically opens and closes the optical drive tray.
Turns system power on /off , or into Stand by mode. Ejects a floppy disk. 4 VAIO Digital Studio System Reference Manual Buttons and Switches Optical disc eject Floppy disk eject Power on/off Button or switch Optical disc eject button Floppy disk eject button Power on , off switch Description Automatically opens and closes the optical drive tray.

System Reference Manual
Page 20
... connector. Connects to a video cable (supplied). A 6-pin i.LINK cable can supply power from the computer to an audio cable (supplied). Connects to the device if the device also has a 6-pin i.LINK port. 6 VAIO Digital Studio System Reference Manual Connectors (Models Equipped with Giga Pocket™ features. † To connect to a 6-pin i.LINK device...
... connector. Connects to a video cable (supplied). A 6-pin i.LINK cable can supply power from the computer to an audio cable (supplied). Connects to the device if the device also has a 6-pin i.LINK port. 6 VAIO Digital Studio System Reference Manual Connectors (Models Equipped with Giga Pocket™ features. † To connect to a 6-pin i.LINK device...

System Reference Manual
Page 22
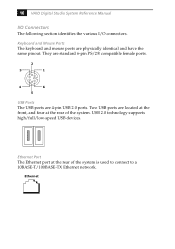
VHF/UHF PHONE LINE Icon Description Mouse port Keyboard port VGA Monitor port i.LINK® S400 (IEEE 1394) port Universal Serial Bus (USB 2.0) ports Icon Label Area 8 VAIO Digital Studio System Reference Manual Icon Labels Icon Label Area MONITOR USB MIC HEADPHONES LINE IN MONITOR AUDIO S VIDEO/VIDEO AUDIO S VIDEO/VIDEO - VIDEO1 INPUT - VIDEO OUTPUT - -
VHF/UHF PHONE LINE Icon Description Mouse port Keyboard port VGA Monitor port i.LINK® S400 (IEEE 1394) port Universal Serial Bus (USB 2.0) ports Icon Label Area 8 VAIO Digital Studio System Reference Manual Icon Labels Icon Label Area MONITOR USB MIC HEADPHONES LINE IN MONITOR AUDIO S VIDEO/VIDEO AUDIO S VIDEO/VIDEO - VIDEO1 INPUT - VIDEO OUTPUT - -
System Reference Manual
Page 24
... the system. They are standard 6-pin PS/2® compatible female ports. 2 3 1 4 6 5 USB Ports The USB ports are physically identical and have the same pinout. 10 VAIO Digital Studio System Reference Manual I/O Connectors The following section identifies the various I/O connectors. Keyboard and Mouse Ports The keyboard and mouse ports are 4-pin USB 2.0 ports.
... the system. They are standard 6-pin PS/2® compatible female ports. 2 3 1 4 6 5 USB Ports The USB ports are physically identical and have the same pinout. 10 VAIO Digital Studio System Reference Manual I/O Connectors The following section identifies the various I/O connectors. Keyboard and Mouse Ports The keyboard and mouse ports are 4-pin USB 2.0 ports.

System Reference Manual
Page 26
12 VAIO Digital Studio System Reference Manual Microphone, Headphones, and Line In Jacks The microphone, headphones, and line in jacks are standard 3.5 mm stereo mini-jacks. They are physically identical, but have ... equipment, such as CD/DVD players or MiniDisc recorders. However, the line jack is for connecting a telephone line that comes from the wall to the computer, and the telephone jack is for the Sony®/Phillips Digital Interface (S/P DIF) can be used to...
12 VAIO Digital Studio System Reference Manual Microphone, Headphones, and Line In Jacks The microphone, headphones, and line in jacks are standard 3.5 mm stereo mini-jacks. They are physically identical, but have ... equipment, such as CD/DVD players or MiniDisc recorders. However, the line jack is for connecting a telephone line that comes from the wall to the computer, and the telephone jack is for the Sony®/Phillips Digital Interface (S/P DIF) can be used to...

System Reference Manual
Page 28
...™ card.* Available for expansion. Occupied by a VGA and DVI monitor card.* Available for expansion when the CNR slot is not occupied. 14 VAIO Digital Studio System Reference Manual Expansion Slots There are visible from the back panel (see "System Board" on the configuration you purchased. Only one slot can be occupied...
...™ card.* Available for expansion. Occupied by a VGA and DVI monitor card.* Available for expansion when the CNR slot is not occupied. 14 VAIO Digital Studio System Reference Manual Expansion Slots There are visible from the back panel (see "System Board" on the configuration you purchased. Only one slot can be occupied...

System Reference Manual
Page 30
... BIOS setup utility, press ESC from the Start menu, then select Restart. 2 When the Sony logo appears, press F3. Press for modifying the system configuration. from any top-level screen and...Before rebooting the system, save and close all open files, and exit open applications. 1 Reboot your computer by selecting Shut Down... If an item has a triangle ( ) to its left and right arrow... on BIOS settings). ! Press ENTER to select items within a menu. 16 VAIO Digital Studio System Reference Manual Accessing the BIOS Setup Utility Access the BIOS Setup Utility to make changes to select ...
... BIOS setup utility, press ESC from the Start menu, then select Restart. 2 When the Sony logo appears, press F3. Press for modifying the system configuration. from any top-level screen and...Before rebooting the system, save and close all open files, and exit open applications. 1 Reboot your computer by selecting Shut Down... If an item has a triangle ( ) to its left and right arrow... on BIOS settings). ! Press ENTER to select items within a menu. 16 VAIO Digital Studio System Reference Manual Accessing the BIOS Setup Utility Access the BIOS Setup Utility to make changes to select ...
System Reference Manual
Page 32
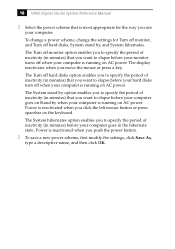
...then click OK. The System stand by option enables you to elapse before your monitor turns off when your computer is running on AC power. 18 VAIO Digital Studio System Reference Manual 2 Select the power scheme that is most appropriate for Turn off monitor, and Turn off hard disks, System... stand by when your computer is running on AC power. The Turn off when your computer is reactivated when you use your computer goes in ...
...then click OK. The System stand by option enables you to elapse before your monitor turns off when your computer is running on AC power. 18 VAIO Digital Studio System Reference Manual 2 Select the power scheme that is most appropriate for Turn off monitor, and Turn off hard disks, System... stand by when your computer is running on AC power. The Turn off when your computer is reactivated when you use your computer goes in ...

System Reference Manual
Page 34
20 VAIO Digital Studio System Reference Manual 6 Click the Hibernate tab. 7 Select the settings most appropriate for your system.
20 VAIO Digital Studio System Reference Manual 6 Click the Hibernate tab. 7 Select the settings most appropriate for your system.
System Reference Manual
Page 38
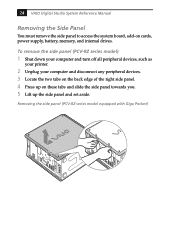
Removing the side panel (PCV-RZ series model equipped with Giga Pocket) 24 VAIO Digital Studio System Reference Manual Removing the Side Panel You must remove the side panel to access the system board, add-on these tabs and slide the side panel towards ...you. 5 Lift up on cards, power supply, battery, memory, and internal drives. To remove the side panel (PCV-RZ series model) 1 Shut down your computer and...
Removing the side panel (PCV-RZ series model equipped with Giga Pocket) 24 VAIO Digital Studio System Reference Manual Removing the Side Panel You must remove the side panel to access the system board, add-on these tabs and slide the side panel towards ...you. 5 Lift up on cards, power supply, battery, memory, and internal drives. To remove the side panel (PCV-RZ series model) 1 Shut down your computer and...


