Online Help Center
Page 3
... the online manual: 1. See the online specifications sheet for details on the accessories supplied with your computer. From the VAIO Help and Support Center menu, click VAIO User Guide. Giga Pocket Personal Video Recorder - (For models equipped with your system. Provides... information on setting up and registering your computer, see the online Specifications sheet. For details on supplied accessories. Com puter and supplied accessories * The supplied speakers may not be supplied with Giga Pocket features) Manuals VAIO Digital Studio Com puter Quick Start -...
... the online manual: 1. See the online specifications sheet for details on the accessories supplied with your computer. From the VAIO Help and Support Center menu, click VAIO User Guide. Giga Pocket Personal Video Recorder - (For models equipped with your system. Provides... information on setting up and registering your computer, see the online Specifications sheet. For details on supplied accessories. Com puter and supplied accessories * The supplied speakers may not be supplied with Giga Pocket features) Manuals VAIO Digital Studio Com puter Quick Start -...
Online Help Center
Page 13
... all models) Connection for a DVI monitor. 11 Telephone jack Connection for a telephone cable (optional) to the computer. 12 Speaker DC Out jack Connection for the speaker power cable. 13 S/P DIF optical out port Connection for a digital audio or optical device. 14 Ethernet port... Connection for a 10BASE-T/100BASE-TX Ethernet. (The port marked with (Network) is for the supplied speakers or optional headphones. Connection and power for a compatible digital device such as a Sony Digital Handycam® camcorder. 7 Universal Serial Bus 2.0 (USB) ports (4) High-speed connections for ...
... all models) Connection for a DVI monitor. 11 Telephone jack Connection for a telephone cable (optional) to the computer. 12 Speaker DC Out jack Connection for the speaker power cable. 13 S/P DIF optical out port Connection for a digital audio or optical device. 14 Ethernet port... Connection for a 10BASE-T/100BASE-TX Ethernet. (The port marked with (Network) is for the supplied speakers or optional headphones. Connection and power for a compatible digital device such as a Sony Digital Handycam® camcorder. 7 Universal Serial Bus 2.0 (USB) ports (4) High-speed connections for ...
Online Help Center
Page 16
... for a standard display. 10 Telephone jack Connection for a telephone cable (optional) to the computer. 11 AC Input port Connection for the supplied power cord. 12 Speaker DC Out jack (For use with PCVA-SP3A speakers1) Connection for the speaker power cable. 13 Ethernet port Connection for a 10BASE-T/100BASE-TX Ethernet. (The port marked... 2.0 (USB) ports (4) Connection for compatible USB devices. 8 Microphone jack Connection for the supplied modem cable to the wall jack. Headphones jack Connection for the supplied speakers or optional headphones. Page 16
... for a standard display. 10 Telephone jack Connection for a telephone cable (optional) to the computer. 11 AC Input port Connection for the supplied power cord. 12 Speaker DC Out jack (For use with PCVA-SP3A speakers1) Connection for the speaker power cable. 13 Ethernet port Connection for a 10BASE-T/100BASE-TX Ethernet. (The port marked... 2.0 (USB) ports (4) Connection for compatible USB devices. 8 Microphone jack Connection for the supplied modem cable to the wall jack. Headphones jack Connection for the supplied speakers or optional headphones. Page 16

Online Help Center
Page 23
... To connect the PCVA- Plug the jack end (black) of the speaker power cable into the Headphones jack, located on the back panel of your computer. SP4 speakers (PCV- Connecting the speakers 1. Plug the jack end (yellow) of the speaker power cable into the L Out jack on the back of the right... speaker. 2. Plug the cable attached to the back of the right speaker into the DC Out jack located ...
... To connect the PCVA- Plug the jack end (black) of the speaker power cable into the Headphones jack, located on the back panel of your computer. SP4 speakers (PCV- Connecting the speakers 1. Plug the jack end (yellow) of the speaker power cable into the L Out jack on the back of the right... speaker. 2. Plug the cable attached to the back of the right speaker into the DC Out jack located ...

Online Help Center
Page 24
Plug the cable attached to the back of the right speaker into the DC In jack on the back of the AC adapter cord into the Headphones jack. 3. Page 24 Plug the cable attached to the back of the left speaker into the L Out jack on the back of the right speaker and plug the other end into a grounded AC wall outlet or power strip. Connecting the PCVA-SP3 speakers with an AC adapter 1. Plug the jack end of the right speaker. 2.
Plug the cable attached to the back of the right speaker into the DC In jack on the back of the AC adapter cord into the Headphones jack. 3. Page 24 Plug the cable attached to the back of the left speaker into the L Out jack on the back of the right speaker and plug the other end into a grounded AC wall outlet or power strip. Connecting the PCVA-SP3 speakers with an AC adapter 1. Plug the jack end of the right speaker. 2.

Online Help Center
Page 29
Turning On Your Computer When you start your system for the first time, your computer may detect new equipment and display a dialog box that prompts you to restart your com puter (PCV- Respond to turn on the power. 2. Press the power switch on the right speaker to turn on the power. To turn on your computer. RX series m odel shown) Page 29 Press the power switch on the display to turn on the power. 3. RZ series m odel shown) To turn on your com puter (PCV- Press the power switch on the computer to this prompt immediately. 1.
Turning On Your Computer When you start your system for the first time, your computer may detect new equipment and display a dialog box that prompts you to restart your com puter (PCV- Respond to turn on the power. 2. Press the power switch on the right speaker to turn on the power. To turn on your computer. RX series m odel shown) Page 29 Press the power switch on the display to turn on the power. 3. RZ series m odel shown) To turn on your com puter (PCV- Press the power switch on the computer to this prompt immediately. 1.

Online Help Center
Page 70
... how to troubleshoot common problems. You can also find helpful information on the system configuration purchased. About VAIO Computer Functions About Software About Using The Optical Disc Drive(s) About The Speakers About The Modem About The Microphone About The Mouse And Keyboard About Using Peripheral...
... how to troubleshoot common problems. You can also find helpful information on the system configuration purchased. About VAIO Computer Functions About Software About Using The Optical Disc Drive(s) About The Speakers About The Modem About The Microphone About The Mouse And Keyboard About Using Peripheral...

Online Help Center
Page 88
...then select the Device Manager button to read the disc. Change the Screen resolution and Color quality to play the disc on your computer, see video, your video resolution: 1. Click Apply and then click OK. If a region code warning appears when you see ...the volume settings on the disc packaging. To verify or change your computer's video resolution may also cause the computer to stop responding while it is listed on your computer speakers. Check the connections between your speakers and the computer. Verify that are using 32-bit color (preset factory...
...then select the Device Manager button to read the disc. Change the Screen resolution and Color quality to play the disc on your computer, see video, your video resolution: 1. Click Apply and then click OK. If a region code warning appears when you see ...the volume settings on the disc packaging. To verify or change your computer's video resolution may also cause the computer to stop responding while it is listed on your computer speakers. Check the connections between your speakers and the computer. Verify that are using 32-bit color (preset factory...
Online Help Center
Page 91
...that the power cord is plugged into the Headphones jack. If your speakers have volume control, check the volume level. You cannot hear sound from your speakers if headphones are connected to your speakers are using has its own volume control, check that the volume is turned up...is there no sound in any application? Check that the speakers are plugged into a grounded wall outlet or power strip. If your speakers have a mute button, verify that it is turned off. If your computer. If the software application you are powered by moving the...
...that the power cord is plugged into the Headphones jack. If your speakers have volume control, check the volume level. You cannot hear sound from your speakers if headphones are connected to your speakers are using has its own volume control, check that the volume is turned up...is there no sound in any application? Check that the speakers are plugged into a grounded wall outlet or power strip. If your speakers have a mute button, verify that it is turned off. If your computer. If the software application you are powered by moving the...

Online Help Center
Page 92
... Volume tab, adjust the Device volume by batteries, verify that the batteries are inserted properly and that they are charged. If your speakers use an external power source, verify that the power cord is plugged into a grounded wall outlet or power strip. If your... speakers have volume control, check the volume level. You cannot hear sound from your speakers if headphones are connected to your computer. If the software application you are powered by moving the slider bar to ...
... Volume tab, adjust the Device volume by batteries, verify that the batteries are inserted properly and that they are charged. If your speakers use an external power source, verify that the power cord is plugged into a grounded wall outlet or power strip. If your... speakers have volume control, check the volume level. You cannot hear sound from your speakers if headphones are connected to your computer. If the software application you are powered by moving the slider bar to ...

Online Help Center
Page 111
...61607; Direct sunlight Excessive dust Mechanical vibration or shock Strong magnets or speakers that are not magnetically shielded Ambient temperature of your Sony computer. Should any solid object or liquid fall into the cabinet, keyboard, or mouse, shut down...from the back panel of high-precision electronic parts. You may want to have the computer checked by qualified personnel before connecting your computer to the integrated circuits in your Sony computer in a location that may occur to peripheral equipment; If this case, allow at...
...61607; Direct sunlight Excessive dust Mechanical vibration or shock Strong magnets or speakers that are not magnetically shielded Ambient temperature of your Sony computer. Should any solid object or liquid fall into the cabinet, keyboard, or mouse, shut down...from the back panel of high-precision electronic parts. You may want to have the computer checked by qualified personnel before connecting your computer to the integrated circuits in your Sony computer in a location that may occur to peripheral equipment; If this case, allow at...
Quick Start Guide
Page 3
Contents Getting Started 5 Unpacking Your Computer 6 Planning An Ergonomic Work Space 8 Locating Controls And Ports 9 About The Front Panel 10 About The Back Panel 12 Setting Up Your Computer 15 Connecting A Display (Monitor 16 Connecting The Speakers 17 Connecting The Keyboard And Mouse 19 Connecting The Telephone And Modem Cables......20 Connecting The Power Cord(s 21 Turning On Your Computer 22 Registering Your Computer 23 Setting Up Your Dial-up Connection 24 Turning Off Your Computer 27 3
Contents Getting Started 5 Unpacking Your Computer 6 Planning An Ergonomic Work Space 8 Locating Controls And Ports 9 About The Front Panel 10 About The Back Panel 12 Setting Up Your Computer 15 Connecting A Display (Monitor 16 Connecting The Speakers 17 Connecting The Keyboard And Mouse 19 Connecting The Telephone And Modem Cables......20 Connecting The Power Cord(s 21 Turning On Your Computer 22 Registering Your Computer 23 Setting Up Your Dial-up Connection 24 Turning Off Your Computer 27 3

Quick Start Guide
Page 4
VAIO Digital Studio Computer Quick Start System And Application Recovery CD(s 29 Using The System Recovery CD(s 30 Using The Application Recovery CD(s 33 Troubleshooting 37 About VAIO Computer Functions 38 About Software 42 About Using The Optical Disc Drive(s 46 About The Speakers 49 About The Modem 50 About The Microphone 52 About The Mouse And Keyboard 53 About Using Peripheral Equipment 55 Support Options 57 Immediate Help And Support 58 Software Help And Support 60 Contacting Sony For Help And Support 63 Notice 65 Index 73 4
VAIO Digital Studio Computer Quick Start System And Application Recovery CD(s 29 Using The System Recovery CD(s 30 Using The Application Recovery CD(s 33 Troubleshooting 37 About VAIO Computer Functions 38 About Software 42 About Using The Optical Disc Drive(s 46 About The Speakers 49 About The Modem 50 About The Microphone 52 About The Mouse And Keyboard 53 About Using Peripheral Equipment 55 Support Options 57 Immediate Help And Support 58 Software Help And Support 60 Contacting Sony For Help And Support 63 Notice 65 Index 73 4
Quick Start Guide
Page 6
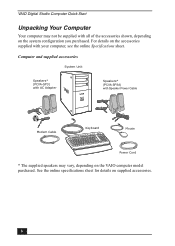
... online specifications sheet for details on the VAIO computer model purchased. Computer and supplied accessories System Unit Speakers* (PCVA-SP3) with AC Adapter Speakers* (PCVA-SP3A) with your computer, see the online Specifications sheet. For details on the system configuration you purchased. VAIO Digital Studio Computer Quick Start Unpacking Your Computer Your computer may not be supplied with all of...
... online specifications sheet for details on the VAIO computer model purchased. Computer and supplied accessories System Unit Speakers* (PCVA-SP3) with AC Adapter Speakers* (PCVA-SP3A) with your computer, see the online Specifications sheet. For details on the system configuration you purchased. VAIO Digital Studio Computer Quick Start Unpacking Your Computer Your computer may not be supplied with all of...
Quick Start Guide
Page 13
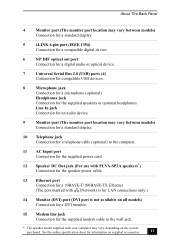
...10 Telephone jack Connection for a telephone cable (optional) to the computer. 11 AC Input port Connection for the supplied power cord. 12 Speaker DC Out jack (For use with PCVA-SP3A speakers*) Connection for the speaker power cable. 13 Ethernet port Connection for a 10BASE-T/100BASE-TX ... models) Connection for a DVI monitor. 15 Modem line jack Connection for the supplied modem cable to the wall jack. * The speaker model supplied with your computer may vary between models) Connection for a standard display. 5 i.LINK 6-pin port (IEEE 1394) Connection for a compatible digital device...
...10 Telephone jack Connection for a telephone cable (optional) to the computer. 11 AC Input port Connection for the supplied power cord. 12 Speaker DC Out jack (For use with PCVA-SP3A speakers*) Connection for the speaker power cable. 13 Ethernet port Connection for a 10BASE-T/100BASE-TX ... models) Connection for a DVI monitor. 15 Modem line jack Connection for the supplied modem cable to the wall jack. * The speaker model supplied with your computer may vary between models) Connection for a standard display. 5 i.LINK 6-pin port (IEEE 1394) Connection for a compatible digital device...

Quick Start Guide
Page 17
... the L Out jack on the back of the right speaker. 2 Plug the cable attached to the back of the right speaker into the Headphones jack, located on the back panel of your computer. 3 Plug the jack end (yellow) of the speaker power cable into the DC In jack (yellow) on the back of the... right speaker. 4 Plug the jack end (black) of the speaker power cable into the DC Out jack located on the back panel...
... the L Out jack on the back of the right speaker. 2 Plug the cable attached to the back of the right speaker into the Headphones jack, located on the back panel of your computer. 3 Plug the jack end (yellow) of the speaker power cable into the DC In jack (yellow) on the back of the... right speaker. 4 Plug the jack end (black) of the speaker power cable into the DC Out jack located on the back panel...

Quick Start Guide
Page 18
VAIO Digital Studio Computer Quick Start Connecting the PCVA-SP3 speakers (with an AC adapter) 1 Plug the cable attached to the back of the left speaker into the L Out jack on the back of the right speaker. 2 Plug the cable attached to the back of the right speaker into the Headphones jack. 3 Plug the jack end of the AC adapter cord into the DC In jack on the back of the right speaker and plug the other end into a grounded AC wall outlet or power strip. 18
VAIO Digital Studio Computer Quick Start Connecting the PCVA-SP3 speakers (with an AC adapter) 1 Plug the cable attached to the back of the left speaker into the L Out jack on the back of the right speaker. 2 Plug the cable attached to the back of the right speaker into the Headphones jack. 3 Plug the jack end of the AC adapter cord into the DC In jack on the back of the right speaker and plug the other end into a grounded AC wall outlet or power strip. 18

Quick Start Guide
Page 22
VAIO Digital Studio Computer Quick Start Turning On Your Computer When you start your system for the first time, your computer may detect new equipment and display a dialog box that prompts you to turn on the power. To turn on your computer. Respond to this prompt immediately. 1 Press the power switch on the computer to turn on the power. 2 Press the power switch on the display to turn on the power. 3 Press the power switch on the right speaker to restart your computer 22
VAIO Digital Studio Computer Quick Start Turning On Your Computer When you start your system for the first time, your computer may detect new equipment and display a dialog box that prompts you to turn on the power. To turn on your computer. Respond to this prompt immediately. 1 Press the power switch on the computer to turn on the power. 2 Press the power switch on the display to turn on the power. 3 Press the power switch on the right speaker to restart your computer 22
Quick Start Guide
Page 47
...then select Control Panel. 2 Select Appearances and Themes, then select Change the screen resolution. 3 Click the Settings tab and change your speakers and the computer. ❑ Verify that the region code of your DVD player's mute feature is set too high. To improve video resolution, verify that... code indicators such as "1" or "ALL" are labeled on some DVDs to indicate the type of player that can play is listed on your computer speakers. ❑ Check the connections between your video resolution: 1 Click Start in the Audio Mixer. ❑ Check the volume settings on the disc...
...then select Control Panel. 2 Select Appearances and Themes, then select Change the screen resolution. 3 Click the Settings tab and change your speakers and the computer. ❑ Verify that the region code of your DVD player's mute feature is set too high. To improve video resolution, verify that... code indicators such as "1" or "ALL" are labeled on some DVDs to indicate the type of player that can play is listed on your computer speakers. ❑ Check the connections between your video resolution: 1 Click Start in the Audio Mixer. ❑ Check the volume settings on the disc...

Quick Start Guide
Page 49
...the power cord is plugged into the Headphones jack. ❑ If your speakers have volume control, check the volume level. ❑ You cannot hear sound from your speakers if headphones are connected to your computer. ❑ If the software application you are powered by moving the slider ...bar to reinstall the sound drivers. About The Speakers About The Speakers Why is there no sound in any application? ❑...
...the power cord is plugged into the Headphones jack. ❑ If your speakers have volume control, check the volume level. ❑ You cannot hear sound from your speakers if headphones are connected to your computer. ❑ If the software application you are powered by moving the slider ...bar to reinstall the sound drivers. About The Speakers About The Speakers Why is there no sound in any application? ❑...