
Online Help Center
Page 65
... Recov ery CD (PCV- The Notes on your computer. Follow the on your computer. Turn off your system is equipped with two optical drives, insert the System Recovery CD into the upper optical drive. 4. After recovering your system using the System Recovery CD(s), you have ... or more System Recovery CDs. On the Main Menu - Press the disc eject button to insert your Application Recovery CD(s) after restarting Windows. Press the disc eject button to run the System Recovery program. RZ series m odel shown) If your computer. 5. When the VAIO System Recovery Utility dialog box ...
... Recov ery CD (PCV- The Notes on your computer. Follow the on your computer. Turn off your system is equipped with two optical drives, insert the System Recovery CD into the upper optical drive. 4. After recovering your system using the System Recovery CD(s), you have ... or more System Recovery CDs. On the Main Menu - Press the disc eject button to insert your Application Recovery CD(s) after restarting Windows. Press the disc eject button to run the System Recovery program. RZ series m odel shown) If your computer. 5. When the VAIO System Recovery Utility dialog box ...
Online Help Center
Page 69
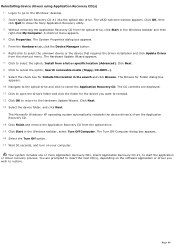
...to close the Sony Application Recovery utility. 3. The Browse for the device you wish to insert the next CD(s), depending on your computer. The CD ...Recovery CD from the optical drive, click Start in the Windows taskbar and then right-click My Computer. The VAIO welcome window appears. Without removing the Application Recovery...Recovery CD. Insert Application Recovery CD #1 into the optical disc drive. Click Properties. The System Properties dialog box appears. 5. The Hardware Update Wizard appears. 7. Navigate to the optical drive and click to the Windows® desktop...
...to close the Sony Application Recovery utility. 3. The Browse for the device you wish to insert the next CD(s), depending on your computer. The CD ...Recovery CD from the optical drive, click Start in the Windows taskbar and then right-click My Computer. The VAIO welcome window appears. Without removing the Application Recovery...Recovery CD. Insert Application Recovery CD #1 into the optical disc drive. Click Properties. The System Properties dialog box appears. 5. The Hardware Update Wizard appears. 7. Navigate to the optical drive and click to the Windows® desktop...

Quick Start Guide
Page 4
VAIO Digital Studio Computer Quick Start System And Application Recovery CD(s 29 Using The System Recovery CD(s 30 Using The Application Recovery CD(s 33 Troubleshooting 37 About VAIO Computer Functions 38 About Software 42 About Using The Optical Disc Drive(s 46 About The Speakers 49 About The Modem 50 About The Microphone 52 About The Mouse And Keyboard 53 About Using Peripheral Equipment 55 Support Options 57 Immediate Help And Support 58 Software Help And Support 60 Contacting Sony For Help And Support 63 Notice 65 Index 73 4
VAIO Digital Studio Computer Quick Start System And Application Recovery CD(s 29 Using The System Recovery CD(s 30 Using The Application Recovery CD(s 33 Troubleshooting 37 About VAIO Computer Functions 38 About Software 42 About Using The Optical Disc Drive(s 46 About The Speakers 49 About The Modem 50 About The Microphone 52 About The Mouse And Keyboard 53 About Using Peripheral Equipment 55 Support Options 57 Immediate Help And Support 58 Software Help And Support 60 Contacting Sony For Help And Support 63 Notice 65 Index 73 4

Quick Start Guide
Page 31
...optical drives, insert the System Recovery CD into the upper optical drive. 31 Inserting the System Recovery CD (PCV-RZ series model shown) ✍ If your computer's optical drive. 3 Press the disc eject button to load necessary files. The System Recovery utility starts from the optical ...drive. Using The System Recovery CD(s) Using the System Recovery CD(s) Your system may...
...optical drives, insert the System Recovery CD into the upper optical drive. 31 Inserting the System Recovery CD (PCV-RZ series model shown) ✍ If your computer's optical drive. 3 Press the disc eject button to load necessary files. The System Recovery utility starts from the optical ...drive. Using The System Recovery CD(s) Using the System Recovery CD(s) Your system may...
Quick Start Guide
Page 34
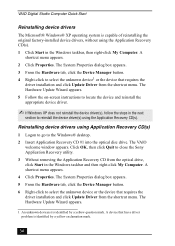
...close the Sony Application Recovery utility. 3 Without removing the Application Recovery CD from the optical drive, click Start in the next section to reinstall the device driver(s) using Application Recovery CD(s) ... Device Manager button. 6 Right-click to the Windows® desktop. 2 Insert Application Recovery CD #1 into the optical disc drive. The VAIO welcome window appears. The Hardware Update Wizard appears. 1 An ...menu. A shortcut menu appears. 2 Click Properties. VAIO Digital Studio Computer Quick Start Reinstalling device drivers The Microsoft® Windows® XP operating ...
...close the Sony Application Recovery utility. 3 Without removing the Application Recovery CD from the optical drive, click Start in the next section to reinstall the device driver(s) using Application Recovery CD(s) ... Device Manager button. 6 Right-click to the Windows® desktop. 2 Insert Application Recovery CD #1 into the optical disc drive. The VAIO welcome window appears. The Hardware Update Wizard appears. 1 An ...menu. A shortcut menu appears. 2 Click Properties. VAIO Digital Studio Computer Quick Start Reinstalling device drivers The Microsoft® Windows® XP operating ...


