PCV-RS Series Hard Disk Drive Replacement Instructions
Page 1
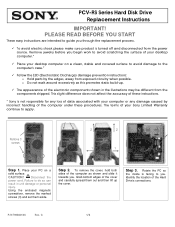
This slight difference does not affect the accuracy of these instructions. * Sony is facing to you begin work to avoid scratching the surface of your desktop computer.* 9 Place your computer or any damage caused by the edges, away from the power source. To remove the cover, hold both sides of the electronic components shown in... do so can result in the illustrations may be different from the components shipped. Remove 3 screws 2 2 1 1 Step 1. The terms of the Hard Drive's connections. CAUTION! PCV-RS Series Hard Disk Drive Replacement Instructions IMPORTANT!
This slight difference does not affect the accuracy of these instructions. * Sony is facing to you begin work to avoid scratching the surface of your desktop computer.* 9 Place your computer or any damage caused by the edges, away from the power source. To remove the cover, hold both sides of the electronic components shown in... do so can result in the illustrations may be different from the components shipped. Remove 3 screws 2 2 1 1 Step 1. The terms of the Hard Drive's connections. CAUTION! PCV-RS Series Hard Disk Drive Replacement Instructions IMPORTANT!
PCV-RS Series Hard Disk Drive Replacement Instructions
Page 2
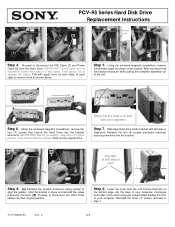
... Hard Drive cables into the base of each side) are in alignment. PCV-RS Series Hard Disk Drive Replacement Instructions Remove screw [2] [1] Step 4. Proceed to initiate the removal of your computer. Pull with all 4 holes (2 on both sides of your computer. With one hand hold the bracket enclosure while pulling the complete assembly out...
... Hard Drive cables into the base of each side) are in alignment. PCV-RS Series Hard Disk Drive Replacement Instructions Remove screw [2] [1] Step 4. Proceed to initiate the removal of your computer. Pull with all 4 holes (2 on both sides of your computer. With one hand hold the bracket enclosure while pulling the complete assembly out...
Quick Start Guide
Page 22
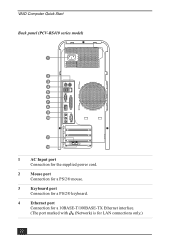
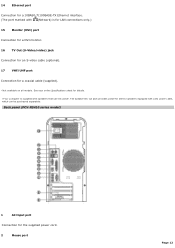
VAIO Computer Quick Start Back panel (PCV-RS410 series model) 1 2 3 4 5 6 7 8 9 10 11 12 1 AC Input port Connection for the supplied power cord. 2 Mouse port Connection for a PS/2® mouse. 3 Keyboard port Connection for a PS/2® keyboard. 4 Ethernet port Connection for a 10BASE-T/100BASE-TX Ethernet interface. (The port marked with (Network) is for LAN connections only.) 22
VAIO Computer Quick Start Back panel (PCV-RS410 series model) 1 2 3 4 5 6 7 8 9 10 11 12 1 AC Input port Connection for the supplied power cord. 2 Mouse port Connection for a PS/2® mouse. 3 Keyboard port Connection for a PS/2® keyboard. 4 Ethernet port Connection for a 10BASE-T/100BASE-TX Ethernet interface. (The port marked with (Network) is for LAN connections only.) 22
VAIO User Guide
Page 12
RS410 series m odel) 1 AC Input port Connection for s tereo s peakers equipped with s peakers that us e A C power. T he s peaker DC out jac k provides power for the supplied power ... (S-Video/video) jack Connection for an S-video cable (optional). 17 VHF/UHF port1 Connection for a coaxial cable (supplied). 1 N ot available on all models . Back panel (PCV- 14 Ethernet port Connection for a 10BASE-T/100BASE-TX Ethernet interface. (The port marked with (Network) is s upplied with a DC power c able, whic h c an be purc...
RS410 series m odel) 1 AC Input port Connection for s tereo s peakers equipped with s peakers that us e A C power. T he s peaker DC out jac k provides power for the supplied power ... (S-Video/video) jack Connection for an S-video cable (optional). 17 VHF/UHF port1 Connection for a coaxial cable (supplied). 1 N ot available on all models . Back panel (PCV- 14 Ethernet port Connection for a 10BASE-T/100BASE-TX Ethernet interface. (The port marked with (Network) is s upplied with a DC power c able, whic h c an be purc...

VAIO User Guide
Page 78
...Before connecting compatible i.LINK devices to a connected i.LINK device. Plug the other . About i.LINK Compatibility Your VAIO® computer may not communicate with each other end of Sony used only to a connected i.LINK device, if the device is equipped with a 6-pin connector. A ...Plug the i.LINK cable connector into the corresponding 4- See the instructions that came with your digital devices. Page 78 For PCV-W series models only Your PCV-W series computer has two 4-pin i.LINK ports available to a connected i.LINK device. The 4-pin i.LINK ports do not supply ...
...Before connecting compatible i.LINK devices to a connected i.LINK device. Plug the other . About i.LINK Compatibility Your VAIO® computer may not communicate with each other end of Sony used only to a connected i.LINK device, if the device is equipped with a 6-pin connector. A ...Plug the i.LINK cable connector into the corresponding 4- See the instructions that came with your digital devices. Page 78 For PCV-W series models only Your PCV-W series computer has two 4-pin i.LINK ports available to a connected i.LINK device. The 4-pin i.LINK ports do not supply ...

VAIO User Guide
Page 85
...use the correct memory module for details about the amount and type of memory installed in your computer's configuration. RS410 series m odel) Installing a memory module Page 85 Unplug your computer and any cables, add-on both sides of the module and lift it from your local ...retailer. Grasp one edge of the module, to remove. 6. Locate the memory module(s) you wish to gently eject it out. Rem ov ing/Installing m em ory (PCV...
...use the correct memory module for details about the amount and type of memory installed in your computer's configuration. RS410 series m odel) Installing a memory module Page 85 Unplug your computer and any cables, add-on both sides of the module and lift it from your local ...retailer. Grasp one edge of the module, to remove. 6. Locate the memory module(s) you wish to gently eject it out. Rem ov ing/Installing m em ory (PCV...

VAIO User Guide
Page 87
...Lithium Battery The lithium battery starts to weaken after several years and the system settings, such as your computer and any peripheral devices. 4. Write down your computer and turn off all peripheral devices, such as the date and time stored in CMOS RAM, may... have made to the settings in the BIOS Setup utility. 2. Replacing a lithium battery Replacing a lithium battery (PCV- Replacing the lithium battery 1. If necessary, remove any changes you may become inaccurate. RS410 series...
...Lithium Battery The lithium battery starts to weaken after several years and the system settings, such as your computer and any peripheral devices. 4. Write down your computer and turn off all peripheral devices, such as the date and time stored in CMOS RAM, may... have made to the settings in the BIOS Setup utility. 2. Replacing a lithium battery Replacing a lithium battery (PCV- Replacing the lithium battery 1. If necessary, remove any changes you may become inaccurate. RS410 series...

VAIO User Guide
Page 88
...The values stored in the CMOS memory are now reset to your unwanted lithium batteries to the factory default values. You can return your nearest Sony Service Center or Factory Service Center. The Date and Time Properties window appears. 2. Click Apply, then click OK. In some areas, the... disposal of the lithium battery properly. Replacing the lithium battery (PCV-RS410 series model) Remove the old battery and install the new battery with the plus (+) side up. 8. Resetting the computer's date and time 1.
...The values stored in the CMOS memory are now reset to your unwanted lithium batteries to the factory default values. You can return your nearest Sony Service Center or Factory Service Center. The Date and Time Properties window appears. 2. Click Apply, then click OK. In some areas, the... disposal of the lithium battery properly. Replacing the lithium battery (PCV-RS410 series model) Remove the old battery and install the new battery with the plus (+) side up. 8. Resetting the computer's date and time 1.

VAIO User Guide
Page 89
... Wizard utility to take full advantage of your Sony computer. Using the Sony Online Support Web site For detailed information about the VAIO Recovery Wizard utility program: 1. Use the drop-down your computer and turn off all peripheral devices, such as your product, series, and model information. The model-specific support Web page appears. 3. Page 89...
... Wizard utility to take full advantage of your Sony computer. Using the Sony Online Support Web site For detailed information about the VAIO Recovery Wizard utility program: 1. Use the drop-down your computer and turn off all peripheral devices, such as your product, series, and model information. The model-specific support Web page appears. 3. Page 89...

VAIO User Guide
Page 118
...you are connected to the desired sound level. From the VAIO Help And Support Center menu, click VAIO Recovery Options. Page 118 From the Volume tab, adjust the Device volume by moving the slider bar to your computer. If the software application you want to use ...2. Click Start in the Windows volume control. The sound driver(s) may not be working properly. To access VAIO Recovery Options, follow these steps: 1. For PCV-V series models only Adjust the volume by pressing the volume control buttons located on the wireless keyboard. Click Start in the Windows...
...you are connected to the desired sound level. From the VAIO Help And Support Center menu, click VAIO Recovery Options. Page 118 From the Volume tab, adjust the Device volume by moving the slider bar to your computer. If the software application you want to use ...2. Click Start in the Windows volume control. The sound driver(s) may not be working properly. To access VAIO Recovery Options, follow these steps: 1. For PCV-V series models only Adjust the volume by pressing the volume control buttons located on the wireless keyboard. Click Start in the Windows...
VAIO User Guide
Page 119
... The sound driver(s) may not be working properly. For PCV-W series models only Adjust the volume control dial, located on the left panel, to mute the sound from your speakers if headphones are connected to your computer. If the software application you are charged. ... system volume. 3. Page 119 Click Start in the Windows taskbar, then select Control Panel. 2. From the VAIO Help And Support Center menu, click VAIO Recovery Options. For PCV-V series models only Adjust the volume by moving the slider bar to use an external power source, verify that the ...
... The sound driver(s) may not be working properly. For PCV-W series models only Adjust the volume control dial, located on the left panel, to mute the sound from your speakers if headphones are connected to your computer. If the software application you are charged. ... system volume. 3. Page 119 Click Start in the Windows taskbar, then select Control Panel. 2. From the VAIO Help And Support Center menu, click VAIO Recovery Options. For PCV-V series models only Adjust the volume by moving the slider bar to use an external power source, verify that the ...

