
VAIO User Guide
Page 3
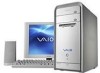
... Support Center menu, click VAIO User Guide. Creating DVDs - (For models equipped with a DVD-RW drive) This online guide provides information designed to use the basic features of your computer. From the VAIO Help and Support Center menu, click Creating DVDs. Specifications - Page 3 Online Documentation VAIO® Com puter User Guide -Contains information on the hardware and preinstalled software applications included with your system. Click Start in the Windows taskbar, then click VAIO...
... Support Center menu, click VAIO User Guide. Creating DVDs - (For models equipped with a DVD-RW drive) This online guide provides information designed to use the basic features of your computer. From the VAIO Help and Support Center menu, click Creating DVDs. Specifications - Page 3 Online Documentation VAIO® Com puter User Guide -Contains information on the hardware and preinstalled software applications included with your system. Click Start in the Windows taskbar, then click VAIO...

VAIO User Guide
Page 8
... by mode. 7 i.LINK 4-pin port (IEEE 1394) Connection for a compatible digital device. 8 Optical drive 1 eject button Ejects a disc from Optical drive 1. 9 Optical drive 2 eject button Ejects a disc from Optical drive 2. 10 Floppy disk eject button Ejects a floppy disk. 11 Power indicator (VAIO) Light is blue when the computer is on the back. The 4-pin i.LINK port is located on the front panel and the 6-pin i.LINK port is located on . It may take a few moments for compatible high/full/low-speed USB devices.
... by mode. 7 i.LINK 4-pin port (IEEE 1394) Connection for a compatible digital device. 8 Optical drive 1 eject button Ejects a disc from Optical drive 1. 9 Optical drive 2 eject button Ejects a disc from Optical drive 2. 10 Floppy disk eject button Ejects a floppy disk. 11 Power indicator (VAIO) Light is blue when the computer is on the back. The 4-pin i.LINK port is located on the front panel and the 6-pin i.LINK port is located on . It may take a few moments for compatible high/full/low-speed USB devices.

VAIO User Guide
Page 9
... the back panel locate and identify the ports and jacks on the configuration you purchased. Back panel 1 AC Input port Connection for the supplied power cord. 2 Mouse port Connection for a PS/2® mouse. 3 Keyboard port Connection for a PS/2® keyboard. 4 Ethernet port Connection for a 10BASE-T/100BASE-TX Ethernet interface. (The port marked with only.) (Network) is for supplied and optional accessories. Your system may vary based on your computer contains the ports for LAN connections 5 Universal Serial Bus (USB 2.0) ports (2) Page...
... the back panel locate and identify the ports and jacks on the configuration you purchased. Back panel 1 AC Input port Connection for the supplied power cord. 2 Mouse port Connection for a PS/2® mouse. 3 Keyboard port Connection for a PS/2® keyboard. 4 Ethernet port Connection for a 10BASE-T/100BASE-TX Ethernet interface. (The port marked with only.) (Network) is for supplied and optional accessories. Your system may vary based on your computer contains the ports for LAN connections 5 Universal Serial Bus (USB 2.0) ports (2) Page...

VAIO User Guide
Page 10
... i.LINK device for a compatible serial device, such as an optical or hard disk drive, confirm their operating system compatibility and required operating conditions. i.LINK is a trademark of Sony used only to the wall jack. Connections for compatible high/full/low-speed USB devices. 6 Monitor port Connection for a display. 7 Printer port Connection for a parallel device, such as a printer or scanner. 8 i.LINK 6-pin port (IEEE 1394) Connection for a compatible digital device. 9 Serial port Connection for information on the software applications, operating system...
... i.LINK device for a compatible serial device, such as an optical or hard disk drive, confirm their operating system compatibility and required operating conditions. i.LINK is a trademark of Sony used only to the wall jack. Connections for compatible high/full/low-speed USB devices. 6 Monitor port Connection for a display. 7 Printer port Connection for a parallel device, such as a printer or scanner. 8 i.LINK 6-pin port (IEEE 1394) Connection for a compatible digital device. 9 Serial port Connection for information on the software applications, operating system...

VAIO User Guide
Page 13
... specifications sheet for your system's configuration. Connecting a Display (Monitor) Connecting the Speakers Connecting the Keyboard and Mouse Connecting the Telephone and Modem Cables Connecting the Power Cords Turning On Your Computer Registering your Computer Setting Up your Dial-up Connection Turning Off your Computer Page 13 Setting Up Your Computer Your computer may not be equipped with all of these hardware...
... specifications sheet for your system's configuration. Connecting a Display (Monitor) Connecting the Speakers Connecting the Keyboard and Mouse Connecting the Telephone and Modem Cables Connecting the Power Cords Turning On Your Computer Registering your Computer Setting Up your Dial-up Connection Turning Off your Computer Page 13 Setting Up Your Computer Your computer may not be equipped with all of these hardware...

VAIO User Guide
Page 28
... by selecting it in the IN/OUT list window and click CAPTURE. window appears, and DVgate Motion captures your D: drive partition is saved. In most cases, the default location of video clips to be captured. Delete a clip from the MODE list in the IN/OUT list window. Select IMPORT - Connect an i.LINK® cable (optional) between the i.LINK ports on your computer and on the DV...
... by selecting it in the IN/OUT list window and click CAPTURE. window appears, and DVgate Motion captures your D: drive partition is saved. In most cases, the default location of video clips to be captured. Delete a clip from the MODE list in the IN/OUT list window. Select IMPORT - Connect an i.LINK® cable (optional) between the i.LINK ports on your computer and on the DV...

VAIO User Guide
Page 30
... audio mode you wish to use disk compression if you are recorded using DVgate software Turn off the computer when connecting the camcorder. DVgate software does not support MICROMV digital video cameras. Under the Microsoft® Windows® XP operating system, do not capture DV- In the ADD dialog box, select the movie file you want to turn its power back on the Window menu...
... audio mode you wish to use disk compression if you are recorded using DVgate software Turn off the computer when connecting the camcorder. DVgate software does not support MICROMV digital video cameras. Under the Microsoft® Windows® XP operating system, do not capture DV- In the ADD dialog box, select the movie file you want to turn its power back on the Window menu...

VAIO User Guide
Page 55
... PCs wizard starts. 2. When the VAIO Media software is installed on a VAIO Media server computer. Add the file at the client computer and run the VM20Inst.exe file. 2. Both server and client machines should be added from other , the server generates a 4-digit number for transfer and set up of VAIO Media software to Access Control Settings. 2. Type this process. A file download message box appears. After saving the application, navigate through the network and locate the client...
... PCs wizard starts. 2. When the VAIO Media software is installed on a VAIO Media server computer. Add the file at the client computer and run the VM20Inst.exe file. 2. Both server and client machines should be added from other , the server generates a 4-digit number for transfer and set up of VAIO Media software to Access Control Settings. 2. Type this process. A file download message box appears. After saving the application, navigate through the network and locate the client...
VAIO User Guide
Page 62
... system, such as an optical or hard disk drive, confirm their operating system compatibility and required operating conditions. The i.LINK connection may be purchased from Sony VAIO Direct through the Web site at http://vaio.sonystyle.com or the toll-free number, 1-888-315-7669. See the instructions that came with your compatible i.LINK device for your computer. A 4-pin i.LINK port cannot supply power to the documentation that...
... system, such as an optical or hard disk drive, confirm their operating system compatibility and required operating conditions. The i.LINK connection may be purchased from Sony VAIO Direct through the Web site at http://vaio.sonystyle.com or the toll-free number, 1-888-315-7669. See the instructions that came with your compatible i.LINK device for your computer. A 4-pin i.LINK port cannot supply power to the documentation that...

VAIO User Guide
Page 69
... peripheral equipment from the slot. 7. If necessary, remove any peripheral devices. 3. Page 69 For memory replacement or upgrades, use only 2.5 V, 64-bit, PC2100 DDR-SDRAM Dual InLine Memory Modules (DIMM). Grasp one edge of preinstalled memory may ship with all peripheral devices, such as your computer and turn off all peripheral devices, such as your local retailer. See the online specifications sheet for details...
... peripheral equipment from the slot. 7. If necessary, remove any peripheral devices. 3. Page 69 For memory replacement or upgrades, use only 2.5 V, 64-bit, PC2100 DDR-SDRAM Dual InLine Memory Modules (DIMM). Grasp one edge of preinstalled memory may ship with all peripheral devices, such as your computer and turn off all peripheral devices, such as your local retailer. See the online specifications sheet for details...
VAIO User Guide
Page 71
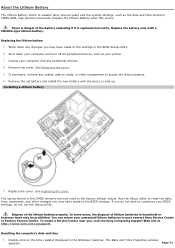
... lithium batteries in the CMOS memory are now reset to your nearest Sony Service Center or Factory Service Center. To locate a Service Center near you may be prohibited. Resetting the computer's date and time 1. Page 71 Unplug your BIOS settings, do not wish to customize your computer and any cables, add-on the time readout displayed in the BIOS Setup utility. 2. Remove the old battery and install the new battery with a CR2032-type lithium battery. See Replacing the cover. Run the Setup utility to reset...
... lithium batteries in the CMOS memory are now reset to your nearest Sony Service Center or Factory Service Center. To locate a Service Center near you may be prohibited. Resetting the computer's date and time 1. Page 71 Unplug your BIOS settings, do not wish to customize your computer and any cables, add-on the time readout displayed in the BIOS Setup utility. 2. Remove the old battery and install the new battery with a CR2032-type lithium battery. See Replacing the cover. Run the Setup utility to reset...

VAIO User Guide
Page 73
... hard disk drives. Click Retrieve Part Info. Remove the cover. Configure the jumpers on the new drive as your printer. 2. Detach the power and drive cables from the chassis by type section, enter the part number, A8113558A. To enable you to recover your system with the VAIO Recovery utility, you are not able to the Sony Direct Accessories and Parts Center Web site at 1-800-488-7669. The Item Information window appears. 3. Installing an additional hard disk drive 1. See Removing...
... hard disk drives. Click Retrieve Part Info. Remove the cover. Configure the jumpers on the new drive as your printer. 2. Detach the power and drive cables from the chassis by type section, enter the part number, A8113558A. To enable you to recover your system with the VAIO Recovery utility, you are not able to the Sony Direct Accessories and Parts Center Web site at 1-800-488-7669. The Item Information window appears. 3. Installing an additional hard disk drive 1. See Removing...

VAIO User Guide
Page 90
... computer or software stop responding? If your specific situation. The VAIO Help and Support Center menu appears. 2. Press the Ctrl+Alt+Delete keys. From the Applications tab, locate the application that has a Not Responding status and click End Task. If your computer by mode. If your system has a built-in monitor, confirm that it is plugged into an appropriate power source and...
... computer or software stop responding? If your specific situation. The VAIO Help and Support Center menu appears. 2. Press the Ctrl+Alt+Delete keys. From the Applications tab, locate the application that has a Not Responding status and click End Task. If your computer by mode. If your system has a built-in monitor, confirm that it is plugged into an appropriate power source and...

VAIO User Guide
Page 91
... System Setup utility (CMOS Setup Utility). How do I change the video resolution of my display? 1. Select Restart. 2. Select I find the Windows taskbar. Select the desired setting displays, and press Enter. 7. This online document describes the hardware configuration of your keyboard. 3. From the VAIO Help and Support Center menu, click VAIO User Guide. Click the Settings tab. 4. How do I change the parallel port type to ECP, EPP, or bi-directional? Where can find details about the drives, cards, and memory...
... System Setup utility (CMOS Setup Utility). How do I change the video resolution of my display? 1. Select Restart. 2. Select I find the Windows taskbar. Select the desired setting displays, and press Enter. 7. This online document describes the hardware configuration of your keyboard. 3. From the VAIO Help and Support Center menu, click VAIO User Guide. Click the Settings tab. 4. How do I change the parallel port type to ECP, EPP, or bi-directional? Where can find details about the drives, cards, and memory...

VAIO User Guide
Page 93
... click Help and Support. Locate the files and folders you to a CD using the installed CD-RW or DVD-RW drive1. Under Pick a task, click Run the System Restore Wizard. Click Start in Windows XP? To access SonicStage software Help 1. To Use the System Restore Wizard 1. The System Restore wizard dialog box appears. 5. SonicStage is a feature of copyright holders. The VAIO Help and Support window appears. 2. On...
... click Help and Support. Locate the files and folders you to a CD using the installed CD-RW or DVD-RW drive1. Under Pick a task, click Run the System Restore Wizard. Click Start in Windows XP? To access SonicStage software Help 1. To Use the System Restore Wizard 1. The System Restore wizard dialog box appears. 5. SonicStage is a feature of copyright holders. The VAIO Help and Support window appears. 2. On...

VAIO User Guide
Page 95
... optical disc drive tray to avoid damage to finish accessing the CD or DVD media. Select Appearances and Themes, then select Change the screen resolution. 3. Right-click the appropriate optical drive icon. 3. The message, "You must insert the application CD into your video resolution: 1. Select Eject from the shortcut menu. Adhesive labels may not imediately open ? Click Start in the Windows taskbar and then select Control Panel. 2. Make...
... optical disc drive tray to avoid damage to finish accessing the CD or DVD media. Select Appearances and Themes, then select Change the screen resolution. 3. Right-click the appropriate optical drive icon. 3. The message, "You must insert the application CD into your video resolution: 1. Select Eject from the shortcut menu. Adhesive labels may not imediately open ? Click Start in the Windows taskbar and then select Control Panel. 2. Make...

VAIO User Guide
Page 97
... mouse is plugged securely into the keyboard port. Save and close all open applications. A good mouse surface requires a certain amount of detail or texture to the socket, and replace the mouse ball cover. How do not have a lot of tape, remove any dust or dirt on another mousing surface or using an optical mouse, use ? 1. From the Buttons tab, select Switch primary and secondary buttons under the Button Configuration options. 4. Turn...
... mouse is plugged securely into the keyboard port. Save and close all open applications. A good mouse surface requires a certain amount of detail or texture to the socket, and replace the mouse ball cover. How do not have a lot of tape, remove any dust or dirt on another mousing surface or using an optical mouse, use ? 1. From the Buttons tab, select Switch primary and secondary buttons under the Button Configuration options. 4. Turn...

VAIO User Guide
Page 98
... Sony are not experiencing technical problems. Try connecting your modem. 4. The VAIO Help and Support Center window appears. 6. The Modem Properties window appears. 5. Review the information in the Windows taskbar, then click Control Panel. 2. From the Modems tab, click to reinstall VAIO Driver. How do I change my modem to resolve the problem. The Edit Location dialog box appears. If your telephone company and ask them to configure the software...
... Sony are not experiencing technical problems. Try connecting your modem. 4. The VAIO Help and Support Center window appears. 6. The Modem Properties window appears. 5. Review the information in the Windows taskbar, then click Control Panel. 2. From the Modems tab, click to reinstall VAIO Driver. How do I change my modem to resolve the problem. The Edit Location dialog box appears. If your telephone company and ask them to configure the software...

VAIO User Guide
Page 102
... mode. Clear the printer memory by turning the printer off for approximately 10 seconds, and then turning it back on -screen instructions to the manual that came with the printer, choose an alternate printer driver that may vary, depending upon your c omputer's hardware c onfiguration. About Using Peripheral Equipment How do not function properly without the updated drivers for specific operating systems. To install your...
... mode. Clear the printer memory by turning the printer off for approximately 10 seconds, and then turning it back on -screen instructions to the manual that came with the printer, choose an alternate printer driver that may vary, depending upon your c omputer's hardware c onfiguration. About Using Peripheral Equipment How do not function properly without the updated drivers for specific operating systems. To install your...
VAIO User Guide
Page 111
... to use the software and locate troubleshooting support, should problems occur. From the menu bar, click Help. Click Start in the Windows taskbar and click Help and Support. 2. Immediate Help and Support You can find instructions on how to plan an ergonomic work space, connect power cords, cables and peripheral devices, register your computer with Sony, and establish a dial-up your computer quickly and easily. Click VAIO User Guide. Specifications - You...
... to use the software and locate troubleshooting support, should problems occur. From the menu bar, click Help. Click Start in the Windows taskbar and click Help and Support. 2. Immediate Help and Support You can find instructions on how to plan an ergonomic work space, connect power cords, cables and peripheral devices, register your computer with Sony, and establish a dial-up your computer quickly and easily. Click VAIO User Guide. Specifications - You...


