
Instruction Manual
Page 1
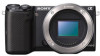
4-469-371-11(1) Interchangeable Lens Digital Camera Instruction Manual E-mount Preparing the camera Mastering the basic operation Using the recording functions Using the playback functions Checking the functions available Importing images to the computer Adding functions to the camera Others NEX-5T
4-469-371-11(1) Interchangeable Lens Digital Camera Instruction Manual E-mount Preparing the camera Mastering the basic operation Using the recording functions Using the playback functions Checking the functions available Importing images to the computer Adding functions to the camera Others NEX-5T

Instruction Manual
Page 3
...without testing of specific absorption ratio (SAR). This equipment has very low levels of RF energy that can help preserve our environment by Sony. • Dispose of used battery packs promptly as described in the instructions. [ AC Adaptor Use the nearby wall outlet (wall socket...Adaptor from the wall outlet (wall socket) immediately if any interference received, including interference that may not cause harmful interference, and (2) this camera only, and should not be used rechargeable batteries to the collection and recycling location nearest you. GB 3 • Do not incinerate or...
...without testing of specific absorption ratio (SAR). This equipment has very low levels of RF energy that can help preserve our environment by Sony. • Dispose of used battery packs promptly as described in the instructions. [ AC Adaptor Use the nearby wall outlet (wall socket...Adaptor from the wall outlet (wall socket) immediately if any interference received, including interference that may not cause harmful interference, and (2) this camera only, and should not be used rechargeable batteries to the collection and recycling location nearest you. GB 3 • Do not incinerate or...
Instruction Manual
Page 5
... in the countries applying EU Directives Manufacturer: Sony Corporation, 1-7-1 Konan Minato-ku Tokyo, 108-0075 Japan For EU product compliance: Sony Deutschland GmbH, Hedelfinger Strasse 61, 70327 Stuttgart, Germany Hereby, Sony Corporation, declares that may cause undesired operation of...standard(s). The supplied interface cable must accept any interference, including interference that this NEX-5T Interchangeable Lens Digital Camera is subject to the following URL: http://www.compliance.sony.de/ [ Notice If static electricity or electromagnetism causes data transfer to discontinue ...
... in the countries applying EU Directives Manufacturer: Sony Corporation, 1-7-1 Konan Minato-ku Tokyo, 108-0075 Japan For EU product compliance: Sony Deutschland GmbH, Hedelfinger Strasse 61, 70327 Stuttgart, Germany Hereby, Sony Corporation, declares that may cause undesired operation of...standard(s). The supplied interface cable must accept any interference, including interference that this NEX-5T Interchangeable Lens Digital Camera is subject to the following URL: http://www.compliance.sony.de/ [ Notice If static electricity or electromagnetism causes data transfer to discontinue ...

Instruction Manual
Page 7
Table of contents Preparing the camera Checking the supplied items 9 Identifying parts 10 Charging the battery pack 14 Attaching/removing the lens 19 Inserting a memory card (sold separately 21 Attaching the ... time 24 Mastering the basic operation Shooting still images 26 Recording movies 28 Playing back images 29 Deleting images 31 Operating the camera 32 Using the guide function of the camera 36 Using the recording functions Setting the function using [Photo Creativity 37 Adjusting the brightness of still images (Exposure compensation 40...
Table of contents Preparing the camera Checking the supplied items 9 Identifying parts 10 Charging the battery pack 14 Attaching/removing the lens 19 Inserting a memory card (sold separately 21 Attaching the ... time 24 Mastering the basic operation Shooting still images 26 Recording movies 28 Playing back images 29 Deleting images 31 Operating the camera 32 Using the guide function of the camera 36 Using the recording functions Setting the function using [Photo Creativity 37 Adjusting the brightness of still images (Exposure compensation 40...
Instruction Manual
Page 8
...supplied lens. Checking the functions available Menu list 55 Functions available for each shooting mode 66 Flash modes available 67 Importing images to the camera 72 Others Checking the number of recordable images 74 List of icons on the LCD screen 77 Learning more about the...regions. This manual covers several models supplied with the supplied software 70 Adding functions to the camera Adding functions to the computer Installing the software 68 What you can do with different lenses. Model name NEX-5T NEX-5TL GB 8 NEX-5TY Lens Not supplied E16 - 50 mm E55 - 210 mm and E16 - 50 ...
...supplied lens. Checking the functions available Menu list 55 Functions available for each shooting mode 66 Flash modes available 67 Importing images to the camera 72 Others Checking the number of recordable images 74 List of icons on the LCD screen 77 Learning more about the...regions. This manual covers several models supplied with the supplied software 70 Adding functions to the camera Adding functions to the computer Installing the software 68 What you can do with different lenses. Model name NEX-5T NEX-5TL GB 8 NEX-5TY Lens Not supplied E16 - 50 mm E55 - 210 mm and E16 - 50 ...
Instruction Manual
Page 9
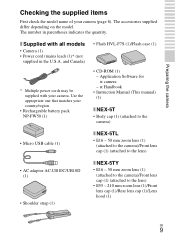
... number in the U.S.A. Use the appropriate one that matches your camera. Application Software for α camera - α Handbook • Instruction Manual (This manual) (1) x NEX-5T • Body cap (1) (attached to the camera) • Micro USB cable (1) x NEX-5TL • E16 - 50 mm zoom lens (1) (attached to the camera)/Front lens cap (1) (attached to the lens) • AC...
... number in the U.S.A. Use the appropriate one that matches your camera. Application Software for α camera - α Handbook • Instruction Manual (This manual) (1) x NEX-5T • Body cap (1) (attached to the camera) • Micro USB cable (1) x NEX-5TL • E16 - 50 mm zoom lens (1) (attached to the camera)/Front lens cap (1) (attached to the lens) • AC...
Instruction Manual
Page 10
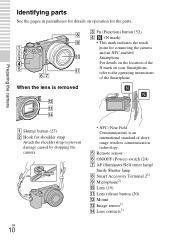
...wireless communication technology. C Fn (Function) button (52) D (N mark) • This mark indicates the touch point for connecting the camera and an NFC-enabled Smartphone. Identifying parts See the pages in parentheses for details on your Smartphone, refer to prevent damage caused by dropping ...the camera. • NFC (Near Field Communication) is removed Preparing the camera A Shutter button (27) B Hook for shoulder strap Attach the shoulder strap to the operating instructions of...
...wireless communication technology. C Fn (Function) button (52) D (N mark) • This mark indicates the touch point for connecting the camera and an NFC-enabled Smartphone. Identifying parts See the pages in parentheses for details on your Smartphone, refer to prevent damage caused by dropping ...the camera. • NFC (Near Field Communication) is removed Preparing the camera A Shutter button (27) B Hook for shoulder strap Attach the shoulder strap to the operating instructions of...

Instruction Manual
Page 11
... the LCD screen after Self-portrait shooting, lower the LCD screen completely until it fits against the camera body, then slide the LCD screen upward until both the bottoms of the LCD screen and the camera body are attached to an easily viewable angle and shoot from any position. • Tilt the... you take a selfportrait. You cannot use the [Self-portrait Self-timer] function when a flash HVL-F7S (supplied) or accessories are aligned. GB 11 Preparing the camera A Image sensor position mark B Wi-Fi sensor (built-in the default setting.
... the LCD screen after Self-portrait shooting, lower the LCD screen completely until it fits against the camera body, then slide the LCD screen upward until both the bottoms of the LCD screen and the camera body are attached to an easily viewable angle and shoot from any position. • Tilt the... you take a selfportrait. You cannot use the [Self-portrait Self-timer] function when a flash HVL-F7S (supplied) or accessories are aligned. GB 11 Preparing the camera A Image sensor position mark B Wi-Fi sensor (built-in the default setting.
Instruction Manual
Page 12
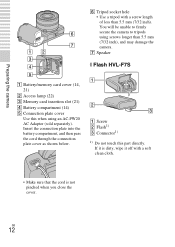
Insert the connection plate into the battery compartment, and then pass the cord through the connection plate cover as shown below. Preparing the camera F Tripod socket hole • Use a tripod with a soft clean cloth. • Make sure that the cord is not pinched when you close the cover. ...You will be unable to firmly secure the camera to tripods using an AC-PW20 AC Adaptor (sold separately). G Speaker x Flash HVL-F7S A Battery/memory card cover (14, 21) B Access lamp (22) C Memory ...
Insert the connection plate into the battery compartment, and then pass the cord through the connection plate cover as shown below. Preparing the camera F Tripod socket hole • Use a tripod with a soft clean cloth. • Make sure that the cord is not pinched when you close the cover. ...You will be unable to firmly secure the camera to tripods using an AC-PW20 AC Adaptor (sold separately). G Speaker x Flash HVL-F7S A Battery/memory card cover (14, 21) B Access lamp (22) C Memory ...

Instruction Manual
Page 13
GB 13 A Focusing ring B Zooming ring C Focal-length scale D Focal-length index E Lens contacts1) F Mounting index 1) Do not touch this part directly. Preparing the camera x Lens See page 96 on the specifications of the lenses. E PZ 16 - 50 mm F3.5-5.6 OSS (supplied with NEX-5TL/NEX-5TY) E55 - 210 mm F4.5-6.3 OSS (supplied with NEX-5TY) A Zooming/Focusing ring B Zooming lever C Mounting index D Lens contacts1) 1) Do not touch this part directly.
GB 13 A Focusing ring B Zooming ring C Focal-length scale D Focal-length index E Lens contacts1) F Mounting index 1) Do not touch this part directly. Preparing the camera x Lens See page 96 on the specifications of the lenses. E PZ 16 - 50 mm F3.5-5.6 OSS (supplied with NEX-5TL/NEX-5TY) E55 - 210 mm F4.5-6.3 OSS (supplied with NEX-5TY) A Zooming/Focusing ring B Zooming lever C Mounting index D Lens contacts1) 1) Do not touch this part directly.
Instruction Manual
Page 14
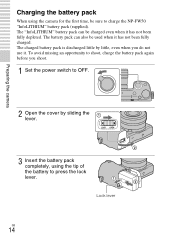
... it has not been fully depleted. The "InfoLITHIUM" battery pack can also be sure to charge the NP-FW50 "InfoLITHIUM" battery pack (supplied). Preparing the camera Charging the battery pack When using the tip of the battery to OFF. 2 Open the cover by little, even when you do not use it... power switch to press the lock lever. The charged battery pack is discharged little by sliding the lever. 3 Insert the battery pack completely, using the camera for the first time, be used when it .
... it has not been fully depleted. The "InfoLITHIUM" battery pack can also be sure to charge the NP-FW50 "InfoLITHIUM" battery pack (supplied). Preparing the camera Charging the battery pack When using the tip of the battery to OFF. 2 Open the cover by little, even when you do not use it... power switch to press the lock lever. The charged battery pack is discharged little by sliding the lever. 3 Insert the battery pack completely, using the camera for the first time, be used when it .

Instruction Manual
Page 15
For customers in the USA and Canada Preparing the camera Power cord (Mains lead) For customers in countries/regions other than the USA and Canada ...the micro USB cable (supplied). If the power switch is outside the recommended range. Connect the AC Adaptor to ON, the camera cannot charge the battery. • When the charge lamp flashes, remove and re-insert the battery pack. GB 15 The ...in a straight line and do not exert undue force. • Even when fully inserted into the camera, the metal portion of the USB cable (supplied) will be visible. 4 Close the cover. 5 Connect the...
For customers in the USA and Canada Preparing the camera Power cord (Mains lead) For customers in countries/regions other than the USA and Canada ...the micro USB cable (supplied). If the power switch is outside the recommended range. Connect the AC Adaptor to ON, the camera cannot charge the battery. • When the charge lamp flashes, remove and re-insert the battery pack. GB 15 The ...in a straight line and do not exert undue force. • Even when fully inserted into the camera, the metal portion of the USB cable (supplied) will be visible. 4 Close the cover. 5 Connect the...

Instruction Manual
Page 16
... of between 10 °C and 30 °C (50 ºF and 86 ºF). • The charge lamp may take longer depending on the camera flashes when the AC Adaptor is finished, disconnect the AC Adaptor from the wall outlet (wall socket). • Be sure to use and circumstances. GB... the charging resumes. Charging time may flash quickly when the battery pack is approximately 280 minutes using the AC Adaptor (supplied). Preparing the camera Notes • If the charge lamp on conditions of use only genuine Sony brand battery packs, micro USB cable (supplied) and AC Adaptor (supplied).
... of between 10 °C and 30 °C (50 ºF and 86 ºF). • The charge lamp may take longer depending on the camera flashes when the AC Adaptor is finished, disconnect the AC Adaptor from the wall outlet (wall socket). • Be sure to use and circumstances. GB... the charging resumes. Charging time may flash quickly when the battery pack is approximately 280 minutes using the AC Adaptor (supplied). Preparing the camera Notes • If the charge lamp on conditions of use only genuine Sony brand battery packs, micro USB cable (supplied) and AC Adaptor (supplied).

Instruction Manual
Page 17
...from the computer. - We do not guarantee operation with all computers. You may not be charged by connecting the camera to a computer using at the same time. z Using your camera and AC Adaptor in any countries/regions where the power supply is not connected to a power source, the laptop battery... level decreases. If the camera is connected to a laptop computer that is within 100 V to 240 V AC, 50 Hz/60 Hz. GB 17 Preparing the camera x Charging by connecting to a computer The battery pack can use may cause a malfunction....
...from the computer. - We do not guarantee operation with all computers. You may not be charged by connecting the camera to a computer using at the same time. z Using your camera and AC Adaptor in any countries/regions where the power supply is not connected to a power source, the laptop battery... level decreases. If the camera is connected to a laptop computer that is within 100 V to 240 V AC, 50 Hz/60 Hz. GB 17 Preparing the camera x Charging by connecting to a computer The battery pack can use may cause a malfunction....

Instruction Manual
Page 18
...not to the operating conditions of the arrow, and pull out the battery pack. x Removing the battery pack Turn off the camera, make sure that has functions for exchanging information related to operating conditions with the following indicators and percent figures displayed on the ... figures is a lithium-ion battery pack that the access lamp is an "InfoLITHIUM" battery pack? Preparing the camera x Checking the remaining battery level Check the level with your camera. Notes • In some circumstances, the displayed battery level may differ from the actual battery level. An ...
...not to the operating conditions of the arrow, and pull out the battery pack. x Removing the battery pack Turn off the camera, make sure that has functions for exchanging information related to operating conditions with the following indicators and percent figures displayed on the ... figures is a lithium-ion battery pack that the access lamp is an "InfoLITHIUM" battery pack? Preparing the camera x Checking the remaining battery level Check the level with your camera. Notes • In some circumstances, the displayed battery level may differ from the actual battery level. An ...
Instruction Manual
Page 19
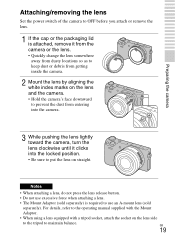
... the packaging lid is required to use excessive force when attaching a lens. • The Mount Adaptor (sold separately) is attached, remove it from the camera or the lens. • Quickly change the lens somewhere away from dusty locations so as to keep dust or debris from getting inside the... the lens by aligning the white index marks on the lens and the camera. • Hold the camera's face downward to prevent the dust from entering into the camera. 3 While pushing the lens lightly toward the camera, turn the lens clockwise until it clicks into the locked position. • Be sure to put...
... the packaging lid is required to use excessive force when attaching a lens. • The Mount Adaptor (sold separately) is attached, remove it from the camera or the lens. • Quickly change the lens somewhere away from dusty locations so as to keep dust or debris from getting inside the... the lens by aligning the white index marks on the lens and the camera. • Hold the camera's face downward to prevent the dust from entering into the camera. 3 While pushing the lens lightly toward the camera, turn the lens clockwise until it clicks into the locked position. • Be sure to put...
Instruction Manual
Page 20
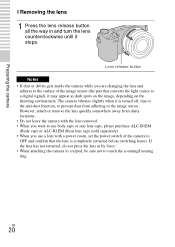
...remove the lens quickly somewhere away from adhering to the image sensor. GB 20 The camera vibrates slightly when it is completely retracted before switching lenses. Lens release button Notes • If dust... or debris gets inside the camera while you are changing the lens and adheres to the surface of the image sensor (... due to the anti-dust function, to prevent dust from dusty locations. • Do not leave the camera with the lens removed. • When you want to use body caps or rear lens caps, please purchase...
...remove the lens quickly somewhere away from adhering to the image sensor. GB 20 The camera vibrates slightly when it is completely retracted before switching lenses. Lens release button Notes • If dust... or debris gets inside the camera while you are changing the lens and adheres to the surface of the image sensor (... due to the anti-dust function, to prevent dust from dusty locations. • Do not leave the camera with the lens removed. • When you want to use body caps or rear lens caps, please purchase...

Instruction Manual
Page 21
GB 21 Check on the direction of the notched corner. Preparing the camera Inserting a memory card (sold separately) 1 Open the cover. 2 Insert a memory card. • Insert the memory card until it clicks as illustrated. 3 Close the cover.
GB 21 Check on the direction of the notched corner. Preparing the camera Inserting a memory card (sold separately) 1 Open the cover. 2 Insert a memory card. • Insert the memory card until it clicks as illustrated. 3 Close the cover.

Instruction Manual
Page 22
...be imported to format the card. Never format the card in this prompt, as doing so will erase all types of memory cards with this camera. Preparing the camera x Memory cards that are not compatible with exFAT. However, proper operation cannot be corrupted. If you connect your... can use following types of the memory cards. Access lamp Notes • When the access lamp is compatible with exFAT before connecting it to the camera. GB 22 Usable memory card Still image Movie Term in response to this manual "Memory Stick PRO Duo" media "Memory Stick PRO-HG Duo" media...
...be imported to format the card. Never format the card in this prompt, as doing so will erase all types of memory cards with this camera. Preparing the camera x Memory cards that are not compatible with exFAT. However, proper operation cannot be corrupted. If you connect your... can use following types of the memory cards. Access lamp Notes • When the access lamp is compatible with exFAT before connecting it to the camera. GB 22 Usable memory card Still image Movie Term in response to this manual "Memory Stick PRO Duo" media "Memory Stick PRO-HG Duo" media...

Instruction Manual
Page 23
...When you want to use the [Self-portrait Self-timer] function when a flash is attached to the camera. Set the power switch of the camera to OFF before you are not using it from the camera. Notes • The power for the flash is provided from harm. To change the setting, see page...you attach or remove the flash. 1 Attach the flash to protect it to the Smart Accessory Terminal 2 of the camera. • Plug the flash fully into the Smart Accessory Terminal 2 of the camera, and fasten the screw securely. GB 23 z Carrying the flash The flash case can be conveniently attached to the...
...When you want to use the [Self-portrait Self-timer] function when a flash is attached to the camera. Set the power switch of the camera to OFF before you are not using it from the camera. Notes • The power for the flash is provided from harm. To change the setting, see page...you attach or remove the flash. 1 Attach the flash to protect it to the Smart Accessory Terminal 2 of the camera. • Plug the flash fully into the Smart Accessory Terminal 2 of the camera, and fasten the screw securely. GB 23 z Carrying the flash The flash case can be conveniently attached to the...


