α Handbook
Page 9
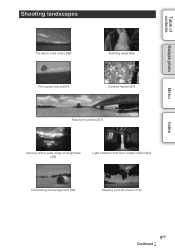
Table of contents Sample photo Menu Shooting landscapes 43 The sky in vivid colors (43) 63 Running water (63) 97 Vivid green colors (97) 97 Colored leaves (97) 57 Panoramic photos (57) 93 Scenery with a wide range of brightness (93) 93 Light outdoors shot from a dark interior (93) 34 Defocusing the background (34) 112 Keeping your shot level (112) Index 9GB Continued r
Table of contents Sample photo Menu Shooting landscapes 43 The sky in vivid colors (43) 63 Running water (63) 97 Vivid green colors (97) 97 Colored leaves (97) 57 Panoramic photos (57) 93 Scenery with a wide range of brightness (93) 93 Light outdoors shot from a dark interior (93) 34 Defocusing the background (34) 112 Keeping your shot level (112) Index 9GB Continued r
α Handbook
Page 22
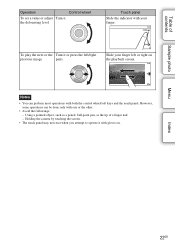
... Control wheel To set a value or adjust Turn it with both the control wheel/soft keys and the touch panel. Menu Index 22GB the defocusing level Touch panel Slide the indicator with one or the other. • Avoid the followings: - Slide your finger. Holding the camera by touching the screen. •...
... Control wheel To set a value or adjust Turn it with both the control wheel/soft keys and the touch panel. Menu Index 22GB the defocusing level Touch panel Slide the indicator with one or the other. • Avoid the followings: - Slide your finger. Holding the camera by touching the screen. •...

α Handbook
Page 26
.... Enhances the outline of in dim places. Shooting Settings AF Illuminator Red Eye Reduction FINDER/LCD Setting Live View Display Auto Review Grid Line Peaking Level Peaking Color MF Assist MF Assist Time Color Space SteadyShot Release w/o Lens Eye-Start AF Front Curtain Shutter Long Exposure NR High ISO NR Lens...
.... Enhances the outline of in dim places. Shooting Settings AF Illuminator Red Eye Reduction FINDER/LCD Setting Live View Display Auto Review Grid Line Peaking Level Peaking Color MF Assist MF Assist Time Color Space SteadyShot Release w/o Lens Eye-Start AF Front Curtain Shutter Long Exposure NR High ISO NR Lens...

α Handbook
Page 74
... all registered faces. Note • You cannot select position 8 by a hat, a mask, sunglasses, etc. Use the control wheel to change the priority. 3 Select the priority level. Order Exchanging Changes the priority of the position, the higher the priority. Select a face and press OK. Index 74GB The smaller the number of faces...
... all registered faces. Note • You cannot select position 8 by a hat, a mask, sunglasses, etc. Use the control wheel to change the priority. 3 Select the priority level. Order Exchanging Changes the priority of the position, the higher the priority. Select a face and press OK. Index 74GB The smaller the number of faces...
α Handbook
Page 75
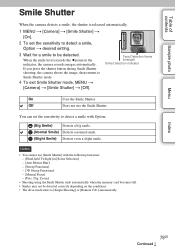
... automatically. Zoom] • Shooting using the Smile Shutter ends automatically when the memory card becomes full. • Smiles may not be detected. When the smile level exceeds the b point on the conditions. • The drive mode turns to Smile Shutter mode. 4 To exit Smile Shutter mode, MENU t [Camera] t [Smile Shutter] t [Off...
... automatically. Zoom] • Shooting using the Smile Shutter ends automatically when the memory card becomes full. • Smiles may not be detected. When the smile level exceeds the b point on the conditions. • The drive mode turns to Smile Shutter mode. 4 To exit Smile Shutter mode, MENU t [Camera] t [Smile Shutter] t [Off...
α Handbook
Page 76
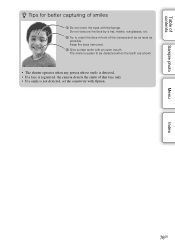
.... 76GB Keep the eyes narrowed. 3 Give a clear smile with the bangs. Do not obscure the face by a hat, masks, sunglasses, etc. 2 Try to be as level as possible.
.... 76GB Keep the eyes narrowed. 3 Give a clear smile with the bangs. Do not obscure the face by a hat, masks, sunglasses, etc. 2 Try to be as level as possible.

α Handbook
Page 87
... using the following functions: - [Intelligent Auto] - [Scene Selection] - [Anti Motion Blur] - [Sweep Panorama] - [3D Sweep Panorama] • The larger the number, the higher the noise level. • When the exposure mode is set between ISO100 and ISO3200. • The [ISO AUTO] setting is the sensitivity to become visible. However, increasing ISO...
... using the following functions: - [Intelligent Auto] - [Scene Selection] - [Anti Motion Blur] - [Sweep Panorama] - [3D Sweep Panorama] • The larger the number, the higher the noise level. • When the exposure mode is set between ISO100 and ISO3200. • The [ISO AUTO] setting is the sensitivity to become visible. However, increasing ISO...
α Handbook
Page 92
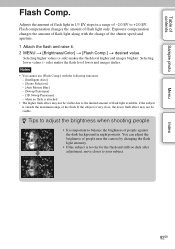
side) makes the flash level lower and images darker. Notes • You cannot use [Flash Comp.] with the change of people against the dark background in a range of contents Sample ... Blur] - [Sweep Panorama] - [3D Sweep Panorama] - Adjusts the amount of flash light in 1/3 EV steps in night portraits. Selecting higher values (+ side) makes the flash level higher and images brighter. You can adjust the brightness of flash light only. Flash compensation changes the amount of people near the camera by changing...
side) makes the flash level lower and images darker. Notes • You cannot use [Flash Comp.] with the change of people against the dark background in a range of contents Sample ... Blur] - [Sweep Panorama] - [3D Sweep Panorama] - Adjusts the amount of flash light in 1/3 EV steps in night portraits. Selecting higher values (+ side) makes the flash level higher and images brighter. You can adjust the brightness of flash light only. Flash compensation changes the amount of people near the camera by changing...

α Handbook
Page 93
...Manual Exposure] - [Shutter Priority] - [Aperture Priority] - [Program Auto] D-Range Opt. Lv5 Corrects the brightness automatically. Select the proper level by checking the recorded image, especially when you enhance the effect. Index 93GB Continued r By dividing the image into small areas, the camera ...gradations of a recorded image in [Scene Selection] • When shooting with the optimal brightness and gradation. Select the optimal level between the subject and the background, producing the image with the D-Range optimizer, the image may be noisy. Corrects the brightness...
...Manual Exposure] - [Shutter Priority] - [Aperture Priority] - [Program Auto] D-Range Opt. Lv5 Corrects the brightness automatically. Select the proper level by checking the recorded image, especially when you enhance the effect. Index 93GB Continued r By dividing the image into small areas, the camera ...gradations of a recorded image in [Scene Selection] • When shooting with the optimal brightness and gradation. Select the optimal level between the subject and the background, producing the image with the D-Range optimizer, the image may be noisy. Corrects the brightness...
α Handbook
Page 94
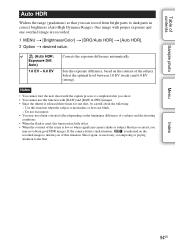
Select the optimal level between 1.0 EV (weak) and 6.0 EV (strong). Auto) 1.0 EV - 6.0 EV Corrects the exposure difference automatically. Notes • You cannot start the next shoot until the capture ...
Select the optimal level between 1.0 EV (weak) and 6.0 EV (strong). Auto) 1.0 EV - 6.0 EV Corrects the exposure difference automatically. Notes • You cannot start the next shoot until the capture ...

α Handbook
Page 112
... help you to what extent your composition. z Checking the frame for movie recording Frame for a well-balanced composition. This enables you to confirm the horizontal level of contents Sample photo Grid Line Sets whether the grid line is displayed or not. Table of your subject is included in the frame.
... help you to what extent your composition. z Checking the frame for movie recording Frame for a well-balanced composition. This enables you to confirm the horizontal level of contents Sample photo Grid Line Sets whether the grid line is displayed or not. Table of your subject is included in the frame.

α Handbook
Page 113
... confirm the focus easily. 1 MENU t [Setup] t [Peaking Level] t desired setting. Table of contents Sample photo Peaking Level Enhances the outline of in-focus ranges with a specific color in -focus ranges is not enhanced when the camera is different, depending on the subject, ... in manual focus. This function allows you to middle. Does not use the peaking function. Sets the peaking level to high. Notes • Since the camera judges that sharp areas are in focus, the peaking level is connected using an HDMI cable. Menu Index 113GB High Mid Low Off Sets the peaking...
... confirm the focus easily. 1 MENU t [Setup] t [Peaking Level] t desired setting. Table of contents Sample photo Peaking Level Enhances the outline of in-focus ranges with a specific color in -focus ranges is not enhanced when the camera is different, depending on the subject, ... in manual focus. This function allows you to middle. Does not use the peaking function. Sets the peaking level to high. Notes • Since the camera judges that sharp areas are in focus, the peaking level is connected using an HDMI cable. Menu Index 113GB High Mid Low Off Sets the peaking...
α Handbook
Page 114
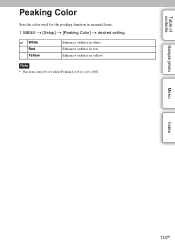
Enhances outlines in yellow. Sample photo Menu Index 114GB Enhances outlines in red. White Red Yellow Enhances outlines in manual focus. 1 MENU t [Setup] t [Peaking Color] t desired setting. Note • This item cannot be set when [Peaking Level] is set to [Off]. Table of contents Peaking Color Sets the color used for the peaking function in white.
Enhances outlines in yellow. Sample photo Menu Index 114GB Enhances outlines in red. White Red Yellow Enhances outlines in manual focus. 1 MENU t [Setup] t [Peaking Color] t desired setting. Note • This item cannot be set when [Peaking Level] is set to [Off]. Table of contents Peaking Color Sets the color used for the peaking function in white.
α Handbook
Page 150
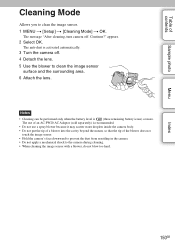
appears. 2 Select OK. Continue?" Notes • Cleaning can be performed only when the battery level is activated automatically. 3 Turn the camera off . The anti-dust is (three remaining battery icons) or more. The use of an AC-PW20 AC Adaptor (...
appears. 2 Select OK. Continue?" Notes • Cleaning can be performed only when the battery level is activated automatically. 3 Turn the camera off . The anti-dust is (three remaining battery icons) or more. The use of an AC-PW20 AC Adaptor (...

α Handbook
Page 151
We recommend that you use a sufficient battery or the AC-PW20 AC Adaptor (sold separately). 151GB Confirm the version when a firmware update is (three remaining battery icons) or more. Table of contents Sample photo Menu Index Version Displays the version of your camera and lens. Note • An update can be performed only when the battery level is released. 1 MENU t [Setup] t [Version].
We recommend that you use a sufficient battery or the AC-PW20 AC Adaptor (sold separately). 151GB Confirm the version when a firmware update is (three remaining battery icons) or more. Table of contents Sample photo Menu Index Version Displays the version of your camera and lens. Note • An update can be performed only when the battery level is released. 1 MENU t [Setup] t [Version].

α Handbook
Page 180
... "PMB Help." • Consult the computer or software manufacturer. Computers Not sure if the OS of the computer is turned on . • When the battery level is low, install the charged battery pack, or use the AC Adaptor (sold separately). • Use the USB cable (supplied) for your OS. • When...
... "PMB Help." • Consult the computer or software manufacturer. Computers Not sure if the OS of the computer is turned on . • When the battery level is low, install the charged battery pack, or use the AC Adaptor (sold separately). • Use the USB cable (supplied) for your OS. • When...
α Handbook
Page 183
... do any further shooting during this reduction process. Incompatible battery. It may not be able to clean the image sensor (Cleaning Mode) when the battery level is not attached.
... do any further shooting during this reduction process. Incompatible battery. It may not be able to clean the image sensor (Cleaning Mode) when the battery level is not attached.
α Handbook
Page 198
... 85 Multi 69, 91 N New Folder 158 Night Portrait 54 Night Scene 54 O Object Tracking 71 P Panorama 57 Panorama Direction 84 Peaking Color 114 Peaking Level 113 Photo Creativity 33 Picture Effect 38, 95 Playback 30 Playback Display 146 Playback on TV 162 Playback zoom 31 PMB 168 PMB Launcher 167...
... 85 Multi 69, 91 N New Folder 158 Night Portrait 54 Night Scene 54 O Object Tracking 71 P Panorama 57 Panorama Direction 84 Peaking Color 114 Peaking Level 113 Photo Creativity 33 Picture Effect 38, 95 Playback 30 Playback Display 146 Playback on TV 162 Playback zoom 31 PMB 168 PMB Launcher 167...
Instruction Manual
Page 17
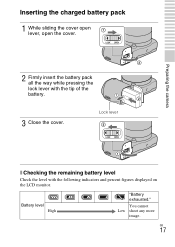
Battery level High "Battery exhausted." GB 17 You cannot Low shoot any more image. Lock lever x Checking the remaining battery level Check the level with the tip of the battery. 3 Close the cover. Preparing the camera Inserting the charged battery pack 1 While sliding the cover open lever, open the cover. 2 Firmly insert the battery pack all the way while pressing the lock lever with the following indicators and percent figures displayed on the LCD monitor.
Battery level High "Battery exhausted." GB 17 You cannot Low shoot any more image. Lock lever x Checking the remaining battery level Check the level with the tip of the battery. 3 Close the cover. Preparing the camera Inserting the charged battery pack 1 While sliding the cover open lever, open the cover. 2 Firmly insert the battery pack all the way while pressing the lock lever with the following indicators and percent figures displayed on the LCD monitor.

Instruction Manual
Page 18
... the battery pack. Using the "InfoLITHIUM" battery pack, the remaining battery time in the direction of your camera. Preparing the camera Note • The displayed level may not be correct under certain circumstances. z What is not lit, slide the lock lever in percent figures is a lithium-ion battery pack that the...
... the battery pack. Using the "InfoLITHIUM" battery pack, the remaining battery time in the direction of your camera. Preparing the camera Note • The displayed level may not be correct under certain circumstances. z What is not lit, slide the lock lever in percent figures is a lithium-ion battery pack that the...