α Handbook
Page 13
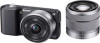
NEX-5/5C NEX-3/3C Flash A Battery/memory card cover B Tripod receptacle • Use a tripod with a screw length of contents E Access lamp F... into the battery compartment, then pass the cord through the connection plate cover as shown below. You will be unable to firmly secure the camera to tripods having screws longer than 5.5 mm (7/32 inch). C Image sensor position mark (53) D Connection plate ... photo Menu search search Table of less than 5.5 mm (7/32 inch), and may damage the camera. NEX-5/5C NEX-3/3C • Make sure that the cord is not pinched when you close the cover.
NEX-5/5C NEX-3/3C Flash A Battery/memory card cover B Tripod receptacle • Use a tripod with a screw length of contents E Access lamp F... into the battery compartment, then pass the cord through the connection plate cover as shown below. You will be unable to firmly secure the camera to tripods having screws longer than 5.5 mm (7/32 inch). C Image sensor position mark (53) D Connection plate ... photo Menu search search Table of less than 5.5 mm (7/32 inch), and may damage the camera. NEX-5/5C NEX-3/3C • Make sure that the cord is not pinched when you close the cover.

α Handbook
Page 137
... pack. • The battery pack is dead. Replace it suggests that there is flashing fast, remove the battery pack and reattach the same battery pack securely. To cancel the power save, operate the camera, such as pressing the shutter button halfway down (page 104). If it with a new one. If the... flashes fast again, it with a new one minute, re-insert the battery pack, then turn on the power. 3 Reset the settings (page 114). 4 Consult your Sony dealer or local authorized...
... pack. • The battery pack is dead. Replace it suggests that there is flashing fast, remove the battery pack and reattach the same battery pack securely. To cancel the power save, operate the camera, such as pressing the shutter button halfway down (page 104). If it with a new one. If the... flashes fast again, it with a new one minute, re-insert the battery pack, then turn on the power. 3 Reset the settings (page 114). 4 Consult your Sony dealer or local authorized...

α Handbook
Page 151
... 1.5 seconds. • When the CHARGE lamp flashes fast, remove the battery pack being charged, and then insert the same battery pack into the battery charger securely again. Table of between 10 °C to 30 °C (50 °F to charge them, posing a risk of injury from electrocution and burns. • Remove the...
... 1.5 seconds. • When the CHARGE lamp flashes fast, remove the battery pack being charged, and then insert the same battery pack into the battery charger securely again. Table of between 10 °C to 30 °C (50 °F to charge them, posing a risk of injury from electrocution and burns. • Remove the...
Instruction Manual
Page 14
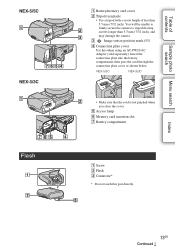
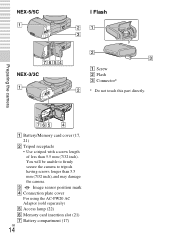
C Image sensor position mark D Connection plate cover For using the AC-PW20 AC Adaptor (sold separately) E Access lamp (22) F Memory card insertion slot (21) G Battery compartment (17) GB 14 NEX-5/5C x Flash Preparing the camera NEX-3/3C A Screw B Flash C Connector* * Do not touch this part directly. A Battery/Memory card cover (17, 21) B Tripod receptacle • Use a tripod with a screw length of less than 5.5 mm (7/32 inch), and may damage the camera. You will be unable to firmly secure the camera to tripods having screws longer than 5.5 mm (7/32 inch).
C Image sensor position mark D Connection plate cover For using the AC-PW20 AC Adaptor (sold separately) E Access lamp (22) F Memory card insertion slot (21) G Battery compartment (17) GB 14 NEX-5/5C x Flash Preparing the camera NEX-3/3C A Screw B Flash C Connector* * Do not touch this part directly. A Battery/Memory card cover (17, 21) B Tripod receptacle • Use a tripod with a screw length of less than 5.5 mm (7/32 inch), and may damage the camera. You will be unable to firmly secure the camera to tripods having screws longer than 5.5 mm (7/32 inch).

Instruction Manual
Page 23
... the accessory terminal of the camera. • When using the E18 - 200 mm lens, you must attach the extender (page 24). 2 Fasten the screw to secure the flash. 3 To fire the flash, raise the flash first. • Lower the flash when you want to use it. Make sure that the flash... is raised, and disabled when lowered. 1 Attach the flash to the camera securely. Preparing the camera Attaching the flash When you do not intend to use a flash during shooting, attach the flash device (supplied). Notes • The power...
... the accessory terminal of the camera. • When using the E18 - 200 mm lens, you must attach the extender (page 24). 2 Fasten the screw to secure the flash. 3 To fire the flash, raise the flash first. • Lower the flash when you want to use it. Make sure that the flash... is raised, and disabled when lowered. 1 Attach the flash to the camera securely. Preparing the camera Attaching the flash When you do not intend to use a flash during shooting, attach the flash device (supplied). Notes • The power...

Instruction Manual
Page 24
Note • Attach only the supplied flash to the extender and fasten the screw. GB 24 Put the flash in the case when you attach the flash directly to the camera, images will be conveniently attached to protect it from harm. x Attaching the extender (when using the E18 - 200 mm lens) If you are not using it to the shoulder strap. To avoid this situation, attach the extender. 1 Attach the extender to the camera securely. 2 Attach the flash to the extender. Preparing the camera z Carrying the flash The flash case can be partly shadowed by the lens.
Note • Attach only the supplied flash to the extender and fasten the screw. GB 24 Put the flash in the case when you attach the flash directly to the camera, images will be conveniently attached to protect it from harm. x Attaching the extender (when using the E18 - 200 mm lens) If you are not using it to the shoulder strap. To avoid this situation, attach the extender. 1 Attach the extender to the camera securely. 2 Attach the flash to the extender. Preparing the camera z Carrying the flash The flash case can be partly shadowed by the lens.

Instruction Manual
Page 70
... is too close. Recording takes a long time. • The noise reduction function is flashing fast, remove the battery pack and reattach the same battery pack securely.
... is too close. Recording takes a long time. • The noise reduction function is flashing fast, remove the battery pack and reattach the same battery pack securely.