α Handbook
Page 11
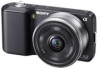
When the lens is removed (NEX-5/5C/3/3C) Index 11GB Continued r A (Playback) button (26) B ON/OFF (Power) switch C Shutter button (23) D Remote sensor (39) E AF illuminator/Self-timer lamp/Smile Shutter lamp F Speaker G Microphone H Smart Accessory Terminal I Lens J Lens release button K Mount L Image sensor* M Lens contacts* * Do not touch this part directly. Table of contents Sample photo Menu search search Identifying parts NEX-5/5C NEX-3/3C See the pages in parentheses for details of operation.
When the lens is removed (NEX-5/5C/3/3C) Index 11GB Continued r A (Playback) button (26) B ON/OFF (Power) switch C Shutter button (23) D Remote sensor (39) E AF illuminator/Self-timer lamp/Smile Shutter lamp F Speaker G Microphone H Smart Accessory Terminal I Lens J Lens release button K Mount L Image sensor* M Lens contacts* * Do not touch this part directly. Table of contents Sample photo Menu search search Identifying parts NEX-5/5C NEX-3/3C See the pages in parentheses for details of operation.

Instruction Manual
Page 7
Table of contents Preparing the camera Checking the accessories supplied 10 Identifying parts 12 Preparing the battery pack 16 Attaching/removing the lens 19 Inserting a memory card (sold separately 21 Attaching the flash 23 Turning on the camera and setting up the date 25 Mastering the basic operation ...
Table of contents Preparing the camera Checking the accessories supplied 10 Identifying parts 12 Preparing the battery pack 16 Attaching/removing the lens 19 Inserting a memory card (sold separately 21 Attaching the flash 23 Turning on the camera and setting up the date 25 Mastering the basic operation ...
Instruction Manual
Page 10
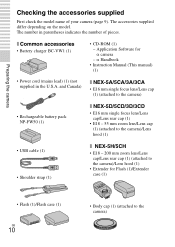
... Checking the accessories supplied First check the model name of pieces. and Canada) x NEX-5A/5CA/3A/3CA • E16 mm single focus lens/Lens cap (1) (attached to the camera) • Rechargeable battery pack NP-FW50 (1) x NEX-5D/5CD/3D/3CD • E16 mm single focus lens/Lens cap/Lens rear cap (1) • E18 - 55 mm zoom lens/Lens cap (1) (attached...
... Checking the accessories supplied First check the model name of pieces. and Canada) x NEX-5A/5CA/3A/3CA • E16 mm single focus lens/Lens cap (1) (attached to the camera) • Rechargeable battery pack NP-FW50 (1) x NEX-5D/5CD/3D/3CD • E16 mm single focus lens/Lens cap/Lens rear cap (1) • E18 - 55 mm zoom lens/Lens cap (1) (attached...
Instruction Manual
Page 12
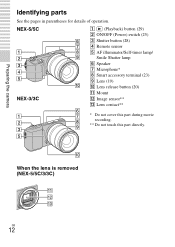
When the lens is removed (NEX-5/5C/3/3C) GB 12 NEX-5/5C NEX-3/3C A (Playback) button (29) B ON/OFF (Power) switch (25) C Shutter button (28) D Remote sensor E AF illuminator/Self-timer lamp/ Smile Shutter lamp F Speaker G Microphone* H Smart accessory terminal (23) I Lens (19) J Lens release button (20) K Mount L Image sensor** M Lens contact** * Do not cover this part during movie recording. ** Do not touch this part directly. Preparing the camera Identifying parts See the pages in parentheses for details of operation.
When the lens is removed (NEX-5/5C/3/3C) GB 12 NEX-5/5C NEX-3/3C A (Playback) button (29) B ON/OFF (Power) switch (25) C Shutter button (28) D Remote sensor E AF illuminator/Self-timer lamp/ Smile Shutter lamp F Speaker G Microphone* H Smart accessory terminal (23) I Lens (19) J Lens release button (20) K Mount L Image sensor** M Lens contact** * Do not cover this part during movie recording. ** Do not touch this part directly. Preparing the camera Identifying parts See the pages in parentheses for details of operation.

Instruction Manual
Page 23
The flash is enabled when it . When the camera is blinking. • Plug the flash fully into the accessory terminal of the camera. • When using the E18 - 200 mm lens, you must attach the extender (page 24). 2 Fasten the screw to secure the flash. 3 To fire the flash, raise the flash first...23 Notes • The power for the flash is attached to use it is raised, and disabled when lowered. 1 Attach the flash to the smart accessory terminal of the camera, and fasten the screw securely. Make sure that the flash is provided from the camera. Preparing the camera Attaching the flash...
The flash is enabled when it . When the camera is blinking. • Plug the flash fully into the accessory terminal of the camera. • When using the E18 - 200 mm lens, you must attach the extender (page 24). 2 Fasten the screw to secure the flash. 3 To fire the flash, raise the flash first...23 Notes • The power for the flash is attached to use it is raised, and disabled when lowered. 1 Attach the flash to the smart accessory terminal of the camera, and fasten the screw securely. Make sure that the flash is provided from the camera. Preparing the camera Attaching the flash...

Instruction Manual
Page 75
...8226; This camera is unrecoverable. GB 75 Others In such a case, save your eyes. The camera may not be played on devices other devices (NEX-5/5C) • This camera uses MPEG-4 AVC/ H.264 High Profile for MP4 format recording. formatting permanently erases all data on the memory card,... to record or play back properly. • Using the camera in insufficient light emission. • Keep the camera, supplied accessories, etc., out of the reach of the lens. • Do not use . For this reason, movies recorded in MP4 format with this camera cannot be swallowed. Devices ...
...8226; This camera is unrecoverable. GB 75 Others In such a case, save your eyes. The camera may not be played on devices other devices (NEX-5/5C) • This camera uses MPEG-4 AVC/ H.264 High Profile for MP4 format recording. formatting permanently erases all data on the memory card,... to record or play back properly. • Using the camera in insufficient light emission. • Keep the camera, supplied accessories, etc., out of the reach of the lens. • Do not use . For this reason, movies recorded in MP4 format with this camera cannot be swallowed. Devices ...